dji Robomaster S1 User manual

ROBOMASTER S1
Quick Start Guide
v1.0

RoboMaster S1
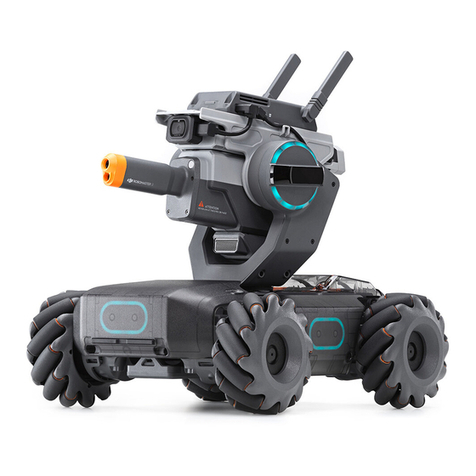
The RoboMaster S1 is an educational robot designed for students, families, and science and
technology enthusiasts. The robot has an omnidirectional chassis with Mecanum wheels of
agile movement, a gimbal of flexible rotation, a stable image transmission system of low
latency and FPV (First Person View) display, providing excellent movement performance and
immersive control experience. In Multi-player Battle mode, it is available to have a competition
via a local area network to enjoy the fun with friends. The powerful computer vision
recognition and speech recognition, together with the programmable DIY method, provides
various artificial intelligence play. Course resources such as programming learning platform,
interactive courses, and video courses constitute a comprehensive robot education solution
centered on the RoboMaster S1. To control the robot, users can choose from RoboMaster app,
gamepad, and keyboard and mouse according to their needs.
1. Chassis Body
2. Right-Threaded Mecanum Wheels
3. Chassis Front Armor (Hit Detector built-in)
4. Right-Threaded Mecanum Wheels
5. Chassis Left Armor (Hit Detector built-in)
6. Chassis Rear Cover
7. Gimbal
8. Wide Infrared Unit (Hit Detector built-in)
9. Gimbal Pitch Motor (LED built-in)
10. Intelligent Controller
11. microSD Card Slot
12. Intelligent Controller Antennas
13. Camera
14. Gel Bead Launcher
15. Launch Trajectory Light
16. Narrow Infrared Unit
17. Speaker
18. Chassis Right Armor (Hit Detector built-in)
19. Gel Bead Container
20. Container Eject Button
21. Motion Controller
22. Chassis Rear Armor (Hit Detector built-in)
23. Rear Armor Open Button
24. Intelligent Battery
25. Battery Eject Button
Using RoboMaster S1
1. Downloading the RoboMaster App
Search for RoboMaster in App Store or Google Play to download the app onto your
control device.
RoboMaster App supports iOS 10.2.2 or later or Android 5.0 or later.
Users can also download the DJI RoboMaster software from the official DJI
website using a computer to control the robot with a keyboard and mouse.
2. Watching Video Tutorials
Watch video tutorials on the official DJI website to learn how to assemble and
use the robot.
3. Checking the Battery Level
4. Charging the Battery
It is required to charge the battery to bring it out of hibernation for the first use.
Make sure the battery is fully charged before using.
Low -------- High
Power Outlet
100~240 V
(50Hz/60Hz)
Charging Time:
1 hour and 20 min
Press once to check the battery level.
Press and hold for 1 second to power it
on. Press and hold for 2 seconds to power
it off.

5. Preparing the Gel Beads
Soak the gel beads to the size with a diameter of 5.9 - 6.8 mm. It is recommended
to use pure water, and it will take around 4 hours to finish soaking.
The average load of the gel bead container is around 430 beads. Soak the
appropriate number of gel beads according to actual usage.
A. Fill the gel bead container with the soaked gel
beads.
B. Make sure to clean the remaining water in the
container.
The size of the soaked gel beads may vary when using different types of water.
Make sure to soak the gel beads to the specific size to avoid block the launcher.
6. Preparing the Robot
Installing the Gel Bead Container Removing the Gel Bead Container
Installing and Powering On the Intelligent Battery
Insert the Intelligent Battery, and then press and hold the power button to power
it on.

Checklist
Before each use, check the robot and make sure that:
•All the cables are securely and firmly connected to the motion controller, and
the chassis rear cover is securely mounted.
•Cables of the intelligent controller, launcher, camera and speaker are securely
and firmly connected.
•The microSD card is inserted into the intelligent controller.
•The intelligent controller antennas are adjusted to the vertical angle or oriented
to the signal source.
•The Intelligent Battery is fully changed and mounted in position.
7. Connecting the App
The robot can connect the app via Wi-Fi or router to enter Single Drive or Multi-
player Battle mode. The available modes vary depending on the connection
method.
Battery Eject Button

Connection via Wi-Fi
Single Drive is available using this connection method.
A. Toggle the mode switch on the intelligent controller to the position .
B. Tap Connection on the upper right corner in the app, and then tap Connection
via Wi-Fi. Select the corresponding Wi-Fi and input the password (check on the
robot body).
C. Go back to the app and wait for connection completion.
Connection via Router
Single Drive and Multi-player Battle are available using this connection method.
A. Toggle the mode switch on the intelligent controller to the position .
B. Tap Connection on the upper right corner in the app, and then tap Connection
via Router. Access to the corresponding local area network and input the
password in the app to generate a QR code.
C. Scan the QR code using the camera on the robot and wait for connection
completion.
First-time activation requires your DJI account and an internet connection.

8. Controlling the Robot
The button on the left of the screen controls the robot’s forward, backward, and
lateral movements.
Tap and hold the blank area on the right part of the screen and move up, down,
left and right to control the gimbal pitch and yaw.
Control the robot position and gimbal angle to target the objective. Then tap the
Launch button in the app to launch gel beads.
DO NOT launch to people, animals or other property.
Forward
Backward
Left
Right
Turn Up
Turn Down
Turn
Left
Turn
Right

Specifications
Structure
Dimensions (L×W×H)
320×240×270 mm
Weight
2.8 kg
Performance
Max Chassis Movement Speed
3.5 m/s (Forward); 2.5 m/s (Backward)
Max Chassis Rotating Speed
600°/s
Max Motor Rotating Speed
1000 rpm
Operating Temperature
14°to 104°F (-10°to 40°C)
Gimbal
Controllable Range
-20°to +35°(Pitch); ±250°(Yaw)
Mechanical Range
-24°to +41°(Pitch); ±270°(Yaw)
Max Rotating Speed
540°/s
Operating Temperature
14°to 104°F (-10°to 40°C)
Gel Bead Launcher
Controllable Launching Frequency
1-8 beads/s
Max Launching Frequency
11 beads/s
Launching Initial Velocity of Gel Beads
Approx. 26 m/s
Average Bead Load
Approx. 430 beads
Intelligent Controller
Image Transmission Resolution
720p 30fps
Transmission Standard
IEEE802.11a/b/g/n
Operating Frequency
2.4 GHz, 5.2 GHz (limited to indoor use), 5.8 GHz
Camera

Sensor
1/4”CMOS; Effective Pixels: 5 million
FOV
120°
Operating Temperature
-4°to 140°F (-20°to 60°C)
Intelligent Battery
Capacity
2400 mAh
Charging Voltage
12.6 V
Battery Type
LiPo 3S
Energy
25.92Wh
Net Weight
Approx. 169 g
Operating Temperature
-4°to 140°F (-20°to 60°C)
Charging Temperature
32°to 104°F (0°to 40°C)
Max Charging Power
29 W
Charger
Voltage
12.6 V
Rated Power
28 W
Compliance Information
FCC Compliance Notice
This device complies with Part 15 of the FCC Rules. Operation is subject to the following two
conditions: (1) This device may not cause harmful interference, and (2) This device must accept
any interference received, including interference that may cause undesired operation.
Any changes or modifications not expressly approved by the party responsible for compliance
could void the user’s authority to operate the equipment.

This equipment has been tested and found to comply with the limits for a Class B digital device,
pursuant to part 15 of the FCC Rules. These limits are designed to provide reasonable
protection against harmful interference in a residential installation. This equipment generates,
uses and can radiate radio frequency energy and, if not installed and used in accordance with
the instructions, may cause harmful interference to radio communications. However, there is
no guarantee that interference will not occur in a particular installation. If this equipment does
cause harmful interference to radio or television reception, which can be determined by
turning the equipment off and on, the user is encouraged to try to correct the interference by
one or more of the following measures:
—Reorient or relocate the receiving antenna.
—Increase the separation between the equipment and receiver.
—Connect the equipment into an outlet on a circuit different from that to which the receiver
is connected.
—Consult the dealer or an experienced radio/TV technician for help.
RF Exposure Information
This equipment complies with FCC radiation exposure limits set forth for an uncontrolled
environment. In order to avoid the possibility of exceeding the FCC radio frequency exposure
limits, human proximity to the antenna shall not be less than 20cm during normal operation.
Other manuals for Robomaster S1
6
Table of contents
Other dji Robotics manuals

dji
dji RoboMaster EP Instruction Manual

dji
dji RoboMaster EP User manual

dji
dji Robomaster S1 User manual

dji
dji RoboMaster LI01 User manual

dji
dji Robomaster S1 Instruction Manual

dji
dji RoboMaster EP Operating instructions

dji
dji ROBOMASTER User manual

dji
dji Robomaster S1 User manual

dji
dji Robomaster S1 User manual