GERMAN ITALIAN FRENCH
DEUTSCH ITALIANO FRANÇAIS
VOR GEBRAUCH DES KISSENS BITTE DIE GEBRAUCHSANWEISUNG SORGFÄLTIG
DURCHLESEN. DIE EINWANDFREIE FUNKTION DES KISSENS IST NUR BEI RICHTIGEM
ANLEGEN GEWÄHRLEISTET.
PRIMA DELL’USO, LEGGERE INTERAMENTE E ATTENTAMENTE QUESTE ISTRUZIONI. LA
CORRETTA APPLICAZIONE È DI FONDAMENTALE IMPORTANZA PER UN FUNZIONAMENTO
CORRETTO.
LIRE ATTENTIVEMENT LA TOTALITÉ DES INSTRUCTIONS SUIVANTES AVANT D’UTILISER
LE DISPOSITIF. UNE MISE EN PLACE CORRECTE EST INDISPENSABLE AU BON
FONCTIONNEMENT DU DISPOSITIF.
VORSICHT: NACH US-AMERIKANISCHEM GESETZ DARF DIESE VORRICHTUNG NUR DURCH ODER AUF
ANORDNUNG EINES ZUGELASSENEN ARZTES BZW. EINER MEDIZINISCHEN FACHKRAFT VERKAUFT
HINWEIS: ES WURDEN UNTER ANWENDUNG DER MODERNSTEN VERFAHRENSWEISEN
SÄMTLICHE ANSTRENGUNGEN UNTERNOMMEN, UM DIE GRÖSSTMÖGLICHE KOMPATIBILITÄT VON
FUNKTION, STÄRKE, HALTBARKEIT UND BEQUEMLICHKEIT ZU ERREICHEN; DIESES PRODUKT
IST JEDOCH NUR EIN BESTANDTEIL DES GESAMTEN VON EINEM ARZT DURCHGEFÜHRTEN
BEHANDLUNGSPROGRAMMS. DIE ANWENDUNG DIESES PRODUKTS STELLT KEINE GARANTIE ZUR
VORBEUGUNG VON VERLETZUNGEN DAR.
ATTENZIONE: LA LEGGE FEDERALE STATUNITENSE LIMITA LA VENDITA DI QUESTO DISPOSITIVO A
PERSONALE MEDICO O PROVVISTO DI PRESCRIZIONE MEDICA.
AVVISO: NONOSTANTE I FORTI INVESTIMENTI IN TECNICHE D’AVANGUARDIA PER ASSICURARE
LA MASSIMA COMPATIBILITÀ FUNZIONALE, DURABILITÀ, RESISTENZA E COMFORT, QUESTO
DISPOSITIVO È SOLO UNO DEGLI ELEMENTI DEL PROGRAMMA DI TRATTAMENTO GLOBALE
PRATICATO DA UN MEDICO. NON È POSSIBILE GARANTIRE CHE L’USO DEL PRODOTTO PREVENGA
IL VERIFICARSI DI LESIONI.
AVERTISSEMENT : LA LOI FÉDÉRALE AMÉRICAINE (ÉTATS-UNIS) EXIGE QUE CET APPAREIL SOIT VENDU
UNIQUEMENT PAR OU SUR L’ORDRE D’UN PROFESSIONNEL DE LA SANTÉ AUTORISÉ.
AVIS : BIEN QUE TOUS LES EFFORTS AIENT ÉTÉ FAITS, SELON LES TECHNIQUES LES PLUS REÇENTES,
POUR OBTENIR UN MAXIMUM DE COMPATIBILITÉ EN MATIÈRE DE FONCTIONNALITÉ, RÉSISTANCE,
DURABILITÉ ET CONFORT, CE DISPOSITIF NE CONSTITUE QU’UN ÉLÉMENT DU PROGRAMME DE
TRAITEMENT GLOBAL ADMINISTRÉ PAR UN PROFESSIONNEL DE LA SANTÉ. NOUS NE POUVONS PAS
GARANTIR QUE L’USAGE DE CE PRODUIT SERA DE NATURE À ÉVITER UNE BLESSURE.
12
7
6
A
C
B
PROFILO UTENTE PREVISTO:
Il prodotto è destinato a essere utilizzato da un medico professionista, dal paziente o dal caregiver del
paziente.L’utente deve poter leggere, comprendere ed essere fisicamente in grado di rispettare tutte le
indicazioni, le avvertenze e le precauzioni fornite nelle istruzioni per l’uso.
INDICAZIONI: Il tutore post-operatorio telescopico DonJoy è progettato per consentire
l’immobilizzazione della gamba e una gamma di movimenti con protezione in seguito a interventi al
legamento crociato anteriore (LCA), al legamento crociato posteriore (LCP), al legamento collaterale
laterale (LCL), al legamento collaterale mediale (LCM) e in seguito a riparazioni meniscali.Fornisce
immobilizzazione o controllo del movimento di un arto o di un segmento del corpo.Fornisce una leggera
protezione dell’arto o di un segmento del corpo per il trattamento acuto o profilattico.
CONTROINDICAZIONI: nessuna
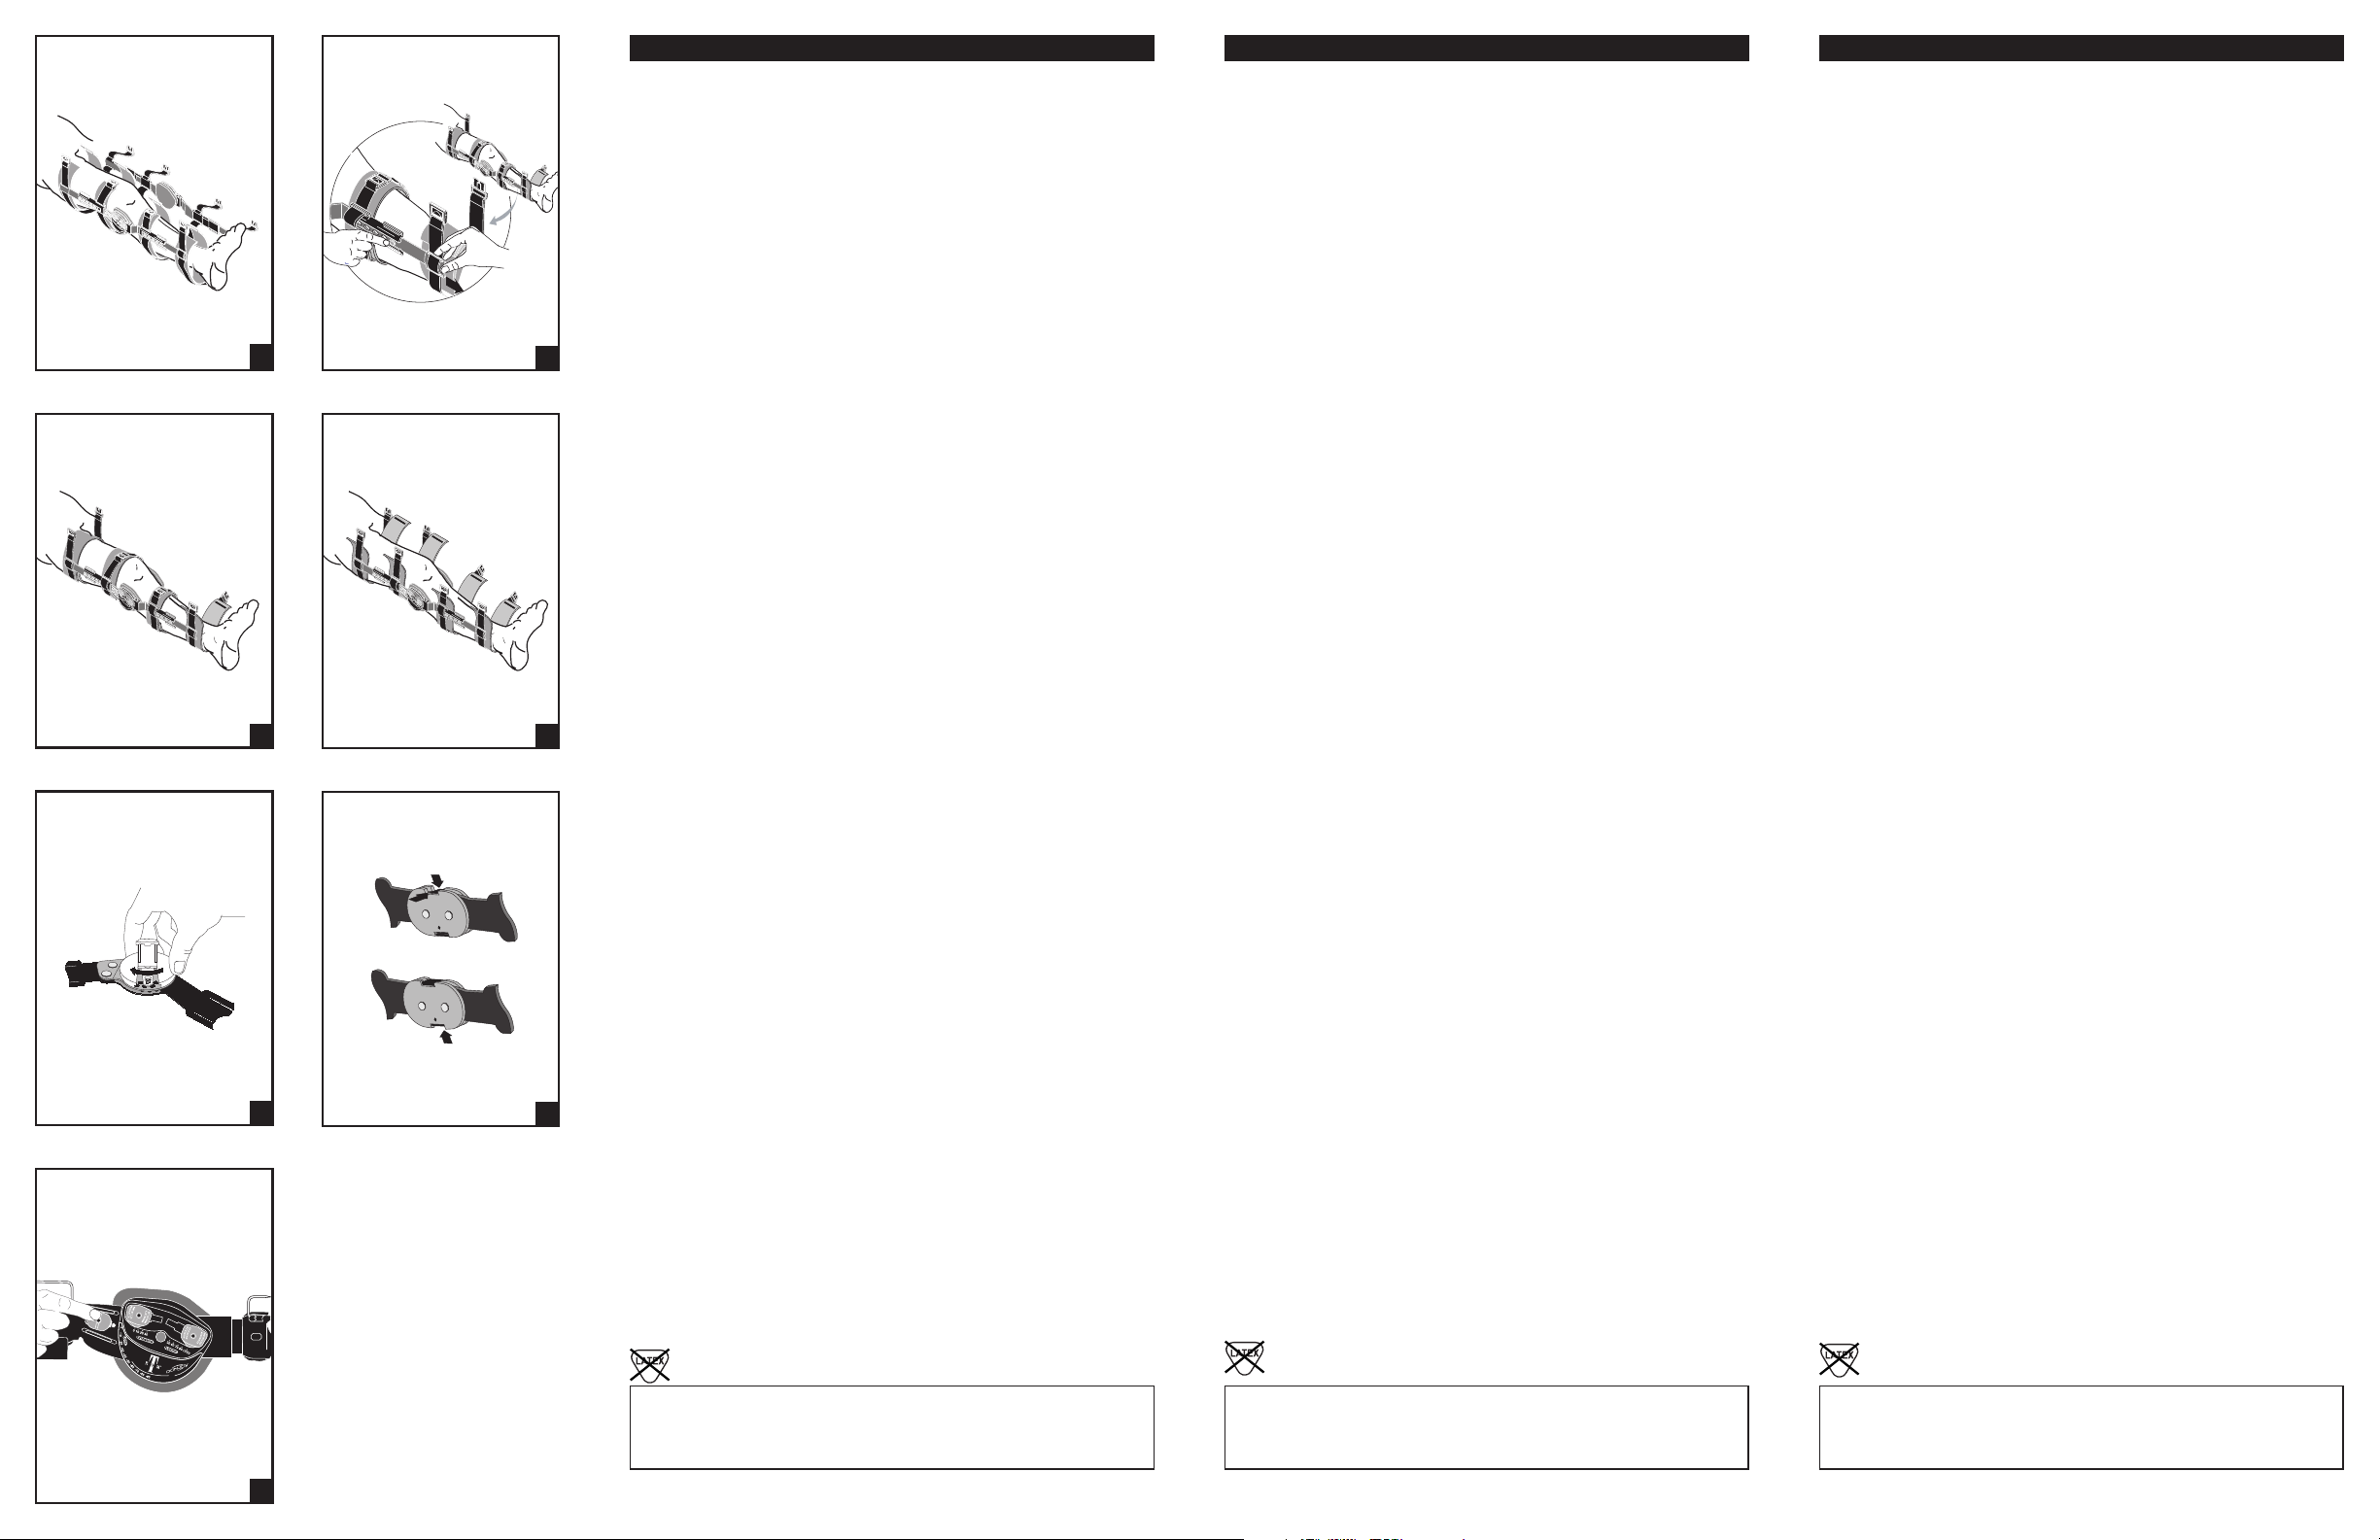
ISTRUZIONI SULL’APPLICAZIONE:
1) Aprire la fibbia di ogni strap della ginocchiera e togliere le aste di articolazione dall’imbottitura
in espanso. Fissare l’estremità del velcro dell’imbottitura con i gancetti flessibili all’asta
dell’articolazione laterale, con una linguetta di imbottitura di 9 cm sul davanti.
2) Regolare la lunghezza dell’asta premendo verso l’interno il bottone grigio e facendo scorrere
l’asta di prolunga nella misura desiderata. Il bottone deve alzarsi al massimo dopo la regolazione,
per assicurare che la posizione sia sicura; le due aste devono avere pari lunghezza. Le aste
post-operatorie possono essere allungate per tutta la lunghezza della gamba fino alla caviglia.
3) Posizionare l’asta dell’articolazione laterale (esterna) per allinearla con la rotula e l’asse centrale
della gamba. Il malleolo e il grande trocantere faranno da punti di riferimento per l’allineamento
all’asse centrale.
4) Avvolgere le imbottiture della coscia e del polpaccio intorno alla gamba, in modo che siano aderenti,
e fissarle sul davanti.
5) Mettere in posizione e premere sull’asta mediale (interna). Assicurarsi che l’altezza delle due
articolazioni sia identica.
6) Regolare le lunghezze degli strap in base alla gamba, quindi agganciare le fibbie iniziando dalle due
più vicine al ginocchio. Stringere bene gli strap. Fissare quindi le fibbie e gli strap rimanenti.
7) Per rimuovere la ginocchiera senza smontarla, aprire le fibbie e le imbottiture in espanso. A questo
punto la ginocchiera può essere rimossa e riapplicata come un unico pezzo.
ISTRUZIONI PER LA REGOLAZIONE DELL’ASTA
È possibile regolare la lunghezza delle aste di coscia e polpaccio a seconda della lunghezza della
gamba. Regolare la lunghezza dell’asta premendo verso l’interno il bottone grigio e facendo scorrere
l’asta di prolunga nella misura desiderata. Il bottone deve alzarsi al massimo dopo la regolazione, per
assicurare che la posizione sia sicura; le due aste devono avere pari lunghezza. L’asta di prolunga può
essere sfilata completamente. Questa operazione va fatta prestando attenzione.
CERNIERA IROM: A Premere verso il basso, far scorrere verso l’esterno e sollevare il dispositivo di
bloccaggio di sicurezza della carniera. Ruotare la calotta fino ad esporre lo spi-notto corrispondente
alla flessione o all’estensione desiderata. Rimuovere lo spinotto e reinserirlo in base all’impostazione
prescelta (in gradi). Ruotare la calotta in modo che il dispositivo di bloccaggio di sicurezza sorpassi lo
spinotto e reinnestare il dispositivo di bloccaggio.
CERNIERA ELS: B Per bloccare la cerniera, la gamba deve essere completamente estesa. Premere il
pulsante sul retro della cerniera verso l’interno e quindi in avanti. Per sbloccare la cerniera, premere il
pulsante sul davanti della cerniera verso l’interno e quindi verso il retro.
ARTICOLAZIONE TROM: C Per regolare la flessione e la distensione, premere il pulsante, quindi
regolare la linguetta nella posizione desiderata. Per bloccare l’articolazione, regolare nella posizione
desiderata, premere il pulsante e inserire la linguetta nella posizione di blocco. NOTA: perché il
posizionamento sia sicuro, il pulsante deve sollevarsi completamente dopo aver regolato l’angolo di
flessione e distensione o aver inserito il blocco.
USO E MANUTENZIONE
• Le barre delle cerniere possono essere curvate in base al profilo varo o valgo. Curvare ciascuna barra
laterale in modo identico sopra e sotto la cerniera. Non curvare le barre afferrandole per le estremità.
• I rivestimenti spugnosi vanno lavati a mano in acqua fredda con sapone neutro. LASCIARE
ASCIUGARE ALL’ARIA. NON ESPORRE A GETTI DI ARIA CALDA.
• Tutte le parti in materiale spugnoso possono essere rifilate a seconda delle necessità.
AVVERTENZE E PRECAUZIONI:
• La perdita di circolazione, la sensazione di disagio sperimentata dal paziente e una nuova lesione a suo
carico costituiscono effetti potenziali causati dal malfunzionamento del dispositivo.
• Le impostazioni del ROM non devono essere modificate senza la supervisione di un medico.
• Questo prodotto deve essere prescritto e applicato da un operatore sanitario.
• La frequenza e la durata d’uso devono essere stabilite dall’operatore sanitario.
• Se si sviluppa una reazione allergica e/o si manifesta una sensazione di prurito o si nota un
arrossamento della pelle quando è a contatto con qualsiasi parte del dispositivo, interrompere l’uso e
rivolgersi immediatamente al medico curante.
• In caso di dolore, gonfiore, variazioni di sensibilità o altre reazioni insolite durante l’uso del prodotto,
contattare immediatamente il medico.
• Il supporto deve essere ben aderente, ma non deve ostacolare la circolazione.
• Non usare su ferite aperte.
• Non usare il dispositivo se risulta danneggiato e/o se la confezione è stata aperta.
NOTA: contattare il produttore e l’autorità competente in caso di gravi incidenti dovuti all’uso di questo
dispositivo.
GARANZIA: DJO, LLC s’impegna alla riparazione o alla sostituzione di tutti i componenti del dispositivo
e dei relativi accessori in caso di difetti di lavorazione o materiali, rinvenuti entro sei mesi dalla data di
acquisto.
IL PRESENTE PRODOTTO È DESTINATO ALL’USO SU UN SOLO PAZIENTE.
PRODOTTO RX
PRODOTTO NON REALIZZATO IN LATTICE DI GOMMA NATURALE.
PROFIL DE L’UTILISATEUR VISÉ :
Le produit s’adresse à un professionnel de santé agréé, au patient ou à l’aide-soignant du
patient. L’utilisateur doit être capable de lire et de comprendre l’ensemble des consignes, des
avertissements et des précautions qui figurent dans le mode d’emploi et être physiquement apte à
les respecter.
INDICATIONS: L’orthèse télescopique postopératoire DonJoy est conçue pour faciliter l’immobilisation
de la jambe et protéger l’amplitude des mouvements après une chirurgie du LCA, du LCP, du LCL et du
LCMMC et une réparation du ménisque. Assure l’immobilisation ou le mouvement contrôlé du membre
ou du segment corporel. Elle offre une protection modérée d’un membre ou d’un segment corporel pour
les soins intensifs et prophylactiques.
CONTRE-INDICATIONS : Aucune
INSTRUCTIONS CONCERNANT LA MISE EN PLACE:
1) Ouvrir la boucle sur chaque courroie de l’attèle et retirer les barres de charnière des garnitures en
mousse. Fixer l’extrémité à crochet des garnitures en mousse sur la barre à charnière latérale avec
un pan de 9 cm (4 po) de garniture de mousse sur le devant.
2) Régler la longueur de la barre en appuyant sur le bouton gris et en glissant la rallonge à la
longueur désirée. Le bouton doit complètement ressortir après le réglage pour assurer
un positionnement ferme et les deux barres doivent être de la même longueur. Les barres
post-opératoires peuvent être allongées sur toute la longueur de la jambe jusqu’à la cheville.
3) Positionner la barre latérale (extérieure) en alignant la charnière avec la rotule et la médiane de
la jambe. La malléole latérale et le trochanter supérieur à la hanche servent de bons points de
référence pour l’alignement sur la médiane.
4) Enrouler fermement les coussinets de mousse de cuisse et de mollet autour de la jambe et fixer sur
le devant de la jambe.
5) Positionner et appuyer la barre médiale (intérieure) en place. S’assurer que les hauteurs de
charnière médiale et latérale sont égales.
6) Régler les longueurs de courroie en fonction de la jambe, puis fermer les boucles en commençant
avec les deux courroies les plus proches du genou. Tirer sur les courroies pour les bloquer en
place. Fermer les boucles et courroies restantes.
7) Pour pouvoir retirer facilement l’attèle d’une seule pièce, détacher les boucles et ouvrir les
coussinets de mousse. L’attèle peut alors être retirée et repositionnée en un seul morceau.
INSTRUCTIONS POUR LE RÉGLAGE DE LA BARRE
La longueur des barres de cuisse et de mollet peut être réglée en fonction de la longueur de la jambe.
Régler la longueur de la barre en appuyant sur le bouton gris et en glissant la rallonge à la longueur
désirée. Le bouton doit complètement ressortir après le réglage pour assurer un positionnement ferme
et les deux barres doivent être de la même longueur. La rallonge peut facilement être enlevée en la
faisant glisser soigneusement.
CHARNIÈRE IROM: A Appuyez sur le loquet de sécurité de la charnière, puis faites-le coulisser pour le
lever. Tournez le couvercle jusqu’à apparition de la clavette d’extension ou de flexion désirée. Retirez
la clavette et placez-la sur le degré d’extension ou de flexion choisi. Tournez le couvercle de façon à ce
que le loquet de sécurité passe au-delà de la clavette puis replacez le loquet.
CHARNIÈRE ELS: B Pour engager la charnière, la jambe doit être complètement é tendue. Poussez le
bouton situé derrière la charnière en arrière, puis en avant. Pour désengager la charnière, poussez le
bouton situé sur le devant de la charnière en arrière puis de retour en position normale.
CHARNIÈRE TROM: C Pour régler la flexion et l’extension, appuyer sur le bouton et insérer le taquet à
la position désirée. Pour verrouiller la charnière, la mettre à la position désirée, appuyer sur le bouton
et insérer le taquet à la position de verrouillage. REMARQUE: Le bouton doit ressortir complètement
une fois le réglage de l’angle de flexion et d’extension (ou le verrouillage) effectué.
UTILISATION ET ENTRETIEN
• Les attelles des charnières peuvent être pliées pour obtenir des courbes varous ou valgus. Pliez
chaque attelle de côté de la même façon au-dessus et en-dessous de la charnière.
• Lavez à la main les garnitures en mousse dans l’eau froide avec un détergent doux.
SéCHEZ à L’AIR LIBRE.
• Toutes les garnitures peuvent être découpées.
AVERTISSEMENTS ET PRÉCAUTIONS :
• La perte de circulation, l’inconfort du patient et une nouvelle lésion du patient sont des effets
potentiels en cas de défaillance du dispositif.
• Les réglages de l’amplitude de mouvement ne doivent pas être modifiés sans la supervision d’un
professionnel de santé.
• Ce produit doit être prescrit et installé par un professionnel de santé.
• La fréquence et la durée d’utilisation doivent être déterminées par votre professionnel de santé.
• En cas de réaction allergique et/ou de démangeaisons ou de rougeurs cutanées après tout contact
avec une partie quelconque de ce produit, cesser de l’utiliser et contacter immédiatement votre
professionnel de santé.
• En cas de douleur, de gonflement, de modification de la sensation ou d’autres réactions inhabituelles
lors de l’utilisation de ce produit, contacter immédiatement un médecin.
• Le support doit être bien serré sans toutefois entraver la circulation.
• Ne pas utiliser sur une plaie ouverte.
• Ne pas utiliser le dispositif s’il est endommagé et/ou si l’emballage a été ouvert.
REMARQUE : Contacter le fabricant et l’autorité compétente en cas d’incident grave découlant de
l’utilisation de ce dispositif.
GARANTIE: DJO, LLC se chargeront de réparer ou de remplacer tout ou partie de l’appareillage et
ses accessoires en cas de vice de matériau ou vice de fabrication, pendant une période de six mois à
compter de la date de vente.
DESTINÉ À ÊTRE UTILISÉ SUR UN SEUL PATIENT.
PRODUIT DÉLIVRÉ SOUS ORDONNANCE
FABRIQUÉ SANS LATEX DE CAOUTCHOUC NATUREL.
ANWENDERPROFIL:
Das Produkt ist für zugelassene medizinische Fachkräfte, Patienten oder Pflegekräfte des Patienten
bestimmt. Der Anwender sollte in der Lage sein, alle Anweisungen, Warnungen und Vorsichtshinweise in
der Gebrauchsanweisung zu lesen und zu verstehen, und körperlich in der Lage sein, diese auszuführen.
INDIKATIONEN: Die DonJoy Post-OP-Teleskop-Orthese wurde entwickelt, um die Ruhigstellung des
Beins zu unterstützen und einen geschützten Bewegungsumfang nach Operationen des vorderen und
hinteren Kreuzbandes und des medialen und lateralen Seitenbands sowie nach Meniskusreparaturen
zu gewährleisten. Es sorgt für die Ruhigstellung oder kontrollierte Bewegungen der Extremität oder
des Körpersegments. Sanfter Schutz einer Extremität oder eines Körpersegments für die Akut- und
Prophylaxeversorgung.
KONTRAINDIKATIONEN: Keine
ANWENDUNGSHINWEISE:
1) Die Schnallen an allen Bändern der Stütze lösen und Scharnierstäbe von den
Schaumstoffeinsätzen abnehmen. Die Fixationsenden der Schaumstoffeinsätze so am lateralen
Scharnierstab befestigen, daß die Einsätze auf der Vorderseite 9 cm überstehen.
2) Die gewünschte Stangenlänge durch Drücken des grauen Knopfes und Schieben der
ausziehbaren Stange einstellen. Der Knopf muß nach dem Einstellen einrasten, um einen
sicheren Halt zu gewährleisten, und beide Stangen müssen gleich lang sein. Die Stangen der
postoperativen Kniestütze können auf die volle Beinlänge bis zum Sprunggelenk ausgezogen
werden.
3) Die laterale (äußere) Seitenstange so positionieren, daß das Scharnier entsprechend der Patella
(Kniescheibe) und der Beinmittellinie ausgerichtet ist. Der laterale Malleolus und Trochanter
major an der Hüfte dienen als Orientierungspunkte für die Ausrichtung auf der Beinmittellinie.
4) Die Waden- und Oberschenkelschaumstoffpolster eng um das Bein wickeln und vorn fixieren.
5) Die mediale (innere) Stange positionieren. Darauf achten, daß sich das mediale und das laterale
Scharnier auf gleicher Höhe befinden.
6) Die Bandlänge dem Bein anpassen und Schnallen, beginnend mit den beiden Bändern, die dem
Knie am nächsten sind, schließen. Beide Bänder fixieren. Die verbleibenden Schnallen und
Bänder befestigen.
7) Die Stütze kann als komplette Einheit abgenommen werden, indem die Schnallen gelöst und die
Schaumstoffpolster geöffnet werden. Die Stütze kann nun abgenommen und wieder angelegt
werden.
ANLEITUNG FÜR DIE STANGENEINSTELLUNG
Die Länge der Oberschenkel- und Wadenstangen kann auf Beinlänge eingestellt werden. Die
gewünschte Stangenlänge durch Drücken des grauen Knopfes und Schieben der ausziehbaren Stange
einstellen. Der Knopf muß nach dem Einstellen einrasten, um einen sicheren Halt zu gewährleisten,
und beide Stangen müssen gleich lang sein. Die ausziehbare Stange kann durch vorsichtiges Ziehen
vollständig aus der Halterung genommen werden.
IROM-SCHARNIER: A Den Sicherungsriegel drücken, herausschieben und abheben. Die Abdeckung
drehen, bis der gewünschte Flexions- oder Extensionsstift freiliegt. Den Stift herausnehmen und in die
gewünschte Gradein-stellung stecken. Die Abdeckung so drehen, daß der Sicherungs-riegel hinter dem
letzten Stift liegt. Sicherungs-riegel wieder e insetzen.
ELS-SCHARNIER: B Zur Feststellung des Scharniers muß das Bein ganz ausgestreckt sein. Den Knopf
auf der Rück-seite des Scharniers nach innen und dann nach vorne drücken. Um das Scharnier zu
ent-riegeln, den Knopf vorne am Scharnier nach innen und dann nach hinten drücken.
TROM SCHARNIER: C Zur Flexions- und Extensionseinstellung den Knopf hineinschieben und die
gewünschte Position einstellen. Zum Sperren des Scharniers die gewünschte Position einstellen, den
Knopf hineinschieben und die Sperre in die Lock Position einsetzen. HINWEIS: Nach dem Einstellen
des Flexions- und Extensionswinkels bzw. dem Einsetzen der Sperre muß der Knopf vollständig
herausstehen, um die Stellung zu sichern.
GEBRAUCHS- UND PFLEGEHINWEISE
• Die Scharnierschienen können in eine Varus- oder Valgusstellung gebogen werden. Die
Seitenschienen müssen unter und über dem Scharnier gleich stark gebogen werden.
• Die Schaumstoffeinlagen von Hand mit kaltem Wasser und einem Feinwaschmittel waschen.
NUR AN DER LUFT UND NICHT MIT HITZE TROCKNEN.
• Alle Schaumstoffteile lassen sich verkleinern.
WARNHINWEISE UND VORSICHTSMASSNAHMEN:
• Durchblutungsstörungen, Patientenbeschwerden und erneute Verletzungen des Patienten
können durch Mängel der Vorrichtung verursacht werden.
• Die ROM-Einstellungen dürfen nur unter der Aufsicht eines Arztes geändert werden.
• Dieses Produkt ist verschreibungspflichtig und muss unter Aufsicht einer medizinischen
Fachkraft angepasst werden.
• Die Häufigkeit, die Dauer der Anwendung und die Gebrauchsanweisung sollten vom Arzt
bestimmt werden.
• Wenn eine allergische Reaktion auftritt und/oder Sie nach Kontakt mit einem Teil dieses
Produkts eine juckende, gerötete Haut bemerken, verwenden Sie das Produkt nicht länger und
wenden Sie sich sofort an Ihren Arzt.
• Wenn bei der Verwendung dieses Produkts Schmerzen, Schwellungen, Empfindungsänderungen
oder andere ungewöhnliche Reaktionen auftreten, nehmen Sie bitte sofort Kontakt mit Ihrem Arzt
auf.
• Die Orthese sollte fest sitzen, darf die Blutzirkulation jedoch nicht beeinträchtigen.
• Nicht auf offenen Wunden verwenden.
• Das Produkt nicht verwenden, wenn es beschädigt ist und/oder die Verpackung geöffnet wurde.
HINWEIS: Den Hersteller und die zuständige Behörde benachrichtigen, falls es durch die
Verwendung dieses Produkts zu einem schwerwiegenden Vorfall kommt.
GARANTIE: DJO, LLC garantiert bei Material- oder Herstellungsdefekten die Reparatur bzw. den
Austausch der kompletten Vorrichtung oder eines Teils der Vorrichtung und aller zugehörigen
Zubehörteile für einen Zeitraum von sechs Monaten ab dem Verkaufsdatum.
ZUR VERWENDUNG AN EINEM PATIENTEN BESTIMMT.
RX-PRODUKT
NICHT AUS NATURKAUTSCHUKLATEX HERGESTELLT.


