DLG PrimeFeeder VILOFOSS FirstFeeder User manual

FirstFeeder®
User manual
REV: 2020-12-15

Page 2 of 11
Overview:
1 Introduction page 2
2 Safety page 4
3 Principle of operation page 5
4 Placement and connection page 5
5 Power up: page 7
6 Menu: page 8
7 Menu settings: page 9
8 Rengøring page 10
1 Introduction
First Feeder gives you a possibility to put your piglet production into
‘turbo’ mode. It has a really good effect on all the production
parameters and, as a result, significantly increases the contribution
margin.
First Feeder improves the productivity of both small and older
piglets. Furthermore it can be used as a ‘feeding sow’ for the piglets
which, after the 3 weeks nursing period, are lagging behind their
siblings from the same litter.
If you apply First Feeder, we recommend using feed mixtures from
the Prime Feed range.
You achieve the following:
Feed blended with water increases feed intake and growth.
Frequent feeding in small quantities ensures a better health of
the animals.
No unwanted growth of bacteria in the feed and,
consequently, the preservation of its health and nutritional
value.
Automatic feeding 24 hrs a day significantly improves feed
intake and growth.

Page 3 of 11
Optimization of working time of the personnel, because the
trough does not have to be checked and filled several times a
day.
Reduced mortality and medicine use.
Text in the picture,
Danish
English
Tastatur
Keyboard
Display
Display
Sikkerhedsafbryder
Safety switch
Foderbøjle
Feeding ring
Sensor
Sens
or

Page 4 of 11
2 Safety:
In order to prevent accidents, you should always follow the safety
rules which are indicated in the manual.
Make sure that all screens are undamaged and correctly
mounted before putting
the device into operation.
Always disconnect the mains power supply of the First Feeder
device before performing any service and cleaning. Take the
plug out of the socket to prevent accidental start-up.
First Feeder is equipped with an integrated safety switch,
which is mounted in the cover of the feed container. When
the cover is being opened, the switch interrupts power supply
to the feed mixing system in order to prevent accidental start-
up. It is forbidden to disconnect the safety switch because of
the danger of personal injury connected with touching the
feed auger during operation.
All electrical installations must be carried out in accordance
with local regulations being in force at the place of operation
of First Feeder. The device must be plugged into
a power supply socket with earth wire and the installation
must be protected with
a ground fault circuit interrupter.

Page 5 of 11
3 Principle of operation:
First Feeder settings are divided into feeding periods of one hour
each. For each hour it is possible to indicate the number of minutes
in which the feed is to be available for the piglets.
At the beginning of each feeding period the device makes a buzzing
sound and at the same time a portion of feed is dispensed.
When the piglets activate the feeding ring, the automatic device
releases 10 gram of feed and then adds water in accordance with
the desired dry matter content. The sensor ensures that
the trough does not become overfilled and the feed is always fresh
and hygienic.
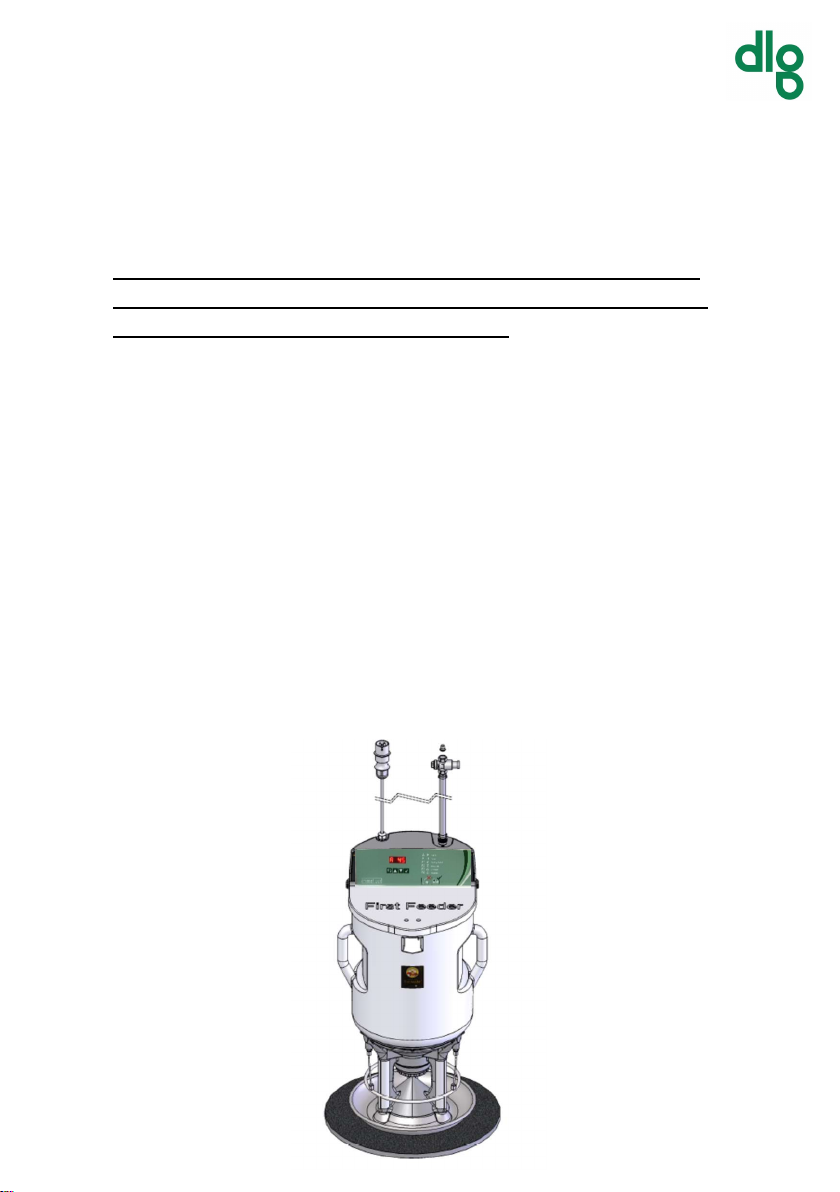
4 Placement and connection:
The First Feeder device is designed for indoor operation in a frost-
free space.
After thorough cleaning, First Feeder® should be placed in the
middle of a piglet box (max. 50 piglets pr. device).
Connect First Feeder to 230 V power supply socket with earth wire.
The installation must be protected with a ground fault circuit
interrupter.
Use square cable with a thickness of at least 1.5 /translator’s
remark: no unit is mentioned in the source text/. Make sure that the
cable is laid in a safe way, so that there is no risk of it getting
damaged, either by the piglets or by the wheels of carts, etc.

Page 6 of 11
Important notice:
Together with the First Feeder device a 2 metre long water hose is
delivered, with a connector at one end and a pressure regulating
valve at the other.
It is crucial for correct operation of the device, that the end with
the connector is mounted on the First Feeder and water supply is
connected to the pressure regulating valve.
The hose acts as a pressure accumulator and equalizes water
pressure. Therefore, only the originally supplied hose may be used
between the First Feeder and the pressure regulating valve, as it
has the correct damping ability.
Connect a water supply pipe to the pressure regulating valve on the
First Feeder. In order to achieve optimal operation of the device,
the water pressure should be at least 2 bar and
the supply pipe should be at least 0.5 inch in diameter. Water
supply connector to the First Feeder, i.e. to the pressure regulating
valve, is 0.5 inch in diameter (internal pipe thread). Install the
supplied filter between the water supply and the pressure
regulating valve.

Page 7 of 11
5 Power up:
In the display the following is shown at startup:
u003
This indicates the software-version in the controller. In this case the
software-version is 003.
After displaying the software-version, the unit enters normal
function, where a feeding is initiated according to the parameters
set.
Display in normal function:
In the Display Description:
A 43
A indicates that feeding is Active
43 is the remaining time of the feeding period in
minutes.
P 17
P indicates the feeding is paused
17 is the remaining time of the feeding pause in
minutes.
A_08
After the A, a small line can be shown.
1) A line in the top = Motor is running
2) A line in the middle = Dispensing water
3) A line in the bottom = Delay before new
feeding (adjustable in menu F2)
----
Too much water detected. Feeding paused.
o
Display alternating between the 2 symbols while
beeping indicates that the lid is open.

Page 8 of 11
6 Menu:
The menu is navigated by the 4 buttons.
Accept new value
Adjust to lower value
Adjust to higher value
Enter menu / change menu
Menu example:
F1:23 Menu F1 (Feeding period)
Value 23 minutes, active every hour
: semicolon indicates whether the displayed value
has been changed or not.
1) If the semicolon is displayed constant, the
value that is display is the one being used
2) If the semicolon is flashing the value is
changed but not accepted
If the menu has been activated, it will close automatically after 10
seconds if no buttons have been pressed.
Accepted values are used immediately, but will not be permanent
saved until the unit exits the menu. If the power is removed from
the unit while the menu is active, changed and accepted value will
not be saved for next power up.

Page 9 of 11
7 Menu settings:
F1 - Feeding period:
The number of minutes per hour the activation ring can start a
feeding. After X number of minutes, the unit enters Pause mode. In
the Pause mode no feeding will be started. The Active / Pause cycle
is restarted every hour.
F2 - Delay (sec):
The delay in seconds after every feeding has been completed.
F3 - Drymatter.
This value gives the proportion between the drymatter and how
much water is dispensed. The value ranges from 0 to 6.
At setting 0, the most water is added to the water.
At setting 6, the least amount of water is added.
F4 - Activations.
Indicated the number of feedings should be given at every
activation of the activation ring.
For example, at the value 3:
Activation ring is engaged:
1. Motor running, water dispensed
2. Motor running, water dispensed
3. Motor running, water dispensed
4. Pause for (F2) seconds
Ready for new activation.

Page 10 of 11
8 Cleaning
It is recommended to wash the First Feeder device thoroughly
before it is used for the feeding of a new herd of pigs.
Always disconnect the mains power supply of the First Feeder
device and take the plug out of the socket before performing any
cleaning.
Remove any feed residues from the feed container.
First Feeder may only be cleaned with a brush and water from a
bucket or hose at low pressure. Never use high pressure cleaner.
The operator’s panel may be wiped with a moist cloth.
Let the device dry completely before taking it into use again.
Cleaning of water nozzles: Check water nozzles in the red fitting
under the feed container regularly for stoppages. In order to
facilitate the cleaning of nozzles, the red fitting may be removed
with a special wrench which is supplied together with the device.
Screw the red fitting on again and remember not to re-tighten it too
hard. Therefore it is recommended to tighten the fitting only by
hand.

Page 11 of 11
Further information on the FirstFeeder can be found at:
https://www.dlg.dk/p/First-Feeder/First-Feeder-foderautomat/237702
Table of contents
Popular Farm Equipment manuals by other brands

horsch
horsch LEEB PT 350 Short instructions

Maschio
Maschio GASPARDO AIRONE Use and maintenance

Duratech
Duratech HAYBUSTER 107 DRILL Operating Instructions and Parts Reference

H&S
H&S TF6128 Operation manual

Rabe
Rabe Super Albatros 140 RMW+ operating instructions

Dhollandia
Dhollandia DH-RMH 44 installation manual