DMG LuxaCore Dual User manual

LuxaCore
Dual

3
Inhalt | Contents
Gebrauchsinformation – DEUTSCH 4
Instructions for use – ENGLISH 14
Mode d´emploi – FRANÇAIS 23
Istruzioni d‘uso – ITALIANO 33
Instrucciones de empleo – ESPAÑOL 43
Instruções de uso – PORTUGUÊS 53
Gebruiksinformatie – NEDERLANDS 63
Brugsanvisning – DANSK 73
Användarinstruktioner – SVENSKA 82
Instrukcja użycia – POLSKI 91
Информация по применению – РУССКИЙ 102
使用说明-简体中文 113
사용 설명서-독일어 121

4
Gebrauchsinformation Deutsch
Produktbeschreibung
LuxaCore-Dual ist ein automatisch anmischendes,
dualhärtendes Composite, das speziell für alle Arten
von Stumpfaufbauten und Aufbaufüllungen ent-
wickelt wurde. Das röntgensichtbare LuxaCore-Dual
zeichnet sich durch seine hohe Druckfestigkeit aus
und ist beschleifbar wie Dentin. Durch die zusätz-
liche Lichthärtung ist der Aushärtezeitpunkt selbst
bestimmbar. Mit dem Intraoral-Tip und dem Endo-
Tip kann LuxaCore-Dual direkt appliziert werden.
Indikationen
• Stumpfaufbauten aller Art
• Befestigung von Wurzelstiften
Kontraindikationen
•
Das Material nicht verwenden, wenn Aller-
gien gegen einen der Inhaltsstoffe bestehen
oder Kontaktallergien existieren.
•
Das Material nicht mit Ein-Flaschen-Bonds
verwenden, weil in der Regel ein optimaler
Haftverbund mit chemisch- oder dualhär-
tenden Materialien nicht sichergestellt ist.
•
Das Material nicht verwenden, wenn kein
trockenes Arbeitsumfeld möglich ist.
Grundlegende Sicherheitshinweise
Für Kinder unzugänglich aufbewahren!
Nur für den zahnärztlichen Gebrauch!
Um eventuelle Pulpenreaktionen zu vermei-
den, einen geeigneten Pulpa-/Dentinschutz
verwenden!
Kontakt mit Haut und Augen vermeiden. Im
Falle eines unbeabsichtigten Kontakts sofort
mit viel Wasser spülen und gegebenenfalls
einen Arzt konsultieren!
Nebenwirkungen
Es sind keine systemischen Nebenwirkungen
bekannt.

5
Wechselwirkungen
•
Eugenolhaltige Materialien können die Poly-
merisation von LuxaCore-Dual behindern
und zu Verfärbungen führen.
• Wasser und ölhaltige Luft können die Poly-
merisation von LuxaCore-Dual an der Kon-
taktstelle behindern.
Applikationssystem
Automix-Kartusche: siehe »Handhabung der
Automix-Kartusche« auf Seite 8.
Smartmix-Spritze: siehe „Handhabung der
Smartmix-Spritze“ auf Seite 10.
Zeitablauf
Verarbeitungszeit* ≈ 1:30 min
Chemische Här-
tung intraoral 5:00 min
Lichthärtung 20 s (Schicht ≤ 2mm)
40 s (Schicht ≤ 4mm)
*Hinweis: Die angegebene Zeit gilt für eine Raumtempera-
tur von 23 °C und eine normale relative Luftfeuchte von 50%.
Höhere Temperaturen verkürzen, niedrigere verlängern diese
Zeit.
Hinweise zur Anwendung
Lichtgeräte sollten bei 450 nm emittieren und
regelmäßig überprüft werden. Die Lichtin-
tensität sollte mindestens 400 mW/cm2betra-
gen. Das Licht so nahe wie möglich am Werk-
stoff platzieren.

6
Empfohlene Anwendung
Stumpfaufbau durchführen
1.
Den zu präparierenden Zahn mit einem Kof-
ferdam isolieren.
2.
Bestehende Füllungen und Karies entfernen.
3.
Falls der eingesetzte Haftvermittler einen
zusätzlichen Ätzschritt erfordert, gemäß Her-
stellerangaben des Ätzgels ätzen.
Hinweis: DMG empfiehlt die Verwendung des
dualhärtenden Adhäsivsystems LuxaBond-Total
Etch. In diesem Fall ist unbedingt das Ätzen der
betroffenen Schmelz- und Dentinflächen erfor-
derlich. Herstellerangaben beachten.
Vorsicht! Ungeschützte Pulpa.
In tiefen Kavitäten vor dem Bonding pulpa-
nahe Bereiche z.B. mit einer kleinen Menge
Calciumhydroxid und einer dünnen Schicht
Glasionomerzement schützen.
4.
Haftvermittler gemäß Herstellerangaben
auftragen.
5.
Um das Legen von LuxaCore-Dual zu verein-
fachen, eine Matrize um den präparierten
Zahn legen und LuxaCore-Dual direkt in die
Kavität applizieren. Falls eine vorgefertigte
Stumpfaufbauform verwendet wird,
LuxaCore-Dual direkt in die Stumpfaufbau-
form applizieren und auf den präparierten
Zahn aufsetzen.
Hinweis: LuxaCore-Dual kann innerhalb der Ver-
arbeitungszeit von 1:30 Minute mit einem übli-
chen Composite-Instrument, z.B. einem Heide-
mannspatel, geformt werden. Zur besseren
Bearbeitung kann der Heidemannspatel mit einem
Bond als Trennmittel benetzt werden.
6.
LuxaCore-Dual für ca. 5Minuten intraoral
abbinden lassen oder mit einem geeigneten
Lichtgerät für mindestens 40 Sekunden
belichten (maximale Schichtdicke ≤4 mm).
Bei einer dünneren Schichtung (≤2 mm) ist
eine Belichtung von 20 Sekunden ausrei-
chend.

Hinweis: Bei chemischer Härtung führen nied-
rigere Temperaturen, z. B. bei Arbeiten im Front-
zahnbereich, zu einer Verlängerung der Abbin-
dezeit.
7.
Falls vorhanden, eine Matrize erst nach dem
vollständigen Aushärten des Materials ent-
fernen.
8. Die Präparation für die gewünschte Restau-
rationsform unter Verwendung der üblichen
Präparationsinstrumente durchführen.
9.
Falls ein Kunststoffprovisorium auf dem prä-
parierten Zahn angefertigt werden soll, die
Präparation mit einem geeigneten Separati-
onsmittel (z.B. Vaseline) isolieren.
Befestigung von Wurzelstiften
1.
Eventuelle Vorbehandlungsprozeduren für
den Wurzelstift gemäß Herstellerangaben
des Wurzelstifts durchführen.
2.
Wurzelkanal entsprechend den Anforderun-
gen des zu setzenden Wurzelstifts aufberei-
ten.
3.
Falls der eingesetzte Haftvermittler einen
zusätzlichen Ätzschritt erfordert, Kanalinne-
res gemäß Herstellerangaben des Ätzgels
ätzen.
Hinweis: Die Verwendung des dualhärtenden
Adhäsivsystems LuxaBond-Total Etch wird emp-
fohlen. In diesem Fall unbedingt die betroffenen
Schmelz- und Dentinflächen ätzen. Hersteller-
angaben beachten.
4.
Haftvermittler gemäß Herstellerangaben
auftragen. Falls ein Adhäsivsystem mit einem
lichthärtenden Bestandteil verwendet wird,
Überschüsse vor Belichtung mit einer Papier-
spitze aus dem Kanal aufnehmen, da es
ansonsten zu einer Verblockung des Lumens
kommen kann.
5.
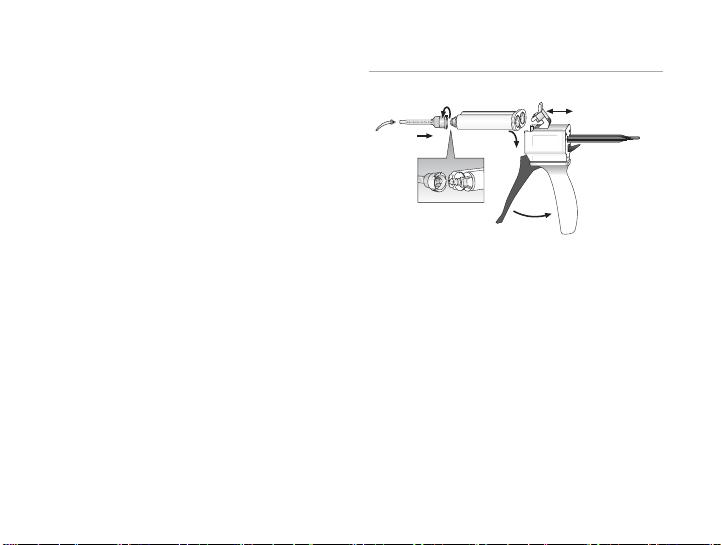
LuxaCore-Dual in das Kanallumen applizie-
ren. Dabei die Spitze des verwendeten Tips
immer im Material eingetaucht lassen. Falls
gewünscht, kann zusätzlich der Wurzelstift
mit LuxaCore-Dual benetzt werden. Die Ver-
7

8
Handhabung der Automix-Kartusche
AB
C
D
E
G
F
Kartusche einsetzen
1.
Den Hebel [A] an der Rückseite des Automix-
Dispensers nach oben drücken und den
Schieber [B] vollständig zurückziehen.
2. Kunststoffriegel [C] nach oben klappen, die
Kartusche einsetzen und mit dem Kunststoff-
riegel [C] arretieren.
Hinweis: Darauf achten, dass die Aussparungen
an der Kartusche und dem Automix-Dispenser
übereinstimmen.
arbeitungszeit von LuxaCore-Dual beträgt
1:30 Minuten.
Hinweis: Bei Verwendung von LuxaBond-Total
Etch verkürzt sich die Verarbeitungszeit von
LuxaCore-Dual im Wurzelkanal durch den Kon-
takt mit dem Pre-Bond auf ca. 30 Sekunden. Auch
bei der Verwendung anderer Haftvermittler kann
es zu einer Verkürzung der Verarbeitungszeit kom-
men. Herstellerangaben beachten.
6. Wurzelstift setzen.
7.
Das Material mit einer geeigneten Lampe für
20 Sekunden belichten.
8.
Das Material 5:00 Minuten aushärten lassen.
Hierdurch ist eine vollständige Aushärtung
auch in Bereichen, die mit Licht nicht erreich-
bar sind, gewährleistet.
Hinweis: Mit LuxaCore-Dual kann der korona-
le Anteil des Zahnes als Stumpfaufbau ausgear-
beitet werden. Durch die fließfähige Konsistenz
empfiehlt sich hierbei ein Arbeiten mit Matritze
(siehe »Stumpfaufbau durchführen« auf Seite
6).

9
Das Material durch Betätigen des Hebels [G]
am Automix-Dispenser in der Mischkanüle
mischen und direkt applizieren.
Hinweis: Die benutzte Mischkanüle nach der
Applikation als Verschluss auf der Kartusche belas-
sen!
Kartusche entnehmen
1.
Den Hebel [A] an der Rückseite des Automix-
Dispensers nach oben drücken und den
Schieber [B] vollständig zurückziehen.
2. Kunststoffriegel [C] nach oben klappen und
die Kartusche entnehmen.
Mischkanüle aufsetzen
1. Kartuschenkappe [D] oder benutzte Misch-
kanüle nach Drehung um 90° gegen den Uhr-
zeigersinn abziehen und verwerfen.
2. Neue Mischkanüle [E] aufsetzen.
Hinweis: Um ein optimales Mischergebnis zu
erzielen, empfiehlt DMG die Verwendung der
bei DMG erhältlichen Mischkanülen. Alle Misch-
kanülen sind auch als Nachfüllpackung erhältlich.
Hinweis: Darauf achten, dass die Aussparungen
an der Mischkanüle und der Kartusche überein-
stimmen.
3.
Die Mischkanüle durch Drehen um 90° im
Uhrzeigersinn arretieren.
4. Intraoral-Tip [F] oder Endo-Tip aufsetzen.
Material applizieren
Beim erstmaligen Gebrauch einer Kartusche
eine etwa erbsengroße Menge des Materi-
als ausbringen und verwerfen.

10
2. Neue Mischkanüle [B] aufsetzen.
Hinweis: Um ein optimales Mischergebnis zu
erzielen, empfiehlt DMG die Verwendung der
bei DMG erhältlichen Mischkanülen. Alle Misch-
kanülen sind auch als Nachfüllpackung erhältlich.
Hinweis: Darauf achten, dass die Aussparungen
an der Smartmix-Spritze [C] und der Mischka-
nüle übereinstimmen.
3.
Die Mischkanüle durch Drehen um 90° im
Uhrzeigersinn arretieren.
Handhabung der Smartmix-Spritze
A
1.
Vor dem Aufsetzen der Mischkanüle die Ver-
schlusskappe [A] oder benutzte Mischkanü-
le nach Drehung um 90° gegen den Uhrzei-
gersinn abziehen und verwerfen.
C
B

11
Die Desinfektion kann mit einer handelsüblichen
Tauchdesinfektion erfolgen. DMG empfiehlt die
ausschließliche Verwendung von RKI (Robert
Koch Institut) gelisteten Desinfektionsmitteln.
Der Automix-Dispenser ist außerdem autoklavierbar.
Technische Daten
Druckfestigkeit 300 MPa
Biegefestigkeit 100 MPa
Diametrale Zugfestigkeit 50 MPa
Wasseraufnahme 20 µg/mm3
Zusammensetzung
Bariumglas und pyrogene Kieselsäure in einer
Bis-GMA basierten Matrix aus Dentalharzen. Füll-
stoffanteil: 72 Gew.% = 49 Vol.% (0,02 - 2,4µm)
Lagerung und Haltbarkeit
Bei 2 bis 25 °C/36 bis 77°F trocken lagern!
4. Intraoral-Tip oder Endo-Tip aufsetzen.
5.
Das Material wird beim Ausbringen in der
Kanüle gemischt und kann direkt appliziert
werden.
Hinweise: Beim erstmaligen Gebrauch einer
Spritze eine etwa erbsengroße Menge des Mate-
rials ausbringen und verwerfen!
Die benutzte Mischkanüle nach der Applikation
als Verschluss auf der Smartmix-Spritze belassen!
Desinfektion des Automix-Dispensers
Der Automix-Dispenser ist nach der Desinfektion
wiederverwendbar, sollte aber bei sichtbaren
Verschleißspuren ausgetauscht werden.

12
1 Kartusche à 95 g (50 ml) Paste***,
25Automix-Tips, 15 Intraoral-Tips, 10 Endo-
Tips
Farbe A3 REF 212326
*** Nicht in allen Ländern erhältlich.
LuxaCore-Smartmix Dual
2 Spritzen à 9 g (5 ml) Paste, 20 Smartmix-
Tips, 10 Intraoral-Tips, 10 Endo-Tips**
Farbe A3 REF 212039
Farbe Blau REF 212038
Farbe Weiß REF 212064
** In den USA und Canada sind 10 Smartmix-Tips und 10 Intra-
oral-Tips enthalten.
Falls möglich, unangebrochenes Material im
Kühlschrank lagern.
Nach Ablauf des Haltbarkeitsdatums nicht
mehr verwenden.
Klassifikation
ISO 4049:2000, type 2, class 3
Handelsformen
LuxaCore-Automix Dual
1 Kartusche à 50 g (25 ml) Paste, 35 Auto-
mix-Tips, 25 Intraoral-Tips, 10 Endo-Tips*
Farbe A3 REF 212011
Farbe Blau REF 212012
Farbe Weiß REF 212126
* In den USA und Canada sind 35 Automix- & 35 Intraoral-Tips
enthalten.

13
Zubehör
1 Automix-Dispenser
Type 25 1:1 REF 110253
1 Automix-Dispenser
Type 50 1:1 REF 909507
50 Automix-Tips Yellow 1:1 REF 909200
50 Intraoral-Tips Yellow 1:1 REF 909201
50 Endo-Tips Yellow REF 212280
50 Smartmix-Tips Combi REF 212042
50 Smartmix-Tips Endo REF 212041

14
• Do not use the material with a single-bottle
bond because an optimum adhesive bond is
generally not assured with chemical or dual-
cure materials.
•
Do not use the material if a dry working envi-
ronment is not possible.
Basic safety instructions
Keep out of reach of children!
For dental use only!
In order to avoid any pulp reactions, use suit-
able pulp/dentine protection!
Avoid contact with skin and eyes. In case of
accidental contact, irrigate immediately with
plenty of water and consult a physician, if nec-
essary!
Side effects
No systemic side effects are known.
Instructions for use English
Product Description
LuxaCore-Dual is an automatic mixing, dual-cure
composite that has been specially developed for
all types of core build-ups and build-up fillings.
Radiopaque LuxaCore-Dual stands out due to its
high compressive strength, and it cuts like den-
tine. The curing time can be self-determined due
to additional light curing. It is possible to apply
LuxaCore-Dual directly using the Intraoral-Tip
and the Endo-Tip.
Indications
• All types of core build-up
• Cementation of root posts
Contraindications
• Do not use the material in cases of allergies
to any of the components or in the event of
contact allergies.

15
Timing
Working time* ≈ 1:30 min
Chemical curing intraoral 5:00 min
Light curing 20 s (layer ≤2 mm)
40 s (layer ≤4 mm)
*Please note: The times apply at a room temperature of 23 °C
and a normal relative air humidity of 50%. Higher temperatures
shorten, lower temperatures increase this time.
Instructions for use
Light-curing units should have an output
of 450 nm and should be checked regularly.
The light intensity should be a minimum of
400 mW/cm
2
. Place the light as close as pos-
sible to the material.
Recommended use
Carry out core build-up
1.
Isolate the tooth prior to preparation using a
rubber dam.
Interactions
•
Materials containing eugenol may inhibit the
polymerization of LuxaCore-Dual and lead to
discoloration.
•
Air containing water and oil can inhibit the
polymerization of LuxaCore-Dual at the con-
tact surfaces.
Application system
Automix cartridge: See “Using the Automix
cartridge” on page 18.
Smartmix syringe: See “Using the Smartmix
syringe” on page 19.

16
LuxaCore-Dual directly into the core build-
up form and place on the prepared tooth.
Please note: LuxaCore-Dual can be formed with-
in the working time of 1:30 minutes using a stand-
ard composite instrument, e.g. a Heidemann spat-
ula. In order to enhance processing, coat the
Heidemann spatula with a bond as a separating
medium.
6.
Leave LuxaCore-Dual to bond intraorally for
approx. 5 minutes or expose to a suitable
light curing unit for a minimum 40 seconds
(maximum layer thickness ≤4 mm). In the
case of thinner layers (≤2 mm) exposure to
light for 20 seconds is sufficient.
Please note: With chemical curing, low temper-
atures (e.g. when working in the area of the front
teeth) lead to longer bonding times.
7.
If used, remove a matrix only once the mate-
rial has hardened fully.
8. Produce the preparation for the desired res-
toration form using standard preparation
instruments.
2. Remove existing fillings and caries.
3. If the bonding agent used requires an addi-
tional etching step then etch using the etch-
ing gel per the manufacturer’s instructions.
Please note: DMG recommends the use of the
dual-cure adhesive system LuxaBond-Total Etch.
In this case it is essential to etch the affected enam-
el and dentine surfaces. Observe the manufac-
turer’s instructions.
Caution! Unprotected pulp.
Prior to bonding in deep cavities in areas close
to pulp, provide protection by using a small
quantity of calcium hydroxide and a thin lay-
er of glass ionomer cement for example.
4.
Apply bonding agent in accordance with the
manufacturer’s instructions.
5.
In order to simplify the application of
LuxaCore-Dual, place a matrix around the
prepared tooth and apply LuxaCore-Dual
directly into the cavity. If a pre-fabricated
core build-up form is used, apply

17
used, use a paper tip to remove any excess
from the canal prior to the application of
light. Otherwise the lumen may be blocked.
5.
Apply LuxaCore-Dual to the canal lumen.
When doing so keep the end of the tip con-
stantly immersed in the material. If desired,
it is additionally possible to coat the root
post with LuxaCore-Dual. The LuxaCore-Dual
working time is 1:30 minutes.
Please note: When using LuxaBond-Total Etch,
the working time of LuxaCore-Dual in the root
canal is reduced to approx. 30 seconds due to
the contact with the pre-bond. It is also possible
that the working time may be reduced with oth-
er bonding agents. Observe the manufacturer’s
instructions.
6. Set the root post.
7.
Using a suitable lamp, apply light to the mate-
rial for 20 seconds.
8.
Leave the material to harden for approx. 5:00
minutes. This guarantees complete curing,
9.
If a plastic temporary restoration is to be
applied to the prepared tooth, isolate the
preparation using a suitable separation medi-
um (e.g. Vaseline).
Cementation of root posts
1.
Carry out any preparation procedures neces-
sary for root posts in accordance with the
manufacturer’s instructions.
2.
Prepare the root canal in accordance with the
requirements of the respective root post.
3. If the bonding agent used requires an addi-
tional etching step then etch inside the canal
using the etching gel per the manufacturer’s
instructions.
Please note: It is advisable to use the dual-cure
adhesive system LuxaBond-Total Etch. In this case
it is essential to etch the affected enamel and
dentine surfaces. Observe the manufacturer’s
instructions.
4.
Apply bonding agent in accordance with the
manufacturer’s instructions. If an adhesive
system with a light-curing component is

18
Insert cartridge
1.
Push up the lever [A] at the back of the
Automix dispenser and pull back the slide [B]
completely.
2.
Lift up the plastic lever [C], insert the car-
tridge and lock it by pushing down the plas-
tic lever [C].
Please note: Make sure that the notches on the
cartridge line up with those on the Automix-Dis-
penser.
Attaching a mixing tip
1.
Remove the cartridge cap [D] or used mix-
ing tip by turning it 90° counterclockwise,
and discard it.
2. Attach a new mixing tip [E].
Please note: In order to achieve an optimum
mixing result, DMG recommends the use of mix-
ing tips available from DMG. All mixing tips are
also available as refill packs.
Please note: Make sure that the notches on the
mixing tip line up with those on the cartridge.
also in the areas that cannot be reached by
light.
Please note: With LuxaCore-Dual it is possible
to work on the coronal portion of the tooth as a
core build-up. Due to the easy-flowing consist-
ency, it is recommended that work be carried out
using a matrix (see “Carry out core build-up” on
page 15).
Using the Automix cartridge
AB
C
D
E
G
F

19
Using the Smartmix syringe
A
1.
Before attaching the Mixing-Tip, remove the
cap [A] or used Mixing-Tip after turning it
90° counterclockwise, and discard it.
C
B
2. Attach a new Mixing-Tip [B].
3. Turn the mixing tip clockwise 90° to lock it
into place.
4. Attach an Intraoral-Tip [F] or Endo-Tip.
Applying the material
When using a cartridge for the first time,
express a pea-sized amount of material and
discard it.
The material is mixed in the mixing tip by
pulling the trigger [G] of the Automix Dis-
penser and it is then applied directly.
Please note: After the application, leave the used
Mixing-Tip on the cartridge to cap unused mate-
rial!
Remove cartridge
1.
Push up the lever [A] at the back of the Auto-
mix Dispenser and pull back the slide [B]
completely.
2. Lift up the plastic lever [C] and remove the
cartridge.

20
4. Attach an Intraoral-Tip or Endo-Tip.
5.
The material is mixed in the Mixing-Tip when
it is expressed and it can be applied directly.
Please note: When using a syringe for the first
time, express a pea-sized amount of material and
discard it!
Leave the used Mixing-Tip on the Smartmix syringe
after use. It serves as a cap!
Disinfection of the Automix-
Dispenser
The Automix-Dispenser is reusable after disinfection,
although it should be replaced if visible signs of
wear appear.
Please note: In order to achieve an optimum
mixing result, DMG recommends the use of Mix-
ing-Tips available from DMG. All Mixing-Tips are
also available as refill packs.
Please note: Make sure that the notches on the
Mixing-Tip line up with those on the Smartmix
syringe [C].
3. Turn the Mixing-Tip clockwise 90° to lock it.

21
If possible, store unopened material in a refrig-
erator.
Do not use after the expiration date.
Classification
ISO 4049:2000, type 2, class 3
Available product sizes
LuxaCore-Automix Dual
1 cartridge @ 50 g (25 ml) paste, 35 Auto-
mix-Tips, 25 Intraoral-Tips, 10 Endo-Tips*
Shade A3 REF 212011
Shade blue REF 212012
Shade white REF 212126
* In the USA and Canada, 35 Automix- & 35 Intraoral-Tips are
included.
Disinfection can be carried out using a commercially
available dipping disinfectant. DMG recommends
using only disinfecting solutions listed by the RKI
(Robert Koch Institute). The Automix Dispenser
is also autoclavable.
Technical data
Compressive strength 300 MPa
Flexural strength 100 MPa
Diametral tensile strength 50 MPa
Water absorption 20 µg/mm3
Ingredients
Barium glass and pyrogenic silicic acid in a Bis-
GMA based matrix from dental resins. Filler con-
tent: 72% by weight = 49 % by vol. (0.02–2.4 µm)
Storage and shelf life
Store in a dry place at 2–25 °C/36–77 °F!
Table of contents
Languages:
Popular Medical Equipment manuals by other brands

Microlife
Microlife OXY500 BT manual

Stryker Medical
Stryker Medical COMPANION Operation and maintenance manual

InfuSystem
InfuSystem CardinalHealth SVED Patient Quick Reference Guide

Claris Healthcare
Claris Healthcare Reflex Instructions for use

Invacare
Invacare Classic Visco user manual

Patterson Medical
Patterson Medical 09 153 7786 quick start guide

promotal
promotal Duolys 306 Series user guide

Otto Bock
Otto Bock 10S17 Instructions for use

Motif Medical
Motif Medical Motif Phototherapy Blanket BiliTouch Operational manual

Karl Storz
Karl Storz UNIDRIVE S III Service manual

Siemens
Siemens MULTIMOBIL 10 troubleshooting guide

Stryker
Stryker Power-PRO XT Operation manual