DogWatch IB-200 User manual

1
Product Features and Operating Instructions
DogWatch®IB-200
The IB-200 is a dual function transmitter designed to be used either
as a ireless unit that emits a signal directly from the transmitter
ithout the use of a boundary ire oorrit may be installed ith a
boundary ire to establish larger or multiple avoidance areas.
Set Up: Wireless / With Wire
The INT/EXT switch on the back of the unit allows you to choose your preferred application.
You cannot use
both applications at the same time.
INT allows you to use the transmitter as a wireless unit.
EXT allows you to use the transmitter with boundary wire.
Wireless: When using the IB-200 as a wireless unit (INT) place the unit in the area that you want your pet to avoid.
The signal range can be adjusted up to a maximum of 10 feet in diameter (5 feet in all directions from the
transmitter).
Avoid placing the transmitter on or near large metal objects.
With Wire: When using the boundary wire (EXT) you can customize your avoidance zone(s)
and adjust the signal range using both the Signal Range adjustment and by increasing or
decreasing the distance between the separated wires. See instructions on page 3.
EXT WIRE
Boundary wire
attachment
INT - Wireless
EXT - Wired
Power Status Light
Frequency
(for Dealer Use Only)
®
IB-200 TRANSMITTER
TOP
BOTTOM
Signal Range
Power Status Light
The Power Status Light on the top of the transmitter turns “on” and glows
green when the transmitter is plugged-in and sending a signal. When sing
a bo ndary wire, the Power Stat s Light t rns “on” only when there is a
continuous signal loop. See instr ctions on page 3.
Note: The green light may be steady green or blinking green. This depends
of the Frequency setting of the transmitter.
Signal Range
Signal range is the distance the signal radiates from the transmitter or
the boundary wire.
•Turn the knob toward the ‘+’ to increase the signal range.
This increases the size of the signal field.
•Turn the knob toward the ‘-’ to decrease the signal range.
This decreases the size of the signal field.
Never adj st the signal range while yo r pet is wearing the receiver
collar. Always test the signal field and mark the edge of the field with
warning flags before allowing yo r pet near the bo ndary area.
Frequency
This switch controls the broadcast frequency of the signal. Your Dealer will
set this switch for your system. Do NOT change this setting. It is for
DEALER USE ONLY.

2
Installation
TRANSMITTER
Place the transmitter in the center o
the boundary area. For example,
under a piece o urniture, on a
counter or near a doorway.
Increase or decrease the
range to make the area
larger or smaller.
BOUNDARY FLAGS
Place lags around edge o the
audible warning zone to mark
the boundary area. Gradually
remove the lags a ter your
pet is trained.
The IB-200 transmitter emits a radio signal that is detected by the receiver collar worn by your pet. As your pet
approaches the signal field of the boundary area the receiver collar begins to emit an audible warning beep. If
your pet goes beyond the warning zone the audible warning is quickly followed by a mild ‘correction’ - - an
unpleasant but safe sensation from the receiver collar. With proper training your pet will quickly learn to stay
away from areas that he associates with the audible warning.
EEssttaabblliisshhiinngg tthhee BBoouunnddaarryy AArreeaa
The IB-200 can be used to train your pet to stay within an area or to avoid an area. Set the signal range then
place the transmitter in the center of the area where you want to create a signal field or a boundary you do not
want your pet to cross. [NOTE:Do not set the transmitter on or near large metal objects.]
BOUNDARY AREA
(SIGNAL FIELD)
CORRECTION ZONE
AUDIBLE WARNING ZONE SAFE AREA
Unseparated boundary
wire no signal)
Transmitter
Multiple Boundary Areas Loop
Signal Fields Twisted end of
boundary wire
Wireless (No Boundary Wire)
Wired Installation
■All wires should be placed so that they do not
interfere with normal household activities.
■Carefully plan the location where you want to
create the signal field(s) (see diagram). Boundary
wire that is not separated to create a signal field
may emit a slight radio signal which could
activate the receiver collar if your pet lies directly
on top of the wire.
■Do not install boundary wires next to baseboard
heating units as the heating units could pick up
the radio signal.
The boundary wire allows you to isolate one or more avoidance areas within your house that are off-limits to
your pet. Follow these general guidelines when placing the boundary wire.
Single Area Loop

3
Troubleshooting
Training
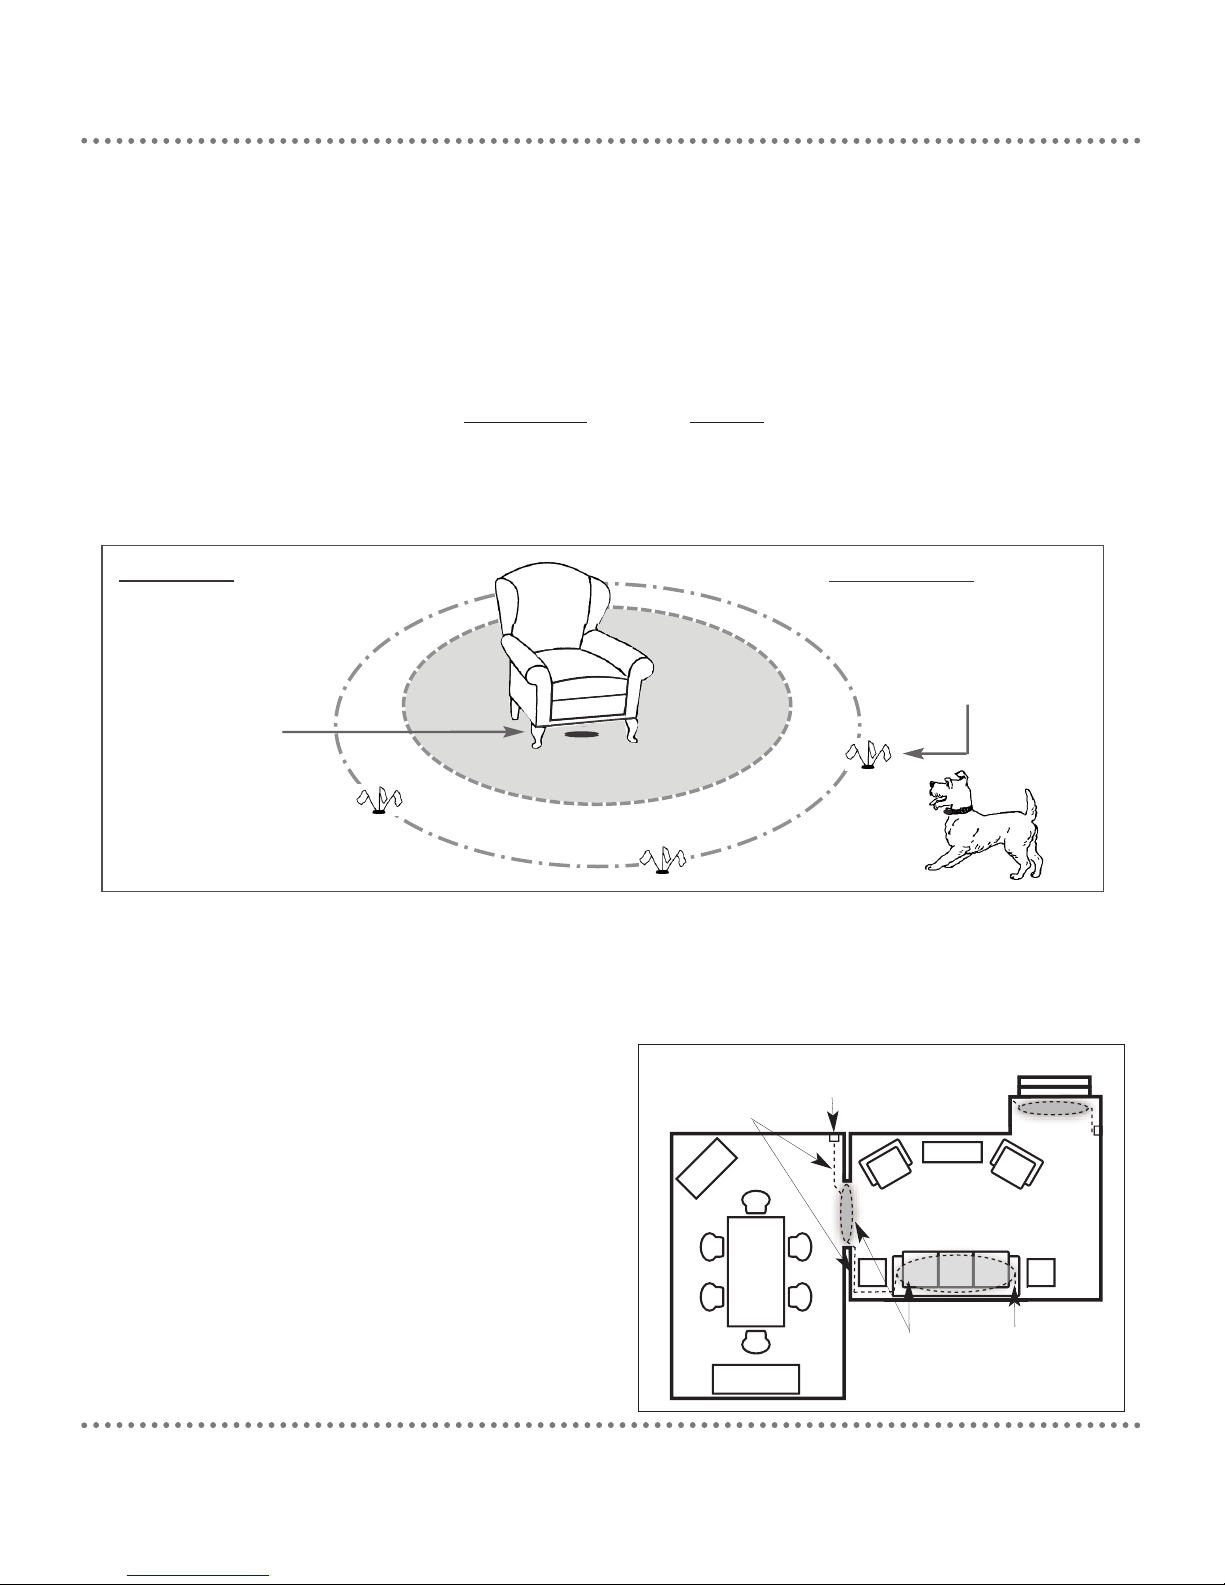
■Establish your boundary area(s) and mark the edge of the Audible Warning Zone with flags just past where
the receiver collar picks up the audible signal. The boundary flags serve as visual clues for your pet while he
learns which areas are safe and which areas to avoid.
■Put the receiver collar on your pet making sure it is adjusted appropriately. It should be snug with the
contact posts touching the skin but not uncomfortably tight.
■Attach a leash to your pet’s regular collar and approach the signal field. As you near the flags shake a
boundary flag in front of him and firmly say “Watch out!” or “Careful!”
■Allow your pet to walk past the boundary flags. As he crosses into the audible warning area he will hear a
beeping noise. If your pet has already been trained to an outdoor Hidden Fence he may retreat immediately
when he sees the flags or hears the beeps. If he continues into the correction zone he will receive a brief
‘correction’ (a mild sensation that is unpleasant but will not harm your pet.) Immediately call out “Watch
out” and tug the leash firmly to pull your pet out of the signal field.
■Again allow your pet to approach the boundary flags. If he retreats when he hears the audible warning
reinforce the behavior with praise and affection. If your pet fails to stop at the audible warning repeat the
above. You may need to repeat this several times over several days. Allow for plenty of rest and play time.
■Each time you set up a new boundary area be sure to retrain your pet to the new boundary area.
If your pet enters the avoidance area without responding to the correction signal make sure that both the
transmitter and the receiver collar are “on” and working. If both the transmitter and the receiver are functioning
properly you may need to increase the signal range on the transmitter or the correction level on the collar.
Reminder:
Never adjust the transmitter while your pet is wearing the receiver collar.
■Check to make sure the transmitter is plugged in wall switches are turned on and the power light is on.
■Check the receiver by placing the test light on the contact posts while holding the receiver next to your
wireless transmitter. Avoid touching the posts. If your test light lights up your receiver is working properly.
■Ensure that the collar fits and the contact posts on the receiver collar actually touch your pet’s skin.
■Be sure the receiver battery is inserted correctly. Replace the battery if necessary.
Smaller
Signal Field
Larger
Signal Field
Twisted wire
completes the signal loop)
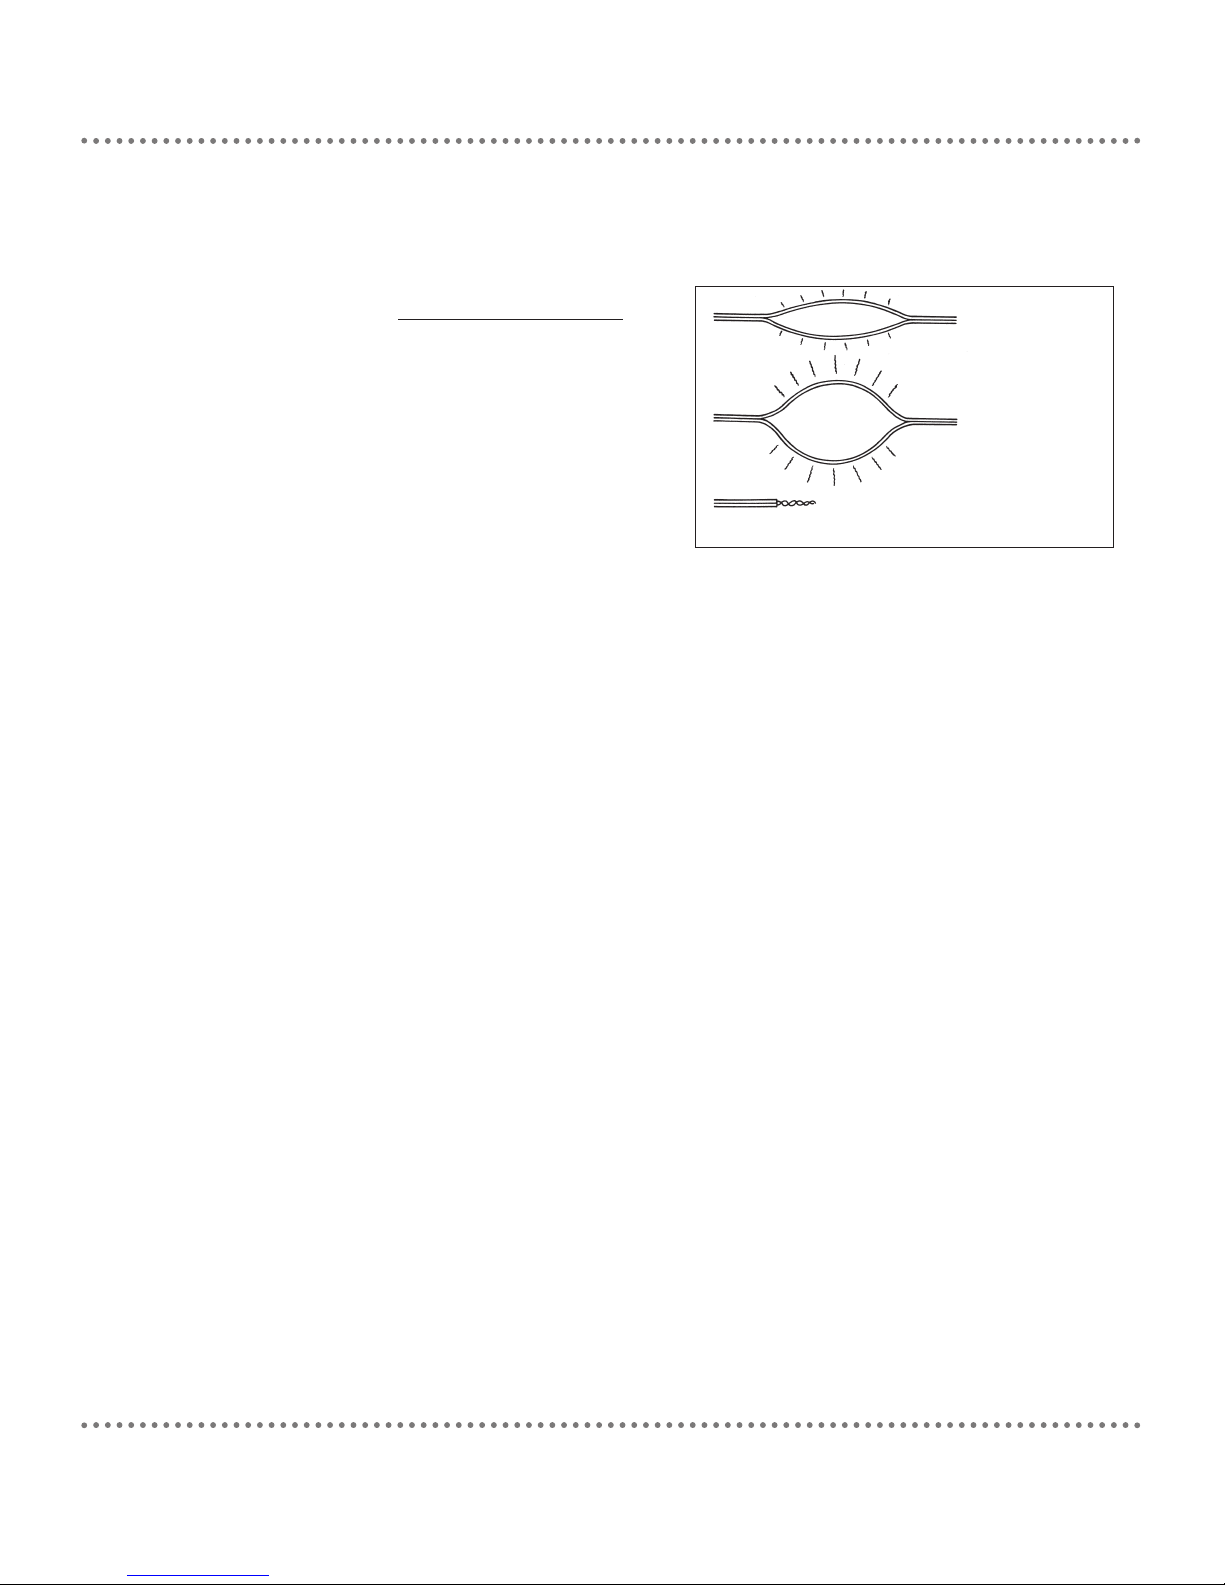
The boundary wire supplied with the transmitter is a double wire designed to be separated in the areas where
you want to create a signal field (the avoidance area). When the two wires are next to one another there is no
signal field.
TThhee ssiiggnnaall ffiieelldd iiss ccrreeaatteedd bbyy sseeppaarraattiinngg tthhee wwiirreess..
Separating the wires increases the size of the
signal field as well as the signal range (the distance the signal travels from the wire). A signal field may be
created in a single location or multiple locations on the wire.
The boundary wire must form a continuous signal loop for
there to be a signal field. To accomplish this you must strip
and twist the final ends of the boundary wire together.
The Power Status light turns “off” if you have not closed the
signal loop or if the wire is bro en.
The boundary wire carries a harmless radio signal. You do not
need to worry about an electrical shock from the wires.

To Activate Your Warranty
Register online at www.dogwatch.com
DogWatch products are protected under U.S. Patent numbers:
5 353 744; 5 465 687; 6 079 367; 6 360 698; 6 467 435; 6 575 120; 6 825 768 and D 491 481.
4
This device complies with Industry Canada rules. This device complies with part 15 of the FCC Rules. Operation is subject to the following
two conditions: (1) This device may not cause harmful interference and (2) this device must accept any interference received including
interference that may cause undesired operation.
Le présent appareil est confirme aux CNR d’Industrie Canada applicables aux appareils radio exempts de licence. Cet appareil est
conforme à la partie 15 régles FCC. L’exploitation est autorisée aux deux conditions suivantes: (1) l’apppareil ne doit pas produire de
brouillage et (2) l’utilisateure de l’appariel doit accepter tout brouillage radioélectrique subi même si le brouillage est susceptible d’en
compromettre le fonctionnement.
Modifications or changes to this equipment not expressly approved by DogWatch Inc.
may void the user’s authority to operate the equipment.
DogWatch products are lead-free and compliant with the Reduction of Hazardous Substances (RoHS) initiative.
©2012 DogWatch Inc. All rights reserved. 295074 Rev. A.1 7-12
Warranty
DogWatch Inc. subject to the terms and conditions set forth hereunder hereby warrants that it will repair or replace at its
own discretion without charge for parts or labor the Indoor Product or any part thereof which is found by DogWatch Inc. to
be defective by reason of improper workmanship and/or materials for a period of two (2) years from the original date of sale
hereunder. Warranty claims may be subject to dealer service charges and/or manufacturer shipping and handling charges.
EXCEPT FOR THE EXPRESS WARRANTY STATED ABOVE DOGWATCH INC. DISCLAIMS ALL EXPRESSED AND
IMPLIED WARRANTIES OR MERCHANTABILITY OR FITNESS FOR A PARTICULAR PURPOSE.
As a condition to this warranty Customer must register the product online at www.dogwatch.com within seven (7) days
after purchase hereunder (a) notify DogWatch Inc. within the warranty period after the purchase hereunder of a claimed
defect and (b) mail product back insurance and postage prepaid to the authorized DogWatch dealer or DogWatch Inc.
DOGWATCH INC.’S SOLE LIABILITY UNDER THIS WARRANTY SHALL BE TO REPAIR OR REPLACE AT ITS OPTION
ANY PRODUCT OR PART WHICH DOGWATCH INC. DETERMINES TO BE DEFECTIVE. IN NO EVENT WILL DOGWATCH
INC. BE LIABLE FOR ANY SPECIAL INDIRECT OR CONSEQUENTIAL DAMAGES ARISING OUT OF THE PURCHASE OR
USE OF THE PRODUCT. IN NO EVENT SHALL DOGWATCH INC.’S LIABILITY EXCEED THE PURCHASE PRICE OF THE
PRODUCT.
RREEPPLLAACCEEMMEENNTT BBAATTTTEERRIIEESS AANNDD CCOOLLLLAARRSS
For replacement batteries and additional collars call your authorized DogWatch Dealer
visit our web site at www.dogwatch.com or contact us at 800-793-3436.
NOTE: The use of any battery other than a battery authorized by DogWatch Inc.
can cause erratic operation of the receiver or could cause permanent damage.
The use of any unauthorized battery will void the warranty on the receiver.
Table of contents
Other DogWatch Transmitter manuals
Popular Transmitter manuals by other brands

BTG
BTG MBT-4500 user manual

TX Digicast
TX Digicast DABTX200 user manual

KROHNE
KROHNE OPTITEMP TT 53 R Ex Handbook

Lectronics
Lectronics uh200 operating instructions

Linear
Linear XT-1H Operation instructions

EMERGENCY BEACON CORPORATION
EMERGENCY BEACON CORPORATION EBC-406HM Instruction and maintenance manual