Dojo DL0007 User manual

1
Dojo by BullGuard-DL0007
User’s Guide
9 Devonshire Square EC2M 4YF London. United Kingdom
Company website: dojo.bullguard.com
For information, contact: info@dojo-labs.com
For support, contact: helpdesk@dojo-labs.com
May 2017
® All rights reserved.

2
Table of Contents
Overview...............................................................................................................................3
Dojo Technology...............................................................................................................3
Further Information............................................................................................................4
Setup....................................................................................................................................5
Before You Start................................................................................................................5
Unpacking the Dojo Pebble Kit..........................................................................................5
Setting Up Dojo.................................................................................................................5
Using the Dojo App.............................................................................................................17
Logging In.......................................................................................................................17
Dojo Tab .........................................................................................................................18
My Devices Tab ..............................................................................................................18
Device Groups ............................................................................................................20
Changing Groups........................................................................................................21
Editing Device Details .................................................................................................23
Alerts and Actions .......................................................................................................24
Removing an Action from a Device .............................................................................26
Dojo Menu.......................................................................................................................27
Protecting a Device with Remote Access........................................................................ 29
Router Settings ...........................................................................................................29
Dojo app settings.........................................................................................................29
Regulatory Compliance Information....................................................................................30
Technical Specification....................................................................................................30
Base Unit ....................................................................................................................30
Pebble.........................................................................................................................30
Product Information.........................................................................................................30
FCC Statement ...............................................................................................................30
IC Statement...................................................................................................................31
CE...................................................................................................................................32

3
Overview
*This manual is addressed for ISPs’ consumer base. All sections mentioning Wi-Fi
connections are referring to the user’s home router.
Congratulations on your Dojo, the smart security and privacy solution for your smart
connected home!
Dojo keeps you in control of your home network and privacy by monitoring your home router
and alerting you of new devices trying to connect. Dojo provides a security technology that
connects to your network and acts as the essential layer between your smart devices and
any threats to your security and privacy.
If any suspicious device tries to connect to your home router, Dojo will notify you via the Dojo
app (available for Android and iOS) and you can simply block it.
This guide provides instructions for connecting the Dojo system to your home network and
using the Dojo app to monitor and control devices in the network.
Dojo Technology
Dojo is a comprehensive and in-depth security system for smart devices and connected
homes. It has three main components:
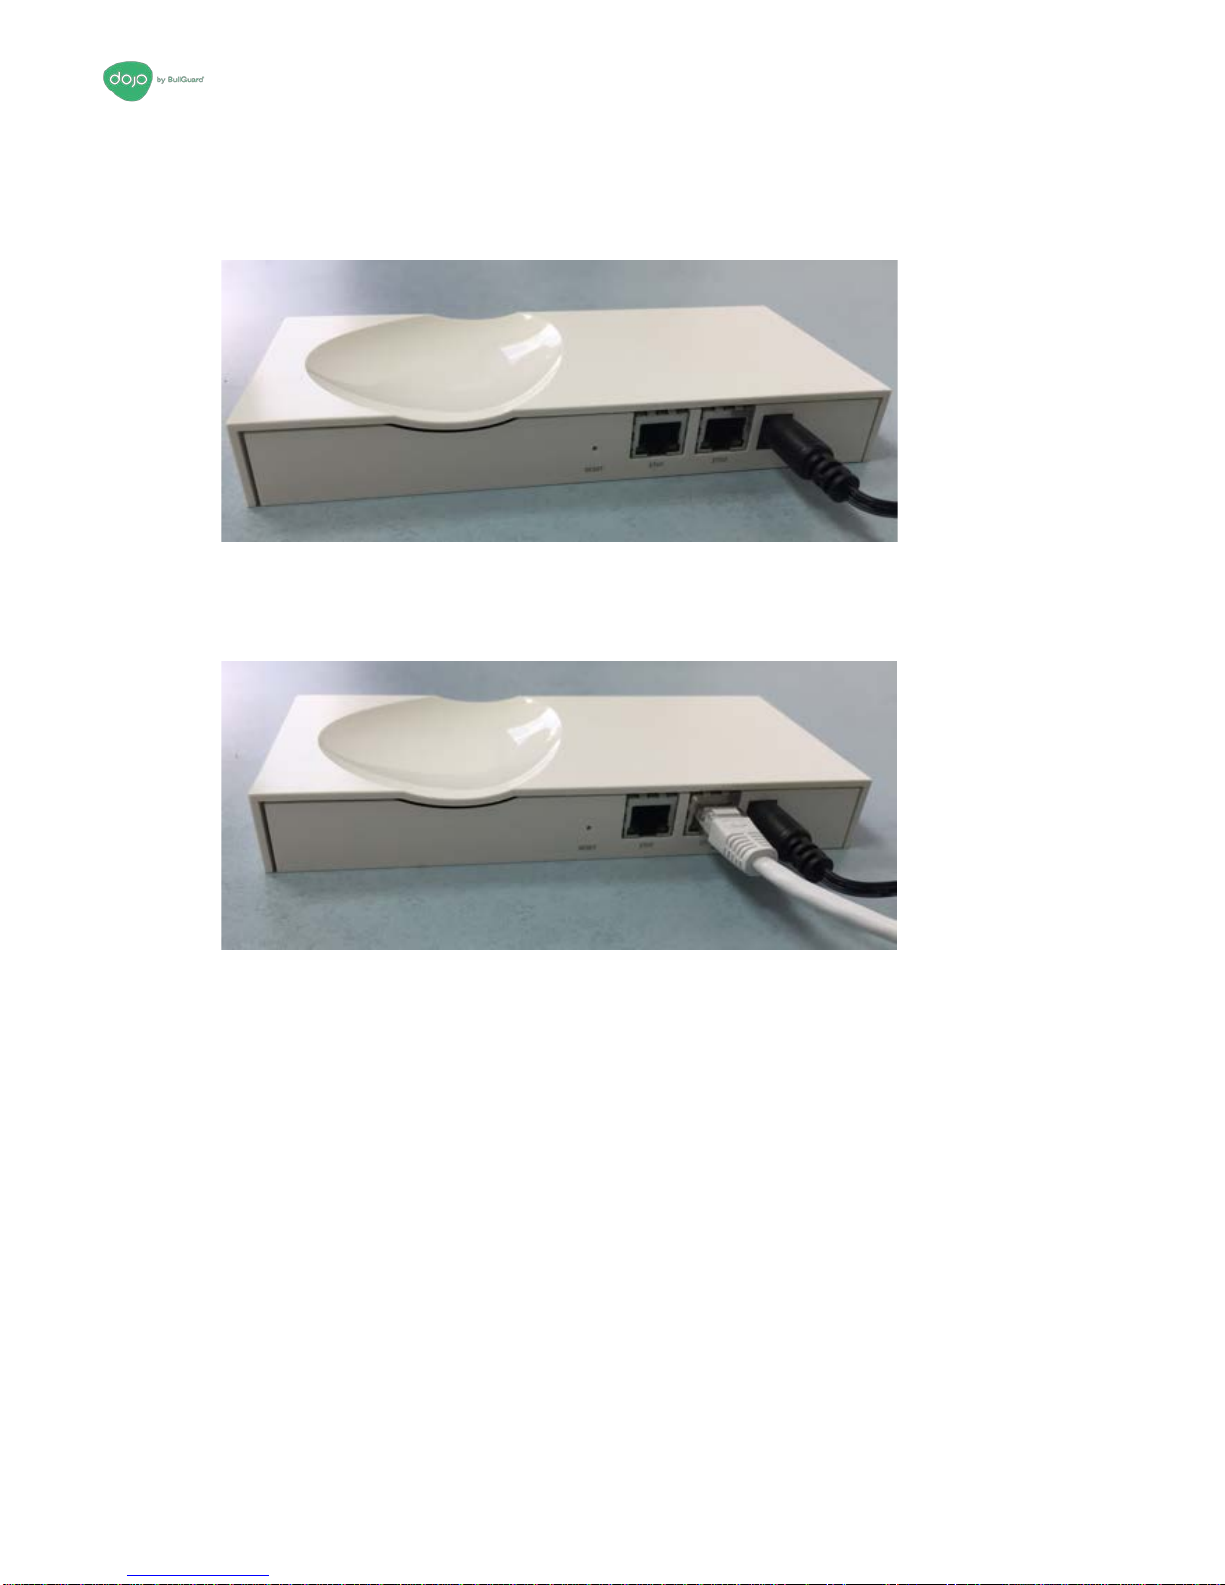
•Dojo Base Unit: A local intelligent unit that plugs into your router and takes care of
threat detection and prevention alongside network management and control. Dojo
constantly analyzes all the network traffic within the home network and enforces the
security policy of that specific network.
•Dojo Cloud Service: Dojo-Labs runs a cloud-based cybersecurity engine that constantly
collects and analyzes the metadata that has been generated by all the deployed Dojos
devices. The collected data is then applied to thousands of other smart homes using
Dojo, to prevent similar attack from being carried out.
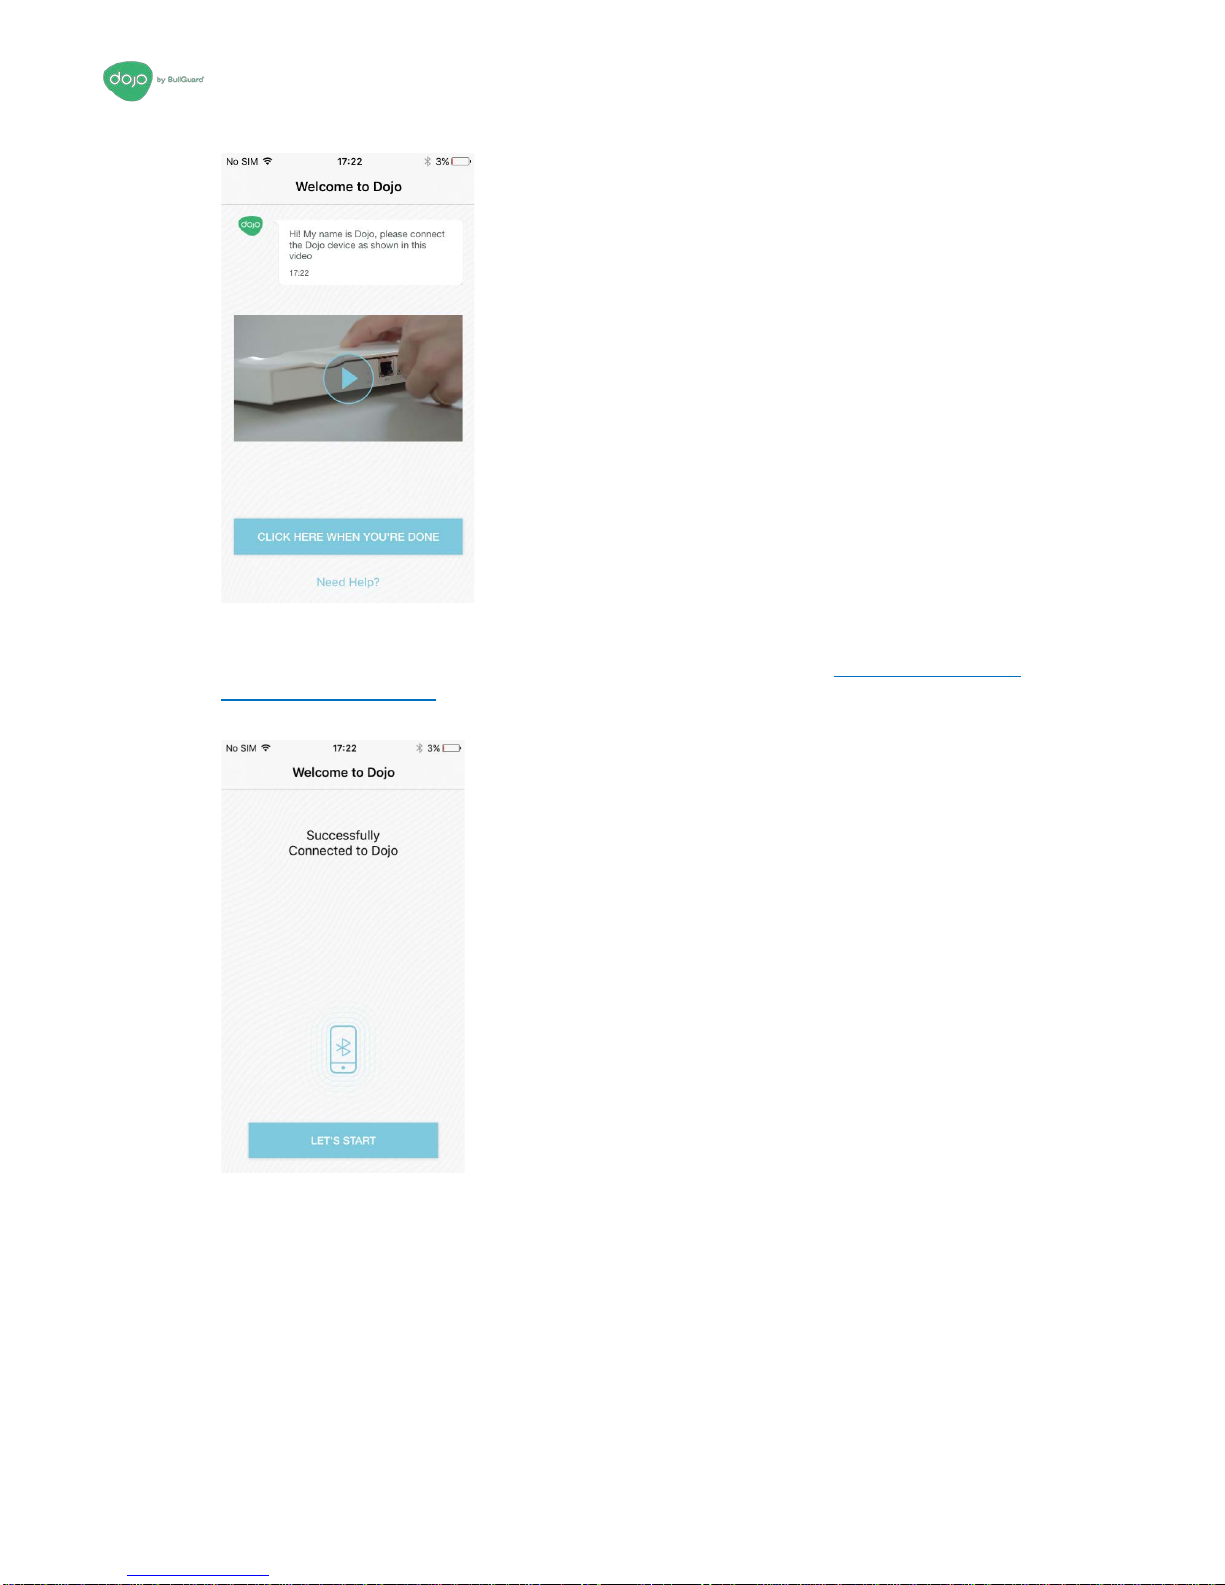
•Dojo Mobile App: The Dojo application is the main interface for using the service. It
provides an intuitive user interface that provides users with alerts if a security incident is
identified, as well as options on what action they can take if required. Using the app does
not require any technical knowledge.
The solution is built of technologies that provide comprehensive security and privacy
solution for all connected devices:
1. Automatic Device Discovery: Dojo automatically discovers all the devices
connected to the home router and assigns them to the appropriate security groups.
This enables Dojo’s Intelligent Platform to tailor a specific profile for each device as
well as enforce a security and privacy policy.
2. Smart Managed Firewall: Dojo has smart firewall capabilities, keeping the home
router and smart connected devices secured from any malicious activity and hacking
attempts.

- Further Information
4
3. Smart Managed IDPS: Dojo uses a managed enterprise-grade intrusion detection
and prevention system. Its smart IDPS is constantly updated with the latest threat
detection packages, specifically tailored to meet IoT related vulnerabilities and
threats.
4. Secure Web Proxy: Dojo uses a managed secure web proxy capable of interacting
with the other components, enabling secure and private web access to all the smart
devices connected to the user’s home router.
5. Smart Vulnerability Scanner: Dojo continuously and actively scans the home route
rand connected devices, detecting potential risks and vulnerabilities. The security
profile is updated with the outcome of this process and constantly enhances the
device protection.
6. Behavioral Analysis: Dojo constantly monitors and analyzes the home router and
connected devices. The Dojo Cybersecurity Engine is based on cutting-edge Artificial
Intelligence and Machine Learning technology using sophisticated algorithms for
anomaly detection and behavioral analysis.
Further Information
In addition to this guide, the following resources are available for information:
•A Quick Start Guide is included in the Dojo Pebble kit.
•FAQs on company website at: www.dojo.bullguard.com.
If you experience technical difficulties, contact the support team at: helpdesk@dojo-labs.com

Setup - Before You Start
5
Setup
This chapter describes how to set up the Dojo network, install the Dojo app, register to the
Dojo service and discover the devices in your network.
Before You Start
Before you begin to set up the Dojo Pebble, ensure that you have the following:
•Dojo Mobile App for smartphones.
Download via App Store or Google Play
Four AA batteries
•Router admin credentials
•Turned on your smartphone’s Bluetooth*
*Bluetooth connection is used only for first-time installation and for Pebble and Base Unit
communications.
Unpacking the Dojo Pebble Kit
The Dojo Pebble Kit includes the following items (see Figure 1):
•Dojo Pebble
•Dojo base unit
•Quick Start Guide
•Ethernet cable
•AC adapter
Figure 1: Dojo Pebble kit
Setting Up Dojo
There are four general steps in the setup:
Step 1: Connecting the Dojo Base Unit to the Router
Step 2: Downloading and Installing the Dojo App on your Smartphone
Step 3: Powering on the Dojo Pebble
Note: Please press for 3 seconds on the Pebble power button for it to turn on

Setup - Setting Up Dojo
6
Step 4: Registering a New Dojo User and Pairing the Dojo App with the Dojo Base Unit
Step 1: Connecting the Dojo Base Unit to the Router
There are two modes for connecting the Dojo base unit to the router, depending on the way
your home network is set up:
•Router Mode: When using your service-provider router only. The connections look like
this:
Figure 2: Router setup
•Bridge Mode: Currently unavailable.
When using both your service-provider router and an additional home router. The
connections look like this:
Figure 3: Bridge setup
It is important to understand which setup your network uses, both for the physical setup and
software configuration.

Setup - Setting Up Dojo
7
Router Mode
1. Plug the AC adapter into the Dojo Base Unit as shown in Figure 4, then connect the
adapter to a power outlet.
Figure 4: Router mode power connection
2. Plug one end of the Ethernet cable into the ETH2 port of the Dojo Base Unit, as
shown in Figure 5, then plug the other end into an available port in the router.
Figure 5: Router mode network connection
Wait a few minutes before you continue with the setup.
Bridge Mode
1. On the home router side, unplug the cable connecting the home router to the service-
provider router.
2. Plug one end of the Ethernet cable that was provided in the Dojo kit into the ETH2
port of the Dojo Base Unit. Plug the other end into the same port of the home router
from which you unplugged the cable in step 1. See Figure 6.
3. Plug the AC adapter into the Dojo Base Unit and connect the adapter to a power
outlet. See Figure 6.

Setup - Setting Up Dojo
8
Figure 6: Power and ETH2 connections
4. Plug the Ethernet cable that you unplugged in step 1 into the ETH1 port.
Wait a few minutes before you continue with the setup.
Step 2: Downloading and Installing the Dojo App on your Smartphone
To download the Dojo app, scan the QR code in the Quick Start Guide. You will be
transferred to the Google Play Store or Apple Store, depending on your device.
Step 3: Powering on the Dojo Pebble
1. Turn the Pebble over, so that the Dojo logo is visible.
2. Slide the battery cover off in the direction of the arrows, to expose the battery holder.
3. Insert four AA batteries into the battery holder. Ensure they are aligned properly.
Close the battery cover.
4. Turn on the Pebble: Press and hold down the button located next to the Dojo logo for
3 long seconds.
Red, Green, and Blue circles flash to indicate that the Pebble is powering on.
5. Turn the Pebble right-side up.
The hollow in the base unit is designed to hold the Pebble. Place it there, or anywhere
within five meters of the base unit.
Step 4: Registering a New Dojo User and Pairing the Dojo App with the Dojo Base Unit
Register your username and pair the Dojo app with the Dojo Base Unit.
As you perform the following procedures, make sure you are within five meters of the Dojo
Base Unit.
1. Open the Dojo app.

Setup - Setting Up Dojo
9
Figure 7: Push notifications screen
2. Select Allow push notifications to receive alerts from Dojo.
3. Select Register.
Figure 8: Registration screen
4. Select Register.

Setup - Setting Up Dojo
10
Figure 7: Welcome screen
If you have already performed the instructions in the previous step-Connecting the Dojo
Base Unit to the Router, on page 6, touch Click Here When You’re Done. Wait for the
app to display Successfully connected to Dojo.
Figure 10: Successful Dojo connection screen
5. Select Let’s Start to begin registration.

Setup - Setting Up Dojo
11
Figure 8: Personal details screen
6. Enter your first name, last name, email, and a password. Enter the password again in
the second field.
Note: The email is also used as your username and cannot be
changed once the Dojo is registered. Make sure you are satisfied with
the email address that you are going to enter.
7. iPhone users: To enable sign in with Touch-Id, select the Allows login with Touch
ID check box.
8. Touch Next to proceed.
Figure 9: Terms and policy screen
9. Touch Agree to continue with the setup.

Setup - Setting Up Dojo
12
Figure 10: Confirmation screen
10. Check your email for a message that contains a six-digit PIN code. Enter the PIN
code into this screen, then select Submit.
Figure 11: Account verification screen
11. Select Next.

Setup - Setting Up Dojo
13
Figure 15: Installation mode screen
In this screen, you may select either Router Mode or Bridge Mode, according to the
network configuration you set up earlier:
12. Select a mode, then touch Next.
Figure 12: Installation mode confirmation screen
13. Confirm or cancel your selection.

Setup - Setting Up Dojo
14
Figure 13: Home Router admin screen
14. In this screen, you may select one of the following options:
•Let Dojo set your router remotely. In this case, enter your home router admin
credentials.
OR
•Change the home router setting manually, on your own. In this case, you do not enter
the credentials, and instead, select the check box next to I’ll change my home
router settings manually.
Note: If you select this option, you must access your home router to
disable the DHCP server manually. You will need to restart it and any
Internet switch or bridge that you may have in your home network. For
instructions, see Disabling the DHCP Server Manually, on page 16.
15. Select Next to complete the setup.
16. If you chose to disable the DHCP manually, you will see the following screen:

Setup - Setting Up Dojo
15
Figure 18: DHCP configuration notification screen
Make the necessary configuration in your router, then touch Click Here When
You’re Done to proceed.
Figure 19: Dojo is analyzing network screen
17. Dojo begins to analyze your network. This process may take several minutes. When
Dojo completes the analysis, a notification will be sent to your smartphone and the
following screen is will be displayed.

Setup - Setting Up Dojo
16
Figure 14: Dojo is ready screen
In addition, the Pebble will blink with a Green light.
Figure 15: Pebble: ready state
Disabling the DHCP Server Manually
Perform the following procedures only if you chose the option I’ll change my home router
settings manually at the end of the process for registering a New Dojo User and Pairing the
Dojo App with the Dojo Base Unit, on page 8.
1. Log into the home router admin page.
2. Disable the DHCP server.
3. Apply the changes.
4. Restart the router.
Discovering Devices in Your Network
Once the Dojo Base Unit is activated and ready, it scans your home network to discover all
connected devices.

Using the Dojo App - Logging In
17
Note: For Dojo to detect and manage all your devices, ensure that you have restarted the
Internet switch, or other home router access points that you may have in your home network.
As devices are discovered, they are displayed in the My Devices tab. A push notification
about each one is also sent and an event is added to the chat.
Figure 21: My Devices tab
Note: Dojo places a new device in the Guests group until you move it into another group.
Using the Dojo App
This chapter will guide you on how to use the Dojo app.
Logging In
When you access the app, you are required to log in.
1. Select Login.

Using the Dojo App - Dojo Tab
18
Figure 16: Login screen
2. Enter your username and password.
3. Select Login.
The Dojo tab is displayed.
Dojo Tab
The Dojo tab is the main screen of the app and shows the recent activity relating to devices
in your network. The activity is communicated to you via the Dojo Bot in the form of chat.
There are three types of messages from Dojo:
•Red notifications: Alerts about threats to your network and requires you to take action.
•Orange notifications: Signifies that Dojo has handled a threat on your network. You are
not required to do anything.
•Green notifications: Dojo is continuously monitoring your network, and all well is done.
Your interactions with Dojo previewed as a message in a grey block:
My Devices Tab
In this tab, you can view all the devices that Dojo has identified in your home network.

Using the Dojo App - My Devices Tab
19
Figure 23: My Devices tab
Each device has the following markings:
•Device name
•Device type. For example, a router has the following icon: .
•Device activity. An active device is marked with three moving dots: ; an
inactive device is marked with three static dots.
•A blocked device is marked .
•A device that uses a static IP is marked .
Every detected device is located in one of four groups: Smart Home, Personal Devices,
Guests, and Unprotected. You can collapse and expand the devices in a group. In this
example, the first three groups are in a collapsed state:

Using the Dojo App - My Devices Tab
20
Figure 24: Collapsed device group
•By touching a specific device, you can see detailed information about it (at the top of the
screen), as well as the recent Dojo monitoring activity relating to the device (at the
bottom of the screen).
Figure 17: Device details
•The Edit button lets you edit details of the device so that they are more easily
understood or recognized.
Device Groups
Devices that have been discovered by Dojo are sorted into groups.
Each group has particular characteristics and capabilities. By placing a device in a particular
group, you define how it interacts with others in that group, how it accesses the Internet, and
how the Internet interacts with it.
The following groups are available:
Smart Home Group
The following are the characteristics and behaviors of the devices in the Smart Home group:
This manual suits for next models
1
Table of contents