Dolby Laboratories DP590 User manual

Dolby Object Authoring Tool DP590
Quick-start guide
Preliminary 10 May 2017

Copyright
©2017 Dolby Laboratories. All rights reserved.
Dolby Laboratories, Inc.
1275 Market Street
San Francisco, CA 94103-1410 USA
Telephone 415-558-0200
Fax 415-863-1373
http://www.dolby.com
Trademarks
Dolby and the double-D symbol are registered trademarks of Dolby Laboratories.
The following are trademarks of Dolby Laboratories:
Dialogue Intelligence™
Dolby®
Dolby Advanced Audio™
Dolby Atmos®
Dolby Audio™
Dolby Cinema™
Dolby Digital Plus™
Dolby Digital Plus Advanced Audio™
Dolby Digital Plus Home Theater™
Dolby Home Theater®
Dolby Theatre®
Dolby Vision™
Dolby Voice®
Feel Every Dimension™
Feel Every Dimension in Dolby™
Feel Every Dimension in Dolby Atmos™
MLP Lossless™
Pro Logic®
Surround EX™
All other trademarks remain the property of their respective owners.
Patents
This product is protected by one or more patents in the United States and elsewhere. For
more information, including a specific list of patents protecting this product, please visit
http://www.dolby.com/patents.
Disclaimer of warranties
Equipment manufactured by Dolby Laboratories is warranted against defects in
materials and workmanship for a period of one year from the date of purchase. There
are no other express or implied warranties and no warranty of merchantability or fitness
for a particular purpose, or of noninfringement of third-party rights (including, but not
limited to, copyright and patent rights).
Limitation of liability
It is understood and agreed that Dolby Laboratories' liability, whether in contract, in
tort, under any warranty, in negligence, or otherwise, shall not exceed the cost of repair
or replacement of the defective components or accused infringing devices, and under no
circumstances shall Dolby Laboratories be liable for incidental, special, direct, indirect,

or consequential damages (including, but not limited to, damage to software or
recorded audio or visual material), cost of defense, or loss of use, revenue, or profit,
even if Dolby Laboratories or its agents have been advised, orally or in writing, of the
possibility of such damages.
Regulatory notices
United States (FCC)
Note: This equipment has been tested and found to comply with the limits for a Class A
digital device, pursuant to Part 15 of the FCC Rules. These limits are designed to provide
reasonable protection against harmful interference when the equipment is operated in a
commercial environment. This equipment generates, uses, and can radiate radio
frequency energy and, if not installed and used in accordance with this instruction
manual, may cause harmful interference to radio communications. Operation of this
equipment in a residential area is likely to cause harmful interference in which case the
user will be required to correct the interference at his own expense.
Canada
This Class A digital apparatus complies with Canadian ICES003.
Avertissement: Cet appareil de la classe A est conforme à la norme NBM003 du Canada.

Contents
1 Introduction to Dolby Object Authoring Tool DP590 documentation 6
1.1 Using this information 6
1.2 Speaker name abbreviations 7
1.3 Questions and feedback 7
1.4 Branding guidelines 7
2 Overview of Dolby Object Authoring Tool DP590 8
2.1 Bill of materials 8
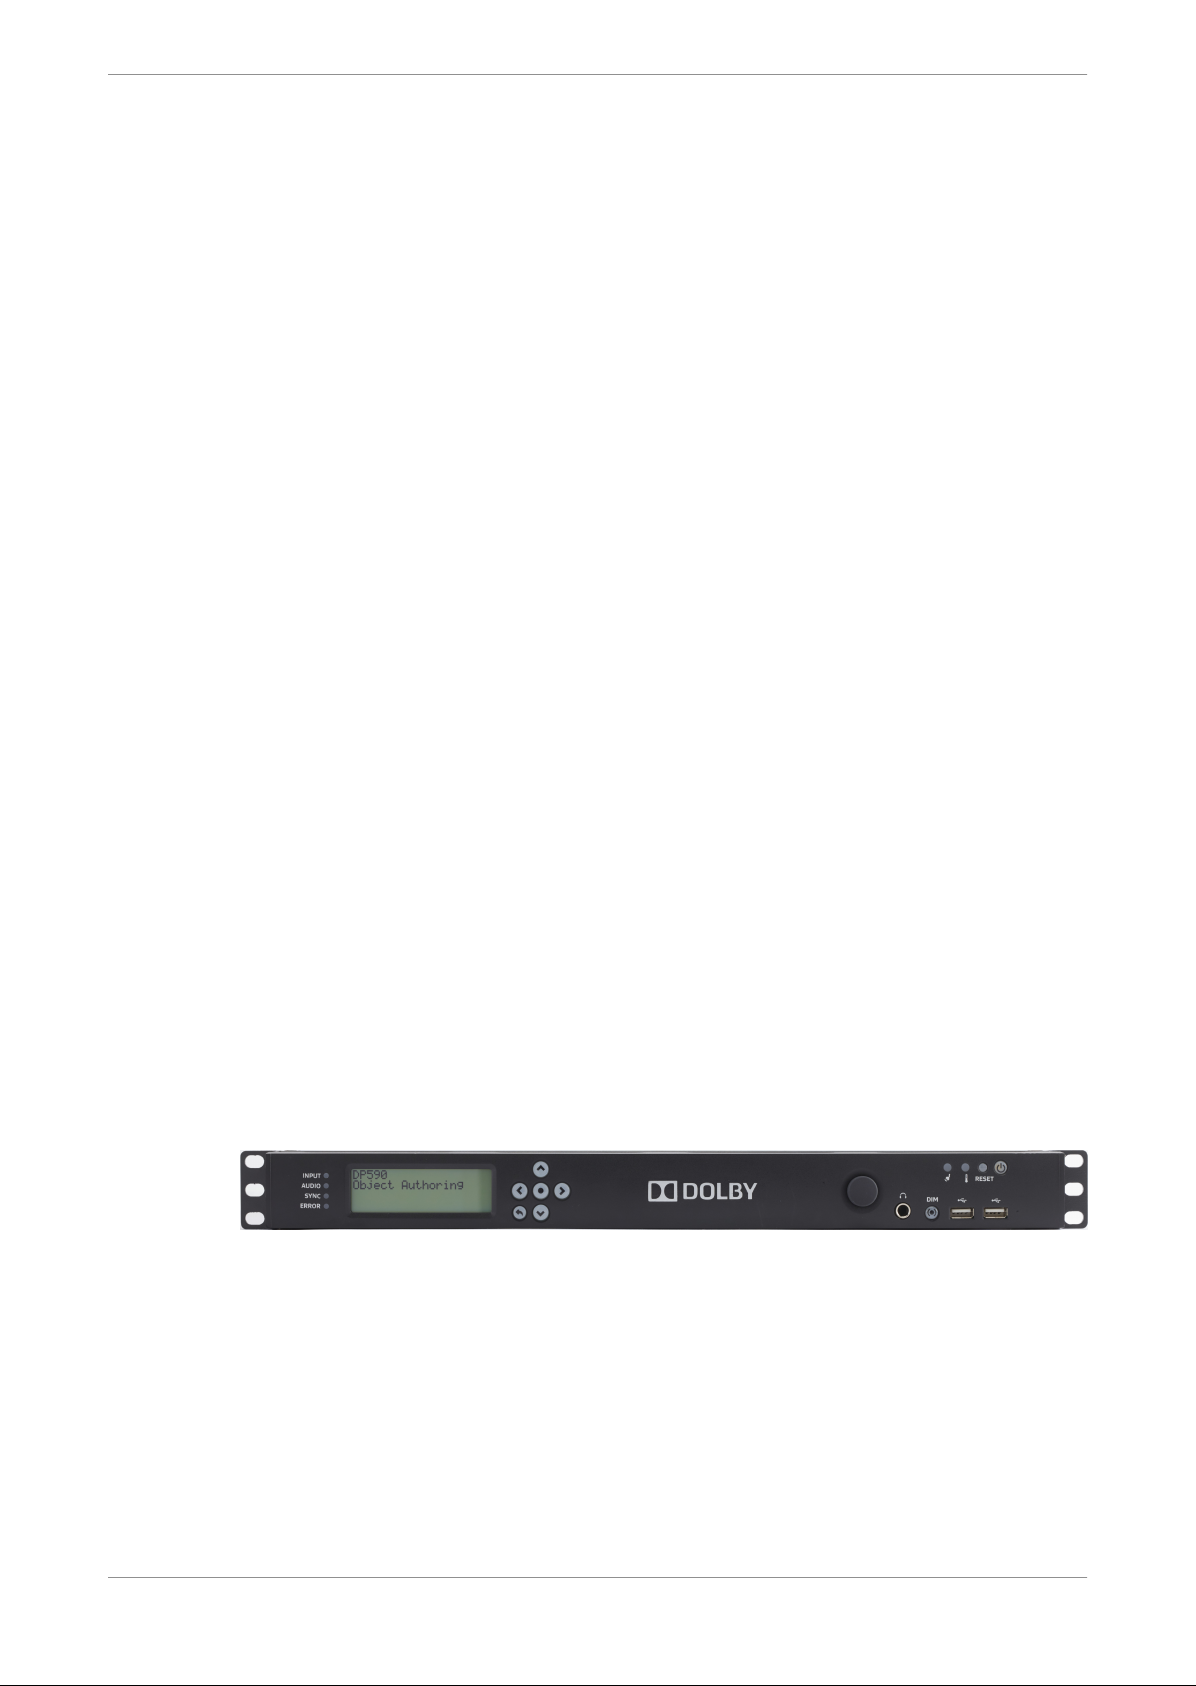
2.2 DP590 front-panel components 8
2.3 DP590 rear-panel components 9
2.3.1 DP590 rear-panel component descriptions 10
2.4 Clock source priority 10
2.5 Specifications and requirements 11
2.5.1 Environmental specifications 11
2.5.2 Power requirements 11
2.5.3 Dimensions 11
3 Installation of Dolby Object Authoring Tool DP590 12
3.1 Installing hardware 12
3.2 Configuring network settings 12
3.2.1 Configuring command port 13
3.2.2 Checking IP address 13
3.3 Downloading and installing DP590 client 13
3.4 Default session settings 14
4 Dolby Object Authoring Tool DP590 operation 16
4.1 Creating new or opening existing session 16
4.2 Saving session 16
4.3 Adding beds and dynamic objects 17
4.4 Modifying input channel routing 18
4.5 Enabling beds and dynamic objects for presentations 19
4.5.1 Setting bed parameters 19
4.5.2 Setting dynamic object parameters 20
4.5.3 Creating target device configurations 21
4.6 Setting production renderers 22
4.7 GPIO configuration 23
4.7.1 Configuring GPIO 23
4.8 Monitoring local output 23
4.9 Monitoring loudness value 24
4.10 Monitoring 5.1-channel downmix 24
4.11 Monitoring dynamic range control 25
4.12 Monitoring audio meters 26
4.13 Connecting to DP591 26
4.14 Sending metadata to DP591 26
5 Error log 28
5.1 Opening the error log window 28
5.2 Error log browsing options 28
5.3 Saving client log 29
5.4 Saving system logs 29
Contents
Dolby Object Authoring Tool DP590 quick-start guide
Preliminary 10 May 2017 4

1 Introduction to Dolby Object
Authoring Tool DP590
documentation
The Dolby Object Authoring Tool DP590 enables immersive audio for live TV broadcasts, and
for live streaming to set-top boxes and mobile applications.
•Using this information
•Speaker name abbreviations
•Questions and feedback
•Branding guidelines
The DP590 is a metadata authoring and emulation tool to create immersive broadcasts. It
enables a broadcast audio mixer to create an immersive environment and experience for fans
of live events, especially for sports. The use of dynamic objects in broadcast and streaming
transmissions heightens the viewer’s sense of involvement and intensifies the connection to
the game.
The unit receives PCM audio, creates presentations of dynamic objects, enables local
monitoring of the created experience, and then transmits metadata information about those
dynamic objects and presentations to the next link in the transmission chain, the Dolby
Broadcast Processor DP591, a Dolby Audio encoder.
The DP590 includes these features:
•Support for stereo, 5.1, 5.1.2, and 5.1.4 speaker configurations
•Ability to render a selected presentation and monitor mode to a MADI output
•Ability to ingest 64 out of the 64 PCM channels over a MADI input, and to render the
created presentations (of up to 16 channels per presentation) to the MADI output
•Ability to send metadata to other units in the system
•A sound-mapping display for configuration of beds and dynamic objects, and assigning
them to presentations representing different audio environments
•Ability to provide metering information on inputs and outputs
1.1 Using this information
This section references specific chapter topics.
Use these topics to locate specific information about the functionality of the Dolby Object
Authoring Tool DP590:
•
Product overview
summarizes the supported containers, content, and available tools for
the DP590.
•
Installation
covers the installation process for the DP590.
•
DP590 operation
covers most of the important functions of the DP590, and provides
instructions for completing associated tasks.
Introduction to Dolby Object Authoring Tool DP590 documentation
Dolby Object Authoring Tool DP590 quick-start guide
Preliminary 10 May 2017 6

1.2 Speaker name abbreviations
Speaker names used for DP590 output.
This table lists the names of speakers that receive output, as well as their abbreviations.
Table 1: Speaker abbreviations
Speaker name Abbreviation
Left L
Right R
Center C
Low-Frequency Effects LFE
Left Surround LS
Right Surround RS
Left Front Height LFH
Right Front Height RFH
Left Rear Height LRH
Right Rear Height RRH
1.3 Questions and feedback
Support services are available to address any questions about this hardware product or its
documentation.
For any questions regarding the described technology, contact
If you have comments or feedback about this information set, send us an email at
1.4 Branding guidelines
The branding guidelines provide additional information to assist you in designing your
product.
•
Dolby Audio brand guidelines
, Dolby Laboratories, available from http://
www.dolbysecure.com.
Introduction to Dolby Object Authoring Tool DP590 documentation
Dolby Object Authoring Tool DP590 quick-start guide
Preliminary 10 May 2017 7

2 Overview of Dolby Object
Authoring Tool DP590
The Dolby Object Authoring Tool DP590 adds new audio dimensions to live broadcast.
•Bill of materials
•DP590 front-panel components
•DP590 rear-panel components
•Clock source priority
•Specifications and requirements
The Dolby Object Authoring Tool DP590 is a part of a multiple-unit system that includes the
Dolby Audio Encoder DP591 and Dolby Reference Decoder DP580. The products work
together to enhance the audio experience of the viewer during live TV broadcasts. The DP590
creates user-defined presentations from a combination of beds and dynamic objects along
with positional and gain metadata. The DP591 receives dynamic metadata from the DP590,
and encodes the metadata with source PCM signals as usable audio signals for other
components in the broadcast stream. The DP580 also decodes and renders the signal using
Dolby technologies as appropriate for reception by a TV or set-top box.
2.1 Bill of materials
These items are included in the box for the DP590.
•Dolby Object Authoring Tool DP590
•Two power cables
2.2 DP590 front-panel components
The front-panel components of the DP590 provide control and informational functions.
The front panel includes the components shown in this image.
Figure 1: DP590 front panel
The DP590 front-panel components are as follows:
•Input LED:
•Green indicates that there is a supported signal available at the MADI input.
•Red indicates that either the incoming signal is not supported or there is no cable
connected to the MADI input.
•Audio LED:
•Green indicates that the audio processing is in progress.
•Off indicates that no audio processing is in progress.
Overview of Dolby Object Authoring Tool DP590
Dolby Object Authoring Tool DP590 quick-start guide
Preliminary 10 May 2017 8

•Sync LED:
•Green indicates that the unit is synchronized with a source of the highest available
priority.
•Yellow indicates that the unit is synchronized with a non-highest-priority source.
•Off indicates that the unit is not synchronized with any source.
•Error LED (nonfunctional)
•User-control screen
•Navigation keys
•Volume control knob (nonfunctional)
•Headphone jack
•Dim button (nonfunctional)
•Power failure indicator
•Over-temperature indicator
•Reset button
•Power button
•Two Universal Serial Bus (USB) 2.0 ports
2.3 DP590 rear-panel components
The rear-panel components of the DP590 provide several types of inputs and outputs.
The rear panel includes the components shown in this image.
Figure 2: DP590 rear panel
The DP590 rear-panel components are as follows:
•Two AC power connectors
•MADI or AES IN port
•Gigabit Ethernet port (not in use)
•MADI OUT port
•Four AES OUT ports
•Video IN port
•Two serial digital interface (SDI) IN ports
•Two SDI OUT ports
•Four USB 2.0 ports
•Gigabit Ethernet port (COMMAND)
•Gigabit Ethernet port (MEDIA; not in use)
•VGA video port
•Serial port (not in use)
Overview of Dolby Object Authoring Tool DP590
Dolby Object Authoring Tool DP590 quick-start guide
Preliminary 10 May 2017 9

2.3.1 DP590 rear-panel component descriptions
This section provides details on the rear-panel components supported by the DP590.
MADI in
Receives PCM signals. This input is an unbalanced 75Ωfemale BNC connector per
AES10-2008.
MADI out
Outputs PCM signals.
SDI in
Only as clock source.
Video in
Only as clock source (based on a voltage reference [VREF] signal).
Command port (Gigabit Ethernet)
Connects a network to administer the unit through a PC web-based user interface.
2.4 Clock source priority
Clock sources are prioritized in a preprogrammed order.
The clock reference source for DP590 is selected automatically, based on a preprogrammed
priority scheme and the availability of the particular sources. The priority is:
1. SDI
2. VREF
3. MADI
The highest available input becomes the clock source. For example, if the SDI clock source is
not available, then the DP590 attempts to sync with VREF, and so on.
In case the reference source becomes asynchronous with the input source, then the DP590
reverts to lock on to the input.
Characteristics of VREF signal as clock source
The VREF (video reference) signal is used only as a clock source in the DP590. VREF connects
through the video-in port. In this case, the supported sync types are CVBS, Y (luma) from Y/C
and YPbPr, and G (sync on green) from GBR with either bilevel or trilevel sync, as specified in
these video standards:
•Composite video (CVBS) and S-Video (Y/C):
•SDTV: SMPTE 170M (NTSC), ITU-R BT.470 (PAL)
•Component video (YPbPr/GBR):
•SDTV: SMPTE 125M, SMPTE 267M, ITU-R BT.601 (480i, 576i)
•EDTV: ITU-R BT.1358 (480P, 576p)
•HDTV: SMPTE 296M (720p), SMPTE 274M (1080i/p), SMPTE RP 211 (1080PsF)
RGB formats that conform to VESA standards used for PC graphics are not supported.
Overview of Dolby Object Authoring Tool DP590
Dolby Object Authoring Tool DP590 quick-start guide
Preliminary 10 May 2017 10

2.5 Specifications and requirements
Familiarity with the dimensions, environmental specifications, and power requirements of
the DP590 promotes better operational success. We recommend that you review this
information prior to first use of the component.
2.5.1 Environmental specifications
These are the temperature and humidity operating ranges for the DP590.
The Dolby Object Authoring Tool DP590:
•Operates at temperatures between 10º and 35ºC
•Supports operation with relative noncondensing humidity levels between 5% and 90%
2.5.2 Power requirements
These are the DP590 power minimums and maximums.
The DP590 operates with a power input of between 100 and 240 VAC, 50–60 Hz, and 350 W.
2.5.3 Dimensions
These are the physical dimensions of the DP590.
•Height: 44 mm (1.75 in)
•Width: 483 mm (19 in)
•Depth: 394 mm (15.5 in)
•Weight: 6.5 kg (14.5 lb)
Overview of Dolby Object Authoring Tool DP590
Dolby Object Authoring Tool DP590 quick-start guide
Preliminary 10 May 2017 11

3 Installation of Dolby Object
Authoring Tool DP590
This section provides procedures for installing the Dolby Object Authoring Tool DP590.
•Installing hardware
•Configuring network settings
•Downloading and installing DP590 client
•Default session settings
3.1 Installing hardware
Install the DP590 using the components included with the unit, plus any other equipment
you require for your intended use. After the unit is installed, proceed to configuration and
full operation.
Procedure
1. Rack mount the DP590 in a 1-U rackspace. The DP590 measures 44 × 483 × 394 mm (1.75
× 19 × 15.5 inches), so the rack must be at least 400 mm (16 inches) deep.
Caution: To ensure proper ventilation, do not block the front-panel ventilation area
on the top surface at the front of the machine.
2. Connect the provided power cable to the AC connector.
3. Connect your audio and video inputs and outputs.
4. Connect an Ethernet cable from your network to the Command port.
5. Turn on the device by pressing the power button.
3.2 Configuring network settings
The DP590 uses a COMMAND port network connection; the port can be configured using
front-panel navigation keys.
About this task
The port connects to your management network through a client application. By default, the
COMMAND port is set to Dynamic Host Configuration Protocol. Configure the port using the
front-panel navigation keys shown in this figure.
Figure 3: Front-panel navigation keys
Installation of Dolby Object Authoring Tool DP590
Dolby Object Authoring Tool DP590 quick-start guide
Preliminary 10 May 2017 12

3.2.1 Configuring command port
The DP590 uses a COMMAND port network connection.
Procedure
1. In the front panel-navigation key set, press the escape key.
The DP590 menu is displayed.
2. Go to DP590 Settings > System Settings > IP Settings > Command Interface.
3. Select Static IP Mode or DHCP Mode, depending on the network:
•For Static IP Mode, configure the IP address, mask (MSK), and gateway (GWY), then
select Apply.
Note: Do not use the 192.168.1.2 IP address. It is used internally by the DP590.
•For DHCP Mode, select Apply.
3.2.2 Checking IP address
Check the IP address of your DP590 to be able to connect through your web browser or to
the DP590 software client.
About this task
You can check the IP address in the DP590 user-control screen.
Procedure
1. In the front-panel navigation key set, press the escape key.
The DP590 menu is displayed.
2. Use the left or right arrow key to navigate to the CMD Interface screen.
The CMD Interface screen displays the IP, mask (displayed as MSK) and gateway (GWY)
information.
3.3 Downloading and installing DP590 client
Install the DP590 client to control the unit functions.
Prerequisites
To install the DP590 client software, the operating system must be Microsoft Windows 7 or
later.
You must install the Microsoft Visual C++ 2010 Redistributable Package prior to installing the
DP590 client application. Use these links to download the package:
•For the 32-bit version: https://www.microsoft.com/en-us/download/details.aspx?id=5555
•For the 64-bit version: https://www.microsoft.com/en-us/download/details.aspx?
id=14632
Installation of Dolby Object Authoring Tool DP590
Dolby Object Authoring Tool DP590 quick-start guide
Preliminary 10 May 2017 13

Procedure
1. Open a web browser, and type the IP address of your DP590 server (for example, http://
192.168.1.112).
2. Download the .zip file to a convenient location on your hard disk.
3. Unzip the contents of the file to the same location.
4. Locate the dp590-client.exe file in the extraction folder, and then double-click the file.
The DP590 graphical user interface (GUI) launches with an option to connect to a DP590
server or work offline.
5. Ensure that the displayed IP address of your DP590 is correct. If not, correct the address,
and then click Connect.
The application connects to the DP590 server and reads the session that is currently
available on it. If you are using the DP590 server for the first time, a default session is
read. You can save that session as a backup for future use.
Related information
Default session settings on page 14
Saving session on page 16
Creating new or opening existing session on page 16
3.4 Default session settings
The DP590 server is delivered with default session settings that include basic object and
presentation settings.
Table 2: Object settings
Object type Object label Object information MADI
input
channel
Bed 5.1 M&E Six channels for background music and effects 1 ‑ 6
Dynamic LFH Object representing Left Front Height speaker 7
Dynamic RFH Object representing Right Front Height speaker 8
Dynamic LRH Object representing Left Rear Height speaker 9
Dynamic RRH Object representing Right Rear Height speaker 10
Dynamic Commentator 1 Object representing commentator's voice located in
the Center speaker 11
Table 3: Presentation settings
Presentation name Presentation information
Immersive •5.1.4 presentation with enabled commentator 1 object.
•The same configuration for every target device (stereo, 5.1, and
Dolby Atmos).
•The presentation is enabled in the bitstream.
Immersive clean •5.1.4 presentation with disabled commentator 1 object.
•The same configuration for every target device (stereo, 5.1, and
Dolby Atmos).
•The presentation is enabled in the bitstream.
Installation of Dolby Object Authoring Tool DP590
Dolby Object Authoring Tool DP590 quick-start guide
Preliminary 10 May 2017 14

4 Dolby Object Authoring Tool
DP590 operation
Create bed and dynamic objects, define their settings, and save presentations for reuse.
•Creating new or opening existing session
•Saving session
•Adding beds and dynamic objects
•Modifying input channel routing
•Enabling beds and dynamic objects for presentations
•Setting production renderers
•GPIO configuration
•Monitoring local output
•Monitoring loudness value
•Monitoring 5.1-channel downmix
•Monitoring dynamic range control
•Monitoring audio meters
•Connecting to DP591
•Sending metadata to DP591
Rendering of dynamic objects for broadcast is available in a range of output configurations
and combinations with the DP590. The unit has the capacity to create presentations of up to
16 active objects using a combination of bed (grouped) and dynamic objects that enable a
high level of immersive audio for live broadcast. This chapter provides instructions for using
the unique functions of the unit.
4.1 Creating new or opening existing session
Begin the authoring by creating a new or opening an existing session file.
About this task
A session file is a collection of presentations with defined beds and dynamic objects used
during a broadcast. You can create a new or open an existing session.
In an offline mode, a new session opens automatically after DP590 client launches. In an
online mode, the client reads the session that is currently available on the DP590 server.
•To create a new session, in the File menu, click New Session (or press Ctrl+N).
•To open an existing session, in the File menu, click Open Session... (or press Ctrl+O) and
browse to the desired file.
4.2 Saving session
If you want the configuration you have created to be available for reuse, you can save it as a
session file with a unique name.
Dolby Object Authoring Tool DP590 operation
Dolby Object Authoring Tool DP590 quick-start guide
Preliminary 10 May 2017 16

Procedure
1. In the File menu, select Save session.
The Save session window displays.
2. Navigate to a location where you want to save the file, enter a unique file name, and then
click Save.
The configuration is saved.
4.3 Adding beds and dynamic objects
Create a required list of beds and dynamic objects. The beds and dynamic objects are
automatically routed to free consecutive MADI input channels, and they are shared across all
available presentations.
About this task
There are the following requirements for the list of beds and dynamic objects:
•A maximum six beds is allowed.
•A maximum 64 occupied input channels is allowed. Note that beds and objects occupy
different numbers of channels depending on the type, as presented here:
Bed type or object Number of occupied channels
Dynamic 1
Bed 2.0 2
Bed 5.1 6
Bed 5.1.2 8
Bed 5.1.4 10
Procedure
1. Click the Add Bed button in the creation window, and select the type of bed you want to
create.
Note: Double-click the bed label to change its name. Press Enter to confirm the
change.
Note: Only a 5.1 bed is supported across the entire broadcast chain, and a 2.0 bed is
supported only by the Dolby Digital Plus with Dolby Atmos content encoder. All other
bed configurations are supported only for DP590 rendered output monitoring.
2. Click the Dynamic button in the creation window to add a dynamic object.
Note: Double-click the dynamic object label to change its name. Press Enter to
confirm the change.
The red icon to the left of the bed or dynamic object indicates that it is not mapped to a
MADI channel.
3. Repeat steps 1 and 2 to add additional beds and/or dynamic objects as desired.
Results
The beds and dynamic objects are automatically routed to free consecutive MADI input
channels, and they can be enabled for presentations.
Related information
Modifying input channel routing on page 18
Dolby Object Authoring Tool DP590 operation
Dolby Object Authoring Tool DP590 quick-start guide
Preliminary 10 May 2017 17

Enabling beds and dynamic objects for presentations on page 19
4.4 Modifying input channel routing
Change the MADI assignments to match your input channel configuration.
Procedure
1. From the Settings menu, select Routing.
The input channel routing window lists all created beds and dynamic objects and their
current assignment to 64 available MADI input channels.
Figure 4: Input channel routing window
2. Drag and drop any bed or dynamic object into the channels you want to assign it to.
Different beds and dynamic object occupy different numbers of channels.
Bed type or object Number of occupied channels
Dynamic 1
Bed 2.0 2
Bed 5.1 6
Bed 5.1.2 8
Bed 5.1.4 10
Caution: Dropping a bed or dynamic object into an already occupied channels cancels
the previous assignment. Consequently, the red icon appears on the left side of the
bed or dynamic object name. Modify the routing so that every bed and dynamic
object is correctly assigned. The correct assignment is marked with a green icon on
the left side of the bed or dynamic object name.
3. Click Close to close the input channel routing window.
Results
The MADI routing matches the custom input configuration, and the beds and dynamic
objects are ready to be enabled for presentations.
Related information
Enabling beds and dynamic objects for presentations on page 19
Dolby Object Authoring Tool DP590 operation
Dolby Object Authoring Tool DP590 quick-start guide
Preliminary 10 May 2017 18

4.5 Enabling beds and dynamic objects for
presentations
Enable beds and dynamic objects for selected presentations.
About this task
There are the following requirements for the list of enabled beds and dynamic objects:
•A maximum 62 occupied channels are allowed for enabled beds and dynamic objects.
Note that beds and objects occupy different numbers of channels depending on the type,
as presented here:
Bed type or object Number of occupied channels
Dynamic 1
Bed 2.0 2
Bed 5.1 6
Bed 5.1.2 8
Bed 5.1.4 10
Procedure
1. Select the presentation you want to enable bed and dynamic objects for.
Note: Double-click the presentation tab to change its name. Press Enter to confirm
the change.
2. Check the Enable box for the bed and dynamic objects you want to activate.
Note: Double-click the bed or dynamic object label to change its name. Press Enter to
confirm the change.
3. Click Save to save the presentation configuration.
4. Repeat the procedure for each presentation you want to configure.
Results
The beds and dynamic objects are enabled and they are ready for configuration.
Related information
Setting bed parameters on page 19
Setting dynamic object parameters on page 20
4.5.1 Setting bed parameters
Adjust the channel gain levels of the selected bed for monitoring.
Prerequisites
Ensure the bed is enabled.
Procedure
1. Select the bed to which you want to adjust the channel gain levels.
2. Set the gain levels of individual channels to change the mix.
Dolby Object Authoring Tool DP590 operation
Dolby Object Authoring Tool DP590 quick-start guide
Preliminary 10 May 2017 19

Figure 5: Bed parameters
Note: Note that the new gain levels are audible only when monitoring. However, use
the gain of the Lchannel only to set the overall gain used in the DP591 encoding
stage.
3. Click Save to save the changes.
Results
The channel gain levels of the selected bed are changed for monitoring.
4.5.2 Setting dynamic object parameters
You can set a range of parameters for individual dynamic objects, including gain, category,
and field placement parameters.
Procedure
1. Select a presentation. Settings for dynamic objects will apply only to those in the chosen
presentation.
2. Ensure that the dynamic object is enabled and selected.
3. Set the gain on the channel to which a dynamic object is assigned using any of these
methods:
a) Double-click in the individual channel Gain box to highlight the numeral, and then
enter any value between -49 and +15 dB.
The -49 dB setting entirely mutes an object.
b) Click the up/down arrows within the Gain box to change the value in increments of 1
dB. You can hold an arrow to scroll through the values at a faster pace.
Dolby Object Authoring Tool DP590 operation
Dolby Object Authoring Tool DP590 quick-start guide
Preliminary 10 May 2017 20
Other manuals for DP590
1
Table of contents