DOM ELS-P-PG1 User manual

Operating instructions ELS-P-PG1
The right to make technical changes is reserved Last amended: Juni 2005
1
Device summary
Device view left side Device view top
F1 F2 F3 F4
LOCKING PLAN
EVENTS
SYSTEM DATA
OPTIONS
F1
F4
F3
F2
ÀÀ
ÁÁ
ÂÂ
ÃÃ
ÄÄ
ÅÅ
ÆÆ
ÇÇ

Operating instructions ELS-P-PG1
The right to make technical changes is reserved Last amended: Juni 2005
2
Explanatory notes
Operating elements and their function
ÀWrite/read device for data transfer to/from the ELS read device
Read devices all readers available in the ELS system
ÁLCD display for menu functions
ÂFunction keys
ÃDOM key (input key below the DOM logo)
ÄRead device for reading in locking media below the DOM logo
ÅLED for displaying the charge state (left)
ÆSub-D socket for connecting the programming cable (PC)
ÇCable for connecting the battery charger
Charge indicator Å
Display Function/state
LED flashes green Batteries are charged
LED lit on green Charging process completed, batteries are
charged to optimum performance value
LED flashes red No batteries are in the device. The device
can however be operated stationary using
the power supply unit.
LED continuously on
red
There is a charge error. Extract the plug
from the socket and check whether the
batteries have been inserted in the correct
sequence. Then reinsert the plug.
The factory-set charge voltage (12V) gives a charge period of approx. 3 hours to optimum charged state.
Special display symbols and their function
Symbol Function
↓↓
Downward arrow: Enables you to run down the screen (forwards). Use the function key
marked with the appropriate symbol.
↑↑
Upward arrow: Enables you to run up the screen (backwards). Use the function key
marked with the appropriate symbol
→→
Sideways arrow: Enables you to run right across the screen or to select a symbol in the
direction of the arrow. Use the function key marked with the appropriate symbol. NB:
switching back is not possible. If you go too far, you have to repeat all the successive
steps up to the symbol required.
ABR
Close or end a function. Use the function key marked with the appropriate symbol,
always F4.
A
Authorise. Use the function key marked with the appropriate symbol, always F3
W
Repeat. Use the function key marked with the appropriate symbol, always F3.

Operating instructions ELS-P-PG1
The right to make technical changes is reserved Last amended: Juni 2005
3
Contents
Device summary _____________________________________________________________________1
Explanatory notes____________________________________________________________________2
Operating elements and their function ___________________________________________________2
Charge indicator ÅÅ __________________________________________________________________2
Special display symbols and their function ________________________________________________2
Contents____________________________________________________________________________3
Introduction_________________________________________________________________________4
Safety instructions ___________________________________________________________________4
Starting operation____________________________________________________________________5
Brief instructions ____________________________________________________________________5
Summary ___________________________________________________________________________6
Work sequence using the PG1 _________________________________________________________6
Menu structure ELS-P-PG1____________________________________________________________6
Summary of PG1 functions ____________________________________________________________7
Apply programming device ____________________________________________________________8
Brief instructions ____________________________________________________________________8
Working with PG1 and the ELS software________________________________________________10
Brief instructions ___________________________________________________________________10
Description of new ELS devices _______________________________________________________12
Setting up time zones _______________________________________________________________13
Setting up public holidays ____________________________________________________________15
Reading locking media into the database ________________________________________________16
Granting of access rights (time and place authorisation) ____________________________________18
Programming the PG1_______________________________________________________________18
Programming of authorisations _______________________________________________________20
Brief instructions ___________________________________________________________________20
Programming authorisations, continued _________________________________________________21
Manual reading in of new locking media________________________________________________22
Brief instructions ___________________________________________________________________22
Manual authorisation of locking media _________________________________________________23
Brief instructions ___________________________________________________________________23
Technical data ELS-P-PG1____________________________________________________________24

Operating instructions ELS-P-PG1
The right to make technical changes is reserved Last amended: Juni 2005
4
Introduction
The ELS-P-PG1 is a cordless programming device for contact-free communication with DOM ELS
equipment, with many practical functions. This device has been developed to the latest state of the art.
The operating instructions will assist you in your use of the PG1.
PG1 enables you to store up to 125 DOM ELS devices with a total of 500 people and their locations and
time authorisations, to transport and to transmit to the devices in maximum security.
The device has batteries and can therefore be used at the doors, without any cabling. By integrated charge
circuitry and the associated power supply unit, the batteries remain in an economic condition and at
optimum charge. This means that the PG1 is always ready for service for mobile use at doors.
You can simply read ELS closing media without contact into the device and can cancel them with just a few
actions. Immediately after reading in, the associated PC software makes screen templates available to you
for personalisation. With Explorer-compatible programming, you will find yourself working easily in a
familiar environment. Before you work with PG1, you should first read the operating instructions and then
use your equipment accordingly. Take your time. Try all the functions out once so that you are familiar with
all the features and know your equipment and learn how to use it.
Preliminary note:
In these instructions the term ELS devices is used for the ELS-999 cylinder and ELS-MFS control units in
combination with wall or fitting readers. Differences in use are described specific to each device.
Safety instructions
The device should not be subjected to high levels of moisture. Protect the device against rain when you are
programming in the open air.
Attention
Only use the correct nickel-cadmium (Ni-Cd) batteries
•There are 3 rechargeable Ni-Cd batteries supplied with the PG1, type AA. (Mignon cells). Only use this
type of batteries as replacements or in reserve.
•No other types of battery or non-rechargeable batteries must be used. This could lead to damage to the
device or malfunction.
•DOM Sicherheitstechnik CANNOT ASSUME ANY LIABILITY under such circumstances!
•Do not immerse batteries in water
•Do not throw batteries into fire
•The batteries become warm during the charging process. This is a normal and non-dangerous process.
•Do not use any other charging devices
•Changing the adapter will result in damage to the device, only use as described.
•Batteries must not be disposed of with domestic waste or in reclaimable material containers. Please only
dispose of as permitted!

Operating instructions ELS-P-PG1
The right to make technical changes is reserved Last amended: Juni 2005
5
Starting operation
Instructions:
The programming device switches off automatically when it has not been used for 10 minutes. There is no
separate on-off switch.
Brief instructions
1. Insert power supply unit plug into connection
socketÇ
2. Insert plug-in power supply unit into 230 V
socket
3. Switch device on using the DOM keyÃ
4. Time control and correction, if required
The device is ready for operation when delivered. As the battery charge state cannot be assessed, you
should first use the power supply unit.
The power supply unit is set at the factory to the correct voltage value (12V), the connected plug is set for
the device socket in the PG1 and the operating mode required for this device.
Plug polarity: -+
Note:
This DC plug must not be twisted onto the corresponding mating component of the power supply unit lead.
The device may be damaged in this way.
Insert the mains plug of the power supply unit into a socket outlet with earthing contact. Insert the DC plug
into socket Ç. The charging indicator is switched on.
Now switch on the device by pressing any key.
You will see the following display:
DATE 25. 01. 2000
TIME 10: 35: 25
CORRECT ?
YES F1 NO F4
Please check time and date.
If time and date are not correct, you
should correct the time later.
You can set the time by making the
correction either on the PG1 or using the
software.
Press F1 for yes. The device switches
the display to the main menu.

Operating instructions ELS-P-PG1
The right to make technical changes is reserved Last amended: Juni 2005
6
Summary
Work sequence using the PG1
1. Apply programming device with Master ID Card to the ELS device.
2. Apply ELS device in the programming device, note serial number
and location.
3. Please carry out this process for all ELS devices
4. Connect the programming device to the PC
5. Read the serial numbers of the ELS devices from the programming
device and at the same time allocate the ELS devices with door ID
and other functions.
6. Send authorisations to the programming device
7. Finally program all ELS devices using the programming device.
Menu structure ELS-P-PG1
LOCKING PLAN
EVENTS
SYSTEM DATA
OPTIONS
F1
F4
F3
F2
DEVICES
TRANSPONDER
AUTHORISATIONS
NEXT
F1
F4
F3
F2
NEW ENTRY
VIEW
CANCEL
RETURN
F1
F4
F3
F2
PLEASE ACTIVATE
DEVICE
NR. 0000000000
ESC
MAIN MENUE
Function Menue
Function
Action
EXAMPLE: FUNCTION KEY F1
F1
F1
F1
All PG1 functions are menu-controlled. You reach the appropriate submenu if you press the
function key indicated to the right of the description. The above example shows you the procedure
for the new entry of an ELS device (cylinder ELS 999 or control unit ELS-MFS) in the programming
device.

Operating instructions ELS-P-PG1
The right to make technical changes is reserved Last amended: Juni 2005
7
Summary of PG1 functions
In the PG1 main menu, there are various menu items, each associated with particular functions
Main menu Function menu Functions
The LOCKING PLAN menu item gives you
the opportunity to enter new devices into
the system, to view devices and to cancel
devices from the system.
We refer to 999 cylinders and MFS control
units as devices.
You can enter new locking media into the
system, view and cancel them.
Transponders are all locking media that
can be used in the ELS system.
Access authorisation of individual people
can be maintained, viewed and transferred
to different devices or received by devices.
The transfer of time zones and public
holidays is also possible in this menu.
LOCKSYSTEM
EVENTS
SYSTEMDATA
OPTIONS
F1
F4
F3
F2 RECEIVE
VIEW
DELETE
RETURN
F1
F4
F3
F2
The EVENTS menu item enables you to
receive specific events from the devices,
to view and cancel them
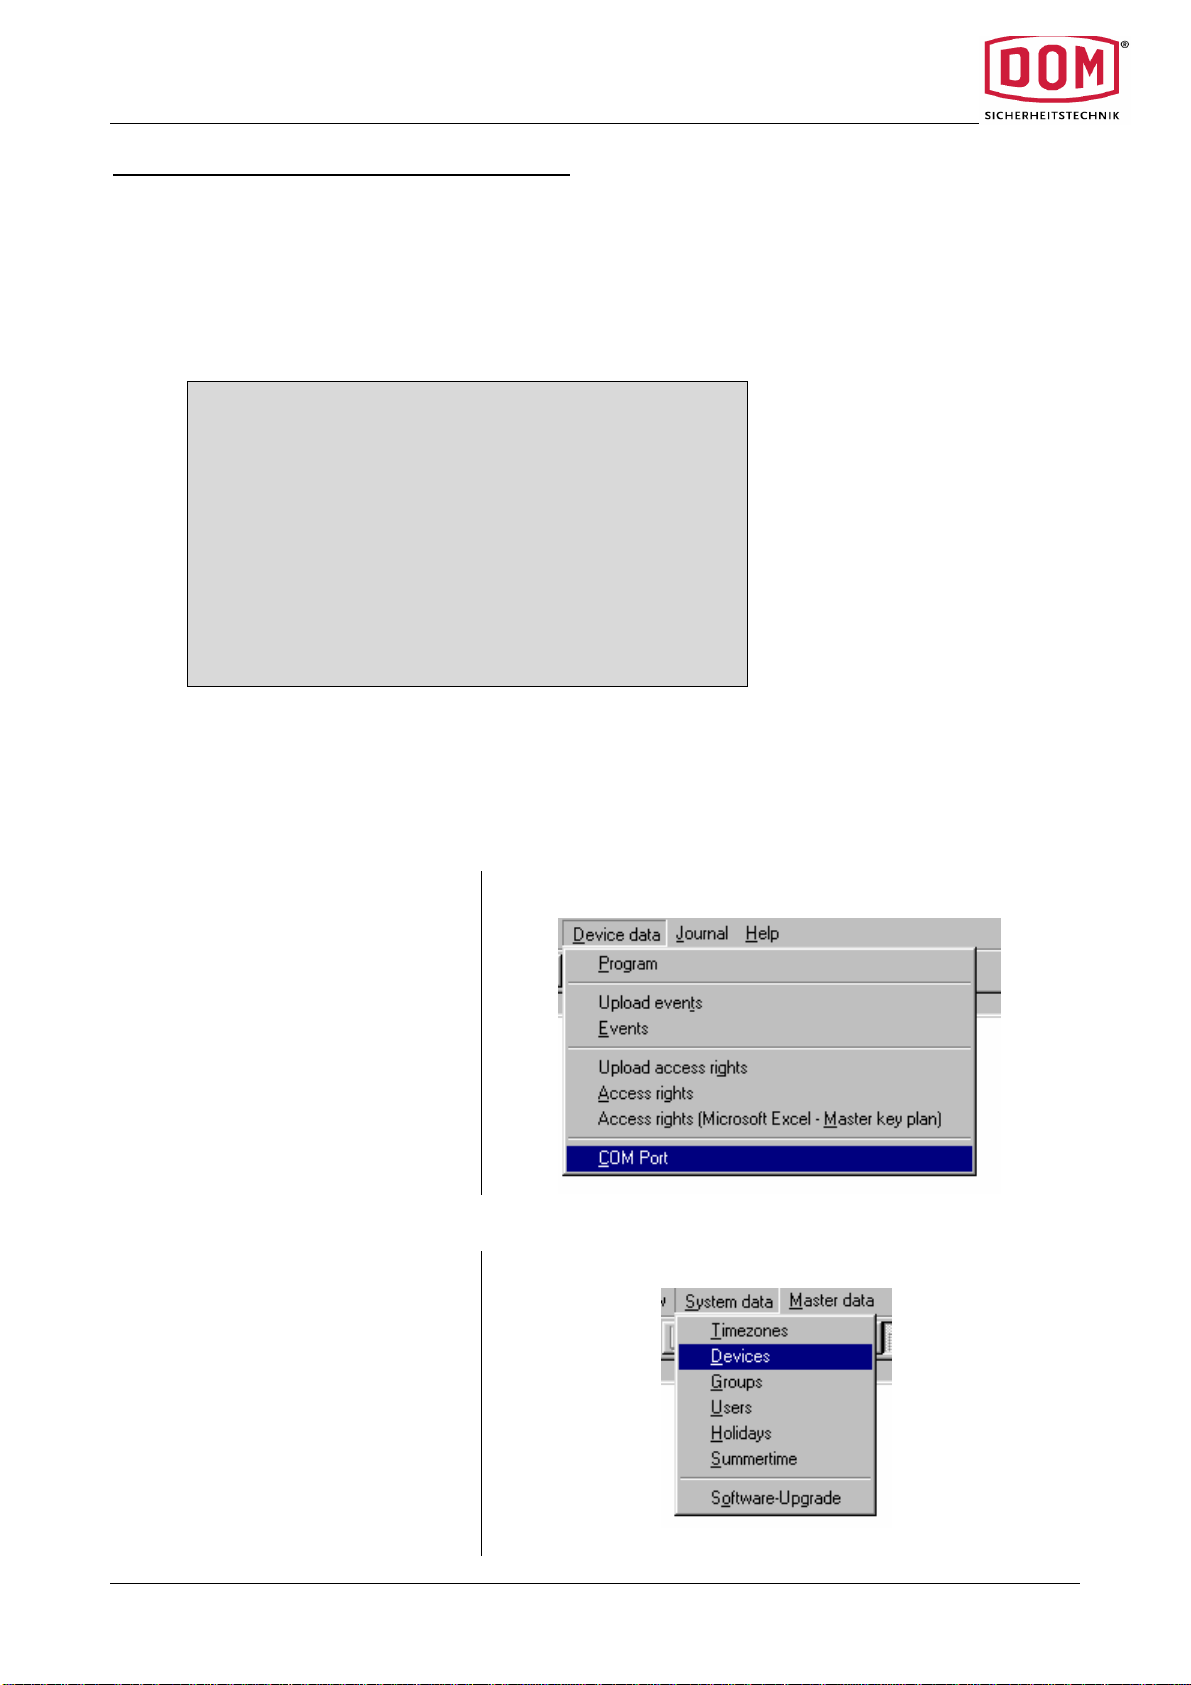
The SYSTEM DATA menu item enables you
to receive date and time from the devices,
to change such data and to transmit it in
an updated form to the devices. You can
tell from the Device function what name
and what serial number the current device
has. The Prog.Card-Mod. function is
required for the new entry of programming
devices in the ELS cylinders and MFS
control units. With this function, you can
use the programming device like a
programming card.
As OPTIONS there are currently various
languages available. The programming
device can manage 2 languages. You can
choose between two languages for your
work with PG1 using the Language
function.
Languages: German, English, French and
Dutch. Any combination of two languages
can be selected at the time of ordering.
LOCKSYSTEM
F1
F4
F3
F2
DEVICES
TRANSPONDER
AUTHORISATION
NEXT
F1
F4
F3
F2
EVENTS
SYSTEMDATA
OPTIONS
F1
F4
F3
F2
LOCKSYSTEM
EVENTS
SYSTEMDATA
OPTIONS
F1
F4
F3
F2
DATE / TIME
DEVICE ?
PROGCARD-MOD.
RETURN
F1
F4
F3
F2
LOCKSYSTEM
EVENTS
SYSTEMDATA
OPTIONS
F1
F4
F3
F2
LANGUAGE
RETURN
F1
F4

Operating instructions ELS-P-PG1
The right to make technical changes is reserved Last amended: Juni 2005
8
Apply programming device
Apply means the enabling of PG1 in ELS devices and the storage of ELS devices in the PG1. Both
processes can be carried out immediately after one another. Only by applying does the PG1 become a
usable programming tool for the ELS system. Only the owner of a master ID card can enable programming
tools for ELS devices.
Requirements:
Master ID card, serviceable PG1 and initialised ELS devices are present
Brief instructions
1. Switch on PG1
2. Switch on device
3. Read the master ID card using the ELS device
4. Read PG1 in the prog. card mod. using the ELS
device
5. Change to the Locking plan menu
6. Select apply new in the Devices menu
7. Read in the ELS device
8. Accept using the DOM key ÃÃ
Complete
Process Display
Switch on the PG1.
Press key F3 in the main menu
Press the F3 key again
The PG1 now asks you to activate the ELS.
For cylinder 999:
To activate, turn the knob approx. 45.
The cylinder is active for a max. of 5 seconds.
After this time, the device must be reactivated
Hold the Master-ID-Card in front of the reader
Wait for approx. 3 seconds The reader sends a single signal tone direct
Now hold the PG1 with the write/read device À
near to the reader.
For cylinder 999:
PG1 direct on with the
write/read device Àouter knob.
The reader resends a single signal tone
The ELS device SENDS a signal tone, PG1 is read
in
DATE / TIME
DEVICE ?
PROGCARD-MOD.
RETURN
F1
F4
F3
F2
LOCKSYSTEM
EVENTS
SYSTEMDATA
OPTIONS
F1
F4
F3
F2
PLEASE ACTIVATE
DEVICE...
ESC

Operating instructions ELS-P-PG1
The right to make technical changes is reserved Last amended: Juni 2005
9
Process Display
If you have to apply several devices, repeat this
process for each device.
Now change to the main menu by pressing F4 for
ESC (close) and once more press F4 for BACK.
Now select F1 for LOCKSYSTEM and then F1 for
DEVICES.
Reselect F1 for NEW ENTRY
The PG1 now asks you to activate the ELS device.
For 999 cylinders:
To activate, turn the knob approx. 450.
The cylinder is active for a max. of 5 seconds.
After this period, the device has to be reactivated
Now hold the PG1 with the write/read device À
near to the reader.
For cylinder 999:
PG1 direct with the write/read device Àon the
outer knob.
The ELS device sends a double tone and is read
in. In the display, you will now see the serial
number of the device that has been read.
Now press the DOM key Ã, the device being read is
included in the memory of the PG1 and is available
for further processing
The display flickers for a short time and remains with
the serial number read in. If several devices are
already present, the process may take somewhat
longer and the display says "PLEASE WAIT"
If you have to apply several devices, repeat this
process for each device.
The devices are now available in the PG1’s memory
for further processing.
You can then describe the ELS devices using the ELS software and carry out further
programming work.
NEW
VIEW
DELETE
RETURN
F1
F4
F3
F2
PLEASE ACTIVATE
DEVICE
ESC
NR. 0000000000

Operating instructions ELS-P-PG1
The right to make technical changes is reserved Last amended: Juni 2005
10
Working with PG1 and the ELS software
Requirements:
PG1 is ready for operation, software is installed and ready for operation
Brief instructions
1. Connect PG1 using the connection cable to a serial
interface (COM1...4) of the PC
2. Start up the PC and ELS software
3. Set the serial interface COMx in the ELS software
4. Apply programming device in the system
5. Set date and time
6. Transfer and describe the read-in devices into the
database
7. Where appropriate, set up time zones
8. Where appropriate, set up public holidays
9. Read in the locking media and allocate access rights
10. Program the PG1
Complete
Preparation:
Insert the connecting cable AK1 with plug (M) on the programming device and with socket (W) on the PC.
As the work may take some time, you should operate the PG1 using the power supply unit.
Switch the PG1 on and select at least the main menu.
Start up the ELS software and register with name and ID.
Process Display
Click in the Device data menu bar and
then COM interface.
If there are several interfaces, choose the one that has been preassigned to AK1. Where there is only one available interface, the software
makes an automatic selection. Click on OK.
Click in the System Data menu bar and
then on Devices

Operating instructions ELS-P-PG1
The right to make technical changes is reserved Last amended: Juni 2005
11
Process Display
Click using the right-hand mouse key in
the blank field below device/description
and select New.
Now select the programming device
The serial number of the programming
device can be found in the batteries
compartment under the batteries.
Enter the serial number of the
programming device and click on OK.
The ELS device management view is
displayed. Here, enter the device
description and switch the status to
activated. Then click on OK. The new
PG1 has been applied. The symbol
appears with the data entered in the
main screen.
Double click on the symbol of the new
programming device, the ELS device
management view reappears.
First click on General and then on
date... set. This transfers the current
time on the PC to PG1. The devices
can then be set to the same time.
Click on devices... and then on read in
devices applied...
Continued on next page

Operating instructions ELS-P-PG1
The right to make technical changes is reserved Last amended: Juni 2005
12
Process Display
The devices applied previously are read
in. Each new device must be confirmed
by clicking on OK.
In the background, the newly applied
devices appear with the serial numbers.
Then click on OK.
You will now see the main screen and
can now describe the new devices.
Description of new ELS devices
Example knob cylinder ELS 999
Process Display
Double click in the device management main screen
on a new device.
In the following view, please enter under description
e.g. the door ID that you noted before with the serial
number. Under Reader, you can input a short
description or figures. You can then determine
under Store event, which events are recorded by
this device.
If several programming devices are present, you can
change the allocation under Programming device.
Click on OK to complete the process.
Repeat this process for all devices. The devices are
then indicated with the new designations in the main
screen.
Continued on next page

Operating instructions ELS-P-PG1
The right to make technical changes is reserved Last amended: Juni 2005
13
Setting up time zones
You have 31 time zones available for the issuing of access rights. Time zone 32, "no time limit" is basically
fixed. If no time limits are required in your access system, you can allocate everyone to time zone 32. This
means that everyone on any date and at any time are entitled to gain access. When this setting is used,
you can skip the next section.
Process Display
Click on time zones in the menu bar
under system data
You will then find yourself in the time
zones main menu
Click the right hand mouse key in the
white blank space and then New.
Continued on next page

Operating instructions ELS-P-PG1
The right to make technical changes is reserved Last amended: Juni 2005
14
You could choose now one of 31 free
definable timezones.
Click on the required timezone and
press ENTER.

Operating instructions ELS-P-PG1
The right to make technical changes is reserved Last amended: Juni 2005
15
Process Display
In the time zone management view you
must give a description and then a time
for authorised access for each day.
Fields not filled in will automatically be
filled with 00:00 and need no time
authorisation.
You can switch between the fields using
the mouse. You can also insert the TAB
key. When you have prepared the
required time profile, click on OK to
store. If you need several time profiles,
carry out the processes several times.
With the Enter key, copy fields already described onto the next date.
You should then check your work in the
main menu
Setting up public holidays
In the ELS software, up to 16 public holidays can be defined in advance.
In the system, public holidays are entered such as Sundays. This means that people who have locking
authorisation on a Sunday also have this authorisation on public holidays. By contrast, people have no
locking authorisation on public holidays if they have no time authorisation for Sundays.
Please set up public holidays as follows:
Process Display
Click on public holidays in the System
Data menu
Continued on next page

Operating instructions ELS-P-PG1
The right to make technical changes is reserved Last amended: Juni 2005
16
Process Display
Click on the public holidays main menu
with the right-hand mouse key in the
white blank field. Then click on New.
In holiday management, please enter
the date and name of the public holiday.
Click on OK to complete the process.
Repeat the process for each public
holiday.
Then check your details in the main
menu.
Reading locking media into the database
To read in locking media, there is a read device Ä in the PG1. You do not need a separate
device.
Ensure that PG1 is ready for operation. The main menu must be switched on.
Have all available locking media ready.
Please proceed as follows:
Process Display
Click devices in the System Data Menu
Continued on next page

Operating instructions ELS-P-PG1
The right to make technical changes is reserved Last amended: Juni 2005
17
Process Display
Double click on the programming device
symbol in the main menu.
In the view, please click on read-in
transponder.
Your PC then gives an acoustic signal.
(if loudspeaker is present). The egg
timer appears next to the mouse cursor.
This means that a transponder is
expected. Now hold a transponder over
the read deviceÄ of the PG1 below the
DOM key.
As soon as the transponder is read, a
new employee master record is offered.
Click on OK.
You will now see the master data
Employees view.
First enter here personal data such as
surname, first name etc.
If you have a picture database of your
employees, you can directly add the
appropriate image by a mouse click .
Then click on access rights.
Continued on next page

Operating instructions ELS-P-PG1
The right to make technical changes is reserved Last amended: Juni 2005
18
Granting of access rights (time and place authorisation)
Process Display
The summary of the available devices and time
zones set up by you in advance is shown.
Now click on a device for which an access right is to
be issued.
If this employee is to be authorised e.g. for all doors,
click the first device on the list, hold the Shift key
pressed down and click the last device on the list.
This marks all the devices present.
Now go to the time zones and click the required time
zone.
Then click on insert.
The selected time zone is allocated to the marked
devices. The access rights for these employees are
set up. Then click OK. You will then be taken back
to the Devices Menu, read in transponders .
Now proceed as described above for each new
transponder.
If you have set up access rights for all transponders
as described above, your database is prepared for
programming the individual devices.
Programming the PG1
In this process, all previously allocated time zones, public holidays and of course access rights are written
into the PG1. This sets up the PG1 for programming your ELS system.
Please proceed as follows:
Process Display
Click on program in the Devices Data
menu
Continued on next page

Operating instructions ELS-P-PG1
The right to make technical changes is reserved Last amended: Juni 2005
19
Process Display
You receive an inquiry as to whether
just one amendment list is to be
programmed. Please reply to this with
No. The programming device should be
charged for the first time with the
complete data. Then you will receive a
choice of data that can be sent to the
PG1. Select accordingly by clicking in
the small boxes. If you do not mark
device description and name, this data
will not appear in the programming
device.
Then click on OK
PG1 is now programmed with new data.
At the end of this process, you will be
requested to mark the devices that you
wish to program. For the first time, we
recommend that all devices should be
marked.
Then click on OK.
The process is complete.
You can now go to the individual doors
and program the devices.
Continued on next page

Operating instructions ELS-P-PG1
The right to make technical changes is reserved Last amended: Juni 2005
20
Note: For subsequent programming work, you can send a change list to the programming device. The
device is then programmed with the new, amended data.
To make things easier for you, only the new devices affected by changes in the database have to be
programmed.
Process Display
The changed data is displayed on the
screen. Then click on close.
After the amendment list has been
written, only those devices having to be
reprogrammed are shown.
You can print out the list and then
initiate programming for the individual
doors.
Programming of authorisations
Brief instructions
Requirements: PG1 is ready for operation, available devices are ready for operation and the
PG1 is applied in the devices as authorised programming device.
1. Switch on PG1
2. Transfer date and time **
3. Switch PG1 in the AUTHORISATIONS menu to
TRANSFER, then to SEND.
4. Activate device
5. Hold PG1 in front of the read device
6. Authorisations are automatically transferred.
Complete
Table of contents
Popular Conference System manuals by other brands

Poly
Poly G7500 Administrator's guide

LEGRAND
LEGRAND WIREMOLD 6000 Series installation instructions

AT&T
AT&T SPIRIT 308 Administration manual

AT&T
AT&T MERLIN LEGEND Release 2.0 Analog Multiline... System programming

Vidyo
Vidyo VidyoRoom HD-230 Getting started guide

Ocean Technology Systems
Ocean Technology Systems PowerCom Surface Station 3000S user manual