DOSKO 200-6H-CE User manual

1
Owner's Manual
Instructions for Operation, Maintenance
Compact Stump and Root Grinder
200-6H-CE (2961090CE)
Your Dosko grinder is intended for outdoor-use only and can be used to remove many tree stumps and
exposed root systems close to ground level. By moving the blade in sweeping movements laterally over
the top and front of the stump, you can gradually grind it away. Make sure you completely read and
understand this manual before using the grinder for the first time.
WARNING
READ and UNDERSTAND this manual completely before using the grinder! Failure to properly operate,
and maintain this grinder could result in serious injury or death to the operator or bystanders.
All machines have hazards associated with their operation. This stump grinder has certain special hazards,
which you must be aware of. As an operator or owner you have a duty to be aware of these hazards and know
preventive measures to take to avoid them. When reading this manual pay particular attention to avoiding these
hazards.
In particular, be aware of the following:
Know location of buried electrical and other utility lines.
Do not allow children or untrained adults to operate.
Wear eye protection and other personal protection against flying rocks and debris.
Check that cutter wheel teeth are secured, sharp and not missing.
Do not operate if operator presence bar fails to stop engine upon release.
Make sure no children or bystanders are within 23 meters of stump grinding operation.
Protect cars, windows and other objects within 23 meters from flying debris.
Be prepared for machine "kickback" when initially contacting the stump.
Be aware of potential for carbon monoxide (CO) poisoning.
Prevent fires/explosions from fueling.
Do not attempt to perform adjustments, declog or clean unit while engine is running.
Avoid burns from engine or hot exhaust.
Avoid using in wet or icy conditions where falls may occur.
Details about these hazards are found throughout the manual and are summarized at the end of the manual under
"Important Safety Information."
STOP!
ADD ENGINE OIL: Your stump grinder comes fully assembled and requires only that you add engine oil to crankcase
and fuel to tank.
INSPECT COMPONENTS: Closely inspect to make sure no components are missing or damaged. See the "Receiving
Your Unit" section for instructions on whom to contact to report missing or damaged parts.
Any Questions, Comments, Problems, or Parts Orders
Call your dealer or Dosko Customer Service 1-763-428-2237
MODEL NUMBER: 2961090CE
SERIAL NUMBER: _____________
M2961090CED.2

Hazard Signal Word Definitions
2

Table of Contents
3
Part I. Introduction
About Your Grinder .............................................................................................................. 4
Safety Decal Locations ............................................................................................................ 5
Safety Decals ............................................................................................................................ 6
Receiving Your Unit ................................................................................................................ 7
Machine Component Identification ...................................................................................... 8
Part II. Operation
Operation:
1. Pre-Start Check List & Procedures ............................................................................... 9
2. Starting the Grinder....................................................................................................... 12
3. Stopping the Engine ...................................................................................................... 13
4. Grinding the Stump ....................................................................................................... 14
5. Refueling ....................................................................................................................... 15
6. Storing the Machine ...................................................................................................... 16
Part III. Maintenance and Repair
Maintenance (To be done by owner or Rental Dealer) .......................................................... 18
1. Belt Tension Adjustment ............................................................................................ 20
2. Stop-Switch Adjustment ............................................................................................. 21
3. Installing Teeth ........................................................................................................... 21
4. Schedule ...................................................................................................................... 23
Specifications .......................................................................................................................... 24
Part IV: Important Safety Information
Summary of Important Safety Information ....................................................................... 25
Special Safety Information on Static Electricity ................................................................ 28
Parts Explosion ........................................................................................................................ 29
Warranty .................................................................................................................................... 31

About Your Grinder
4
Thank you for purchasing or renting your Dosko grinder!
Owner/Operator/Renter Training
Read and follow all instructions and safety precautions presented throughout this manual. A summary of
important safety information can be found at the end of the manual. Keep this manual for reference and
review. If the owner of this unit is different than the operator, give a copy of this manual to any
operator to read.
Rental Companies
All persons to whom you rent/loan this grinder must have access to this manual and read it. Check the
tube on the side of the unit to make sure a manual is inside. Advise all persons who will operate the
machine to read it. You should also provide personal instruction on how to safely operate the grinder and
remain available to answer any questions a renter/borrower might have. If videos are available, have
renter watch training video.
Engine Instructions
For detailed Engine operation and maintenance information, always refer to the engine Owner's Manual
furnished with the grinder.
Product Suitability
Before using, the user shall determine the suitability of this product for this intended use and assumes
liability therein.
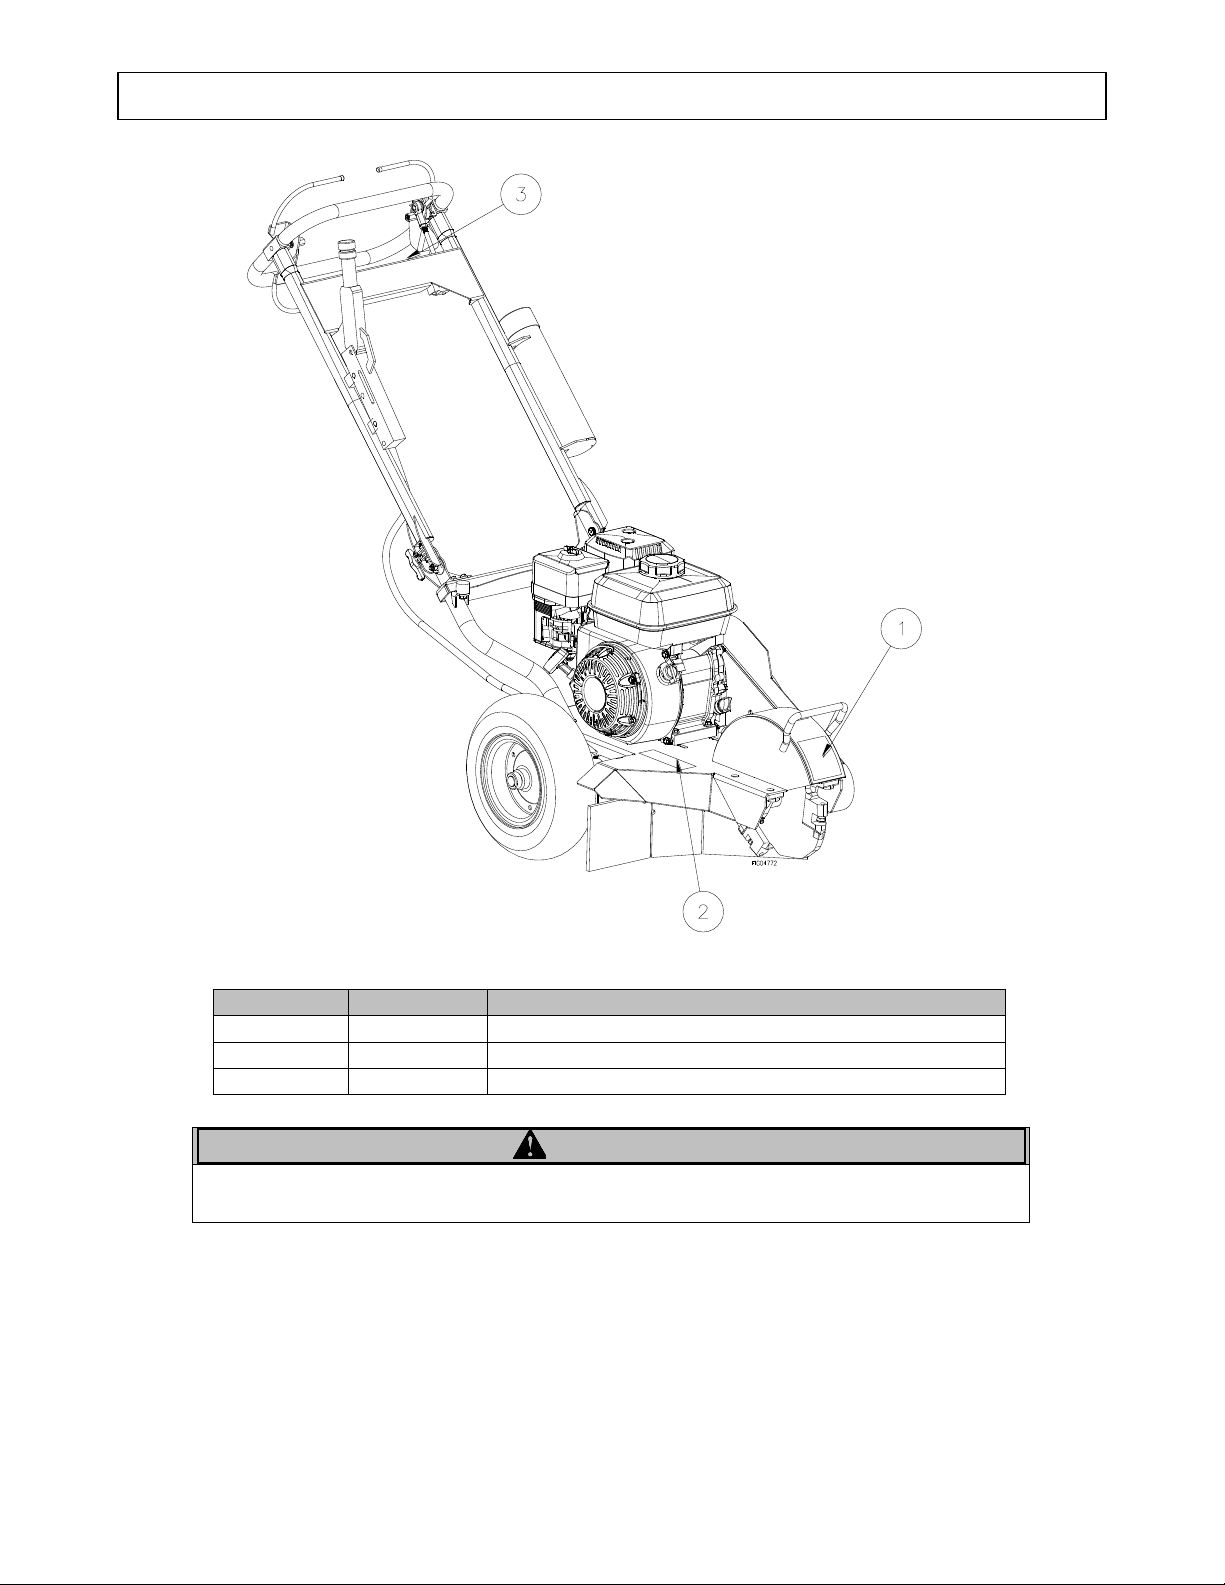
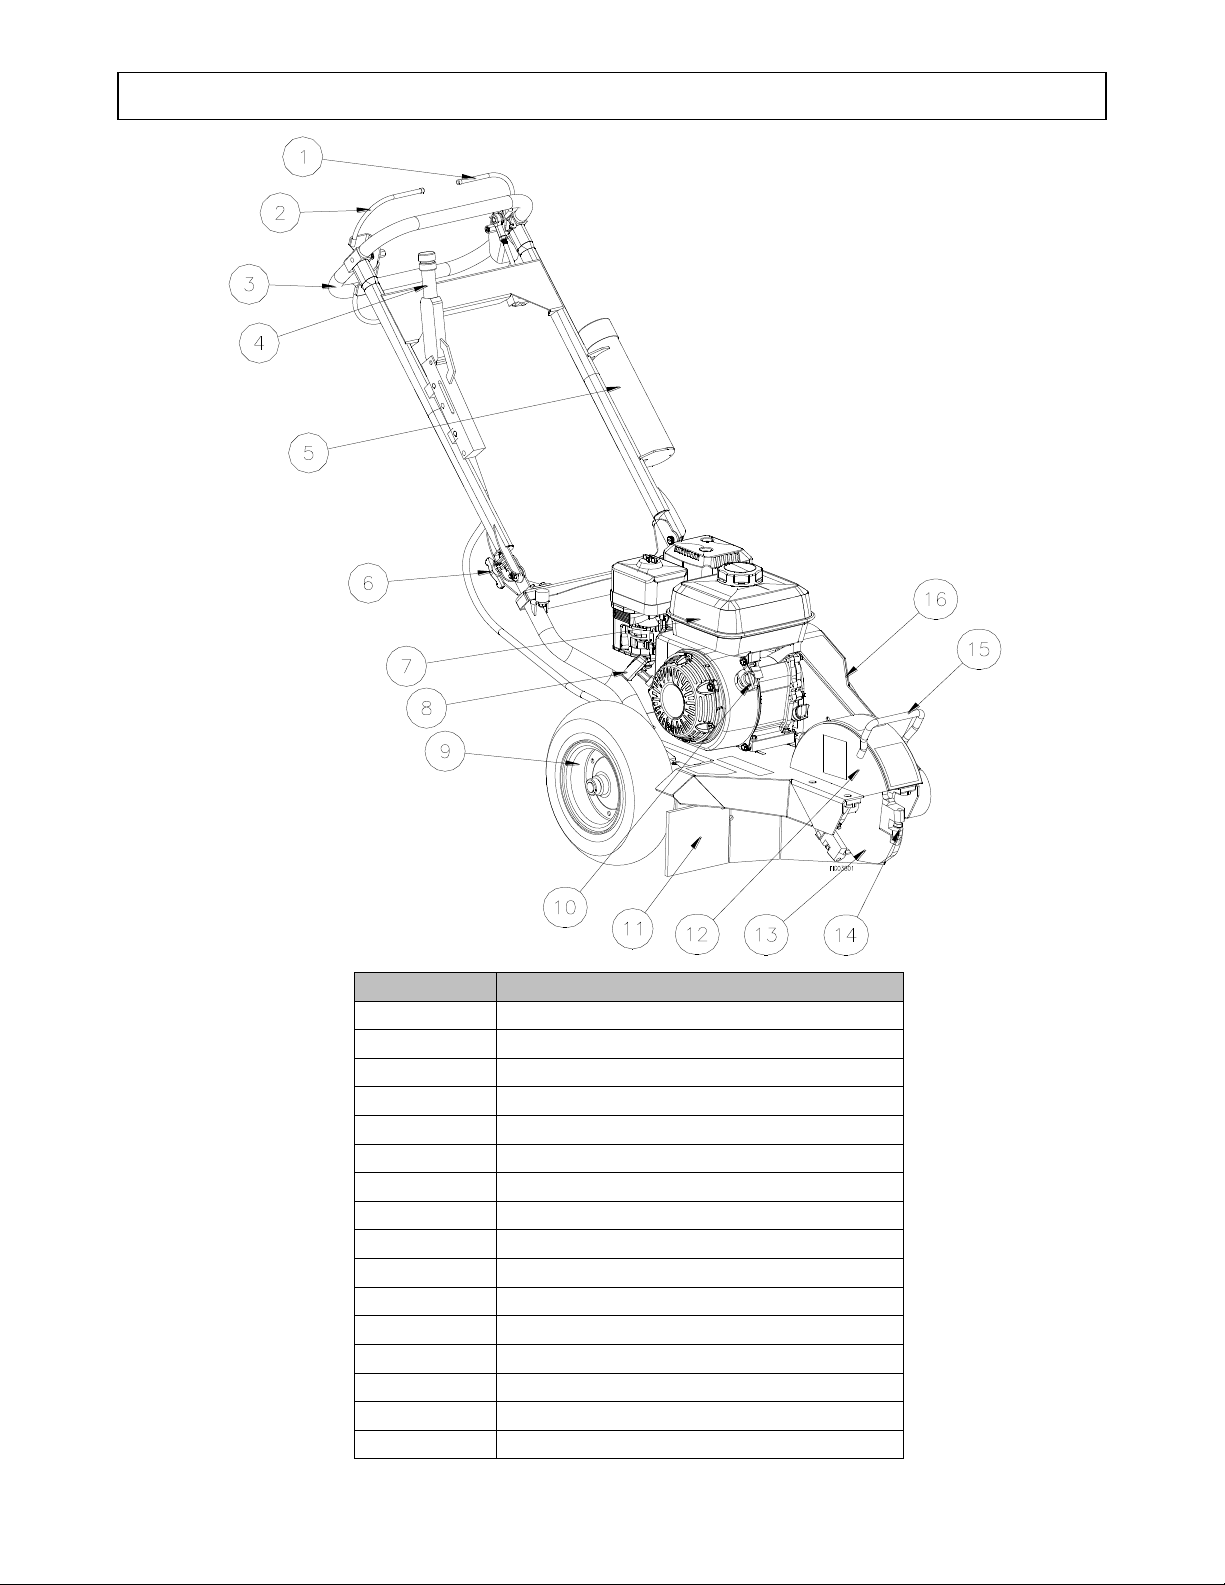
Your Dosko grinder can be used to remove many tree stumps and exposed root systems close to ground
level. By moving the blade in sweeping movements laterally over the top and front of the stump, you can
gradually grind it away. Make sure you completely read and understand this manual before using the
grinder for the first time. If you have any questions, contact your retail or rental dealer or Dosko
Customer Service at 1-763-428-2237.
WARNING: Never attempt to cut on a slope exceeding 15.
Exercise caution when cutting stumps on an incline, as the machine may shift or slide unpredictably. Never
attempt to cut with the machine uphill or downhill from you as it may slide toward you or you may fall
toward the machine. Cut only on a slope from the side.
˙
Dosko is constantly improving its products. The specifications outlined herein are subject to change
without prior notice or obligation. The purchaser and/or user shall assume liability for any modification
and/or alterations of this equipment from original design and manufacture. Any alterations shall void
warranty and CE Certification.
Contact Dosko Customer Service at 1-763-428-2237 for any questions about the appropriate use of
this grinder or about optional accessories.
Warranty Registration
Please fill out and submit the warranty registration card so that we have your contact information for any
future product literature or replacement parts you may need.

Safety Decal Locations
5
Reference #
Part #
Description
1
789537
Cut Foot Hazard
2
789538
Thrown Object Hazard
3
789666
Control Panel
WARNING
ALWAYS make sure safety labels are in place and in good condition. If a safety label is
missing or not legible, order new labels.

Safety Decals
6
To order replacement safety labels, call Dosko Customer Service at 1-763-428-2237.
REF.
DESCRIPTION
A
Cutting hazard to
foot. Keep
distance.
B
Thrown object
hazard. Keep
distance.
C
Wear eye
protection while
operating.
D
Wear ear
protection while
operating.
E
Wear protective
footwear while
operating.
F
Wear gloves while
operating.
G
Hazards exist. Read
manual before operating.
H
Move control
forward to
disengage brake.
Move control
backward to
engage brake.
1
789537
A
2
789538
B
3
C
D
E
F
G
H
789666

Receiving Your Unit
7
1. Receiving Your Unit
For all Units
You should inspect the grinder immediately after you receive delivery.
See the "Machine Component Identification" section of this
manual for a diagram of the grinder and its components.
If you have missing components, contact your rental company or Dosko
Customer Service at 1-763-428-2237.
New Unit: Truck
Delivery
Depending on your unit and model, it may have been shipped on a
wooden skid, cardboard container or other appropriate method.
For any shipping damage, make sure the delivery driver acknowledges it
and a claim is filed with the freight delivery company.
Note: Shipping damage claims are not covered by Dosko
warranty. Please contact carrier!
If any assembly is required. Separate assembly instructions will be
included.
New Unit: From a
Dealer
Your unit should have been delivered completely assembled and ready to
run. Read the "Pre-Start Checklist & Procedures" section, and verify that
the unit has been properly "prepped" before initial use.
Factory Delivery
In these cases, your unit has been completely assembled, tested and pre-
run. It should be ready for usage. See "Pre-Start Checklist and
Procedures".

Machine Component Identification
8
Reference #
Description
1
Operator Presence Handle Bar
2
Throttle Control Lever
3
Handle Bar
4
Adjustable Brake Lever
5
Manual Storage
6
T-Handle Knob
7
Engine
8
Starter Grip
9
Tire and Hub
10
Engine On/Off Switch
11
Discharge Flap
12
Cutter Guard
13
Cutter Wheel Disc
14
Cutting Tooth
15
Front Handle
16
Belt Guard

Operation
9
1. Pre-start Check List & Procedures
CAUTION:
Add engine crankcase oil. A new engine is shipped without oil. You must add the correct
amount of oil to engine crankcase or engine will be damaged beyond repair.
Before starting the engine you will want to make sure you have completed the following:
1. Marking Underground Utilities
2. Checking Controls
3. Checking Cutting Teeth
4. Checking/Adding Oil
5. Filling Stump Grinder Gasoline Tank
6. Inspecting Fuel System for Leaks
7. Locking Handle Bar
8. Wearing Personal Protection
9. Trimming Stump with Saw
10. Clearing Area of People and Objects
11. Working During Daylight
Each of these procedures is discussed in detail below.
Marking
Underground
Utilities
Call your local utility company to request marking utilities 3 days
before stump grinding. Trees can grow on top of and around
underground wiring that was installed many years before a tree was
planted.
Check controls.
Check that:
All guards are in place and tight.
Operator presence bar switch is free moving.
Inspect tires and rims for looseness, damage, and tire inflation.
Check cutting teeth
Inspect cutting teeth for tightness and sharpness. Only use factory-approved
parts for repair.
Check/add oil
Check the oil level using the dipstick and add oil as needed.
Using a funnel, add oil up to the FULL mark on the dipstick with the
recommended oil type for your engine and expected ambient conditions.
(See engine Owner's Manual for oil type and capacity, and more detailed oil
check/fill instructions.)
WARNING: Burn hazard
Never open oil fill port while engine is running. Hot oil can spray
over face and body.
˙

Operation
10
Fill stump grinder
gasoline tank
Check the gasoline level in the engine's fuel tank. If needed, fill tank with
fresh unleaded gasoline from a portable container, after first reading the
warnings and instructions below.
- Do NOT fill the gas tank to the top. Gasoline may spill when operating
on a slope.
- Do NOT overfill the gasoline tank. Allow at least 2.5 cm of empty
space below the fill neck to allow for fuel expansion.
WARNING: Gasoline fire/explosion hazard
Gasoline is highly flammable and explosive. Heat, sparks, and
flames can ignite gasoline vapors, which can become widespread
during fueling. A flash fire ignition and/or explosion could result
and cause serious injury or death. The following conditions could
result in gasoline ignition/explosion:
gas vapor collection inside enclosures
static electric sparks
sparks from electric wiring, batteries, or running engines
sources of heat (such as a hot engine or exhaust)
open flames, including pilot lights
Inspect Fuel
System / Check for
Leaks
Inspect fuel system & check for leaks BEFORE starting grinder.
WARNING: Fuel leak hazard
A leaking fuel line no matter how small can be the source of a fire or
explosion when starting or operating the engine.
Inspect the entire fuel system. Look for: Signs of leaks or deterioration,
chafed or spongy fuel hose, loose connections, loose or missing fuel
hose clamps, damaged gasoline tank, or defective gasoline shut-off
valve.
If grinder is in an enclosed area and you smell gas, DO NOT start
engine! DO NOT light a match. DO NOT flip on an electrical switch.
Exit area immediately leaving doors open and call fire department.
Locking Handle
Bar
Handle is capable of folding when not in use.
To lock handle into place:
Position T-handle knob and eyebolt so it is on the back side of the
hinge bracket.
Tighten T-handle knob finger tight.
Repeat on other side
To fold handle:
Turn T-handle knob counterclockwise to loosen.
Swing knob and eyebolt to the outside, on both sides of handle.
Carefully fold handle downward until it comes in contact with the
rubber stops.

Operation
11
Personal Protection
Use approved protective clothing and approved protective equipment
when using the machine.
1. Always wear EN166 1F safety glasses with side shields and a full-
face shield.
1) The use of ear plugs or other hearing protection device is also
recommended for persons working within 4.5-6 m of the running
grinder for longer than a few minutes. Hearing can be damaged from
prolonged, close-range exposure to the type of noise produced by this
grinder.
2) Wear long pants to protect legs from sparks, hot engine and flying
debris.
3) Never wear jewelry or loose-fitting clothing when starting or
operating the grinder or any mechanical device. Loose or dangling
apparel, jewelry or hair can become entangled in moving parts.
Trim Stump with
Saw
Cut or trim the stump preferably to ground level using a power saw.
Clear Area
Dig away the earth and remove any stones near the tree stump or roots that
may interfere with your work.
Work During
Daylight Hours
Only use the machine in daylight or in well-lit conditions. Never operate
the grinder after dark.
T-handle knob
Handle
Eyebolt
Hinge bracket
Rubber stop
Locked Position
Unlocked Position

Operation
12
Safe Zone
Danger Zone
Operator
Position
2. Starting the Grinder
After you have completed the pre-start checklist and procedures, you are ready to start the
grinder.
The following directions detail how to start the engine of your grinder.
WARNING:
Never attempt to use the grinder without proper protective equipment,
particularly eye protection and a full-face shield.
To start the grinder:
Note: For additional engine starting instructions see your Honda engine manual.
1) Lock handle in the upright position.
2) Place stump grinder into position with cutting wheel near the front-top edge of the stump.
3) Use brake lever on handle to lock the wheel brake.
Note: For tighter brake adjustment, turn knob on top of brake lever. (See Maintenance &
Repair sections for instructions)
WARNING:
Stay in the OPERATOR POSITION (behind the machine) while
actuating controls. Never leave grinder unattended.
4) For cold engine, move choke
lever to the CLOSED position.
To restart a warm engine, leave
choke lever in OPEN position.
5) Turn engine switch to the ON
position.
6) Grip operator presence bar and
handle bar together in left hand.
WARNING:
A rotating cutting wheel is very dangerous. Stay at the controls and keep
others away until you are sure the blade has come to a complete stop.
7) Pull the starter grip lightly until you feel resistance, then pull briskly. Return the starter grip
gently. If the choke lever was moved to the CLOSED position to start the engine, gradually
move it to the OPEN position as the engine warms up.
8) If engine does not start, repeat steps 5-7.
9) Press down on handle bar to lift cutter wheel off the ground.
10) Grip throttle control lever and handle bar together in right hand. Centrifugal clutch will
engage and cutter wheel will begin to rotate.

Operation
13
3. Stopping the Engine
Stop the engine using the following steps:
1. While holding blade off the ground, release
the operator presence bar. The engine will
stop. Wait until the blade completely stops.
Lower the blade so it is resting against the
ground.
2. Make sure brake is set before leaving the
controls, particularly if you are on an
incline.
3. Turn engine switch to OFF position.
4. Allow the engine to cool for at least 5
minutes before releasing brake and moving
to storage or transporting. A hot engine
can be a fire hazard.
Cutting wheel
Adjustable Brake lever
Throttle control lever
Operator presence
handle bar
Handle bar
Operator presence
handle bar
Adjustable brake lever

Operation
14
4. Grinding the Stump
WARNING: Flying Debris Hazard
Stones, chips, and debris can cause serious injury or property damage.
Debris can fly 23 meters in any direction out of the chute. They can bounce
off any fixed objects as well and hit operator, bystanders or breakable
objects.
1. Set/engage the brake.
2. Pivot the grinder toward the side of the stump, with a fairly light touch feed straight into the
stump. As soon as you feed in, start to swing to the side until you feel the wheel drop off the
edge of the stump. Change direction and swing back the other way until you feel it reach the
other edge of the stump. As you swing to the side listen to the engine. Provide enough feed to
give it a moderate load. If you hear any belt or clutch squealing you are pushing too hard. If
you can’t swing it to the side, raise the grinder up.
You can cut roots off by plunging straight through them.
WARNING: Rotating cutter wheel.
Keep hands and feet away. Contact with wheel rotating teeth will cause
serious personal injury.
M1® Blueshark™ teeth are available in Standard Tooth (Solid Black), Sand & Clay Tooth
(Red Dot) or in a Rock Tooth Version (With Gold Dot). The Rock Tooth is a better choice if
you are experiencing chipping in Rocky Areas.
Chip Build-up
3. When grinding larger stumps, chips may begin to build up under the wheels.
4. Release brake and pull machine towards you so that the "chip pile" is directly under the
cutting wheel.
5. Drop cutter wheel down on "chip pile", material will be discharged from machine area.
WARNING: Flying Debris Hazard
Stones, chips, and debris can cause serious injury or property damage.
Debris can fly 23 meters in any direction out of the chute and bounce off
objects and hit operator, bystanders or breakable objects.
Chip pile
Cutter wheel
Direction of
grinding

Operation
15
6. On these larger stumps, DO NOT allow grinder wheels to drop into stump hole. If a hole is in
the way of your progress, fill it with chips or change position.
WARNING:
Stop engine and set brake before leaving operator's position. KEEP BRAKE
ENGAGED except when changing locations.
7. When finished, stop the machine.
8. Pull machine away from stump, and rake chips away from stump.
5. Refueling
1) Before removing gas cap, turn engine off and allow to cool for at least two minutes.
Note: A running or hot engine can ignite fuel.
2) Remove grinder gasoline cap.
3) Add gasoline through the fill opening:
-Use only an UL-approved portable gasoline container to transfer the gasoline to the grinder's
tank.
-Be aware of safety warning and instructions below for avoiding static electric caused fires.
-Do not overfill.
WARNING:
Static electric spark hazard
A static electric spark can explosively ignite gasoline vapor, resulting in a flash fire that
could cause serious injury or death. See "Special Safety Information on Static Electricity" at
end of this manual.
4) Clean up gasoline spills /splashes immediately.
If possible, move the grinder away from spilled gasoline on the ground.
Wipe up spilled gasoline, and wait 5 minutes for excess gasoline to evaporate before starting
engine.
Gasoline soaked rags are flammable and should be disposed of properly.
Wheel
Chip pile/debris
Hole
NOT CORRECT
CORRECT

Operation
16
If gasoline is spilled on your skin or clothes, change clothes and wash skin immediately.
5) Replace gasoline cap securely before starting engine.
6) Store extra gasoline in a cool, dry place in an UL-approved, tightly sealed container.
7) Filling towable units or portable containers at service stations:
Even if you have a towable unit, avoid static electric sparking while filling the
gasoline tank:
Never fill the grinder's gas tank directly from the
fuel pump. The grinder's tank is not grounded
and high velocity flow from the pump can
cause static electricity build-up. Use an
approved portable container to transfer gas to
the grinder's tank.
Use a portable container made of metal or
conductive plastic. This is preferred because it
dissipates static charge to ground more readily.
Never fill a portable gas container while it is
sitting inside a vehicle, trailer, trunk, or pick-
up truck bed. ALWAYS place container on
the ground to be filled.
Keep nozzle in contact with container while
filling. Do not use a nozzle lock-open device.
6. Storing the Machine
When you are finished using the grinder and it has cooled, you must:
Cool engine before storage.
Clean the grinder.
Inspect for worn or damaged parts.
Choose covered storage location.
Prevent accidental starting.
Plan on exercising the engine at least monthly unless the grinder is prepared for long-
term storage.
Detailed instructions are provided below.
Cool engine
Let engine cool for at least five minutes before storing. A hot engine can
be a fire hazard.
Clean grinder
Clean all grease, dirt, mud and other foreign matter from the machine.
Touch up paint damage to prevent rust.

Operation
17
Inspect grinder
Inspect the machine for worn or damaged parts and tighten any nuts or
screws that may have become loose. Pay particular attention to the
cutting teeth.
Choose a storage
location
Store the grinder in a location that is:
- Clean and dry.
- Away from sources of heat, open flames, sparks, or pilot lights, even if
the grinder's gas tank is empty. Residual gasoline could ignite.
- Away from extreme high or low temperatures.
- Cover it for extra protection.
Remove spark plug
Remove spark plug in order to ensure the grinder cannot be started in a
storage location or by untrained persons or children.
Start grinder every
4 weeks
The grinder should be started regularly. At least every four weeks, start
the engine and let it run for 10 to 15 minutes.
Monthly exercising of the grinder will dry out any moisture that has
accumulated, lubricate cylinders, and clean out old gas in the carburetor.
Moisture, old gas, and dry mechanical parts cause deterioration in stored
engines.

Operation
18
Prepare engine for
long term
(seasonal) storage if
needed
If you will not be able to start the grinder regularly, you must prepare
the engine for long term storage to prevent gum deposits from forming
and causing malfunction of the engine.
Prepare engine for long term storage by:
oRemoving all gasoline from the tank and carburetor
OR
oAdding fuel stabilizer to the gasoline (following manufacturer's
instructions)
Fuel stabilizer steps:
1. Ensure gas tank is full.
2. Add fuel stabilizer to fuel tank.
3. Run engine at least 10 minutes after adding stabilizer to
allow it to enter the fuel system.
4. Shut off engine
5. Disconnect spark plug wire and remove spark plug
6. Add one teaspoon oil through spark plug hole
7. Place rag over spark plug hole and turn starter (or pull the
recoil) a few times to lubricate the combustion chamber.
8. Replace spark plug, but do not reconnect the spark plug wire.
WARNING: Gasoline fire/explosion hazard
Gasoline is highly flammable and explosive. Drain the fuel into an
approved container OUTDOORS and far away from open flame.
NEVER store an engine with fuel in the tank indoors or in poorly
ventilated spaces where fuel vapor can come in contact with
static electric sparks
sparks from electric wiring, batteries, or running engines
sources of heat (such as a hot engine or exhaust)
open flames, including pilot lights

Maintenance & Repair
19
WARNING
ALWAYS shut off the engine, make sure the engine is cool, and disconnect the spark plug
before cleaning, adjusting, or servicing the grinder. Make sure all guards and shields are
replaced before using.
Maintenance
Perform regular
maintenance
Perform periodic maintenance as directed in this manual to keep the
grinder in safe working condition.
Follow safety rules
Read and follow these safety rules whenever you will be servicing the
grinder:
Turn off grinder. Always turn off grinder and remove spark plug or spark plug
wire before working on the engine or grinder to prevent accidental starting.
Replace guards/shields. Make sure all guards and shields are replaced after
servicing the grinder.
Burns. Muffler will be hot even after unit is stopped. Allow unit to cool before
servicing.
Repair. Major service, including the installation or replacement of parts, should
be performed only by a qualified electrical service technician. Obtain factory
approved parts from Dosko Service at 1-763-428-2237.
Replacement parts. If a part needs replacement, only use factory approved
repair parts. Replacement parts that do not meet specifications may result in a
safety hazard or poor operation of the grinder and will void the warranty and the
CE Certification.
Perform engine
maintenance
Perform engine maintenance as specified in the engine owner's manual.
Engine maintenance items include:
1. Oil and oil filter changing
2. Air filter check/replacement
3. Spark plug cleaning and replacement
4. Fuel filter check/replacement
5. Fuel tank cleaning.
Inspect fuel system
/ check for leaks
Inspect the fuel system and check for leaks on a regular basis.
Look for: signs of leaks or deterioration, chafed or spongy fuel hose, loose
connections, loose or missing fuel hose clamps, damaged gasoline tank, or
defective gasoline shut-off valve.

Maintenance & Repair (cont’d)
20
Lubricate
Cutter shaft bearings should be greased.
The cutter shaft bearing is greased by pumping grease into zerks located on
the housing of the bearing. Lubricate after every 20 hours of use.
Grease Specification
Soap Type
Lithium Complex
NLGI Grade
#2
Dropping Point
230°C (446°F)
Additives
Corrosion and Oxidation inhibitors, EP
optional
Viscosity Index
80 Minimum
Check and adjust
brake
Check that the brake is functioning properly.
-Lock the brake, push down on handle bar so that cutter wheel is
off the ground.
-Push or pull the grinder- if the brake is loose, the wheel will
rotate.
To adjust braking tension:
-Unscrew set screw.
-Turn knob clockwise to increase
tension or counter-clockwise to
decrease tension.
-Once you have set the brake to the
proper tension, tighten set screw to
lock adjustment knob.
Grease zerks
Cutting wheel
Bearing
Set screw
Knob
This manual suits for next models
1
Table of contents
Other DOSKO Grinder manuals

DOSKO
DOSKO 357 13 HP Honda Electric Start User manual

DOSKO
DOSKO M2961090A User manual

DOSKO
DOSKO 337S-13HC User manual

DOSKO
DOSKO M2961040A User manual

DOSKO
DOSKO M2961090B User manual

DOSKO
DOSKO 200-6HC User manual

DOSKO
DOSKO M2961040K User manual

DOSKO
DOSKO 2961040 User manual

DOSKO
DOSKO 337-13HC-CE User manual

DOSKO
DOSKO 337-13H-CE User manual
Popular Grinder manuals by other brands

Parkside
Parkside PNTS 250 A1 Original instructions

TOOLCRAFT
TOOLCRAFT WSS-100 Solo Original operating instructions

Worx
Worx WX68AG Safety and operating manual

FUXTEC
FUXTEC FX-E1WS20 Original user manual

EINHELL
EINHELL TE-AG 18/115 Q Li Original operating instructions

Makita
Makita GA011G instruction manual