Doughboy Media Master 1300 User manual

365-1757
“the original portable pool”
®
Media Master
Sand Filter with 2 Position Valve
Model 1300 — Item No. 0-1700-013
Owner's Guide
*Shown with Power Pak I, not included.

2
Before you begin installing your filter, refer to your pump
owner's guide for very important installation and electri-
cal information related to your filter.
ELECTRICAL/BUILDING PERMIT
Local building codes may require obtaining an electrical
or building permit and may have regulations on set-
backs and barriers that must be followed.
ELECTRICAL
We recommend you have a qualified electrical contrac-
tor install the electrical power supply as specified in your
pump instructions.
INSTALLED LOCATION
Position filter, pump and any other related components
a minimum of 4 feet from pool to prevent their being
used as a means to climb into the pool by young chil-
dren. DO NOT store toys, chairs, tables, containers or
other objects within 4 feet of the pool for the same
reason.
WARNING
SEVERE ELECTRICAL SHOCK could result if you
install your filter and pump on a deck or above pool
water level. They could fall into the water, causing
severe shock or electrocution. DO NOT install on a
deck or other surface at, above or slightly below the top
rail of the pool.
PROPERLY SUPPORTED
Filter, pump and any other related components should
be properly supported to prevent damage from misalign-
ment, settlement, vibration and mounted so as to
minimize the potential for the accumulation of debris and
moisture.
ACCESSIBILITY
The circulation system components should be installed
to allow accessibility for inspection, repair or replace-
ment.
DO NOT alter the pump electrical cord in any way or
change the plug end to any style.
DO NOT use an extension cord(s). Severe electrical
shock may occur.
IMPORTANT SAFETY INSTRUCTIONS
PREVENT SEVERE SHOCK
To prevent the risk of severe electrical shock, plug your
pump cord end into a grounding type receptacle pro-
tected by a ground fault circuit interrupter (GFCI).
Contact a qualified electrician if you cannot verify that
the receptacle is protected by a GFCI.
DO NOT allow children to operate or play around this
product unless they are closely supervised by adults at
all times.
Replace damaged cord immediately to reduce the risk of
electrical shock.
DO NOT BURY CORD
An exposed cord may accidentally become damaged or
severed by a sharp object or shovel resulting in severe
electrical shock. Position cord to prevent accidental
damage from lawn mowers, hedge trimmers or other
equipment.
BARE FEET/WET GROUND
This is a dangerous combination around electrical
equipment. Always be sure the ground under your feet
and body is dry before you touch electrical equipment.
Failure to heed this warning may cause severe personal
injury or electrocution due to severe electrical shock.
WARNING
Avoid direct water spraying with a garden hose around
electrical outlets, pump or any other electrical devices.
Severe electrical shock or electrocution may occur.
SERVICING YOUR PUMP
Always unplug your pump from the receptacle before
servicing, adjusting or repairing.
“READ ALL INSTRUCTIONS” Failure to follow these important
safety instructions and other basic safety precautions may result
in serious personal injury.
WARNING

3
BEFORE YOU BEGIN
The pool must be properly erected per your pool assem-
bly and installation instructions before installing the filter.
Install the surface skimmer and return fitting.
Before completing the filling of the pool to the water
level indicator marks on the skimmer face plate, the filter
and pump should be installed with all connections
secured tightly.
TOOLS REQUIRED
• Flat head screwdriver
• Flat shovel
• Measuring tape
• Carpenter level
MATERIALS REQUIRED
• Nine 12" x 12" patio blocks
• Waste hose - 1-1/2" inside diameter
• Medium sized rubber band (3" long)
• Ordinary plastic bag
• 100 lbs. #20 grade filter sand
• 1-1/2" hose clamp
• Silicone lubricant (available at pool dealer)
INSTALLATION
INSTALLATION LOCATION
Install your filter and pump and any other related
components at least 4 feet from the pool to prevent their
being used as a means of access to the pool by young
children. Patio blocks provide firm support and keeps
standing water and weeds away from electrical parts.
DO NOT install your filter and pump directly on the
ground surface. Settling and stressing circulation lines
may occur during wet seasons. Position patio blocks as
illustrated, use a shovel and carpenter’s level to level
ground before placing the blocks.
POSITIONING FILTER/PUMP
Position the filter and pump as shown in FIG. 1.
INSTALL HOSES
(See Fig. 1 and Exploded Parts Illustration)
FIG. 1
Suction and return lines should be partially buried to
prevent accidental tripping that could cause personal
injury or damage to the filter system.
Be sure the hoses are routed so that water flow through
them is not restricted.
Starting at least 12" from the pool wall, make two 3-4"
deep trenches, one from the pool skimmer to the front
of the pump and the other from the pool return fitting to
the filter valve return port (located at the bottom of
valve).
The two 8 ft. long hoses (Items 29) are interchangable
and used for the suction and return lines. Slip a hose
clamp over the ends of each hose prior to installing.
Connect one long hose (suction line) between the pool
skimmer and front port of the pump. Connect the other
long hose (return line) between the pool return fitting
and valve return port (located on the lower end of valve).
Connect the short hose (Item 28) between the pump
discharge port (located at top of pump) and the filter
valve pump port (located on the center left side of the
valve). Tighten clamps firmly using a flathead
screwdriver or 5/16" nutdriver. Cover the trenches with
a firm board when finished.
NOTE: Do not completely bury the hoses with dirt.
ELECTRICAL OUTLET
Refer to your pump owners guide for detailed informa-
tion pertaining to the requirements and regulations for
safe electrical installation of the power supply, recep-
tacle outlet, switching and ground fault interrupter.
IMPORTANT: Incorrect hose hook-up could cause
damage to your filter system. Follow the instructions
below carefully.
CORRUGATED HOSE CONNECTION
WITH WIRE CLAMP

4
INSTALL SAND
Gently pour 100 lbs. of filter sand into tank and level
surface with palm of hand. Remove any sand from
plastic bag and tank flange sealing surface. Remove
rubber band and plastic bag.
REINSTALL COVER
Position large O-Ring on tank flange sealing surface and
place cover on top, aligning O-Ring into cover groove.
Install V-Clamp, sandwiching cover and tank flanges.
Tighten knob until ends of clamp are approximately 3/8"
apart.
FINISH FILLING POOL
Finish filling your pool, referring to skimmer installation
and pool assembly instructions for proper water level.
WASTE LINE HOOK-UP
The discharge waste water will contain pool water
treatment chemicals that may harm certain plants and
vegetation. Therefore, position the discharge end of the
waste line in a safe, out-of-sight area capable of accept-
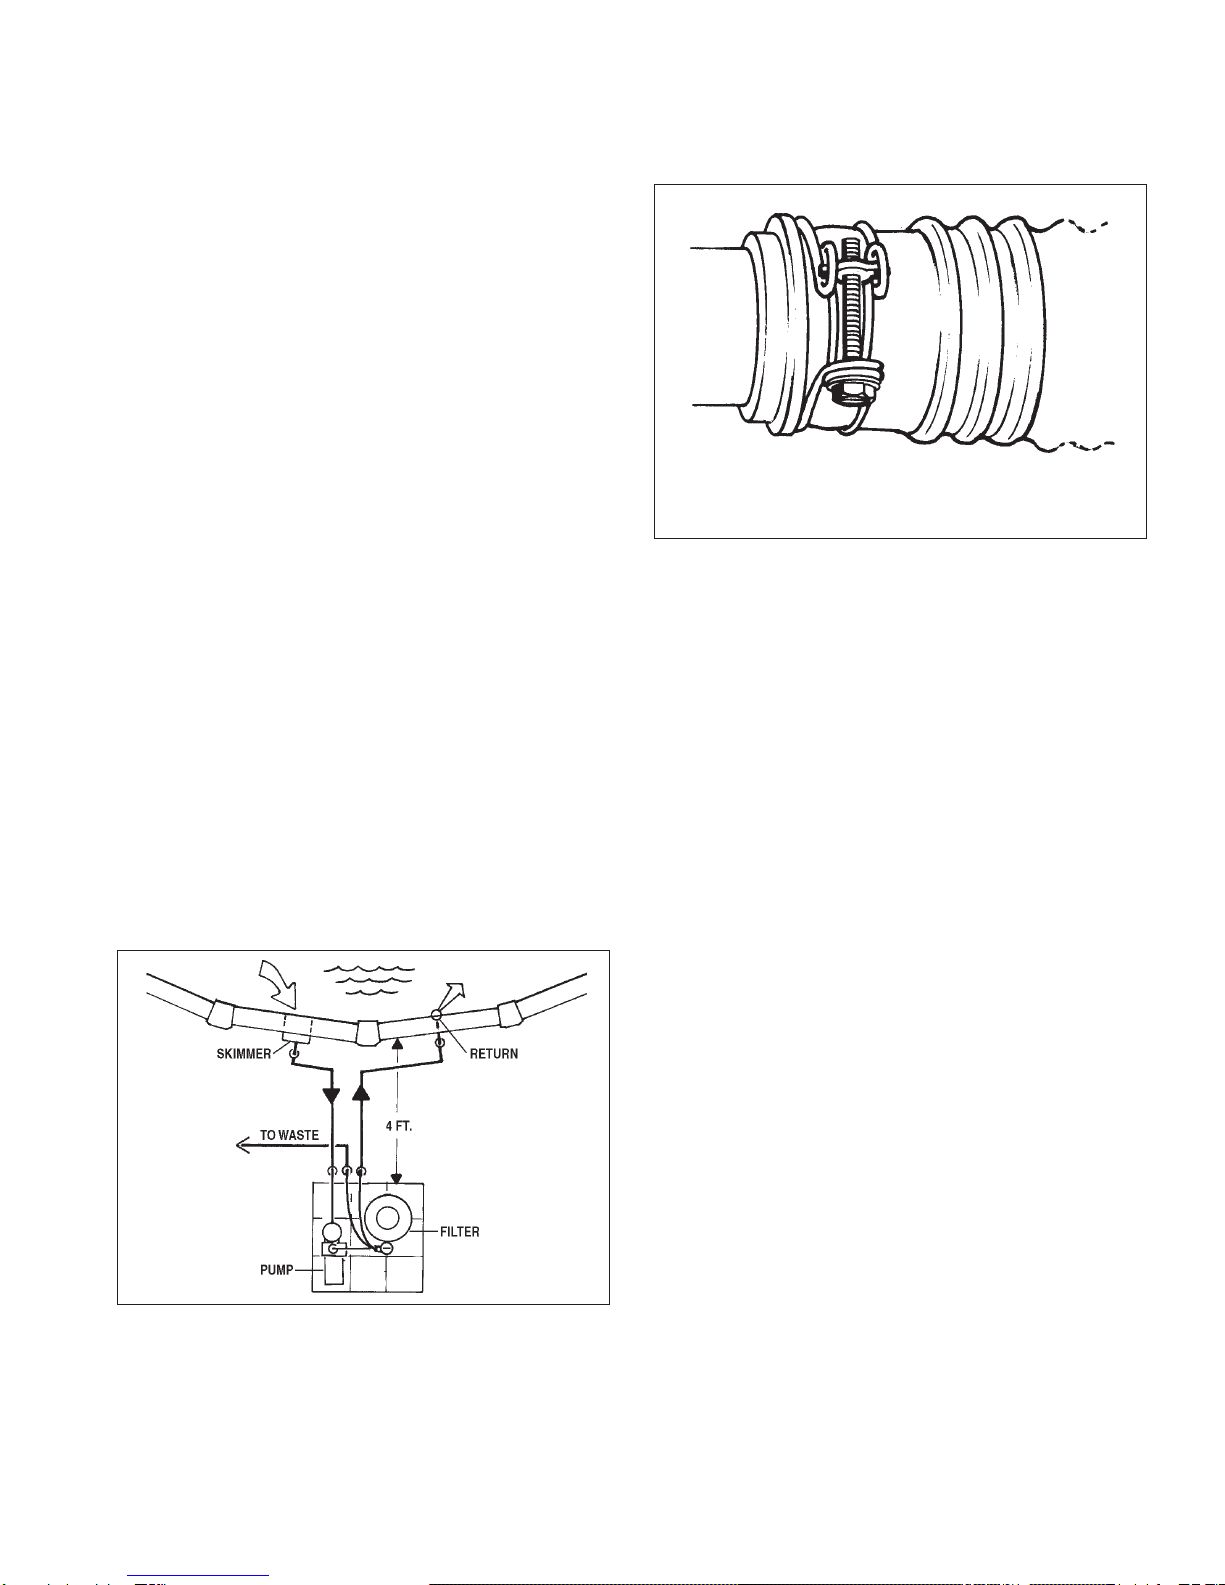
ing 150 to 200 gallons of waste water. Install a 1-1/2"
inside diameter waste discharge hose (not supplied) on
the waste port, located on the valve. Slip a 1-1/2" hose
clamp (not supplied) over one end of the hose. Then,
push hose onto the port fully and tighten clamp firmly.
INSTALL FILTER SAND
Your filter is designed to provide peak performance
using #20 grade filter (.4/.5 mm) sand. The sand should
be uniform in size and appear as crushed sand with
sharp edges. Rounded river bed sand will impair
filtering performance. Consult your local pool store.
REMOVE COVER CLAMP
Unscrew V-Clamp knob counter-clockwise to loosen and
remove clamp.
REMOVE COVER
Lift cover off tank. Remove large O-Ring.
COVER DISTRIBUTOR
Slip a plastic bag over the distributor and secure with
rubber band .
VALVE OPERATION
Your new filter has two positions of operation, which are
explained below. To change positions of the valve,
make sure the pump is off.
FILTERING: Pull handle to the full up position for
filtering or vacuuming pool.
BACKWASH: Push handle to the full down position for
backwashing (cleaning) filter. Water is discharged to
waste through the top valve port. Use for two minutes
or until water runs clear.
INITIAL START UP
Before you begin filtering your pool, the filter sand must
be backwashed thoroughly to remove the extra fine
sand grains normally found in new filter sand.
1. Loosen the pump strainer pot lid to allow air to
escape. Tighten lid when water begins to flow
between strainer pot lid and strainer body. Do not
overtighten.
2. Plug in your pump to the GFCI protected receptacle.
Refer to WARNINGS.
3. Push valve handle down against the valve cover in
the BACKWASH position.
4. Start pump. During this initial start-up allow 4-5
minutes to flush out the super-fine sand grains to
prevent them plugging the underdrain slots. Be-
cause pool water is lost during this operation (100 to
150 gallons) keep a close check on pool water level.
Never let water level get so low that no water flows
to pump. Refill pool as required.
5. Stop pump. Pull valve handle up into the full up
position to the FILTER position and start pump.
Note the pressure reading on your pressure gauge
for future reference of when to backwash.
6. Check all fittings and hoses for leaks and correct if
necessary.
FILTER OPERATION
A newly filled pool is normally filled with unfiltered water
and usually requires continuous filtering for 24 to 48
hours along with chemical treatment of the pool water.
Because all pool installations vary in environmental
conditions (wind, rain, airborne debris, heat and pool
use, etc.), it is impossible to provide an accurate filtering
time for normal usage. Use a trial and error method to
determine how long your filter must operate each day.
Generally, 6 to 8 hours of filtering each day is sufficient
to maintain pool clarity if the pool chemical treatment is
correct.
As the water clears, less backwashing will be required.
Consult your local pool store for helpful advice in
keeping your pool clean and sanitary.
When possible, avoid operating your filter during peak
electricity demands in your community. Check with your
local electric utility company for the best times they
recommend for operating your filter pump.
WHEN TO BACKWASH
As your filter removes debris from the pool water during
the filtering process, the return flow will gradually
reduce. Backwash when the pressure gauge increases
5 to 7 pounds above the clean filter starting pressure.

5
VACUUMING YOUR POOL
When vacuuming your pool, depris is caught in the filter
at a very rapid rate. Consequently, the filter must work
harder, causing a rapid increase in filter pressure as will
be indicated on the pressure gauge. Frequent back-
washing could be necessary during this process de-
pending on the amount of dirt being vacuumed off the
pool floor. Keep a check on the pool water level and
refill as required.
MAINTENANCE
Preventative maintenance will provide continued smooth
performance and extend the life of your filter for many
years. Neglect will cause parts to wear or bind, leaks to
occur and result in costly repairs. Keep moving parts
lubricated and a clean environment around your filter
and related components.
LUBRICATION
There are various types of lubricants available.
However, most are intended for moving metal parts.
Unfortunately, these lubricants will harm or degrade the
plastics. DO NOT use petroleum base lubricants. Many
people consider “PETROLEUM JELLY” safe for babies
and can be applied to anything. But, it will DESTROY
most plastics. Silicone lubricants, available at your pool
dealer, are safe for use on plastics.
LUBE VALVE SHAFT AND O-RING
Periodically lubricate the valve shaft and internal
o-rings in your filter valve to maintain smooth
operations.
1. Stuff a rag in the return fitting and into the bottom
inside outlet of your skimmer to reduce water back-
flow exiting the valve body when the piston assem-
bly is removed.
2. Unscrew valve cover and pull piston assembly up
and out of valve body.
3. Lightly lubricate the piston o-rings and valve shaft
with silicone lubricant.
4. Reinstall piston assembly and remove rags from
skimmer and return fitting.
5. Actuate piston assembly up and down to distribute
the lubricant, then resume normal operations.
REPAIRS
Servicing should be performed by a qualified dealer. If
disassembly is attempted, mark each of the parts
assembled position as it relates to its mating parts. This
assures proper alignment when reassembled.
Malfunction will occur if not properly assembled. See
your dealer for original replacement parts.
CAUTION
BEFORE removing filter or pump from pool for servic-
ing, prevent the backflow of water from your skimmer
and return inlet from flowing out of disconnected hoses.
1. Remove skimmer cover and basket and plug inside
bottom hole with rag.
2. Referring to the instructions for your return inlet,
remove the inlet cover and eye ball. Insert the
winterizing disc and reinstall the cover.
3. Disconnect hoses on filter or pump as necessary
when removing for service or repairs.
DRAIN TANK
See Caution Above
1. Remove V-Clamp from filter and remove cover and
o-ring.
2. Remove tank drain cap to drain.
3. Place plastic bag over distributor in tank and secure
with a rubber band. Scoop out sand with a medium
size can and place in plastic bag.
4. After servicing, reassemble and install in reverse.
Make sure tank o-ring and sealing areas are free of
any sand and that the o-ring is properly seated in
the cover groove before replacing cover.
WINTERIZING FILTER
In areas subject to freezing damage, it is mandatory that
the filter, pump and any related components be re-
moved from the pool and stored indoors. (Refer to
individual components owner's guide such as pump,
skimmer, chlorinator, etc., for specific winterizing
instructions.)
1. Backwash the filter.
2. Siphon pool water level down below skimmer
opening by using your vacuum hose and allow
water to flow to an area that can accept a couple of
thousand gallons or more.
3. Remove V-Clamp from filter and remove cover and
o-ring.
4. Remove tank drain cap and allow tank to drain fully.
5. Disconnect all hoses.
6. Place plastic bag over distributor in tank and secure
with a rubber band. Scoop sand out with a medium
size can and place in plastic bag. If sand is not
badly contaminated, save for next season.
7. Store all components in a warm dry area indoors.
DAMAGE CAUSED BY FREEZING TEMPERATURES
IS NOT COVERED BY PRODUCT WARRANTY.

6
EXPLODED VIEW
MEDIA MASTER 1300
TO POOL RETURN
TO SKIMMER
WARRANTY CARD
OWNER'S GUIDE
TO TOP PUMP PORT
TO FRONT PUMP PORT

PARTS LIST
MEDIA MASTER MODEL 1300
7
1121-1489
340-1926
1121-1490
1107-1467
308-1081
340-1280
340-1964
308-1006
340-1218
324-1018
1107-1130
1107-1464
340-1285
341-1280
343-1100
387-1030
340-1957
308-1206
308-1109
340-1970
307-1001
340-1962
308-1251
330-1027
395-1014
340-1201
387-1003
346-1013
346-1035
340-2160
1300-1014
1300-1002
308-1004
340-1779
1121-1436
365-1757
368-1066
Tank
Tank Cover
Valve Body With Decal
Valve Cap
Valve Cap Gasket
Valve Spool
T-Handle
Piston Rod O-Ring
1/4" Pipe Plug
1/4" x 1" Carriage Bolt
Lateral
Distributor Tube Assembly
Valve Adaptor
Air Relief Tube
Air Relief
V-Clamp
Drain Fitting
O-Ring
Valve Gasket
Drain Fitting Nut
Drain Cap Gasket
Drain Cap
Tank O-Ring
#8 x 1/2" Screw
2" Pressure Gauge
Sand Filter Drain
Hose Clamp
1-1/2" x 2-1/2" Hose
1-1/2" x 8' Hose
Washer - 1.85 O.D. x 1.42 I.D.
Strainer Pot Assembly
Basket
O-Ring
Strainer Body
Strainer Lid w/Decal
Owner's Guide
Warranty Card
1
1
1
1
1
1
1
2
1
1
1
1
1
1
1
1
1
1
2
1
1
1
1
1
1
1
6
1
2
1
1
1
1
1
1
1
1
ITEM PART # QTY DESCRIPTION
1
2
3
4
5
6
7
8
9
10
11
12
13
14
15
16
17
18
19
20
21
22
23
24
25
26
27
28
29
30
31
32
33
34
35
36
37

TROUBLESHOOTING SAND FILTERS
PROBLEM POSSIBLE CAUSE REMEDIES
1 - High gauge pressure, 1 - Insufficient backwashing. 1&2 - Backwash filter.
low return flow. 2 - Excessive contaminants or 3 - Use #20 filter sand.
algae in sand. 4 - Replace sand after cleaning
3 - Filter sand is too fine. underdrain slots.
4 - Underdrain plugged.
2 - Low gauge pressure, low flow. 1 - Water level too low in pool. 1 - Fill pool so water is between
Pump suction drawing in air. 2 - Restriction on suction side of marks on skimmer face plate.
Pump sounds like marbles pump. 2 - Clear obstruction in skimmer,
rattling in it. 3 - Skimmer or strainer basket filled hoses or pump.
with debris. 3 - Clean skimmer and strainer
baskets.
3 - High flow, low or normal 1 - Pool water is chemically out of 1 - Check with test kit or contact
gauge pressure but pool water balance. dealer.
will not clear up. 2 - Sand too coarse. 2 - Use #20 filter sand.
3 - Sand grains rounded or worn. 3 - Use crushed #20 filter sand.
4 - Short filter cycles. 1 - Excessive contaminants or algae 1 - Check chemical balance.
in sand or pool. Filter will require frequent
2 - Improper backwashing. backwashing.
3 - Sand too fine. 2 - Backwash filter thoroughly.
Waste hose too long or
restricted.
3 - Replace sand with #20 filter
sand.
5 - Sand entering pool. 1 - Defective underdrain. 1 - Replace underdrain.
2 - Sand too fine. 2 - Use #20 filter sand.
6 - Water leaking to waste. 1 - Valve not seated in filter position. 1 - Actuate valve handle and make
2 - Defective o-ring in valve body. sure valve is seated.
2 - Replace o-ring or contact
dealer.
Note: Contact your pool dealer for any problems you cannot solve.
“the original portable pool”
®
DOUGHBOY RECREATIONAL • 10959 Jersey Blvd., • Rancho Cucamonga, CA 91730-5194
DB 1297-019 Made in the United States of America Copyright © 1997
Change of Design: Doughboy Recreational expressly reserves the right to
change or modify the design and construction of any product in due course of
our manufacturing procedures, without incurring any obligation or liability to
furnish or install such changes or modifications on products previously or
subsequently sold.
PREVENT
DROWNING
Watch children
at all times.
You can be
permanently injured.
Shallow water.
WARNING
Do not remove or cover.
RESCUE:
NO DIVING!
Table of contents
Other Doughboy Water Filtration System manuals