Doughpro PP1818 Quick start guide

Operational Manual
PP1818
Manual Dough Press
Proprocess Corporation O7328 Madison St. OParamount, California 90723
(562) 531-0305 OToll Free (800) 624-6717 OFax (562) 869-7715
Website: www.doughpro.com OE-Mail: [email protected]

STEP 1 - After allowing upper platen to reach desired
temperature, set desired time cycle. Place your pre-portioned
doughball on the etched mark on the lower platen (off center).
Use an approved lubricant or food release agent such as olive
oil or DOUGHPRO’S cookware food release spray #DPPC1.
This will greatly improve the pressing operation. Flour is NOT
required to press crusts and should NEVER be used on
any part of the machine.
STEP 2 - With both hands pull down the handle into locking
position. Wait until your desired set time has been reached and
the counter beeps.
STEP 3 - With both hands, quickly lift the handle & remove
your crust from either the left or right side. Place flattened crust
on screen, disc or pan. Now you’re ready for make-up and
baking. Keep in mind that the final crust shape and size are
result of proper portioning, rounding and set time.
Introduction
Before attempting to operate your new PP1818 pizza press, take time to read these instructions. The press
has been designed for use by even totally unskilled employees after just a few minutes of simple
instructions. Following these step-by-step instructions will have them pressing pizzas faster, safer, more
consistently and equal in quality to the best hand tossed crusts.
Getting Started
First make sure the press is placed in an area with sufficient room for cleaning and unobstructed
operation. Start by plugging the press into a properly rated outlet depending on the electrical rating of the
press selected - 120V or 240V. Start by setting the temperature as follows dependent on the desired
product: Fresh dough pizza crusts: 150oF (65.5oC). Vary the temperature setting to suit the desired result.
ALLOW 15-20 MINUTES FOR WARM-UP.
Now let’s start pressing pizza crusts.
First allow upper platen to reach set temperature. In most instances, 150oF (65.5C) is ideal, but trial and
error testing will determine the best temperature for your dough. For best results your dough should be
proofed before pressing, but it will also press directly out of your refrigerator. Flour is not required to
press a crust and should not be dusted on any part of the machine. Determining the proper amount
of pressing time will vary depending on the diameter of your product. Start with 5 seconds and go up or
down from there.

Safety Summary
WARNING
In case of power cord damage,
do not attempt to repair or
replace the power cord. Contact
the manufacturer or the local
distributor.
WARNING
Avoid touching hot surfaces
while operating the machine.
CAUTION
During normal operation, the
base of the machine must be
installed or placed above the wall
socket.
CAUTION
When servicing or cleaning the
machine, make sure that the
power cord is removed from the
wall socket.
Control Board Operations
Solid State Controller
This controller has three (3) control
features:
1. Temperature – Temperature may
be set from 100°-325°F (38°-
163°C). The factory default
setting is 150°F. If you would
like to change this setting, simply
follow the Controller Operation
directions.
2. Counter – Cycle counter counts
the number of applications from
1 to 9999 (see additional Notes –
Counter).
3. Timer – Timer may be set from 1
– 99 seconds. The factory
default setting is 10 seconds. If
you would like to change this
setting, simply follow the
Controller Operation directions.
Controller Operation
Temperature Control
1. Press the MODE button until
temperature is displayed.
2. Push and hold SET button and
simultaneously push UP (V) or
DOWN (W) arrow buttons to the
desired temperature setting.
Time Control
1. Press the MODE button until
time is displayed.
2. Push and hold SET button and
simultaneously push UP (V) or
DOWN (W) arrow buttons to the
desired timer setting.

ADDITIONAL NOTES:
Temperature
Note
Fahrenheit/Centigrade (Celsius)
Conversion
The temperature controller can
be programmed to display either
°F or °C. To change: Press the
MODE button until the
temperature is displayed, then
push and hold the SET button for
10 seconds.
Counter
The controller has a built in cycle
counter.
• Press MODE button until the
counter is displayed.
• Counter display range is 0000 to
9999.
• To reset the cycle counter,
display the counter reading, then
push and hold both UP ( ) and
DOWN ( ) arrow buttons for 3
seconds until the counter resets
to zero (0000) on the display.

General Specifications
1. Press Instructions - Easy to follow dough pressing instructions.
2. Handle - Used to clamp the upper platen closed.
3. Lower Platen - Place your pre-portioned dough here.
4. Digital Display - Controls the power, time and temperature.
5. Upper Platen - Teflon coated heated platen. Helps dough flow evenly.
Electrical: 120V / 60hz / 1ph / 1450W / 12.5 amps
240V / 50/60hz / 1450W / 12 amps
Includes 72” cord and NEMA approved plug.
Shipping Weight: 150lbs. (70kg)
1
2
3
4
5


DOUGHPRO
PP1818
MODEL MODEL MODEL
1818A 1818B 1818C
NO PART NAME 120V AC 240V AC 240V AC
1 SHROUD, UPPER PLATEN 1109336 1109336 1109336
2 UPPER PLATEN 110074 110075 110075
3 LOWER PLATEN 110969076 110969076 110969076
4 LOCKING BOLT, ADJUSTMENT BH51618134G5 BH51618134G5 BH51618134G5
5 BOLT, LEVEL ADJUSTMENT 1109367 1109367 1109367
7 SCREW, PRESSURE ADJUST BLOCK BH58113 BH58113 BH58113
8 SPRING, PRESSURE ADJUST BLOCK 110969093 110969093 110969093
9 TERMINAL BLOCK 11096914 11096914 11096914
10 SCREW, TERMINAL BLOCK SP83258 SP83258 SP83258
11 SENSOR ASSEMBLY 110949110 110949110 110949110
12 SET SCREW, SENSOR SST381638 SST381638 SST381638
13 SCREW, SOCKET CAP ALLEN HEAD SCH1428114 SCH1428114 SCH1428114
14 PIVOT BLOCK CLEVIS 1101098919 1101098919 1101098919
15 BOTTOM PRESSURE PIN 11094961 11094961 11094961
16 E-CLIPS, BOTTOM PRESSURE PIN MPSC240 MPSC240 MPSC240
17 LOWER LINK 110949530 110949530 110949530
18 HANDLE PRESSURE PIN 11094962 11094962 11094962
19 GAS SPRING ASSEMBLY 1101098154 1101098154 1101098154
21 WIRE HARNESS 1101098050 1101098050 1101098050
22 HANDLE CHANNEL ASSEMBLY 110109889 110109889 110109889
23 SCREW, PRESSURE PIVOT BLOCK BSH1234 BSH1234 BSH1234
24 PRESSURE PIVOT BLOCK 1101098174 1101098174 1101098174
25 SET SCREW, PRESSURE PIVOT SST142014 SST142014 SST142014
26 SCREW, PIVOT BLOCK CLEVIS SP103258 SP103258 SP103258
27 NUT, PIVOT BLOCK CLEVIS NH1032 NH1032 NH1032
29 SPRING PIVOT PIN 110109862 110109862 110109862
31 SCREW SP83238S SP83238S SP83238S
32 CONTROLLER PANEL 110109822C1 110109822C1 110109822C1
33 SPACER, NYLON 11090109 11090109 11090109
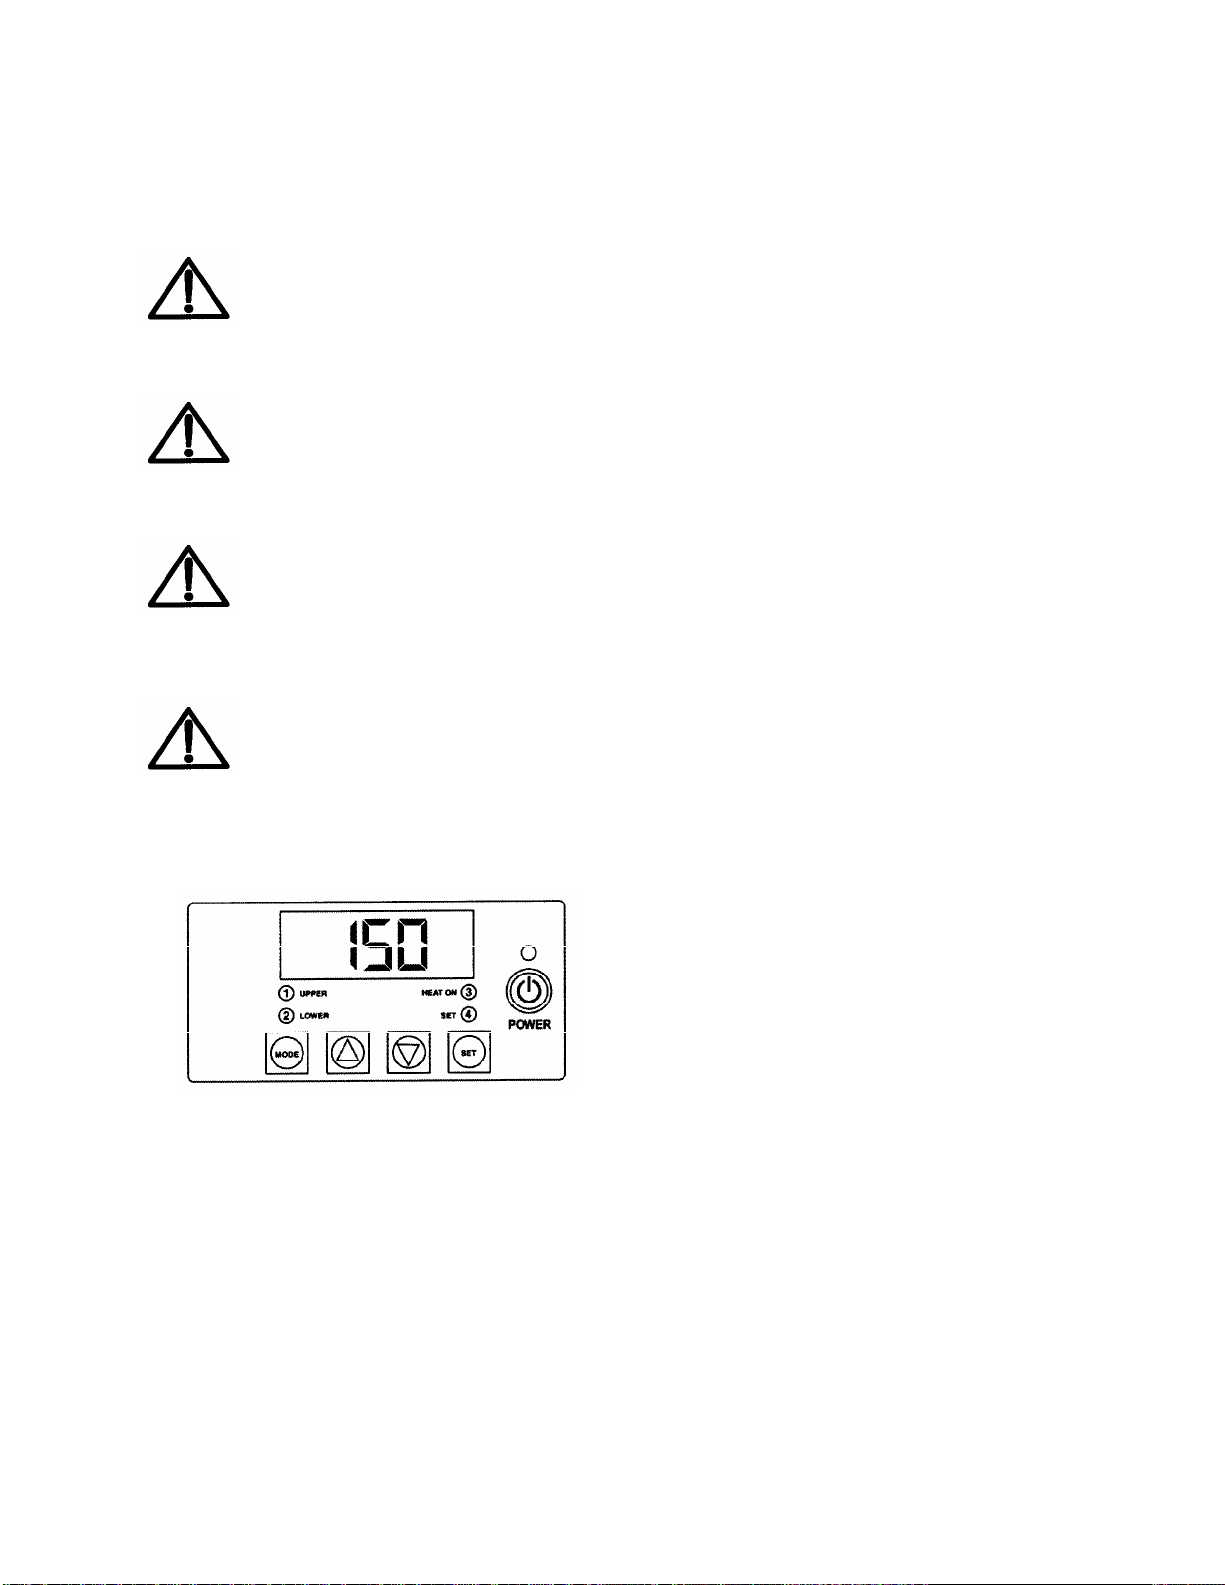
35 DIGITAL CONTROL 11096905218 11096905218 11096905218
36 NUT, DIGITAL CONTROL NH632 NH632 NH632
37 CONTROL PANEL OVERLAY OPROPP1800 OPROPP1800 OPROPP1800
39 COUNTERBALANCE SPRING, LEFT 110949154L 110949154L 110949154L
40 PIVOT HANDLE ASSEMBLY 110109821 110109821 110109821
41 BUMPER, POLY 110969455 110969455 110969455
42 ARM PIVOT PIN 110109863 110109863 110109863
44 RELAY 110942520 110942520 110942520
45 SCREW, RELAY SP83238 SP83238 SP83238
46 TRANSFORMER 11096975 11096975 11096976
47 SCREW, TRANSFORMER SP83238 SP83238 SP83238
49 NUT, MICROSWITCH NH440 NH440 NH440
51 SCREW, RUBBER FEET SP83238 SP83238 SP83238
52 MICRO SWITCH MPS90130 MPS90130 MPS90130
53 SCREW, MICROSWITCH SR44034 SR44034 SR44034
54 SPRING RETAINER 11094926 11094926 11094926
56 BASE FRAME ASSEMBLY 110109811 110109811 110109811
57 FEET, RUBBER 2093W 2093W 2093W
58 POWER CORD 110969174 110969175 110969176
59 CABLE STRAIN RELIEF MPS90014 MPS90014 MPS90014
60 SCREW, LOWER PLATEN SB51618114 SB51618114 SB51618114
PP1818 PL. V1_0 1311_20019_40000

DOUGHPRO
PP1818
61 SCREW, LOWER PLATEN SB51618112 SB51618112 SB51618112
62 WASHER WSAE516 WSAE516 WSAE516
63 FRONT LEG 11094902 11094902 11094902
64 SCREW, FRONT LEG SSH3816112 SSH3816112 SSH3816112
67 COUNTERBALANCE SPRING, RIGHT 110949154R 110949154R 110949154R
68 PLATE GASKET 110949140 110949140 110949140
69 TUBE FOR SPRING 11094930 11094930 11094930
70 PIVOT TUBE 11094923 11094923 11094923
71 LOWER COVER 110109835 110109835 110109835
72 CAP, VINYL, ADJUST. SCREWS SC0687 SC0687 SC0687
73 SUCTION PAD 11096942 11096942 11096942
74 SUCTION RETAINING PLATE 11094940 11094940 11094940
75 SCREW, SUCTION PAD SF83214 SF83214 SF83214
76 O-RING 110969113 110969113 110969113
77 WASHER, BELLEVILLE WB516 WB516 WB516
78 SCREW, GROUND SP8321 SP8321 SP8321
79 WASHER, GROUND WSAE8 WSAE8 WSAE8
80 LOCK WASHER, GROUND WLIT8 WLIT8 WLIT8
81 NUT, GROUND NH832 NH832 NH832
82 CHANNEL COVER 110109888 110109888 110109888
83 SCREW, CHANNEL COVER SP83238S SP83238S SP83238S
84 RUBBER GROMMET 110969116 110969116 110969116
85 OVERLAY, PRESSING INSTRUCTION OPROPP181810 OPROPP181810 OPROPP181810
86 SERIAL PROPROCESS TAG SPROPP1800A SPROPP1800B SPROPP1800C
87 LIMITER HI-TEMP 3455RC6025 3455RC6025 3455RC6025
88 NUT, CAP DEEP DRAWN 1/2 STUD AW500T1427 AW500T1427 AW500T1427
A1 UPPER PLATEN WIRE ONLY 110949074100 110949075100 110949075100
A2 UPPER PLATEN COMPLETE ASSY 110949074200 110949075200 110949075200
PP1818 PL. V1_0 1311_20019_40000


Care and Cleaning
Before cleaning turn machine off and allow to cool down.
Cleaning should be performed whenever required, but at least once a day. NEVER
SUBMERGE MACHINE OR ANY PART THEREOF IN WATER OR OTHER LIQUIDS.
With some simple care and reasonable maintenance your Model PP1818 pizza press
will give you many years of dependable service.
Daily Care
1. Tefloncoated platens. This platen should only be cleaned with mild soap and warm
water then wiped off with a clean, soft cloth or soft sponge. Never use steel wool or
harsh abrasives or you will cause costly damage.
2. All other exterior surfaces. Here again a daily wipe down with mild soap and warm
water on a damp rag, will do the job quite nicely. Never use steel wool or harsh
abrasives or you will cause costly damage.
Service Problems
Contact our factory or approved service agency (U.S. only). Note: When contacting
factory for information, parts or service instructions, it is of the utmost importance that
the serial number of the machine be provided. This number can be found on the serial
plate located on the rear of the machine.
Proprocess Corporation O7328 Madison St. OParamount, California 90723
(562) 531-0305 OToll Free (800) 624-6717 OFax (562) 869-7715
Website: www.doughpro.com OE-Mail: [email protected]

P.O. Box 869
7328 Madison Street
Paramount, CA 90723
(562) 531-0305
(800) 624-6717
Fax (562) 869-7715
Website: www.doughpro.coml E-Mail: [email protected]
Warranty & Return Policy
PROPROCESS CORPORATION warrants all products manufactured by it against defects in workmanship or materials from the
date of purchase for a period of (1) year on parts and labor. This warranty applies to only equipment purchased and used in
the United States.
Exclusions:
1. WOOD / GAS FIRED OVENS: PROPROCESS CORPORATION warranty applies to the main body of the oven being steel
/ refractory and insulation shall be free from defects in materials and workmanship for a period of four (4) years from the
date of purchase. The gas equipment shall be free from defects in materials and workmanship for a period of one (1) year
from the date of purchase. This warranty excludes the tandoori and home oven.
2. TANDOORI & HOME OVENS: PROPROCESS CORPORATION warrants the Tandoori & Home Oven including gas
equipment shall be free from defects in materials and workmanship for a period of one (1) year from the date of purchase.
3. Air compressors are excluded from this warranty, but PROPROCESS CORPORATION may act as a warranty
expeditor in certain instances regarding these compressors. The air compressor manufacturer provides a limited warranty
and a copy of this warranty is furnished with all compressors sold by PROPROCESS CORPORATION. For prompt
handling of compressor warranty claims the instructions of the compressor manufacturer must be adhered to.
4. Equipment built to special order as well as accessories are not returnable unless defective within the terms of this
warranty.
5. In no event shall PROPROCESS CORPORATION be liable for consequential damages arising out of the failure of
any of its products if operated improperly or caused by normal wear or damage by operator abuse.
Returned Merchandise Policy:
Should it become necessary to return any of the company’s products, the following instructions must be adhered to: First,
contact our customer service department for approval and a return authorization number. Please have the serial number
of your item available at that time. All merchandise must be shipped freight prepaid by customer or service agency.
Subject to the inspection of the product by the company, a restocking charge of 20% of the Net purchased price paid to
PROPROCESS CORPORATION will be assessed. Merchandise may not be returned for credit without prior written
approval of PROPROCESS CORPORATION. Collect shipments will not be accepted. No returns after 60 days of original
shipment date on machines. Purchased parts may not be returned after 30 days.
If upon inspection by PROPROCESS CORPORATION or its authorized agent it is determined the equipment has not been
used in an appropriate manner, has been modified, or has not been properly maintained, or has been subject to misuse,
misapplication, neglect, abuse, accident, unauthorized modification, damage during transit, delivery, fire, flood, act or war,
riot or act of God, then this warranty shall be deemed null and void.
Terms & Conditions:
1. Prices indicated in the PRICE LIST are suggested retail prices and are shown in U.S. DOLLARS.
2. Terms of Payment: 2% 10 days, NET 30 days.
3. NEW ACCOUNTS: Satisfactory credit information must be provided before open account status can be extended.
Unless agreed otherwise, all shipments will be made C.O.D., CASH IN ADVANCE.
4. PRICING: Prices, specifications, model numbers, capacities and accessories are subject to change without notice.
5. FREIGHT / ROUTING: Method of shipment will be determined by PROPROCESS CORPORATION unless otherwise
advised by PURCHASER.
6. DAMAGED CLAIMS: All merchandise shipped at purchaser’s risk. Inspection must be made by purchaser at time
goods are received. If goods are damaged, the PURCHASER shall request that the agent of the transportation
company make a written notation on the proper shipping documents immediately and then file a claim for damage.
GOODS DAMAGED IN SHIPMENT ARE NOT RETURNABLE.
7. RETURNS: Machines may not be returned after 60 days. Purchased parts may not be returned after 30 days. A
restocking fee of 20% will be assessed on non-warranty returns.
8. TAXES: Prices indicated herein DO NOT include State, Federal, Local or foreign taxes or duties, nor do they include
fees, permits, insurance or other levies, all of which are the responsibility of the purchaser.
9. All orders are subject to acceptance by PROPROCESS CORPORATION.
10. Possession of this price list shall not be considered an offer to sell.
Table of contents
Other Doughpro Commercial Food Equipment manuals

Doughpro
Doughpro DP1100 User manual

Doughpro
Doughpro Proluxe DP3300BZ User manual

Doughpro
Doughpro Proluxe Impact X1M User manual

Doughpro
Doughpro Proluxe DP2000SE User manual

Doughpro
Doughpro Proluxe DP2010PIPG User manual

Doughpro
Doughpro PROLUXE DP1350 User manual

Doughpro
Doughpro Proluxe DP2010MYE User manual
Popular Commercial Food Equipment manuals by other brands

Royal Catering
Royal Catering RCCS-3.5LSS user manual

Manufacturas Lenin
Manufacturas Lenin COUNTERTOP ECO LENIN PRESS Operation manual

Angelo Po
Angelo Po 091CP1G Use and installation manual

Silver King
Silver King SKDL18-EDUS4 Technical manual and replacement parts list

McAlpine Hussmann
McAlpine Hussmann RHR2 Installation and maintenance instructions

Vesta
Vesta KG-205 user manual