manuals.online logo
Brands
  1. Home
  2. •
  3. Brands
  4. •
  5. Doulton
  6. •
  7. Water Filtration System
  8. •
  9. Doulton HIS User manual

Doulton HIS User manual

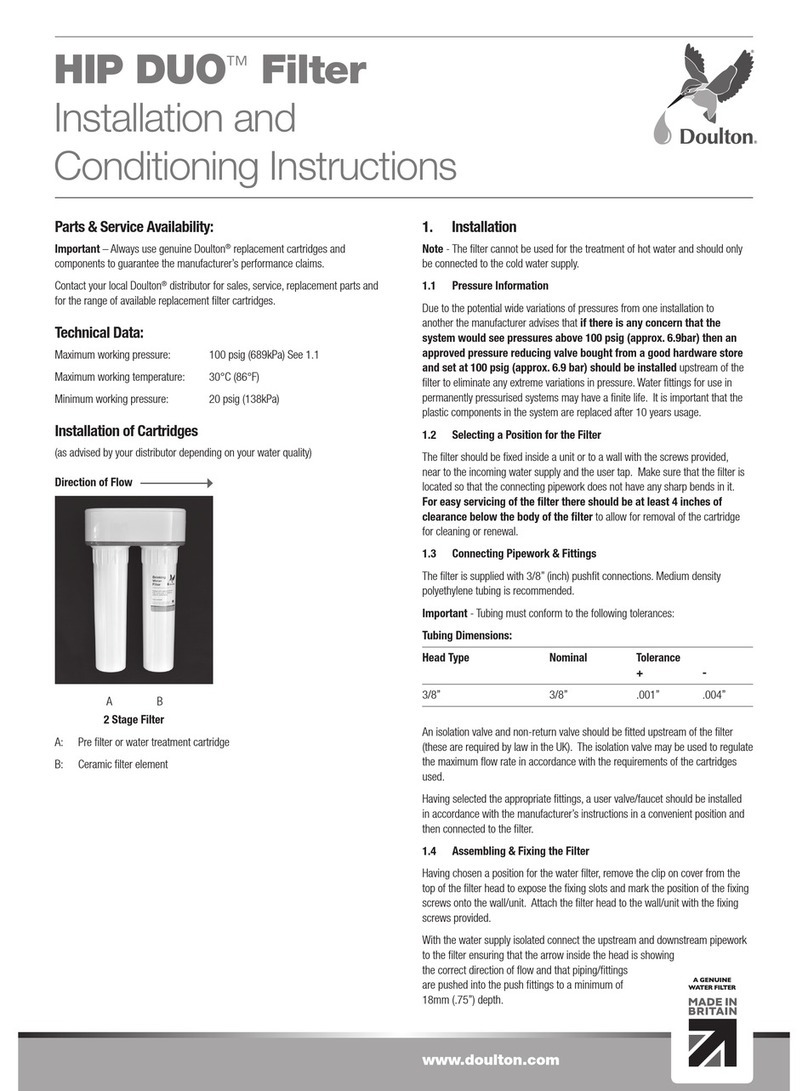
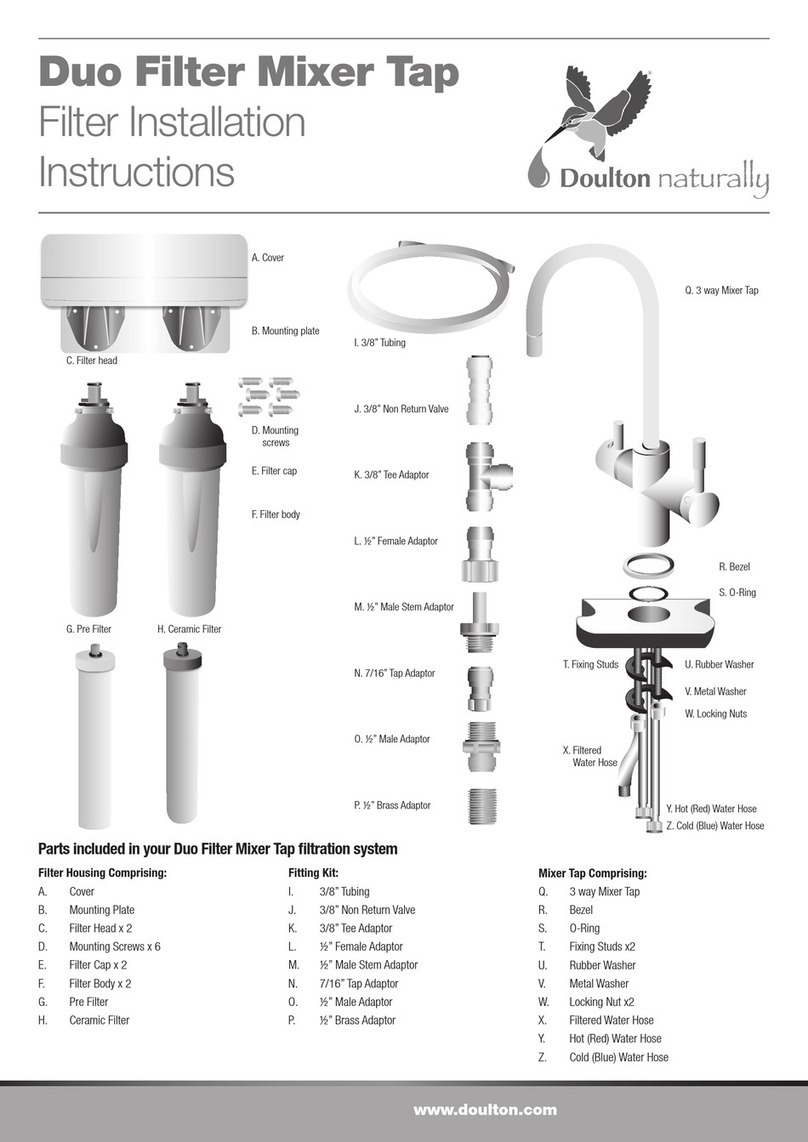
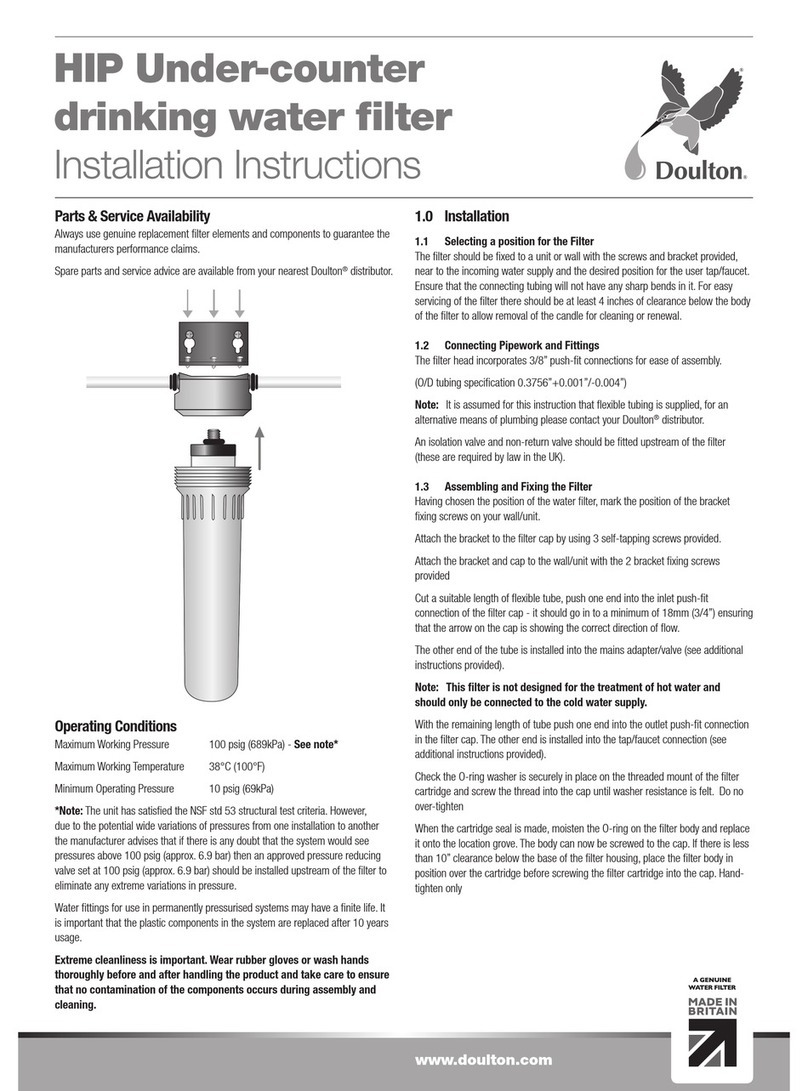
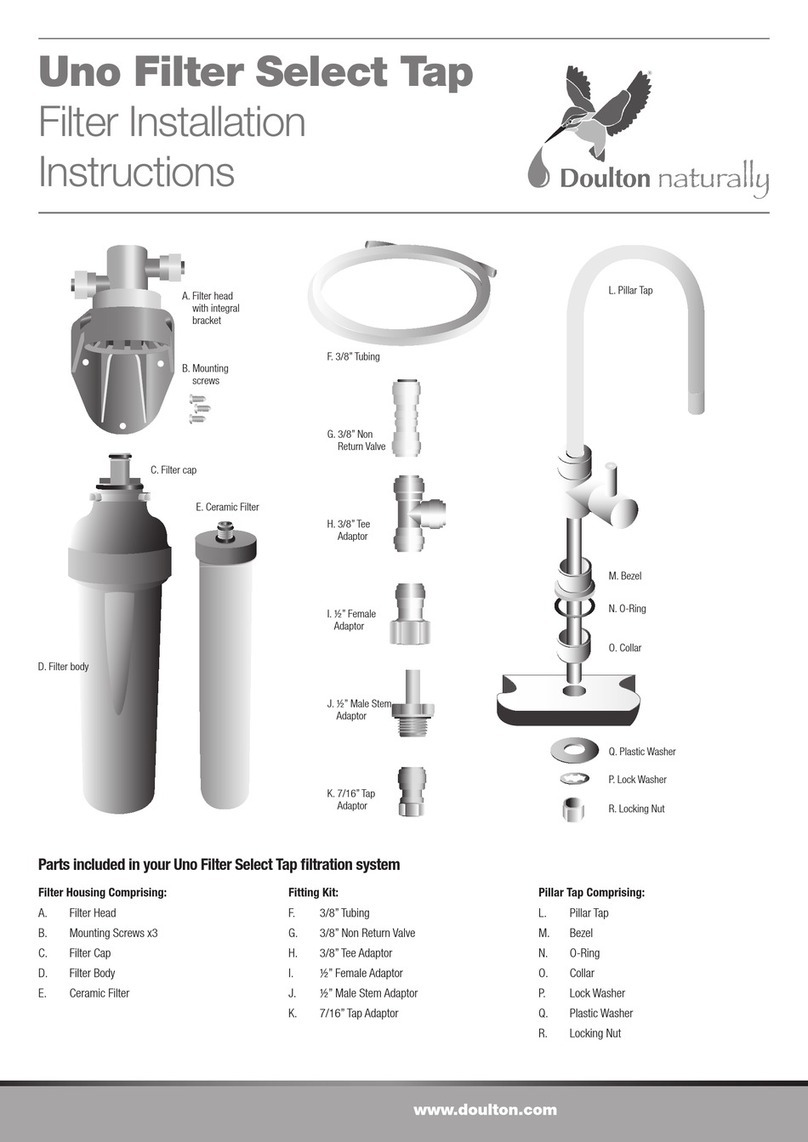
HIS Push-Fit Filter
Installation and
Conditioning Instructions
Parts & Service Availability:
Important – Always use genuine Doulton®replacement filter elements and
components to guarantee the manufacturer’s performance claims.
Contact your local Doulton®distributor for sales, service, replacement parts and for
the range of available replacement filter elements.
1. Installation
Note – The filter cannot be used for the treatment of hot water and should only be
connected to the cold water supply.
1.1 Selecting a Position for the Filter
The filter should be fixed inside a unit or to a wall with the screws and bracket
provided, near to the incoming water supply and the user tap. Make sure that the
filter is located so that the connecting pipework does not have any sharp bends
in it. For easy servicing of the filter there should be at least 4 inches of
clearance below the body of the filter to allow for removal of the filter element
for cleaning or renewal.
1.2 Connecting Pipework & Fittings
The filter is supplied with 3/8” (inch) pushfit connections. Medium density
polyethylene tubing is recommended.
Important - Tubing must conform to the following tolerances:
Tubing Dimensions:
Head Type Nominal Tolerance
+ -
3/8” 3/8” .001” .004”
An isolation valve and non-return valve should be fitted upstream of the filter (these
are required by law in the UK). The isolation valve may be used to regulate the
maximum flow rate in accordance with the requirements of the filter element used.
Having selected the appropriate fittings, a user tap should be installed in
accordance with the manufacturer’s instructions in a convenient position and then
connected to the filter.
1.3 Assembling and Fixing the Filter
Fit the bracket to the filter head using the 4 retaining screws provided and then
having chosen a position for the water filter, mark the position of the bracket fixing
screws onto the wall/unit.
Attach the filter head to the wall/unit with the 2 fixing screws provided.
With the water supply isolated connect the upstream and downstream pipework
to the filter head ensuring that the arrow on the top of the head is showing the
correct direction of flow and that piping/fittings are pushed into the push fittings to
a minimum of 18mm (.75”) depth.
Ensure that a sealing washer is fitted onto the filter element threaded mount stem
and screw the filter element into the filter head until washer resistance is felt. Do
not over-tighten.
If there is less than 10 inches clearance below the base of the filter housing, place
the filter body in position over the filter element before screwing the filter element
into the head.
Moisten the O ring on the filter body, check that it is located correctly and then
screw the filter body to the filter head. Hand tighten only.
2. Conditioning the Ceramic Filter
The filter system should now be ready for pressurisation. With the user tap in the
on position, gradually open the upstream isolation valve until the flow from the tap
has stabilised at the recommended flow rate.
Close the user tap and ensure that the system is watertight.
In order to remove any loose particles resulting from the manufacturing process or
from cleaning the filter element, it is recommended that the first supply of filtered
water should be run to waste for 10 minutes.
www.doulton.com
A GENUINE WATER FILTER
A GENUINE
WATER FILT ER
For a new filter element, the maximum flow rate will be achieved once the
ceramic filter element has become fully saturated; to allow the filter element to be
conditioned to the source water, allow the unit to stand unused for a further 24
hours and then run the first 15 litres of water to waste.
The filter is now ready for use.
Due to filtration of particulate contaminants from the water during use, the flow
of the water from the filter may deteriorate over a period of time. To restore the
water flow to its normal level, simply remove, clean and replace the filter element
as follows:
3. Servicing the Filters
It is important to wear rubber gloves or wash your hands thoroughly before and
after servicing the filter and filter element.
Removal, cleaning and reinstallation/replacement of the filter element is carried out
as follows:
With the upstream isolation valve turned off, vent any pressure by opening the user
tap.
Place a bowl of under the filter body and unscrew the filter body, which will be full
of water. Lower the body into the bowl. The filter element can now be unscrewed
from the filter head and cleaned in accordance with the manufacturer’s instruction
or replaced as described in Section 1.3.
When the filter element have been re-installed, wipe the filter housing clean with a
damp cloth and refill the filter system as described in Section 2.
Cleaning/Sterilising the System
To clean the housing wipe externally with a warm damp cloth. The following
substances should be avoided:
• Strong oxidising agents such as bleach or Milton solution
• All strong acidic materials including some descalents
• Strong alkaline material
A filter element that has reached the end of its life would be indicated by a
reduction in the taste quality of the filtered water. The filter element should be
replaced in accordance with the rated service capacity, which would typically give
a period of six months usage.
Manufactured by:
Doulton Water Filters, Newcastle, Staffordshire, ST5 9BT, United Kingdom.
Telephone: +44 (0) 1782 664420
Fax: +44 (0) 1782 664490
Email: fi[email protected]
Website: www.doulton.com
Doulton®is a trademark registered to Fairey Industrial Ceramics Limited.
W2393021 Issue 3 October 2016 Fairey Industrial Ceramics Limited trading as Doulton Water Filters. www.doulton.com
A GENUINE WATER FILTER
A GENUINE
WATER FILT ER

Other Doulton Water Filtration System manuals

Doulton Ceramic Twin Undersink Operating and safety instructions

Doulton

Doulton Ceramic Twin Undersink Operating and safety instructions

Doulton Duo Filter Mixer Tap User manual

Doulton

Doulton Duo Filter Mixer Tap User manual

Doulton EcoFast User manual

Doulton

Doulton EcoFast User manual

Doulton HIP DUO User manual

Doulton

Doulton HIP DUO User manual

Doulton HIP User manual

Doulton

Doulton HIP User manual

Doulton Uno Filter Select Tap User manual

Doulton

Doulton Uno Filter Select Tap User manual

Popular Water Filtration System manuals by other brands

BUON VINO MINI JET instructions

BUON VINO

BUON VINO MINI JET instructions

STA-RITE Swimming Pool Filter owner's manual

STA-RITE

STA-RITE Swimming Pool Filter owner's manual

HEISSNER Smartline HLF4000-00 Instructions for use

HEISSNER

HEISSNER Smartline HLF4000-00 Instructions for use

SnowPure Electropure EXL Series OEM Engineering Manual

SnowPure

SnowPure Electropure EXL Series OEM Engineering Manual

Atlas Filtri Micro Instructions for installation, use and maintenance manual

Atlas Filtri

Atlas Filtri Micro Instructions for installation, use and maintenance manual

MANN+HUMMEL ProVent Series Installation and maintenance manual

MANN+HUMMEL

MANN+HUMMEL ProVent Series Installation and maintenance manual

Arkal 2" Sand Separator Operation, Service & Maintenance Manual

Arkal

Arkal 2" Sand Separator Operation, Service & Maintenance Manual

GE GNULQ installation instructions

GE

GE GNULQ installation instructions

Goudsmit S NF Series Installation and user manual

Goudsmit

Goudsmit S NF Series Installation and user manual

AquaCo SYS-RO924USA5 Installation and operation manual

AquaCo

AquaCo SYS-RO924USA5 Installation and operation manual

Elba EWP-B2012GU owner's manual

Elba

Elba EWP-B2012GU owner's manual

Innowater RX manual

Innowater

Innowater RX manual

Beko OWAMAT 2 Instructions for installation and operation

Beko

Beko OWAMAT 2 Instructions for installation and operation

Drinking Fountain Doctor EWHA8 1H Installation use and care manual

Drinking Fountain Doctor

Drinking Fountain Doctor EWHA8 1H Installation use and care manual

Kessel EasyOil NS 1.5 Instructions for installation, operation and maintenance

Kessel

Kessel EasyOil NS 1.5 Instructions for installation, operation and maintenance

Blue Gold JUST WATER Series user manual

Blue Gold

Blue Gold JUST WATER Series user manual

Ecolab Aqua Balance Pure Comfort 2.0 user guide

Ecolab

Ecolab Aqua Balance Pure Comfort 2.0 user guide

STA-RITE S7S50 owner's manual

STA-RITE

STA-RITE S7S50 owner's manual

manuals.online logo
manuals.online logoBrands
  • About & Mission
  • Contact us
  • Privacy Policy
  • Terms and Conditions

Copyright 2025 Manuals.Online. All Rights Reserved.