DR.ÖTEK MT9s User manual

DR.ÖTEK
User Manual
Metal Detector MT9s
If there are any issues and are not 100% satisfied for any reason,
please contact us at support@drotekor.com


English···························································001
Français·························································009
Deutsche·······················································021
Español·························································031
Italiano··························································043


Thank you for choosing DR.ÖTEK Metal Detector MT9s. Please read this
manual carefully and become familiar with the function of MT9s before
use. After reading, please keep it safe for future reference.
PACKAGE CONTENTS
1. Metal Detector MT9s
2. 9V Alkaline Battery
3. User Manual
4. Warranty Card
(If anything is missing or not functioning properly, please contact us for
assistance at support@drotekor.com)
ASSEMBLY
The structure of MT9s is shown in the figure below.

handle into the plastic stem.
b. Loosen the screw on the lid and put a battery into the battery box.
c. Turn the control box backwards, the detector will sound a Kate
tone.
d. Loosen the lock nut on the stem and adjust the length of the stem
to enable you to operate the detector comfortably.
a. Press the silver button on the stem of the handle and insert the

the search coil into the position paralleled with the ground. Please
note that the search coil is correctly installed.
BATTERY
Please use a 9V alkaline battery.
Remove the battery out of the battery box if the detector is left without
any operation for a long time.
KEYS
The detector sounds a “DU” tone at every effective touch.
Power touch key
a. Touch the key once to start the detector with two “DU” tones. The
center LED indicator light flashes green and the ring LED indicator
e. Loosen the lock knobs on both sides of the search coil, and adjust

light flashes blue in a breathing way.
b. Touch the key once again to turn off the detector.
Mode touch key DISC PP
a. Once starting the detector, it automatically enters the DISC mode,
i.e. quick motion,the center LED indicator light doesn’t flash.
b. Touch the key once and the detector enters the PINPOINT mode,
mode.
b. Touch the key once to switch it into the high volume mode.
c. Touch the key once more to switch it into the quiet mode.
Color of Center LED
Indicator Light
Operation
Mode
Target Indication Low Voltage
Indication
Not flashing Disc NO
Flashing red quickly Disc Metals containing
iron
Flashing green
quickly
Disc Metals containing
nickel and pull-tabs
Flashing blue
quickly
Disc Metals containing
silver
Flashing red slowly Disc NO Warning of
low voltage
Flashing green
slowly
Pinpoint NO
Flashing green fast Pinpoint Find metals
a. Once starting the detector, it automatically enters the low volume
Center LED indication
i.e. slow motion, the center LED indicator light flashes green.
Volume touch key

FIELD OPERATIONS
This metal detector is used for the outdoors. There are too many
metals indoors and all kinds of devices that send interference signals,
so it is not appropriate to use it indoors.
Where to use this detector? You may use it:
On the beach. There are few interference signals so the
environment is suitable for detection.
In the gardens of your house or your relatives’ houses, especially
old ones.
In places where historical events took place. Of course you need to
get permission first.
On the ground of parks or other public areas with permission.
Away from areas where power lines, cables or pipelines, especially
pipes of flammable gases and liquids, may be buried.
Away from military areas where bombs or gas explosives may be
buried.
Excavate target objects with proper method. Do not cause damage to
vegetation. Recover the surface of the ground to its original state after
excavating.
Field detection is very complicated but of great fun. You may find coins,
jewelry, antiques, or just a horseshoe. Good effects and results call for
your repeated practices and accumulated experience.
1. The DISC mode
If you want to discriminate exact types of metals, you can touch the
MODE key once again to switch the detector into the DISC mode. Then
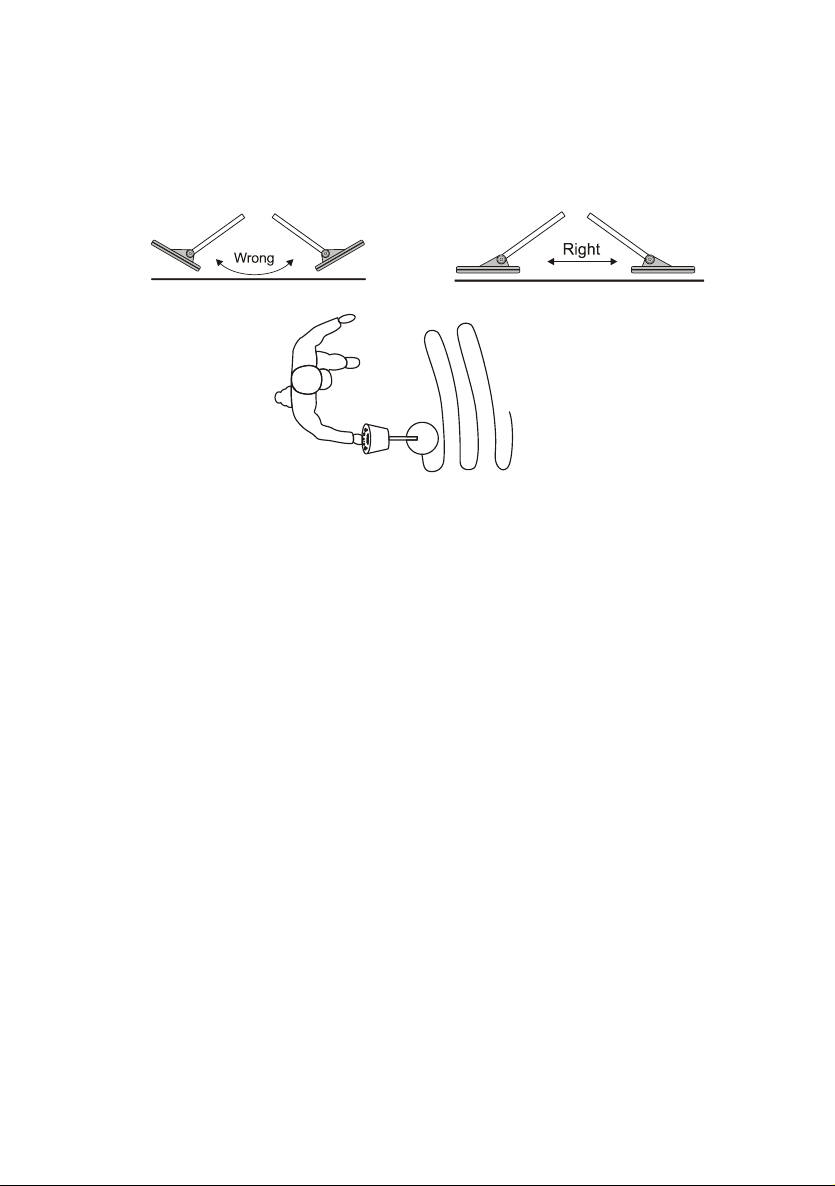
the center LED indicator light will not flash. When detecting you need
to move the search coil comparatively fast. When it detects different
metals, the center LED indicator light flashes in different colors. When
detecting, move the search coil at a constant speed instead of an

unsteady speed. Keep the search coil parallel with the ground and 1/2
inch above the ground surface. Do not swing it high and low like a
pendulum.
2. PINPOINT mode
Hold the search coil in the air, touch the MODE button, it gets into
PINPOINT mode. You can search metals by moving the search coil
slowly till the center LED flashes slowly of green light. When finding
metals, the center LED flashes faster, and the sound frequency turns
higher.
Please note, PINPOINT mode is a slow scan mode, you should move the
search coil slowly. As long as the search coil approaches the metal, the
detector will send out signals, but it can’t discriminate the category of
metals.
CAUTION
1. If you and your companion operate detectors at the same time,
please keep more than 10 meters away from each other.
2. If you turn on the detector and find the center indicator light
flashing red continuously with the “DU” tones, you need to replace
the battery.

3. If the detector flashes green normally but the sensitivity is so low
that you cannot use it to detect target objects, it is possible that
there are large metal objects nearby and the automatic calibration
reduces the sensitivity. You can hold the search coil up in the air
and restart the unit.
4. When detecting on the beach or in red soil areas, the unit sends
finger more slowly over touching areas because this product is
equipped with inductive switches.
signals all the time, due to the interference of conductive sea sand
and mineralized soil. You can hold the search coil near the ground,
and restart the unit. The detector will calibrate itself and properly
reduce the sensitivity.
5. For circumstances of no response on touching, you may move your

date of the original purchase. If for any reason you are not 100%
satisfied, please contact us by email with your purchase order ID
and details of the issue. We will reply to you within 24 hours.
2. We recommend registering your MT9s the day you receive it, so
WARRANTY
1. DR.ÖTEK offers 24-month warranty on Metal Detector MT9s from
that we can help you as quickly and efficiently as possible.
Support Email: support@drotekor.com
Register Warranty: https://www.drotekor.com/warranty
Facebook:https://www.facebook.com/Drotekor/
Instagram: https://www.instagram.com/drotekor/

Merci d'avoir choisi le Détecteur de Métaux DR.ÖTEK Pinpointer
MT9s. Veuillez lire attentivement ce manuel et vous familiariser avec
la fonction du MT9s avant utilisation. Veuillez le conserver pour toute
référence ultérieure.
Conseils
1. MT9s est utilisé pour l'extérieur. Il y a trop d'interférences à
l'intérieur.
2. Maintenez la bobine de recherche en l'air pour allumer / éteindre
pour une meilleure utilisation.
3. Lorsque le détecteur de métaux est allumé, il est en mode DISQUE
par défaut, la LED centrale ne clignote pas. Appuyez une fois sur le
bouton MODE, il passe en mode PINPOINT, la LED centrale clignote en
lumière verte.
4. Lors de la détection, déplacez la bobine de recherche à une vitesse
constante. Laissez la bobine de recherche parallèle au sol et à environ
1/2 pouce de la surface, ne la faites pas pivoter comme un pendule.
5. La plupart des objets métalliques précieux envoient des signaux
cohérents. Si le signal n'est pas cohérent, il s'agit principalement d'un
faux signal.
6. Dans le sol neutre, l'indication de discrimination est plus précise,
tandis que dans le sol de minéralisation ou salin, l'indication de
discrimination aura divers degrés de déviation.
7. Il est normal que les MT9s'allument automatiquement après
l'installation de la batterie.
8. Le film protecteur sur le boîtier de commande est amovible.

Où le détecteur de métaux doit-il être utilisé
●Sur la plage. Il y a moins de signaux d’interférence sur la plage,
adaptée à la détection.
●Au jardin de sa maison ou de votre parent, surtout dans une vieille
maison.
●Où les histoires historiques se produisent. Bien sûr, il faut obtenir le
consentement.
●Détectez dans un parc ou un terrain public, et il faut obtenir le
consentement.
●Évitez les zones où des lignes électriques, des câbles ou des tuyaux
peuvent être enfouis, en particulier, les conduites dans lesquelles sont
placés les gaz et liquides inflammables.
●Ne détectez pas dans les zones militaires où des bombes ou des
explosifs à gaz peuvent être enterrés.
●Utilisez des méthodes raisonnables pour creuser des cibles et ne pas
détruire la végétation. Après avoir creusé, restaurez la surface de la
terre à son état d’origine.
CONTENU DU COLIS
1 X détecteur de métaux MT9s
1 x pile alcaline 9V
1 X Manuel de l'utilisateur
1 X carte de garantie
(Si quelque chose manque ou ne fonctionne pas correctement, veuillez
nous contacter pour assistance à support@drotekor.com)
CARACTÉRISTIQUES
Le détecteur de métaux utilise notre technologie brevetée. Il a
plusieurs fonctions, faciles à utiliser et pleins de plaisir. Il convient aux
débutants d'un mineur. Il se caractérise par:

1. Il peut être calibré automatiquement au démarrage, aucun réglage
n'est requis.
2. Il a trois commutateurs d’induction pour la conversion fonctionnelle
avec une seule touche.
3. Il fonctionne à la fois au mouvement ralenti et au mouvement
rapide. L’indicateur LED de centre peut afficher l’information riche de
détection.

INSTALLATION
a. Appuyez sur des éclats d’argent blanc sur le lien de poignée et
insérez-le dans le tube.
b. Desserrez les vis sur le couvercle de la batterie et insérez la batterie.

c. Retournez la boîte de commande en arrière et il fait un bruit de Kata.
d. Desserrez la bague de verrouillage sur la bielle et ajustez la longueur
de la bielle pour pouvoir l'utiliser confortablement.

Détendez la serrure aux deux extrémités de la sonde et ajustez la
position de la sonde de sorte que la sonde soit parallèle au sol. Veillez à
ne pas égarer la position de la sonde.
Remarque:
1. S’il vous plaît utiliser 1 batterie alcaline 6LR61 de 9V.
2. Ouvrez le couvercle de la batterie et installez la batterie en fonction
du signe de polarité dans le boîtier de la batterie, laissez le ruban
sous la batterie.
3. Si le détecteur n’est pas utilisé pendant une longue période, retirez
la batterie du compartiment de la batterie.

Bouton tactile
Un son "DU" est généré à chaque contact efficace.
Bouton de puissance
Touchez une fois pour allumer la machine et il émet deux fois "DU, DU"
et la bande LED émet une lumière bleue "respirante".
Touchez à nouveau pour arrêter. S’il vous plaît noter que lorsque vous
arrêtez, appuyez sur et maintenez le bouton de puissance et laissez
arrêteraprès avoir fait un son DU.
L’alimentation passe automatiquement par le mode DISC, c’est-à-dire,
le mode à mouvement rapide. Centre LED ne clignote pas.
Touchez le bouton MODE une fois pour entrer le mode PINPOINT,
c’est-à-dire, le mode à mouvement lent. La LED centrale clignote en
vert.
Bouton devolume
La mise en marche s ’accompagne automatiquement d ’unfaible
PP
Bouton de MODE DISC
Table of contents
Languages:
Other DR.ÖTEK Metal Detector manuals