DR. Z Amplification Your Personal Portable Oxygen Bar User manual

1
Your Personal Portable Oxygen Bar
TABLE OF CONTENTS
1. Introduction ................................................. 1
2. Important Safety Rules ......................................... 2
3. Getting Started ............................................... 3
4. Product Overview ............................................. 4
5. How to Operate Your Personal Portable Oxygen Bar . . . . . . . . . . . . . . . . . 5
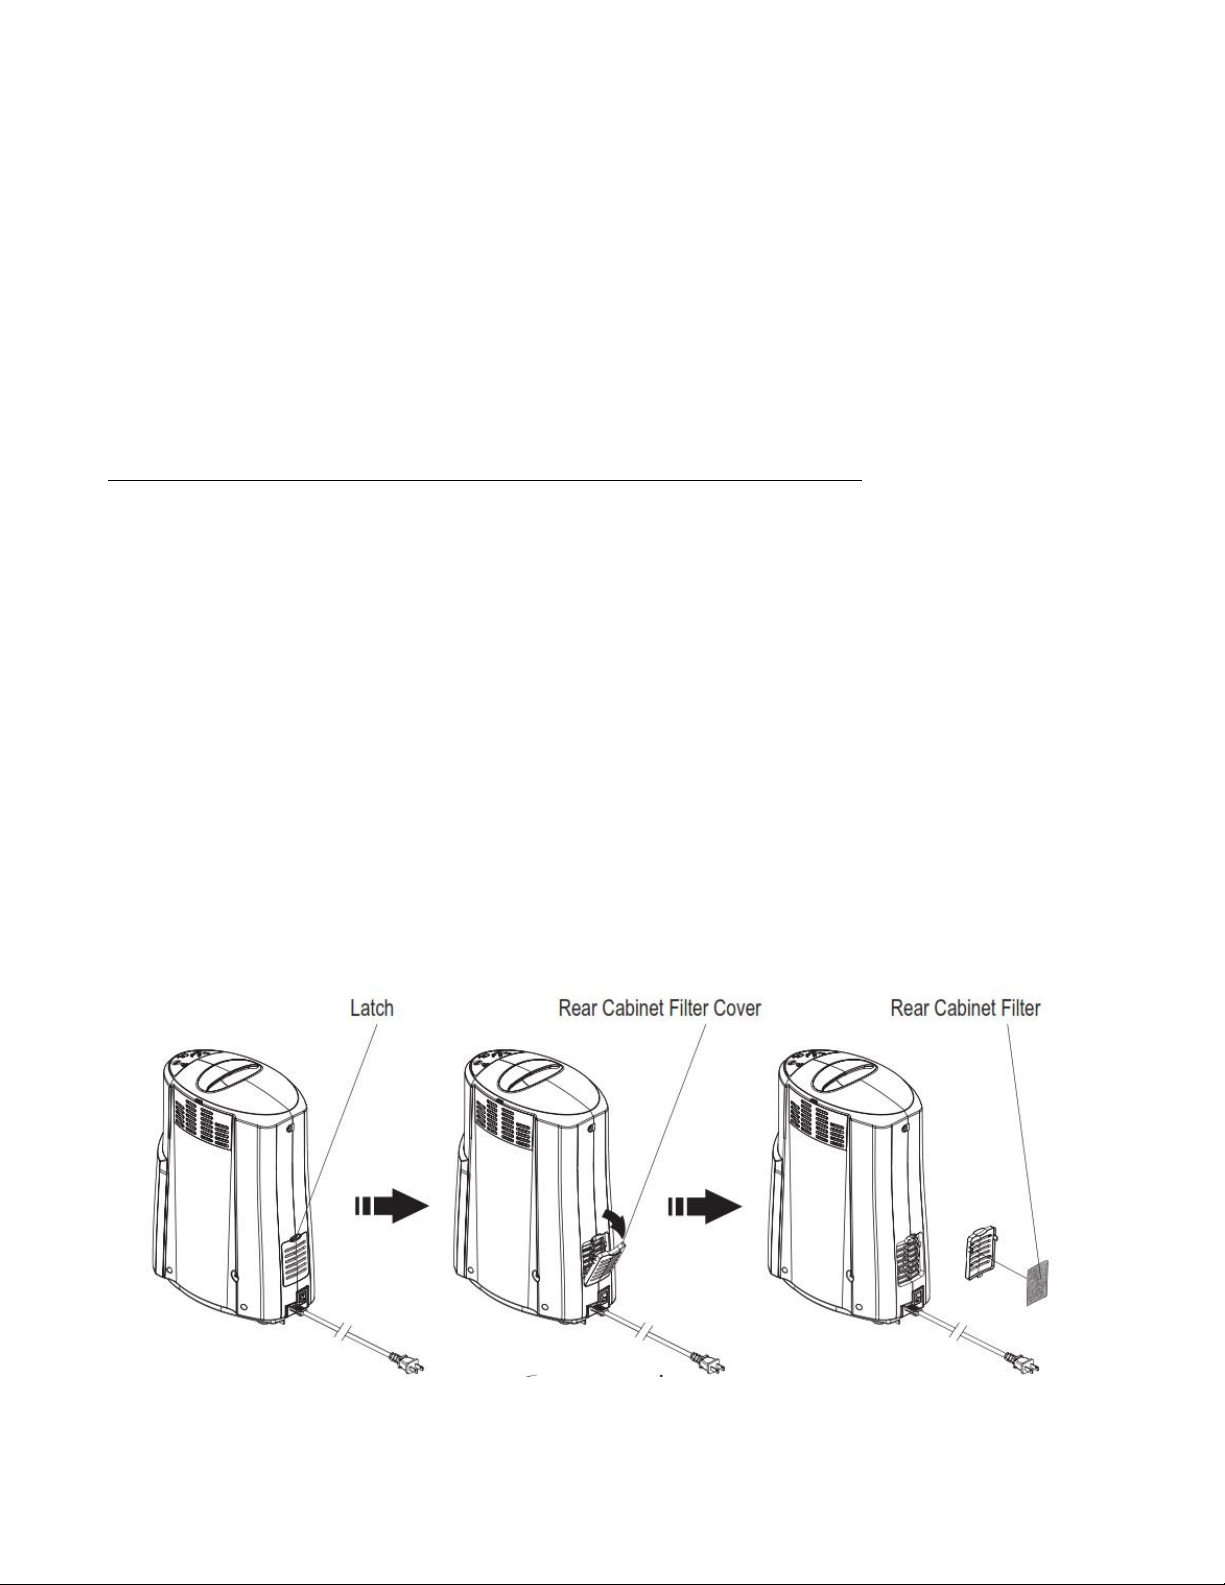
6. Maintenance ................................................. 7
7. Troubleshooting ............................................. 10
8. Product Specifications ........................................ 10
9. Warranty ................................................... 11
INTRODUCTION
Thank you for purchasing
Your Personal Portable Oxygen Bar
! We are confident you will be completely
satisfied with this product for many years to come. So confident in fact that, if you’re not buzzing to everyone about
Your Personal Portable Oxygen Bar
after breathing fresh, clean oxygen enriched air for 30 days, you can
simply return it! We offer a 30 Day Money Back Guarantee (minus 15% restocking fee, minus our shipping cost
to you). The unit must be received by us in good working order in the original packaging with ALL accessories and
documentation within 30 days of shipping date.
Please Note:
You must obtain in advance a
Return
which must be clearly marked on the
outside of the shipping box. We will, under no circumstances, accept any returns without such authorization.
We also offer a 1 Year Limited Warranty. Details are provided in this manual.
Your Personal Portable Oxygen Bar
produces 40% Oxygen Enriched Air (OEA). The unit plugs into a standard
wall (115V) outlet and can be used most everywhere. It features a convenient carrying handle for easy transport.
This Owner’s Manual will acquaint you with
Your Personal Portable Oxygen Bar
. Other helpful and important
hints are included on the DVD. Should you have any questions, Dr. Z will be happy to answer them for you. You
can also visit www.drz.org or call us toll free at
866-453-2021
.
Please be sure to read and understand all the information contained in this Owner’s Manual before you operate
your unit. The included instructional DVD contains further useful information on how and why Dr. Z recommends
to use a small fan at all times with the
Personal Portable Oxygen Bar,
how to place the head set in different
circumstances.
Disclaimer: Any practices or advice given or offered is not intended to replace the services of your physician, or to provide an alternative to professional medical
treatment. Where it suggests the possible usefulness of certain practices in relation to certain illnesses or symptoms, it does so solely for educational purposes–either
to explore the relationship of natural breathing to health, or to expose the user to alternative healing approaches. None of these statements have been evaluated
by the Food and Drug Administration. Products are not intended to diagnose, treat, cure or prevent any disease.
WARNING: Persons with any Medical Condition or Lung Disorder, including Asthma or Emphysema, should consult
their Physician before using recreational oxygen. All products are for recreational use only. No medical claims are
made nor should be made for any of these products shown.
All products warranted and guaranteed. Seller is not responsible for shipping delays.

2
IMPORTANT SAFETY RULES
When using electrical products, especially when children are present, basic safety precautions should always be followed. Read
all instructions before using. Important information is highlighted by these terms:
!! DANGER
- Urgent safety information for hazards that will cause serious injury or death.
!! WARNING
- Important safety information for hazards that might cause serious injury.
!! CAUTION
- Information for preventing damage to the product.
!! NOTE
- Information to which you should pay special attention.
!! DANGER
To reduce the risk of serious or fatal injury from electrical shock:
1. DO NOT use while bathing.
2. DO NOT place the product where it can be splashed by liquid or fall into bathtub, water or other liquid.
3. DO NOT reach for the unit in the event the unit falls into water. Unplug the unit immediately, then send it to your
dealer for repair.
!! WARNING
1. Check the electrical rating on the unit label and wall outlet before connecting the power cord.
2. Keep all electrical cords away from heated surfaces.
3. NO NOT operate this unit if it:
• has been dropped or knocked heavily.
• has been splashed by liquid.
• has a damaged cord or plug.
• is not working properly.
4. This device manufactures high levels of oxygen, which promotes rapid burning. NO NOT allow smoking or open flames
within 5 feet of: (I) this device or (2) any oxygen carrying accessory. Use no oil, grease, or petroleum-based products on
or near the unit. Disconnect the power cord from the electrical outlet before you clean or service the unit.
5. If the unit is turned on but not in use, DO NOT leave the Headset under covering or chair cushions. The oxygen will
make the material flammable. Set the power switch (marked as I/O) located at the back of the unit to the O (off) position
when the Oxygen Bar is not in use.
6. Electrical shock hazard. DO NOT remove cover! Only your dealer should remove the cover.
7. DO NOT use extension cords with this unit. DO NOT overload wall outlets.
!! CAUTION
DO NOT block the ventilation port located on the back of unit. DO NOT set base on carpet or other soft surface.
This could cause air flow restriction and damage to unit.
!! NOTE
DO NOT use
Your Personal Portable Oxygen Bar
more than 30 minutes per session.

3
GETTING STARTED
1. Open the box containing Your Personal Portable Oxygen Bar, check the contents and make sure the following
components are enclosed:
A. Portable Oxygen Bar Unit
B. Headset
C. Headset Hose
D. Mouthpiece Covers
E. Mouthpiece Filters
D. Air Intake Filter
We recommend that you discard the
Mouthpiece Covers and Mouthpiece Filters
at 866-333-7536.
2. It is recommended that you keep an extra Air Intake Filter on Hand at all times as a replacement.

4
Your Personal Portable Oxygen Bar
Overview
1. On/Off Button
2. Power On LED
3. Start Timer Button
4. Timer Indicator LED
5. Unit Handle
6. Air Intake Filter
7. Side Cabinet Filter
8. Side Cabinet Filter Cover
9. Oxygen Outlet
10. Power Switch
11. Power Cord
12. Rear Cabinet Filter
13. Rear Cabinet Filter Cover

5
HOW TO OPERATE YOUR PERSONAL
PORTABLE OXYGEN BAR
1. Familiarize yourself with this unit.
2. Place unit on a stable, flat surface which is clean and free of dust. DO NOT set base on carpet or other soft
surface. This could cause air flow restriction and damage to unit.
3. Check to see that the Power switch is in the
“OFF”
position. Plug power cord into the electrical outlet.
!! NOTE
Before attempting to start a cold unit, let the unit reach room temperature.
4. Press the Power Switch (at the rear lower position) to
“I” (ON
) position.
5. Press the ON/OFF button first and then press the Start Timer Button to start the unit.
!!NOTE
Do not use
Your Portable Personal Oxygen Bar
more than 30 minutes per session.

6
6. Set the running time by pressing the Start Timer Button as follows:
A. Press the Button one time and the unit will run 10 minutes, and the 10 minute indicator window will light.
B. Press the Button two times and the unit will run 20 minutes and the 20 minute indicator window will light.
C. Press the Button three times and the unit will run 30 minutes and the 30 minutes indicator window will light.
!!NOTE
For optimal results, use
Your Personal Portable Oxygen Bar
daily.
7. Connect the Headset Hose to the Oxygen Outlet of
Your Personal Portable Oxygen Bar
.

7
MAINTENANCE
!! DANGER
Electrical shock hazard.
Do not attempt to open cabinet. If service is required, return unit to a qualified dealer. Opening or tampering with the unit will
void warranty.
!! DANGER
Electrical shock hazard.
Turn off the unit and remove the Power Cord from the electrical outlet before maintenance.
Cleaning Your Personal Portable Oxygen Bar and Accessories
Please clean regularly to maintain
Your Personal Portable Oxygen Bar
in good condition. Refer to instruction below.
Cleaning the Cabinet
1. With the power switch in the “Off” position, disconnect the
Personal Portable Oxygen Bar
Unit from all external power
sources.
2. Wipe the cabinet with a soft, clean cloth.
Cleaning the Rear Cabinet Filter and Cover: (Recommended weekly)
1. With the Power Switch in the “Off” position, disconnect the
Personal Portable Oxygen Bar
Unit from all external power
sources.
2. Pull the tab on the latch of the Rear Cabinet Filter Cover with index and middle fingers to open it.
3. Take out the Rear Cabinet Filter.
4. Rinse it thoroughly with warm tap water.
5. Sake out water, put it in a dry place and allow it to air dry.
6. Replace the Rear Cabinet Filter.
7. Replace the Rear Cabinet Filter Cover.
8. Clean the Rear Cabinet Filter Cover once a week. Remove dust on filter cover by using a vacuum cleaner for household
use.

8
Changing the Air Intake Filter: (Recommended Every 3 Months)
1. With the Power Switch in the “Off” position, disconnect the Portable Oxygen Bar Unit from all external power sources
2. Press the latch on Side Cabinet Filter Cover and open the cover.
3. Replace the used Air Intake filter with a new one (Additional filters may be purchased from the dealer).
4. Reinstall Side Cabinet Filter Cover.
!! NOTE
Do not substitute any other material for this Air Intake Filter. Substitution may lead to contamination or poor performance;
use only Portable Oxygen Bar CTA-08 filters. (Item #AF-100)
Cleaning the Side Cabinet Filter and Cover: (Recommended Weekly)
1. With the Power Switch in the “Off” position, disconnect the Personal Portable Oxygen Bar Unit from all external power
sources
2. Pull the tab on the latch of the Side Cabinet Filter Cover with index and middle fingers to open it.
3. Take out the Side Cabinet Filter.
4. Rinse it thoroughly with tap water.
5. Shake out water and put it in a dry place and allow it to air dry.
6. Replace the Side Cabinet Filter.
7. Replace the Side Cabinet Filter Cover.
8. Clean the Side Cabinet Filter Cover once a week. Remove dust on Filter Cover by using a vacuum cleaner for
household use.

9
Cleaning the Headset Hose and Headset:
1. Separate headset hose from unit and from headset. (Reverse directions on page 6).
2. Soak Hose and Headset in warm water and an anti-bacterial/germicidal soap for 2-3 minutes.
3. Rinse thoroughly with warm water.
4. Allow to air dry in a clean, shady area.
5. Re-attach the parts to the unit:
-Connect one end of the Headset Hose to the unit.
-Connect the other end of the Headset Hose to the Headset Oxygen Inlet.
!! NOTE
DO NOT use washing detergent, benzene, thinner or alcohol, etc. It may damage, deteriorate or discolor the product.
DO NOT dry the product with a hair dryer or heater. It may cause deterioration or breakdown of the product.

10
TROUBLESHOOTING
Your
Personal Portable Oxygen Bar
contains no user-serviceable parts. If you believe your unit is not working
properly, BEFORE YOU RETURN IT TO THE DEALER WHERE YOU PURCHASED IT, please take a few
moments to check for these possible causes:
PROBLEM ACTION
Unit does not turn on. 1. Check power sources and connections.
2. Check that your wall outlet is live.
3. Check that power cord is not damaged.
Motor runs, but no oxygen is emitted. 1. Check all hose connections.
2. Check for damaged hoses or hose
kinks.
3. Check that filters are clean.
Limited oxygen flow 1. Check for damaged hoses or hose
kinks.
2. Check voltage of wall outlet.
3. Check that filters are clean.
Emitted oxygen produces an unpleasant
odor.
1. Clean hoses.
2. Clean headset.
3. Replace mouthpiece filter.
Personal Portable Oxygen Bar SPECIFICATIONS
Weight: (Compressor only)
Dimensions: (Compressor only)
15 pound (6.8 kg)
(L) 6.4" x (W) 11.9" x (H) 16.3"
(162 x 303 x 415 mm)
Electrical Requirements:
Power Wattage:
Oxygen Concentration:
Oxygen Output Capacity:
A/C 115V – 60 Hz
150 watts under normal load
40% (+/- 2%)
3 LPM (liters per minute)
Ambient Operation
Temperature Range
Humidity Range:
50 to 95 degrees F (10 to 35 degrees C)
30% to 75%
Transport/Storage
Ambient Temperature:
Humidity:
-13 to 158 degrees F (-25 to 70 degrees C)
10% to 90%

11
One Year Limited Warranty
The comp ressor portion of the
Personal Portable Oxygen Bar
is warranted to be free from defective
workmanship and materials for a period of one year from date of purchase.
Any defective part(s) will be repaired or replaced if the unit has not been tampered with or used improperly during
that period. Make certain that any malfunction is not due to inadequate cleaning or failure to follow the instructions.
If repair is necessary, contact Dr. Z at drz@drz.org or call toll free
866-453-2021
for instructions.
!! NOTE
This warranty does not cover providing a loaner unit, compensating for costs incurred in rental while said unit is
under repair or costs for labor incurred in repairing or replacing defective part(s).
Normal wear and tear are not covered by this warranty. This warranty extends only to the original consumer
purchaser and is not transferable. In addition, proof of purchase must be demonstrated. This warranty is void if
the product has been subject to accident, misuse, abuse, shipment or transit; improper maintenance or repair, or
unauthorized modification or repair. This warranty does not apply to repairs or replacement in the case of improper
storage, improper care or cleaning; use of unauthorized parts, accessories or attachments; operations contrary to
manufacturer’s operating instructions; damage caused by electrical power wiring, systems or utilities; fire, flood,
natural disasters or conditions beyond the control of the owner, and operator. This limited warranty is the only
written or express warranty given unless an extended warranty is purchased by the consumer.
Repair or replacement of the product (or, if repair or replacement is not feasible, a refund of the purchase price)
is the exclusive remedy of the consumer under this warranty. You acknowledge and agree that replacement
product may be a new , renewed or comparable product. A replacement product is covered only for the original
warranty period. When the warranty on the original product expires, the warranty on the replacement product also
expires.
THERE IS NOT OTHER EXPRESS WARRANTY. IMPLIED WARRANTIES, INCLUDING THOSE OF
MERCHANTABILITY AND FITNE SS FOR A PARTICULAR PURPOSE ARE LIMITED TO THE DURATION OF
THE EXPRESS LIMITED WARRANTY AND TO THE EXTENT PERMITTED BY LAW ANY AND ALL IMPLIED
WARRANTIES ARE EXCLUDED. THIS IS THE EXCLUSIVE REMEDY AND LIABILITY FOR CONSEQUENTIAL
AND INCIDENTAL DAMAGES UNDER ANY AND ALL WARRANTIES ARE EXCLUDED TO THE EXTENT
EXCLUSION IS PERMITTED BY LAW. SOME STATES DO NOT ALLOW LIMITATIONS ON HOW LONG AN
IMPLIED WARRANTY LASTS, OR THE LIMITATION OR EXCLUSION OF CONSEQUENTIAL OR INCIDENTAL
DAMAGES, SO THE ABOVE LIMITATION OR EXCLUSION MAY NOT APPLY TO YOU.
Procedure for Warranty Repairs or Replacement
If warranty service is necessary, the original purchaser must call Dr. Z at
866-453-2021, ext. 1
, in advance for a
Return Merchandise Authorization number
. This number must be marked clearly on the exterior of the
package. The original purchaser must return the complete
Personal Portable Oxygen Bar
unit in the original
packaging securely, with ALL accessories and documentation. Please send it via UPS or FedEx, with full
insurance, so it can be tracked. Please include a description of the defect, your name, address and telephone
number, proof of purchase and a check or money order for $25.00 to cover return postage and handling.
Shipping address/instructions will be provided at that time.
We will not process any returns that are missing Return Merchandise Authorization number, proper
documentation and/or shipping and handling charges.
Remember...
Please record below the model and serial numbers found on the product and the purchase date.
MODEL #
SERIAL #
DATE PURCHASED
Table of contents
Popular Medical Equipment manuals by other brands

Otto Bock
Otto Bock 17B44 Instructions for use

ECOPOSTURAL
ECOPOSTURAL C7902 instructions

medi
medi circaid juxtalite ankle foot wrap inelastic compression... Instructions for use

Ossur
Ossur CHEETAH XTREME Instructions for use

Euroclinic
Euroclinic GYNEX instruction manual

Blatchford
Blatchford Echelon Instructions for use