DRAKE DNP50 User manual

Stand-alone Network Media Player for Digital Signage Applications
I N S T R UCT I O N M A N U A L
DNP50
DRAKE ANDROID NETWORK PLAYER
®
• DNP50 Drake Android Network Player
• Instruction Manual
• DC Power Supply
• HDMI Cable
• A/V Cable (RCA to 3.5mm jack)
is a registered trademark of R.L. Drake Holdings, LLC.
© Copyright 2014 R. L. Drake Holdings, LLC P/N: 651234400 A Printed in U.S.A.
Rev: V002 20140106
1002595 DNP50
Contents Included:

i
Contents
DrakeDNP50InstructionManual0
1.Introduction1
1.1.Features1
1.2.Packagecontents1
1.3.Mountingoptions1
1.4.Physicalview2
2.ConfiguringtheDNP50/DNP50AVWMediaPlayer3
2.1.Systemconnections3
2.2.Basicsettings4
2.3.ConnecttheDNP50/DNP50AVWtoyournetwork4
2.4.Timezonesettings6
2.5.Contentsettings7
2.6.PlayerInformation8
2.7.Contentconfiguration‐AppStart8
2.8.Contentconfiguration‐FailSafe9
2.9.Contentconfiguration‐EasyPlay9
2.10.Displaysettings12
2.11.Soundsettings14
2.12.Systemconfiguration‐TimeServer15
2.13.Systemconfiguration‐Scheduledreboot16
2.14.Systemconfiguration‐Firmwareupgrades16
2.15.Systemconfiguration‐Factoryreset17
2.16.Systemconfiguration‐Powersave18
2.17.Systemconfiguration‐ExpandStoragebyusingSDcard18
3.ContentManagement19
4.AuthoringinHTML519
5.WorkingwithSMIL19
5.1.Introduction19
5.2.www.a‐smil.orgfordevelopers20
6.TechnicalData20
6.1.Specifications20
7.Appendix:FAQ21

1
1. Introduction
ThisdocumentdescribesthebasicoperationoftheDNP50/DNP50AVWandfrequentlyaskedquestions.
1.1. Features
TheDNP50/DNP50AVWisanHD720presolutionhighdefinitiondigitalsignageplayerfeaturingindustrialgrade
mechanicaldesignandversatileopen‐standardHTML5andSMILprogrammability.
SupportforHTML5widgetsfordynamiccontent(W3CWidgetsstandard)
HD720phardwaredecodingofMPEG1/2/4,H.264,andVC‐1mediaformats
4GBon‐boardflashlocalstoragewithSDcardslot
IntegratedaudioandvideooutputviaHDMI
SupportsfullPOPAIScreenMediaFormatsStandardsprofilesS1toS12,andE1toE8
Multiple3
rd
partysoftwaresolutioncompatibility
IndustryleadingW3CSMILsupportfordevelopers
(DNP50AVWonly)Built‐inWi‐Fi(wireless)b/g/nnetwork
(DNP50AVWonly)CompositeAVinputandComponentinput
1.2. Packagecontents
NOTINCLUDED:AUSBmouseisrequiredforsystemsetup
1.3. Mountingoptions
Theplayercanbeattachedtomountingpostsonthebacksofscreensor
insidecabinetrywiththebuiltinVESAMIS‐D100(100mmx100mm)
compatiblemountingflange.
ATTACHtheWi‐FiantennatotheDNP50AVW’sWirelessantennapost,andthenscrewtheWi‐Fiantenna
clockwiseontothepostuntilantennaissecure.DONOTOVER‐TIGHTEN.
(DNP50AVWwithWi‐FiAntennaInstalled)
MediaPlayerUnitACAdapter Standard3.5mmto
RCA‐to‐AVadapter
Ethernetcable
SDcardcover
(pre‐installedonunit)
Wi‐FiAntenna
(DNP50AVWonly)
Standard3.5mmto
componentadapter
(DNP50AVWonly)
RS‐232adapter
(DNP50AVWonly)

2
1.4. Physicalview
Physicalfeatures(lefttorightinaboveillustration)
HDMI1.3aconnectorfordigitalvideoandaudiocombinedoutput
ADB,Androiddebugconsoleport
12VDCforpoweradapter
PowerandStatusLEDindicator
3.5mmcompositeAVoutput
Ethernetportfornetworkcontentupdate
SDcardslotwithSDcardcover
USBportsforUSBcontentupdateandconfiguration
S/WResetbuttontoperformfactoryreset
Wirelessantennapost(DNP50AVWonly)
RS‐232port(notusedastelephoneconnector,DNP50AVWonly)
CompositeAVinput(DNP50AVWonly)
Componentinput(DNP50AVWonly)
VGAportforanalogvideooutput(DNP50AVWonly)
DNP50AVWonly
DNP50(withoutWiFiAntenna)/DNP50AVW
(
DNP50AVWonl
y)

3
2. ConfiguringtheDNP50/DNP50AVWMediaPlayer
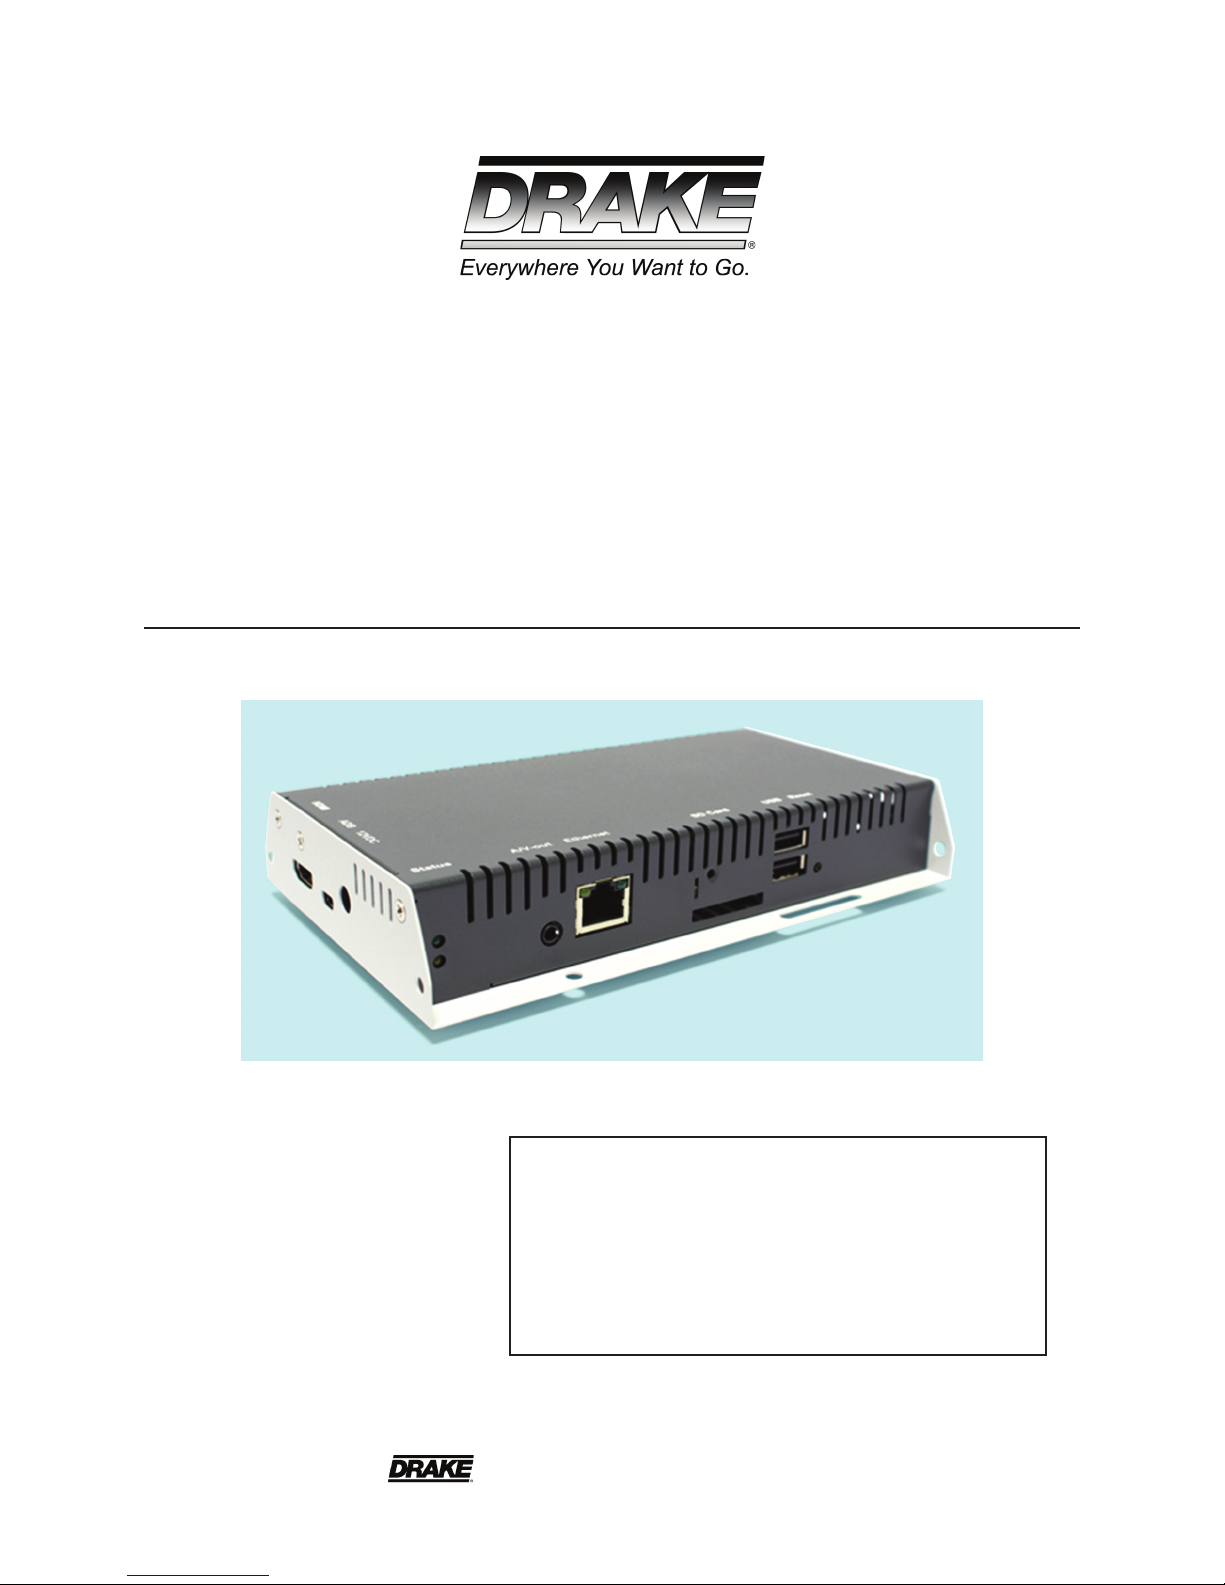
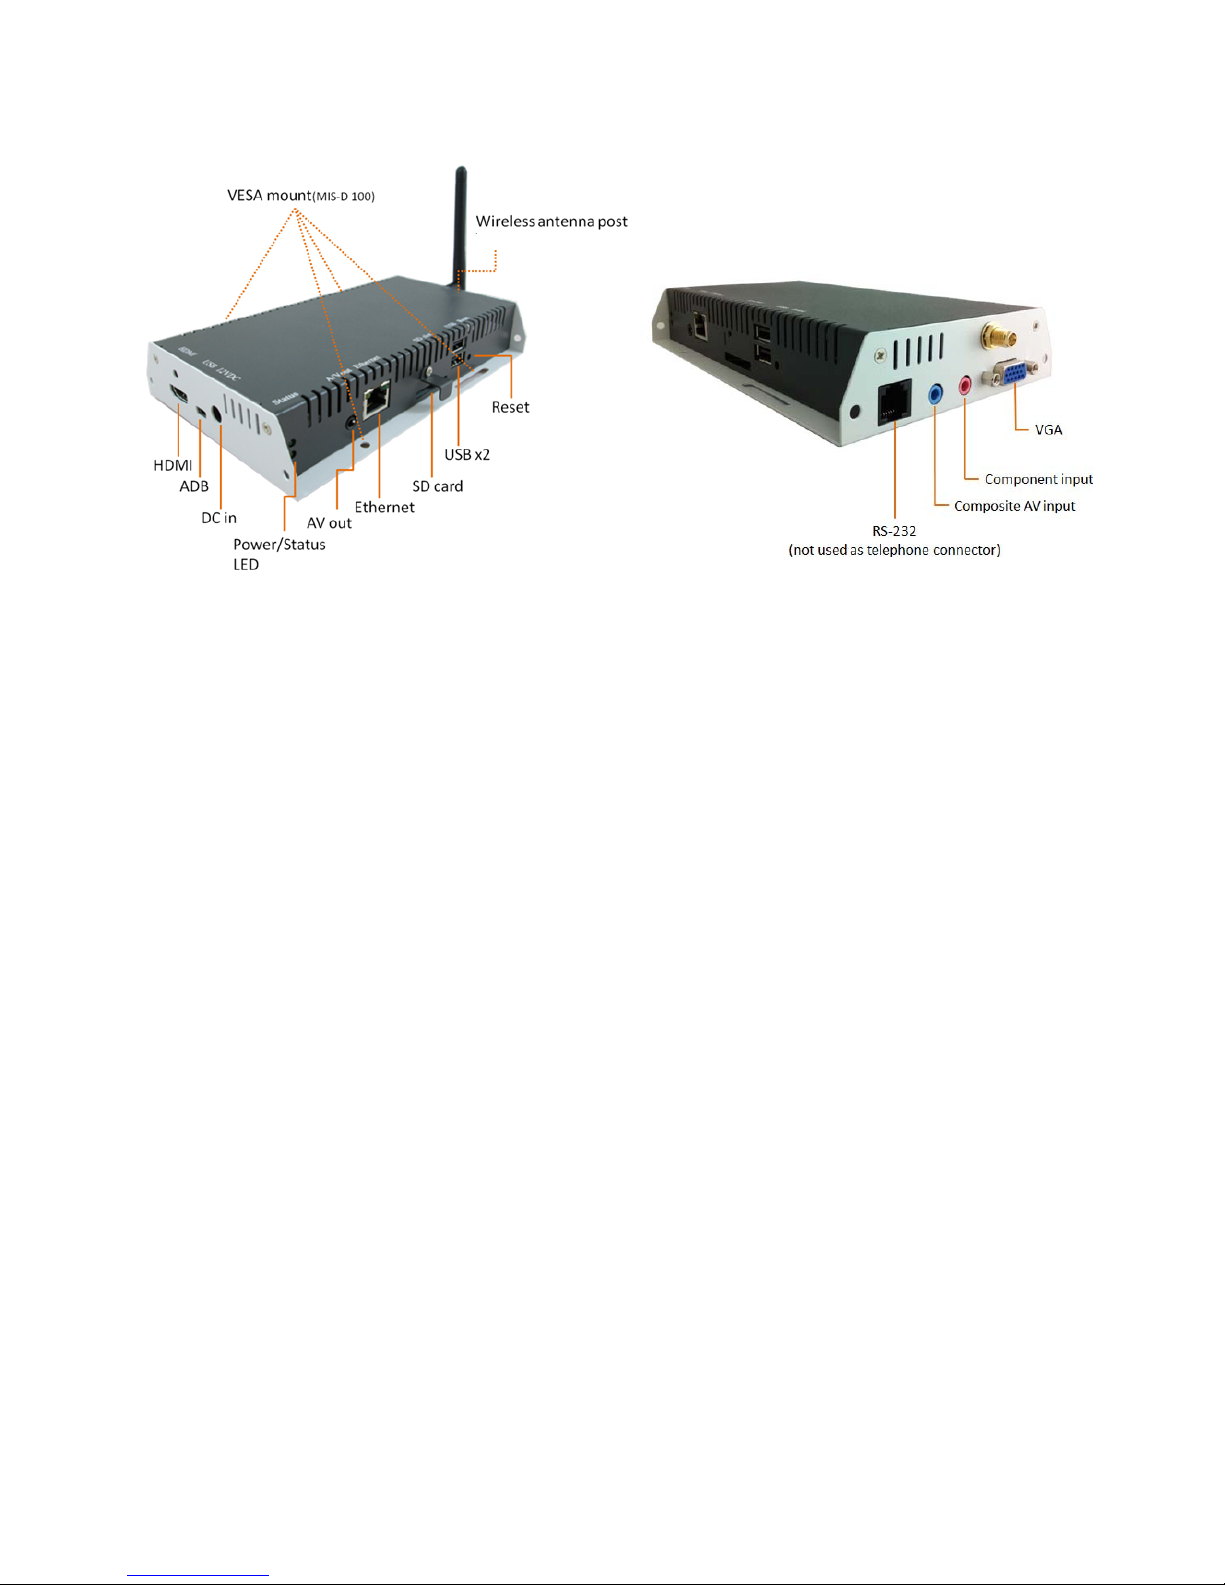
2.1. Systemconnections
1AttachanHDMIcabletoyourmonitor
WhenusinganHDMIconnection,audioissentalongwithvideoovertheHDMIcable,sonoadditionalcablesare
required.
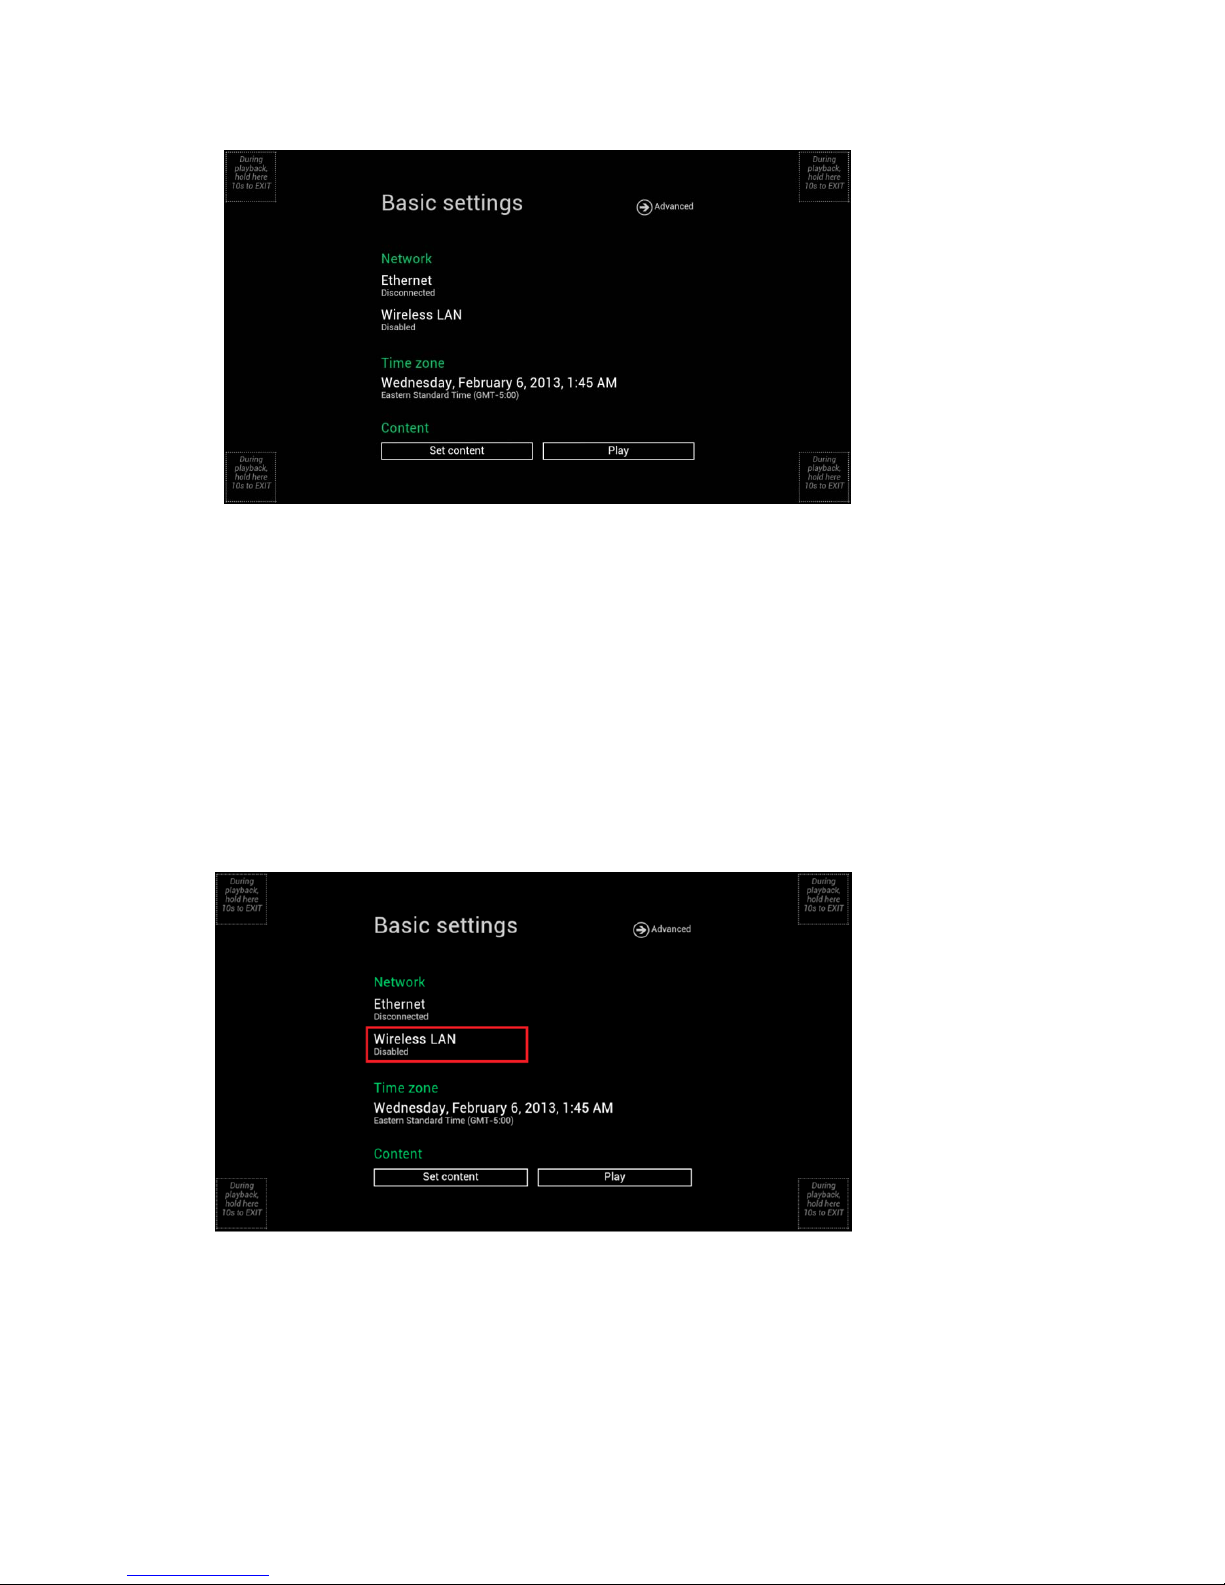
2AttachtheACpoweradaptertopowerontheunit.Afterapproximately40secondsbootinganimationwill
bedisplayedonscreenasshownbelow:
3Playerbootprocesstakesapproximately75secondstocomplete.
Afterbootupcomplete,playerwillstayinbasic
settingsmenuifnocontentservicehasbeen
configured(i.e.firstbootupforbrandnewunit
orafterafactoryreset).PluginaUSBmouseto
startconfiguringtheplayer.
Ifyouhavealreadysetcontentintotheplayer,
contentswillplaybackautomaticallyafter15
secondsafterbootup.
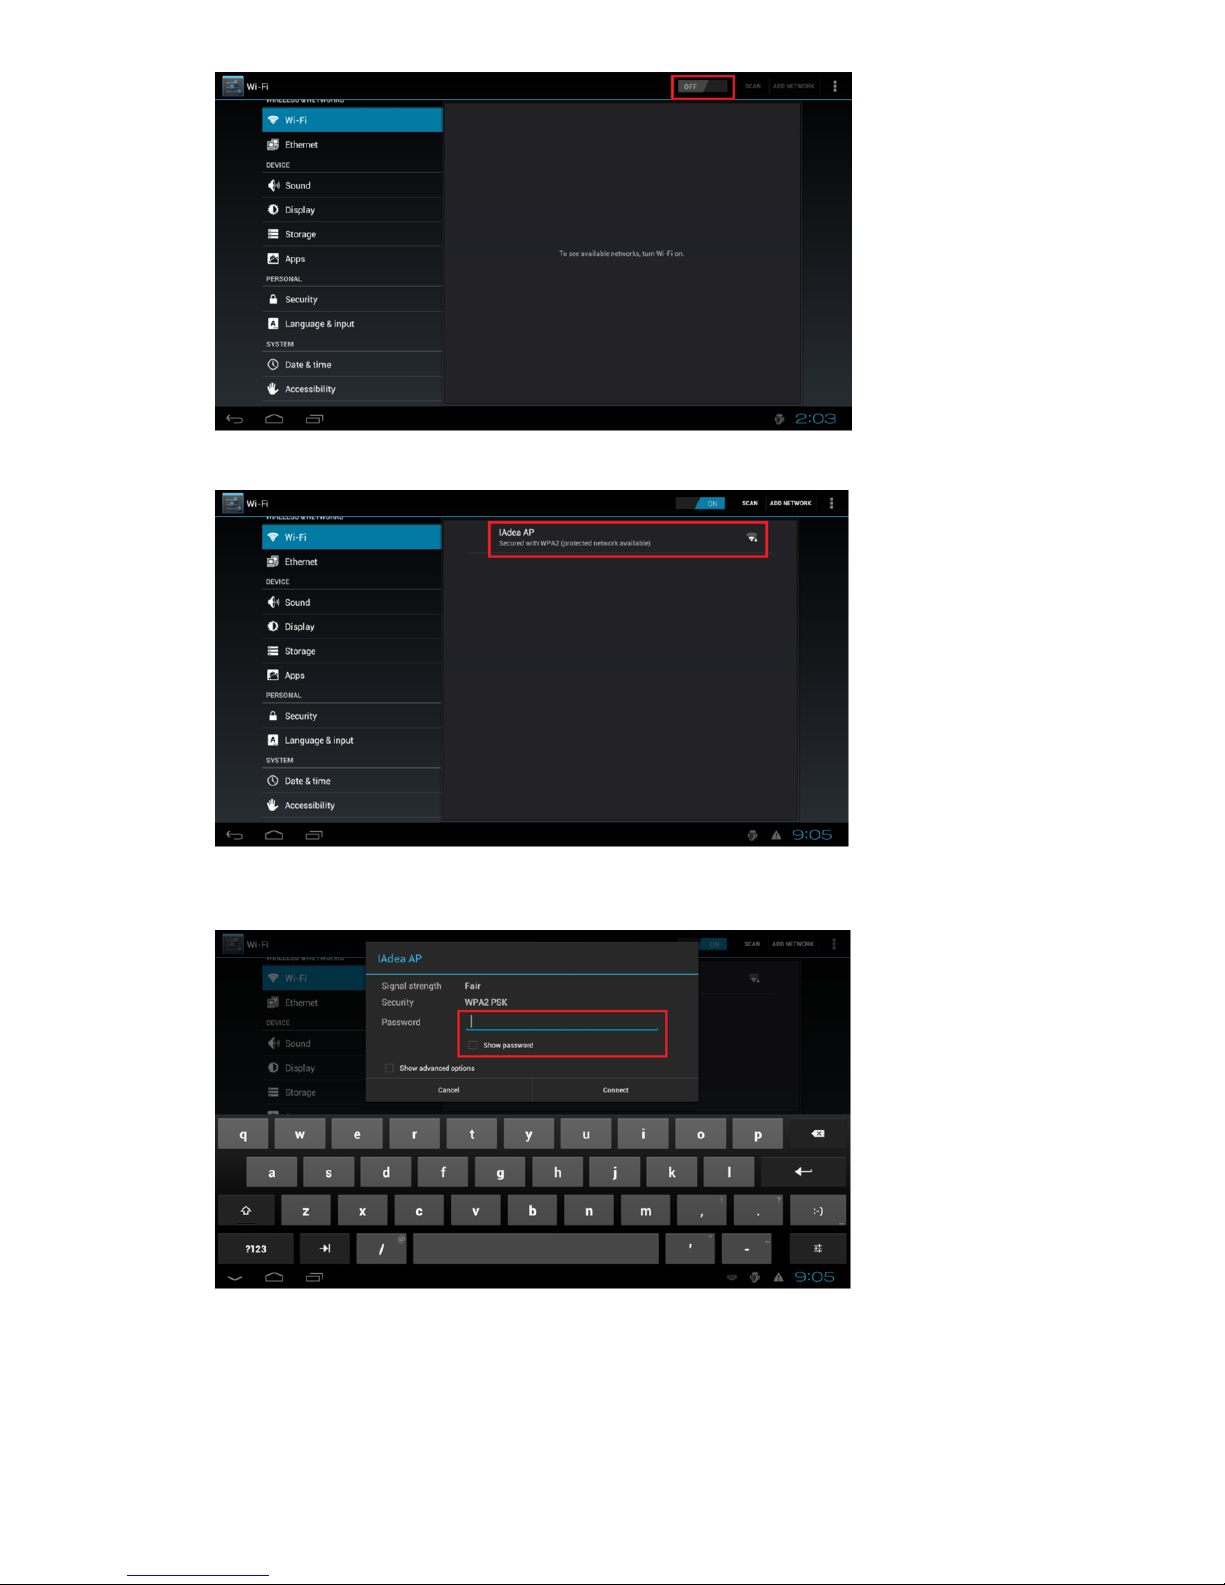
Toenterthemenusystematanytimeduringplayback,pluginaUSBmouseandholdtheleftmousekeyinthe
cornerareaasshownbelowfor10seconds.
*Playerwillaskforpasswordifpasswordhasbeenconfigured.
TroubleshootingTips
1Theoperationindicatorslightup,butnovideoisdisplayedonscreen
Ensurethatyourvideocable(HDMI)issecurelyconnected.WhenusinganHDMIconnection,
choosehighquality,certifiedHDMIcablesortryusingshorterlengthcables
Checkifyourmonitoristurnedonandthecorrectvideoinputsourceisselected
2Nosoundisheard
Checkvolume(mute)settingsonmonitor
IfusingVGAconnection,youalsoneedtoconnectRCAaudiocables(DNP50AVWonly)

4
2.2. Basicsettings
YoumustattachaUSBmousetotheplayertoconfiguresettings.
(Fig.2.2.1)
Basicsettings:
–Network,TimezoneandContent.
EachtimetheBasicsettingsmenuisentered,playbackwillautomaticallybeginafter15secondsifcontent
serviceshavebeenpreviouslyset.Autoplaybackcanbecanceledbyclickingonthebuttonbeforethecountdown
ends.
UserisabletoenterAdvancedSettingsbyclickingtheAdvancedbutton.
2.3. ConnecttheDNP50/DNP50AVWtoyournetwork
Wirelessconnection(Wi‐Fi,DNP50AVWonly)
1ClicktheWirelessLANsettingtolaunchthewirelessconfigurationUI.
(Fig.2.3.1)
2ClicktheON/OFFbuttonasindicatedbelowtoturnONWirelessinterface(Ethernetwillbedisconnected
whenplayerconnectstowirelessnetwork).

5
(Fig.2.3.2)
3Theplayerwillscanforwirelesssignalsnearbyandavailableaccesspointswillbelisted.
(Fig.2.3.3)
4ClickonthenetworkIDtoconnect.Ifthenetworkrequiresauthentication,youwillbeaskedtoprovidea
password.
(Fig.2.3.4)
Wiredconnection
TousethewiredEthernetconnection,connectanEthernetcableanddisableWirelessLANfirst
1ClicktheWirelessLANsettingtoenterthewirelessconfigurationUI.(Fig.2.3.1)
2ClicktheON/OFFbuttonasindicatedbelowtoturnOFFWi‐Fi.(Fig.2.3.2)

6
DHCP–automaticallyassignnetworkIPaddress
3TurnonEthernet.IfusingDHCP,nofurtheractionisrequired.
(Fig.2.3.5)
StaticIP–manuallyassignnetworkIPaddress
4ClickEthernettoconfigurestaticIPaddress.
(Fig.2.3.6)
2.4. Timezonesettings
1ClickTimezone.
(Fig.2.4.1)

7
2Choosethecorrecttimezonefromtheavailableoptions.
(Fig.2.4.2)
2.5. Contentsettings
1ClicktheSetcontentbutton.
(Fig.2.5.1)
2InputthecontentsourceURLandclickConnect.Theplayerwillstartplaybackimmediately.
(Fig.2.5.2)

8
2.6. PlayerInformation
Usercanchecktheplayer’sbasicinformationincludingtheHealthstatus,Firmwareversion,andPlayerID.
1ClicktheAdvancedbutton.
(Fig.2.6.1)
2ClickonInformation.ThedefinitionsoftheHealthStatus:
Green–Normal.ThedeviceisconnectedtotheURLserver.
Blue–Local.ThedeviceisplayingcontentfromtheUSBdriveorSDcard.
Gray–Disconnected.Thedeviceisdisconnected.
(Fig.2.6.2)
2.7. Contentconfiguration–AppStart
UsercanassigntheURLandAPPforexecutionafterthesystemstartup.
1ClicktheAdvancedbutton.(Fig.2.6.1)
2ClickonContent,andthenclickonAppStart.
3EnterthevalidURLofHTML/SMILinAppStart(Fig.2.7.1).
4UsercandisableAutorunfromhere.Autorunwillautomaticallyenablewhencontentisplayed.
Thisisusefulwhensystemintegratorspreparethedeviceintheofficebeforeinstallation.
Inmostcase,thenetworkneedstobere‐configuredonsite,sothispreventsthedevicefromstarting
playbackautomaticallyonthefirststartup.

9
5TheAdvancedoptionisusedfor3rd‐partyAppconfigurationonly.
(Fig.2.7.1)
2.8. Contentconfiguration–FailSafe
UsercanassigntheURLandAPPforexecutionwhilethesystemhasfailedtoplaytheassignedcontent.
1ClicktheAdvancedbutton,advancedconfigurationmenuwillbelaunched.(Fig.2.6.1)
2ClickonContent,andthenclickonFailSafe.
3EntertheURLofHTML/SMILinFailSafe.
4TheAdvancedoptionisusedfor3rd‐partyAppconfigurationonly.
(Fig.2.8.1)
2.9. Contentconfiguration–EasyPlay
ThefeatureEasyPlayallowstheplayertoplaymediacontentfromtheUSBflashdrive(orSDcard)directly.
WhenEasyPlayisenabled,theplayerwillplaycontentfromtheUSBdrive(orSDcard)only.Ifuserwantstoplay
contentfromtheURLserverconfiguredvia‘Setcontent’,EasyPlaymustbedisabled.
1ClicktheAdvancedbutton.(Fig.2.6.1)
2ClickonContent,andthenclickonEasyPlay.

10
3ClickDisabled/EnabledbuttontoenableEasyPlay,andchoosefromPhotoModeorMovieMode.
(Fig.2.9.1)
ConfigurePhotoMode
4ClickonPhotoforchoosingphotosandmusic.Clickonthebuttonasmarkedinredbelow,andselectthe
directoriesforphotosandmusicfromtheUSBdrive.
5ClickSetbuttonafterselectingthedirectories.
(Fig.2.9.2)
ConfigureMovieMode
6ClickonMovie.Clickonthebuttonasmarkedinredbelow,andselectthedirectoryformoviesfromthe
USBdrive.
7ClickSetbuttonafterthefolderisselected.
8ThefilesintheselectedfolderswillbeplayedafterclickingthePlaybuttonintheBasicorAdvanced
settingsmenu.

11
(Fig.2.9.3)
EasyPlayScheduleconfiguration
1ClicktheAdvancedbutton.(Fig.2.6.1)
2ClickonContent,andthenclickonSchedule.
3Clickonthebuttonsmarkedinredbelowtoenable/disabletheEasyPlayscheduleforeachtimeslots.
Typethescheduledtimeinthedialogueboxesmarkedinbluebelowbyusingthepop‐upkeyboardorthe
USBkeyboard.
(Fig.2.9.4)
4The"On"timesassignedinthetimeslotsA‐Eareinclusive.Forexample,ascheduleassignedasthe
examplebelow:

12
(Fig.2.9.5)
Theexactplaybacktimewillbethetimeslotsmarkedinblueasshowninfigure2.9.6.Thedarkblueparts
aretheoverlaptimeofC/DandD/E.
(Fig.2.9.6)
2.10. Displaysettings
OutputMode
Forbestquality,settheoutputresolutiontomatchyourdisplay’snativeresolutiontoavoidimagescalingand
blur.
IfyouareconnectinganLCDcomputermonitor,projector,orplasmadisplay,refertothedevicespecifications
foroptimalsettings.
Ifyouareconnectingtocompositeinputonlymonitor,suchasCRTTV,theoutputresolutionmustbesetto

13
Composite:NTSCorComposite:PAL.
1ClicktheAdvancedbutton.(Fig.2.6.1)
2ClicktheDisplay/soundbutton,andthenclickonDisplay.TheDisplaySettingspagewillbelaunched.
(Fig.2.10.1)
3ClickonOutputmode.SelectOutputmodefromthepopupmenu.
(Fig.2.10.2)
(Fig.2.10.3)
Screenorientation
Screenorientationistosetthedisplaytorotate90/180/270degrees.

14
1ClicktheAdvancedbutton,advancedconfigurationmenuwillbelaunched.(Fig.2.6.1)
2ClicktheDisplay/soundbutton,andthenclickonDisplay.TheDisplaySettingspagewillbelaunched.
(Fig.2.10.1)
3ClickontheScreenorientationmarkedinredbelow.
(Fig.2.10.4)
4Clickonthepreferredanglefromthemenu.Theoption“Auto‐rotate”allowsthedisplaytorotatealong
withthesignboardautomatically.
(Fig.2.10.5)
2.11. Soundsettings
Tocontroltheoutputsoundvolumesandtouchsounds:
1ClicktheAdvancedbutton.(Fig.2.6.1)
2ClicktheDisplay/soundbutton,andthenclickonSound.TheSoundSettingspagewillbelaunched.

15
(Fig.2.11.1)
3ClickonVolumes.Dragthebluesliderstoadjustthevolumesfortheselectedoptions,andthenclickonOK
tosavethenewsettings.(Fig.2.11.3)
4Clickontheiconontherightasmarkedinredtoenable/disabletheTouchsounds.(Fig.2.11.2)
(Fig.2.11.2)
(Fig.2.11.3)
2.12. Systemconfiguration–TimeServer
Thefeatureallowsusertochoosetheplayer’ssynchronizationsource.Whenit’senabled,theplayer
synchronizeswiththetimeofAppStartURL.Otherwise,theplayersynchronizeswithAndroiddefaulttimeserver.
1ClicktheAdvancedbutton,advancedconfigurationmenuwillbelaunched.(Fig.2.6.1)

16
2ClickonSystem,andclickonTimeServer.
3ClicktheUseAppStartURLastimeserverbuttonasmarkedinredbelowtoenable/disablethetimeserver
function.
4ClickonSettosavethesetting.
(
Fig.2.12.1)
2.13. Systemconfiguration–Scheduledreboot
ThefeatureScheduledRebootallowstheplayertorebootontheassignedtimeautomaticallyeveryday.
1ClicktheAdvancedbutton.(Fig.2.6.1)
2ClickonSystem,andclickonScheduledReboot.
3ClicktheEnabledailyrebootbuttonasmarkedinredbelowtoenable/disablethedailyrebootfunction.
Clickonthedialogueboxtosetthetime.Thevaluecanbeinputtedwiththepop‐upkeyboardortheUSB
keyboard.
4ClickonSettosavethesetting.
(Fig.2.13.1)
2.14. Systemconfiguration‐Firmwareupgrades
FirmwareupdatescanbeperformedbyusingaUSBflashdrive.Pleasereadthereleasenotesregardingthe
changesthatwillbemadetoyourplayerbeforeapplyingtheupgrade.
IMPORTANT:DONOTunplugtheUSBdriveorpowerdowntheplayerwhilethesystemisperformingthe
firmwareupdate.

17
1DownloadthelatestfirmwareandcopyittotherootdirectoryofaUSBdrivefrom
http://support.iadea.com
2Pluginthepowercordintothedevice.
3PluginaUSBmousetothedevicetoenterBasicsettingsmenu.
4ClicktheAdvancedbutton.(Fig.2.6.1)
5ClickonSystem,andchooseFirmware.
6ClickonOKtobeginthefirmwareupdate.
(Fig.2.14.1)
7PlugintheUSBdrivewhilethescreenshows“ScanningUSBdrivesforfirmwarepackage”.
(Fig.2.14.2)
2.15. Systemconfiguration‐Factoryreset
Ifyouforgetthesystempassword,youmustresetthesystemtoaccesstotheplayer.
Usingtheresetbutton
1PRESSandHOLDtheresetbuttonwithapin.
2RE‐CONNECTthepowercord.
3WAITabout10secondsoruntilthestatusLEDflashes.
4RELEASEresetbuttonandwaitforsystemtoinitialize.
Resetbutton

18
UsingaUSBmouse
Systemresetwillre‐initializethesystem,clearpasswords,andreturnsettingstotheirdefaultvalues.Performthe
following:
1CONNECTaUSBmouse.
2ClicktheAdvancedbutton.(Fig.2.6.1)
3ClickonSystemconfiguration,andchooseFactorydefault.
4ClickonOKbuttontoperformthesystemreset.
(Fig.2.15.1)
2.16. Systemconfiguration–Powersave
ThePowersavefeatureallowstheplayertopoweroffautomaticallywhileidleintheBasicsettingspagewhile
idlefor10minutes.
1ClicktheAdvancedbutton.(Fig.2.6.1)
2ClickonSystem,andclickonPowersave.
(Fig.2.16.1)
2.17. Systemconfiguration–ExpandStoragebyusingSDcard
AnexternalSDcardmaybeusedtoreplacethecurrentSDcardifmorespaceisneeded.
1TakeanIAdea‐approvedSDcard,formatitasFAT16/32clean
Table of contents
Other DRAKE Media Player manuals