Voice Systems Galileo User manual

Manuale di Istruzioni
User Manual
MULTIMEDIA PLAYER
Ver.: 1.0


73
INDEX
IMPORTANT NOTES ..................................................................................................... 75
Notes on the instrument ............................................................................................. 75
Notes on this manual..................................................................................................76
Limitations to responsability .......................................................................................76
GALILEO BRIEF DESCRIPTION ..................................................................................77
CONTROL PANEL ......................................................................................................... 78
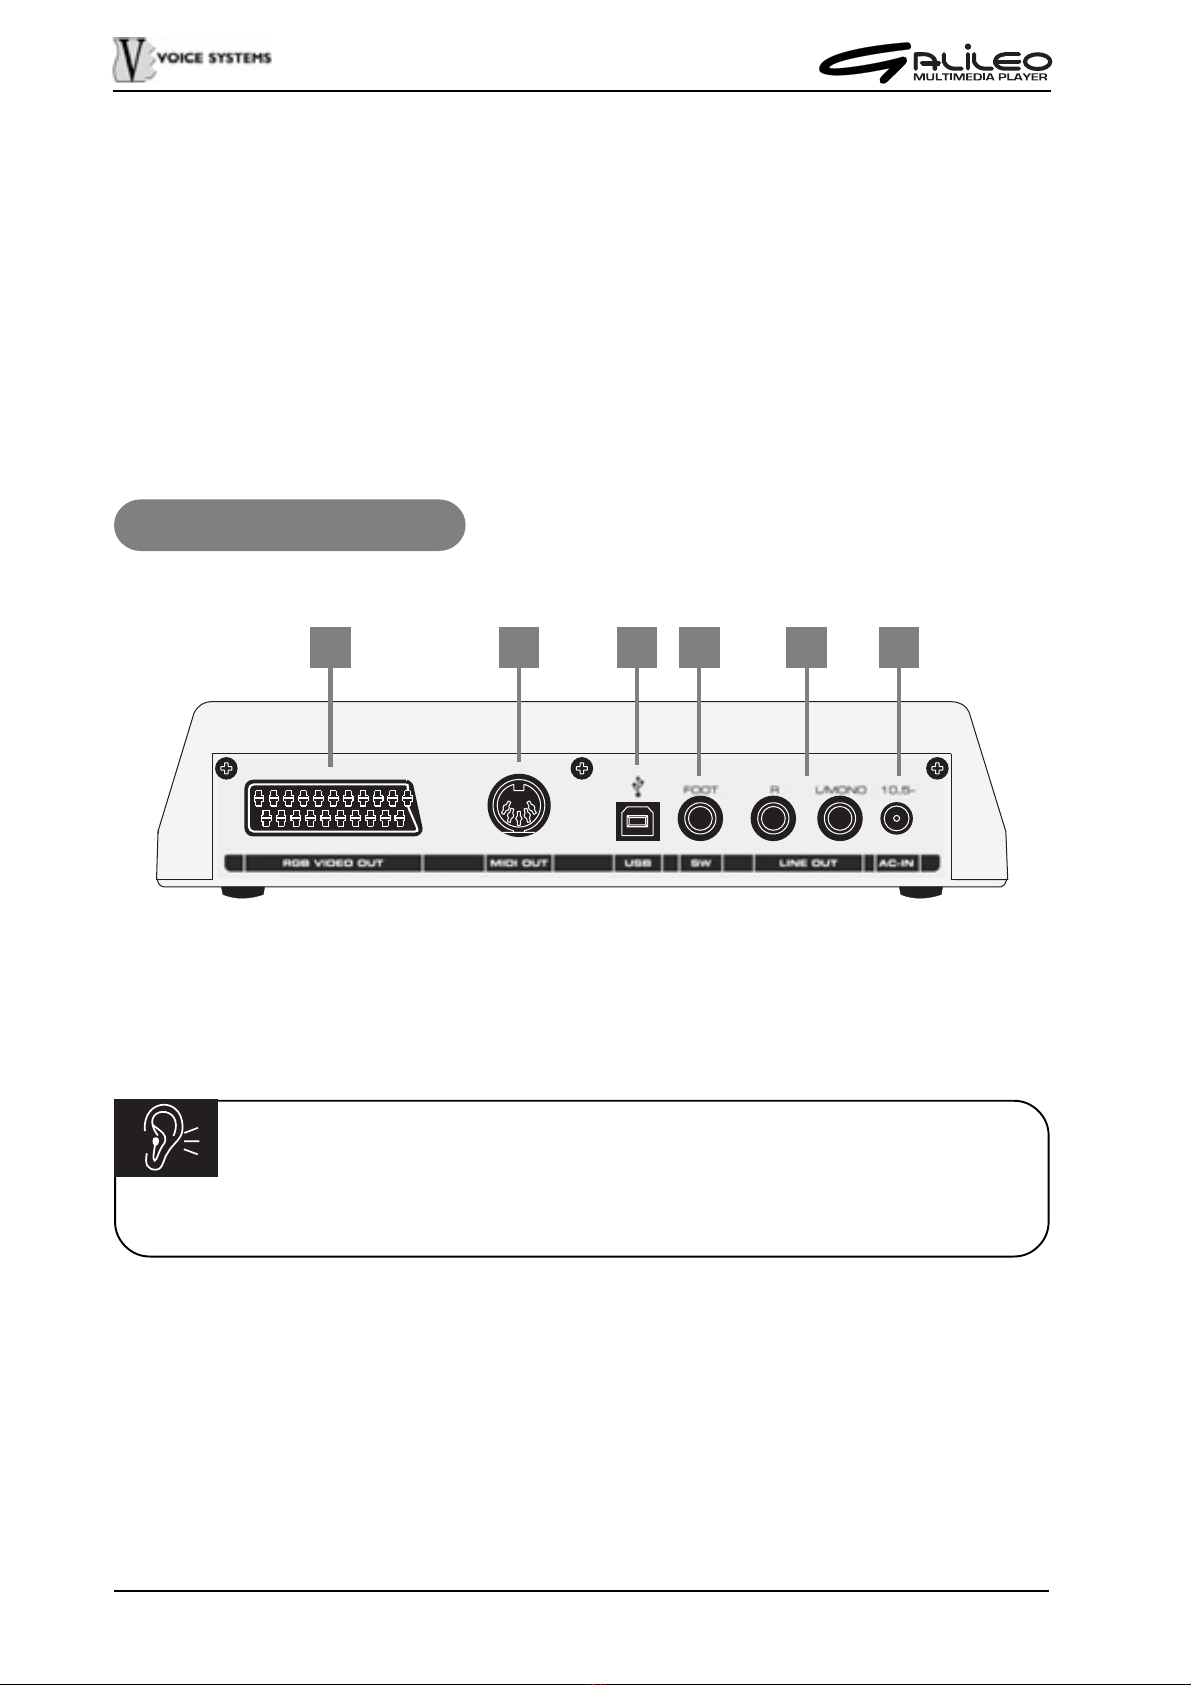
REAR PANEL ................................................................................................................. 80
SIDE PANEL................................................................................................................... 81
CONNECTION EXAMPLES........................................................................................... 82
FIRST SETUP................................................................................................................. 83
Language selection ....................................................................................................84
USB mode selection ...................................................................................................84
Switching off ...............................................................................................................85
CONNECTING AND USING YOUR MICROPHONE ..................................................... 86
USING HEADPHONES .................................................................................................. 86
SELECT AND PLAY SONGS......................................................................................... 87
How to load a song.....................................................................................................87
Playing back a song ...................................................................................................89
CONNECTING A COMPUTER....................................................................................... 91
Windows 98 Second Edition.......................................................................................91
Windows ME - 2000 - XP ........................................................................................... 94
Mac O.S. 9.1 or higher ............................................................................................... 95
Use of a computer to manage files stored in Galileo memory ...................................96
MIDI FILE EDIT FUNCTIONS ......................................................................................100
Transpose function ...................................................................................................101
Mute function ............................................................................................................101
Tempo (change) function.......................................................................................... 102
THE LIST ......................................................................................................................103
Saving a List .............................................................................................................105
QUICK FILE SEARCH ................................................................................................. 106
MICROPHONE EFFECT .............................................................................................. 107

74
EQUALIZER .................................................................................................................108
MIDI Files Equalizer .................................................................................................108
MP3 Files Equalizer..................................................................................................109
SAVE GALILEO SETUP ON THE MEMORY CARD................................................... 110
GLOBAL SETTINGS.................................................................................................... 113
Display contrast ........................................................................................................ 113
Song playback mode ................................................................................................ 114
System settings ........................................................................................................ 116
VIDEO SETTINGS........................................................................................................ 120
Display mode............................................................................................................ 120
Colors selection ........................................................................................................123
Screen center and Auto-AV ......................................................................................124
APPENDIX....................................................................................................................125
Firmware update....................................................................................................... 125
System releases verify .............................................................................................126
Info messages ..........................................................................................................126
Error messages ........................................................................................................127
Troubleshooting guide ..............................................................................................130
Sound list ..................................................................................................................136

75
IMPORTANT NOTES
•Before connecting the power supply unit to the mains please verify that voltage is the
same as indicated on the power supply unit.
•Handle with care knobs and switches.
•Do not place, if possible, the instrument near units that may strongly interfere with it
e.g. radio, TV sets, monitors, etc.
•Do not place Galileo near to heat sources, wet places, dust or strong magnetic fields.
•Do not place Galileo under direct sun rays.
•By no reasons objects or liquids of any kind should be introduced into the instrument.
•To clean Galileo use a soft cloth or compressed air, never use alcohol, solvents or
detergents.
•Use always shielded and good quality cables. When you disconnect plugs please use
the connector itself, do not pull cables.
•Beforeanyconnection oftheunit makesurethat allotherunits(withparticular reference
to power amps and speakers) are switched off. You will avoid noisy and dangerous
sound peaks
NOTES ON THE INSTRUMENT
To obtain the best performance, please note and strictly follow the indicated herebelow
instructions.
•Galileo uses only Smart-Mediamemory card type.
•Be extremely careful with the memory cards; do not place them close to heat sources,
or in wet or dusty environments. Do not touch the metal contacts switch with fingers.
Use the original protection case when memory cards are not inserted into the Galileo.
Files format recommendations:
•Galileo plays only standard MIDI files (extension .MID), files MIDI for Karaoke (.KAR)
and MP3 audio files (.MP3). Files with different extensions will not be shown on the
display.
•In order to be correctly read, the MIDI files must be General MIDI (GM) standard type.
•It is not possible to play MIDI files bigger than 320 Kbytes.

76
NOTES ON THIS MANUAL
•Preserve this manual with care.
•Thismanual is part ofthe instrument itself. No responsibility will be takenfor thecontent
of this manual.
•The manufacturer reserves itself the right to modify parts, details, or accessories to
improve the instrument of for any constructive or marketing reason, in every moment
and without the need of upgrading quickly this manual.
•All rights are reserved; the reproduction of any part of this manual is forbidden, without
written approval from the manufacturer.
•Read carefully the information contained in this manual. You won’t waste your time and
will obtain the best performances from the instrument.
•The information in square brackets ([]) refer to the silk screening of the controls on the
instrument itself. For example [TEMPO] means the TEMPO key.
•The drawings on this manual are merely intended as useful information and can slightly
differ from the ones shown on the instrument display.
•All trademarks listed in this manual are property of the Manufacturer.
LIMITATIONS TO RESPONSABILITY
Voice Systems and Voice Systems dealers are not responsible for any damage caused by
any improper use or modifications of the instrument, and for loss or destruction of any or
all data.

77
GALILEO BRIEF DESCRIPTION
VoiceSystems Galileo isafile player abletoplay filesinthe Standard Midi (.MID),Karaoke
(.KAR) and MP3 audio standards. In addition, it allows to play MIDI files containing audio
tracks and MP3 files with karaoke.
The Midifile sound generation is created by a General Midi (GM) card, with a 42
notes polyphony, which provides 393 sounds, Reverb and Chorus effects,10 drum sets
sounds.
By means of the internal video board, Galileo allows to display on a TV screen the song
lyrics, for all file formats Midifile, Kar, MP3™ (coding ID3 Ver.2.00). The output signal is an
RGB with embedded audio.
As to memory cards, Galileo uses the Smart-MediaTM format, in sizes from 8MB to 128MB;
it supports long file name structure (more than 8 characters), as well as folders structures.
When connected to a computer, via USB cable, Galileo is used as a Mass Storage device,
and it is recognized as a removable disk.
Galileo does not needs any particular software for file storage: by a simple drag and drop
operation you may easly transfer data from the computer to the Smart-MediaTM card and
viceversa; everything in a simple and safe way.
The instrument includes a microphone input (with independent Gain and Level controls),
provided with internal effect and two eq sets for each one of MIDI files and MP3 files.
The audio signal is sent also to the SCART plug, in order to connect Galileo to a TV set,
without necessarily connecting it to an audio power amp.
The interface is multi lingual, and together with the graphic display and the data entry
keys, allow an easy use of Galileo.
Moreover,inorder to keepyou updated aboutthe latest improvementsand/or modifications
we suggest you to check from time to time all news included into our web site
www.vsgalileo.com.

78
CONTROL PANEL
1
2
3
4 5 6 7 8
9
10
11
12
13
1. [GAIN]: potentiometer to trim the input gain for the microphone connected to [MIC IN]
plug.
2. [LCD GRAPHIC DISPLAY]: backlit display (122 x 32 pixels) that shows all instrument
settings.
3. [MASTER]: this potentiometer adjusts the Volume level of the signals on the [LINE
OUT] and [RGB VIDEO OUT] back panel plugs.
4. [BALANCE]: balance potentiometer for MIDI and MP3 sources. The LEDs on the side
of the slider show the sources actually active:
•[MP3]: the player is playing an MP3 file
•[MIDI]: the player is playing a MIDI file
Recalling not mixed songs (only MIDI or only MP3) we recommend to place the slider
in the side of the active source or in the middle, since the other source is not active.
In case that MIDI songs contain one or more MP3 tracks, both LEDs will switch on: use
the slider pot to obtain the correct balance between the sources.

79
5. [MIC.]: this potentiometer controls the microphone output level. The [OVL] LED if it
lighted on indicates the overload (distortion) signal. If this happens, decrease the input
gain with the [GAIN] control, in order to have the LED blinking occasionally.
6. CURSORS section: this section contains, controls the cursors shown on the display
and let the displayed folders run and, more precisely:
•[UP]: it moves cursor up.
•[SELECT]: it moves cursor right. In the main video page it is used for the Dir
function.
•[DOWN]: it moves cursor down.
•[BACK]: it moves cursor left. In the main page, it recalls the Dir function
7. CONTROLS section: instrument general control keys.
•[ON / ENTER]: it is a control which is needed and suitable:
A) to switch on the instrument
B) to load the selected files to be played
C) to select the functions to be displayed
D) to confirm some functions of the instrument which require “ confirmation “
E) to store the modifications which have been made on the presets.
•[ESC]: it is the escaping key to leave a setting procedure without saving the
modifications.
•[PLAY]: play the selected song. When pressed during the playback, it works as
a pause key.
•[OFF / STOP]: stops the playback. By holding down this button for a second,
the Standby mode will be activated.
8. [MEMORY CARD]: insert here the Smart-
Mediamemory card.
Please insert the card with the metal contact
on the lower side.
9. Encoder [DATA ENTRY]: rotary knob to set
the displayed parameters.
10.SET-UP section: sectioncontainingthebuttons
used to recall the general settings procedures.
•[GLOBAL]: shows the menu to control
display contrast, file play mode and other system parameters.
•[VIDEO]: functions related to set up the TV display.
11.CARD Section: these buttons are used for the memory card management.
•[SAVE]: Button used to save data into the card
•[LIST]: It shows the songs contained in the active list (chain of songs)
•[DIR]: It displays the contents of the memory card.

80
12. AUDIO Section: section containing the buttons for the audio parameters editing
•[MIC.]: Microphone effect settings.
•[EQ.]: Equalizer sections for MIDI and MP3 files.
13.MIDI SONG SETTINGS Section: the buttons in this section allow the user to edit the
midifile general parameters like:
•[TRANSP.]: Song transpose.
•[MUTE]: Track mute.
•[TEMPO]: Metronome tempo for playback.
REAR PANEL
1 2 3 4 5 6
1. [RGB VIDEO OUT]: SCARTplugused toconnect aTV set. UsingaTVSet itis possible
to display the lyrics of the song (for karaoke purposes) and get the audio signal in
order to avoid the use of a separate sound system.
ATTENTION!
To connect Galileo with a TV set use a SCART cable with all 21 pins connected.
2. [MIDI OUT]: DIN 5 poles plug for MIDI data, used to connect Galileo with external MIDI
instruments such expanders, electronic drums, etc…
3. [USB]: USB plug to connect Galileo to a computer.
4. [SW]: 1/4 inch Jack plug to connect a foot-switch pedal (optional).

81
5. [LINE OUT]: 1/4 inch Jack plugs for the output audio signal of Galileo, to connect
external sound systems. In case of use of a mono signal, connect the [L/MONO] plug
only.
6. [AC-IN]: connector for the external power supply unit.
ATTENTION!
To connect the power supply of Galileo use only the adapter provided with the
instrument. If some problems occur with the original adapter, please address it to
the nearest authorized service point. VOICE SYSTEMS does not guarantee the
instrument if used with other adapters.
1. [PHONES]: 1/4 inch stereo Jack plug to connect headphones. Use only headphones
with a minimum 16 Ωimpedance.
2. [MIC. IN]: 1/4 inch Jack plug to connect a microphone. Using this input, on the audio
outputs (but also on the [RGB VIDEO OUT] plug) the signal from both songs and
microphone will be reproduced, reducing the need of using an external sound system.
Asstatedbefore, Galileo providesalsoan internaleffectunit, toadddepth andspectrum
to your voice.
SIDE PANEL
12

82
CONNECTION EXAMPLES

83
FIRST SETUP
Once you have connected Galileo to the power supply, the [ENTER] key LED will light up,
showing that the instrument is presently in “energy saving mode” (“Stand-By”).
To switch on the instrument hold down for a second the [ENTER] button, the display will
show the startup video page:
and then the operating system version installed (FIRMWARE REL.):
The contents of the inserted memory card (“root” directory) will be displayed:
If the memory card is not inserted, the display will show:
informing that to proceed it is necessary to insert the card.

84
LANGUAGE SELECTION
Galileo has a multi-lingual user interface, therefore the first operation to execute is to
select the desired language.
To do this press [GLOBAL],
using the key [CURSOR DOWN] select the SYSTEM field and press [ENTER],
now select MORE:
and, if not, set select ENGLISH for the LANGUAGE parameter.
USB MODE SELECTION
Even if you haven’t still connected Galileo to your computer system, it is a good rule to
setup now the USB mode, to avoid all possible erros during the first connection.
Galileo has three different functional modes, depending on the different operating system
with which it shall work.
The USB mode setup is located in the same video page used for the language selection
(reported above). In the following table are listed all the possible Galileo USB modes:
OPERATING SYSTEM USB MODE
Windows 98 Second Edition NORMAL
Windows ME NORMAL
Windows 2000 Home or Professional NORMAL
Windows XP ADVANCED
MAC 9.1 or higher MAC

85
After having selected the language and the right USB mode press [ENTER] to confirm
the new settings and to leave the setup page. Press [ESC] to abort the operation.
SWITCHING OFF
TheGalileoswitch offprocedure includes alsothe saving ofall internal systemparameters.
To switch Galileo off hold down the [STOP] button: the instrument will ask you for a
confirmation:
then press [ENTER] to switch into “Stand-By” mode while, by pressing any other button,
it will switch back to the normal mode.
ATTENTION!
If Galileo is switchedoff without pressing the [STOP] button(for example bypulling
the power supply cable) all the settings which have been performed by the user
will be lost.

86
CONNECTING AND USING YOUR
MICROPHONE
Connect your microphone to the [MIC IN] plug on the Galileo side panel. As a first step it
is necessary to regulate the input signal gain to avoid excessive distortions. To do this
proceed as follows:
Set the [GAIN] pot in a middle position and the [MIC] slider pot in the position where you
would like to have optimum volume. Please note that the slider [MIC] controls only the
volume, and it is not responsible for any distortion.At this point, trim the [GAIN] pot so that
the [OVD] LED blinks occasionally while having a loud signal (e.g. shouting).
NOTE
For a better microphone performance we suggest to use a balanced connection.
USING HEADPHONES
To connect an headphone set use the [PHONES] input plug. The system will automatically
detect the presence of headphones, showing on the display the following page:
Use the [DATA ENTRY] encoder, when the main page is displayed, to set the desired
headphones volume.
NOTE
The [MASTER] slider does not regulate the headphones output level.

87
SELECT AND PLAY SONGS
HOW TO LOAD A SONG
After the power on procedures, Galileo enables automatically the Dir function (that is in
every moment possible to recall by simply pressing [DIR]):
NOTE
The Dir function is also automatically displayed every time a memory card is
inserted.
This function allows the access to the content of the inserted memory card, to load the
desired song or to program a list.
It is possible to see from the picture above that this video page informs you about the
directory(folder) actually selected.The “root” directoryis always selectedat the firstaccess
The middle of the display shows the contents of the selected directory (folder), that can
contain other subdirectories (sub-folders), MIDI files, MP3 files, or lists.
For each type, Galileo shows a different icon as described herebelow:
directory
MIDI file
MP3 file
file list (it is a proprietary file generated by Galileo)
cursor
folders and files stored in
the selected directory
icon indicating the file
type or folder
selected folder

88
By using the computer, it is possible to create a “tree” of directories (folders) where each
folder can contain itself one or more folders, as reported in the herebelow example:
To navigate inside the directory “tree” and to select the desired file use the following
buttons:
•[UP]: to move cursor up.
•[SELECT] when the cursor highlights a directory:to open the selected directory.
•[SELECT] when the cursor highlights a file:to insert the file in a list
•[DOWN]: to move cursor down.
•[BACK]: to go back to the previous directory.
•[ENTER] when the cursor highlights a directory:to open the selected directory.
•[ENTER] when the cursor highlights a file:to load the selected file (MIDI, MP3 or List)
It is also possible to move the cursor by using the [DATA ENTRY] knob.
When loading a MIDI file the display will show:
for all the time which is necessary to load the data in the internal memory.

89
PLAYING BACK A SONG
When the selected file is ready for the playback, the display shows the MIDI or MP3 “play
page”.
MIDIFILE
FILE MP3
metronome
tempo
measure
counter
Beat-meter
elapsed time
When the [PLAY] button is pressed, the LED will light up and playback of the song will
start.
When the [STOP] key is pressed the playback of the song stops and by pressing [PLAY]
againthe playback isit temporarilyinterruptedand theunit enters a“Pause Mode“ (Pause).
The pause mode is indicated by the flashing [PLAY] LED. By pressing [PLAY] again the
execution will restart from the pause point.
To load a new song, stop the playback by pressing [STOP] and then let the memory card
display its contents using, the [DIR] key, the [CURSOR] section buttons or the [DATA
ENTRY] encoder (only if headphones are not connected) and select the desired song.
To program the next song (that will be played automatically at the end of the current song),
after having displayed the memory card content, select the deired song with the [SELECT]
selected folder
selected folder
selected song
selected song

90
NOTES
It is important to remind that all control and configuration functions are always
accessible, without stopping the playback of a song. In addition to all normal
functions such as volumes and balance, you can control in real time the
modifications on the MIDI files, EQ section, microphone, prepare a list and so on.
To program and playback a song list, please refer to the “List” chapter.
While reproducing a song, either MIDI or MP3, do not extract the memory card to
avoid the interruption of the playback.
When the function “HEADER JUMP” (see chapter “Song playback modes”) is
active, the MEAS. field could not start with measure 1.1 depending of where the
first note is located.
For what concerns the description of the MIDI files containing MP3 files, please
consult the advanced user manual.
key (the number “01” will appear near the file name) press [ENTER]. When the display is
back to the main page press [STOP] to execute immediately the new song or wait that the
previous playing will end.
Table of contents
Other Voice Systems Media Player manuals