Droper Field 1000 User manual

INSTRUCTIONS FOR USE
DROPER®FIELD 1000
MECHANICAL PRESSURE INFUSER
PROMOVET sarl
ZAC de la Route de Beauraing, 1
08600 GIVET (France)
contact@promovet.fr

Instructions for use - Version 2 2/15
Table of contents
1 Description of the Droper Field 3
2 Purpose 4
3 Performances 4
4 Warnings 4
5 Materiovigilance 5
6 Use 5
7 Infusion : choice of line and operating mode 7
8 Transfusion : operating mode 10
9 Operating issues 11
10 Cleaning / Disinfection 12
11 Periodic inspection 13
12 Conditions of transport, storage and use 13
13 Warranty 13
14 Lifetime and Disposal 14
15 Specs 14
16 Symbols used 14
17 Useful contacts 15

Instructions for use - Version 2 3/15
1. DESCRIPTION OF THE DROPER FIELD

Instructions for use - Version 2 4/15
2. INDICATIONS
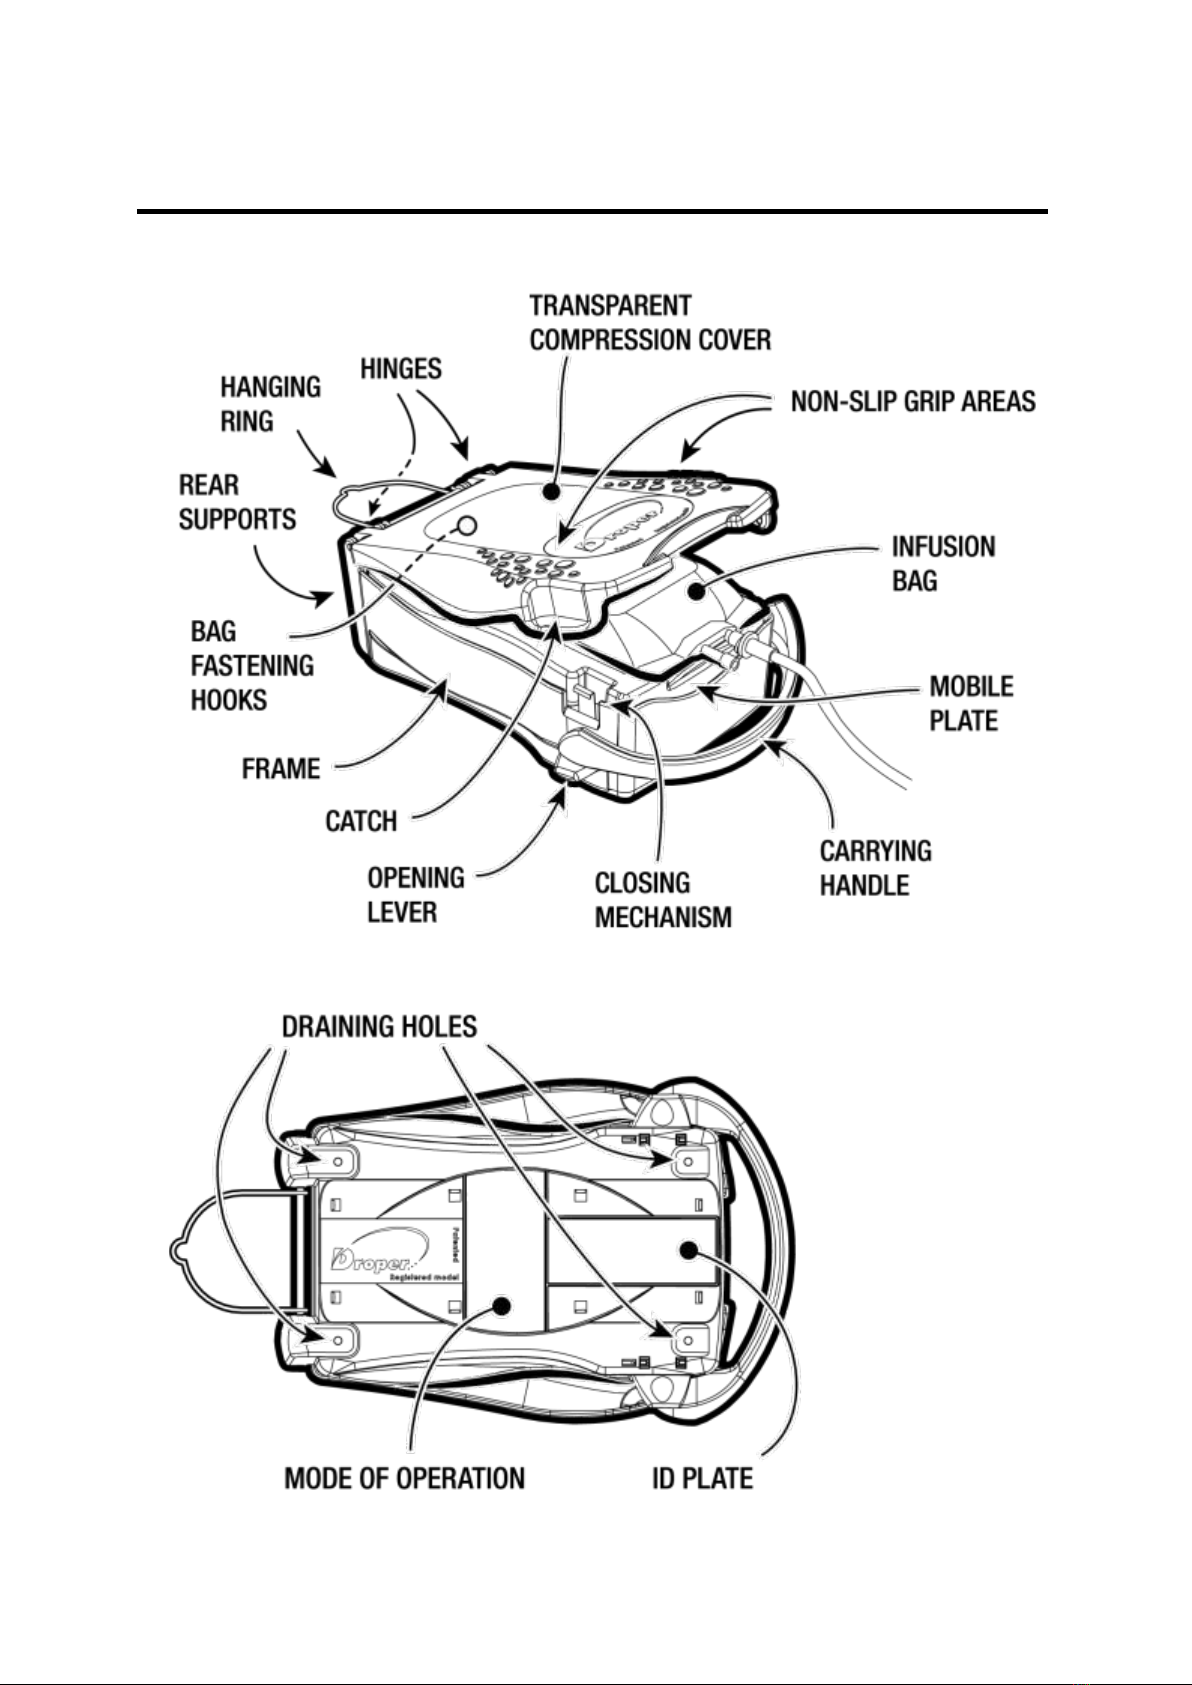
The Droper Field is a medical device designed to pressurise flexible infusion bags to be infused
or transfused in order to maintain a functional venous access as well as for peripheral
intravenous filling with colloids or crystalloids solutes, or blood.
Intended to be used mainly in an out-of-hospital environment in emergency or disaster situations
where stress level is important, the device must be used by healthcare professionals.
The device is sized in such a way as to be able to receive most infusion / transfusion bags from 250
ml up to 1000 ml commercially available at the time of its introduction.
3. PERFORMANCE
Flow rate depends–amongst others - on fluid viscosity and pressure variations. With Droper
Field, once set at the convenient delivery level by medical staff, flow rate remains stable near
completion of the fluid delivery.
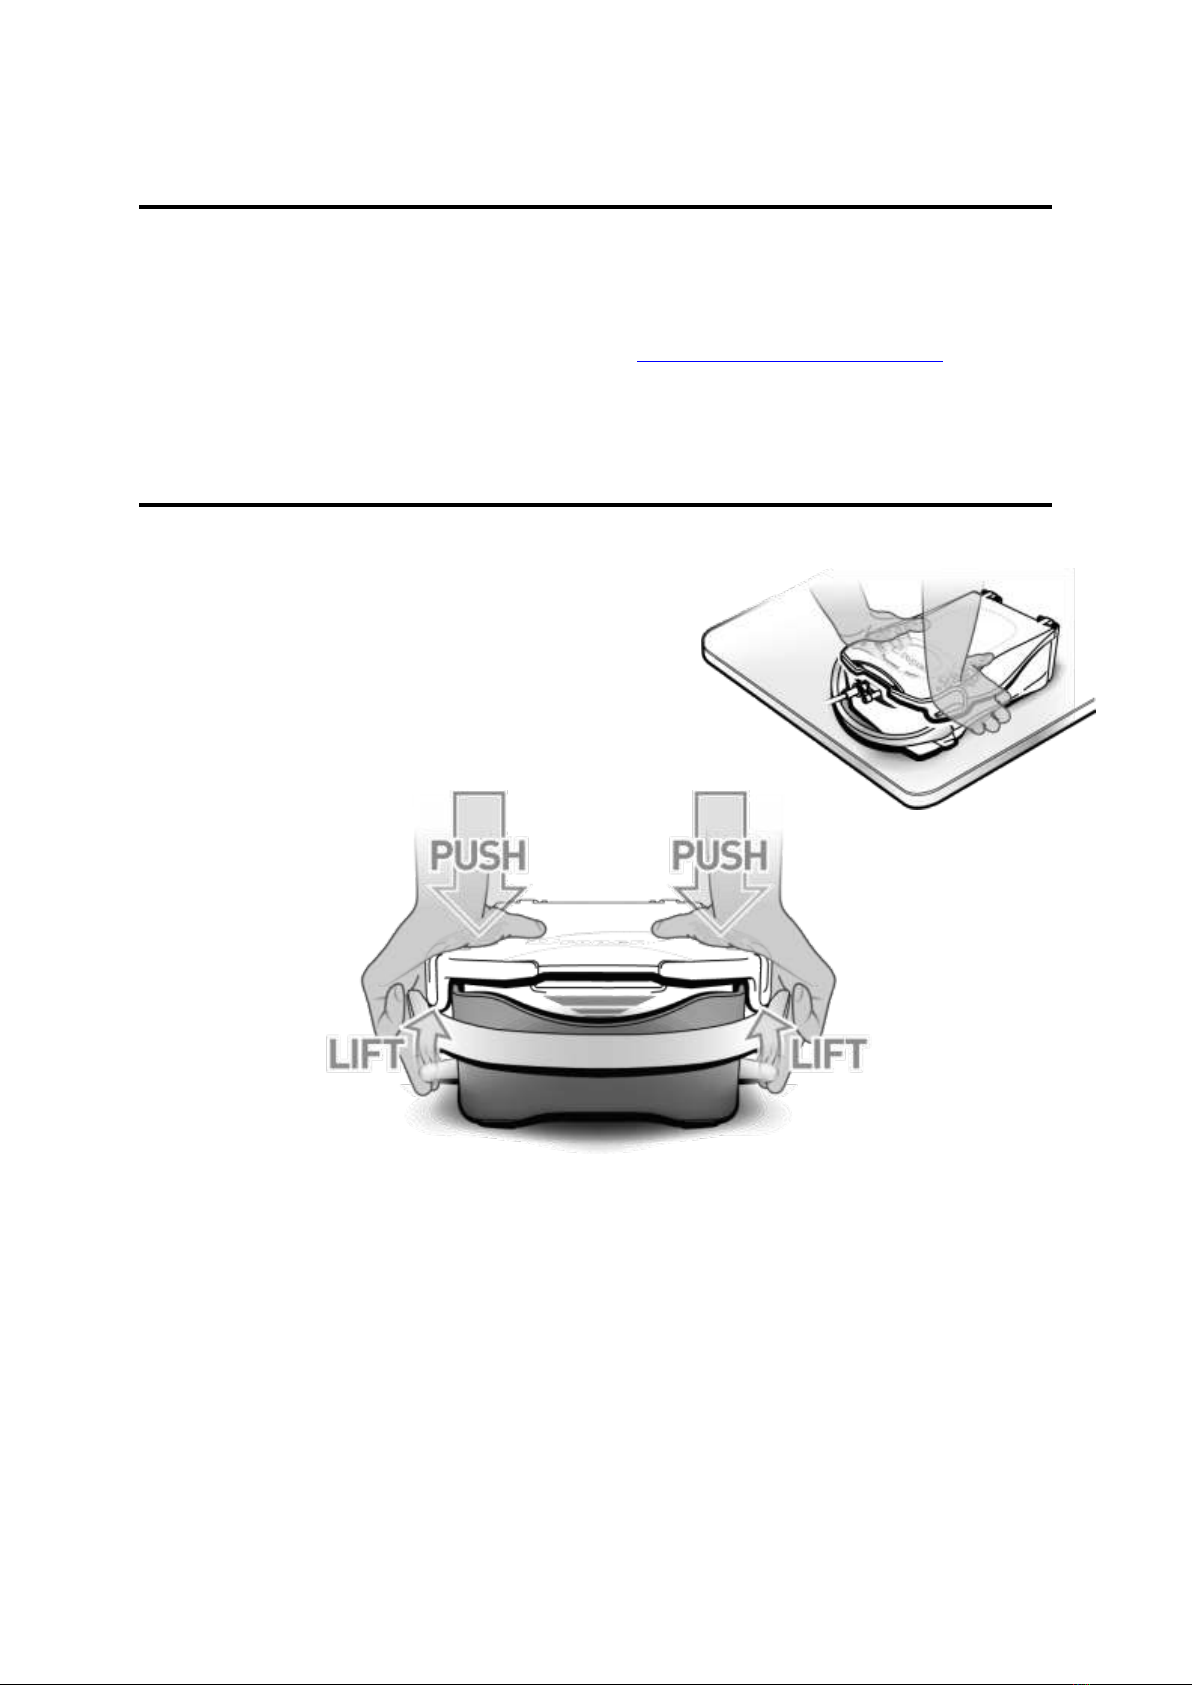
Pressure exerted on infusion bags varies depending on the bag size, going from +/- 100 mbar for
a 1000 ml bag up to +/- 190 mbar for a 250 ml bag.
A pressure of 100 mbar is approximately equivalent to the pressure exerted by the gravity on an
infusion bag hanged on a pole at 1 meter above the patient injection site: 1 cm difference in
height by gravity equals to +/- à 1 mbar.
4. WARNINGS
The safety instructions and recommendations for the use of infusion bags, corresponding
lines and flow regulators must be known before use.
Air embolism : the Droper Field working by pressurising the infusion bags, there is a risk of
residual air injection to the patient, as with other infusion or transfusion devices working under
pressure, like the pressure cuffs.
This imposes precise use rules in order to avoid air embolism (see point 7 and 8 respectively on
infusion and transfusion operating modes).
Glass bottles, rigid and semi-rigid plastic bottles : under no circumstances may these containers
be inserted into the device.
Sensitive drugs and infusion rate accuracy: as with single-gravity or pressure infusion cuff, the
flow rate is adjusted :
using the drip chamber
or the relative position of the roller clamp
or a flow regulator installed on the infusion line selected by the user.
Consequently, the Droper Field is not designed to deliver specific or sensitive drugs requiring
high flow accuracy or strict control of the duration of administration.

Instructions for use - Version 2 5/15
5. MATERIOVIGILANCE
Any incident during the use of the Droper Field must be reported to the manufacturer whose
details appear at the end of these instructions for use, as well as to the National Agency for the
Safety of Medicines and Health Products (ANSM) on materiovigilance@ansm.sante.fr.
6. USE
Opening the cover
Install the Droper Field on a flat surface, with the ability to
handle it at arm’s length rather than arms up.
The device opens in three steps :
1. Exert pressure in a downwards direction on the cover using your body weight and with
outstretched arms. A resulting small downwards movement can be observed.
2. Without releasing the pressure exerted on the cover, rotate the two opening yellow colored
levers using your middle fingers of each hand. The fastening spring clips will pivot inwards and
release the cover.
3. While holding the two open levers in position, release the pressure exerted on the cover, then
open the cover.

Instructions for use - Version 2 6/15
Placing the infusion / transfusion bag in the device
With the cover fully open, position the previously perforated bag on the plate. If the bag
model allows it, use the fixing hook on the plate. Otherwise, with your hand, hold
this pocket in place to prevent it from sliding forward when closing the system.
Closing
Stand directly above the device with outstretched arms and press down on the cover.
Push down until the fastening clips are engaged audible by the "Click" sound.
The system is then closed and primed. This operation pressurises the bag.
Positioning with respect to the patient
Ideally, the device should be positioned at the patient's midaxillary line level.
If placed at a higher level, the pressure shall be increased and conversely if it is placed at a lower
level (a 1 cm height difference is equivalent to ± 1 mbar).
Infusion / transfusion progress
The administration stage may be assessed by the triangle
drawn on the front surface of the mobile plate. The rising
action of the plate during administration will show the
different lines. The first line is wide and green in color. The
next two lines are red. The tip of the pyramid indicates that the
plate has reached its end point.
Remark : If the bag shape is longer than the plate, fold the bag end on itself in
order to meet a length ± equivalent to the plate length («Toothpaste tube »
technic).
Caution: In case only one fastening clip has been inserted, the plate will show an inclined
position. In this event, just press the not engaged side down in order to correctly position the
cover.

Instructions for use - Version 2 7/15
End of administration
The end of the administration can be checked by:
observing the inverted pyramid drawn on the front surface of the mobile plate of the
equipment when the final peak will be visible.
observing, thanks to the cover transparency, the full crushing of the delivered flexible bag.
coupled with the absence of flow of infusion solution in the drip chamber if it is used.
if necessary, by observance of blood reflux in the tubing (with the device being located below
the level on which the patient is lying).
Once administration is completed, close the roller clamp of the infusion / transfusion line, open the
Droper Field using the same method as described in point Opening the cover, and remove the empty
bag from the device. Handle then the flexible bag and the infusion / transfusion lines wastes as when
with classical delivery by gravity or with pressure infusion cuffs.
Stopping administration
This can be stopped by :
closing the roller clamp or flow regulator by turning them to the OFF position.
opening the device (see point Opening the cover), the Droper Field being then at the same
level as the patient
means of any other suitable device.
Necessary accessories
The Droper Field does not need any dedicated accessories. It works with the flexible bags available in
the market up to 1000 ml and the existing infusion / transfusion lines.
7. Infusion: choice of line and operating mode
Two types of infusion lines are possible:
Classic infusion lines with drip-chamber,such as those used for gravity infusion or with
pressure infusion cuffs.
Or
Infusion lines with « Air Stop » filter (Intrafix SafeSet™, AirCatch™,…). These lines are
equipped with a hydrophilic membrane which prevents any air flow from the drip chamber
to the patient.

Instructions for use - Version 2 8/15
Classic infusion lines
1. Close the infusion line roller clamp
2. Insert the spike into the infusion bag like for a classic
infusion
3. Place the bag in the horizontally arranged Droper Field
4. Close the Droper Field
5. Install the Droper Field on its back side by
placing it vertically
6. Open the infusion line roller
clamp
7. Purge all air contained in the entire system (bag,
entire drip chamber and line).
8. Close the infusion line roller clamp
9. Return the Droper Field to the horizontal
position, even if it can work in any position
(vertical, lateral, inverted, hanged, etc.)
10. Connect the infusion line to the patient and re-open the roller clamp
Flow regulation : through a flow regulator if applicable
or simply by estimating the flow by the relative position
of the roller clamp.
Essential precaution : carry out the complete backwards purge
= the infusion bag, the entire drip chamber and the infusion line must be completely purged of any
contained air.
5
4
7
9
2
3
6
8
10
1

Instructions for use - Version 2 9/15
Infusion line with « Air Stop » filter
1. Close the infusion line roller clamp
2. Insert the spike into the infusion bag like for a classic infusion
3. Place the bag in the horizontally arranged Droper Field
4. Close the Droper Field
5. Fill the drip chamber halfway by pinching it between thumb and
index finger
6. Make sure that the drip chamber does not position horizontally but is tilted
downwards to allow permanent contact of the Air Stop filter with the liquid. This
can be facilitated by lines that have an extension between the spike and the drip
chamber (see aside drawing)
7. Open the infusion line roller clamp
8. Purge the line of any air like during classic infusion procedure
9. Close the infusion line roller clamp
10. Connect the infusion line to the patient and re-
open the roller clamp
Flow regulation : through the drip chamber
Essential precaution : Perform the classic purge
= the line is purged of any air and the drip chamber is half filled.
2
4
6
3
5
8
9
10
1
7

Instructions for use - Version 2 10/15
8. TRANSFUSION : operating mode
Transfusion : for residential practice only, with classic transfusion lines by
hanging the Droper Field to a pole by the mean of the hanging ring on the
Droper Field rear side. The drip chamber MUST stay in a vertical position, with
the drip chamber end side down
1. Close the transfusion line roller clamp
2. Insert the spike into the blood bag
3. Place the blood bag in the horizontally arranged
Droper Field
4. Close the Droper Field
5. Hang the Droper Field to a pole
6. Fill the drip chamber halfway by pinching it
between thumb and index finger
7. Open the transfusion line roller clamp
8. Purge the line of any air like during classic transfusion procedure
9. Close the transfusion line roller clamp
10. Connect the transfusion line to the patient and
re-open the roller clamp
Flow regulation : through the drip chamber
Essential precaution : perform the classic purge
= the line is purged of any air and the drip chamber is half filled.
2
3
4
5
1
6
7
8
9
10

Instructions for use - Version 2 11/15
9. OPERATING ISSUES
Stop or absence of administration due to a device malfunction
If the administration stops due to a device malfunction, characterized by a lack of bag pressure, this
incident may be confirmed by an absence of flow of the product in the drip chamber if this one is
used, or –if not used - by observance of blood reflux in the tubing when the device is located at the
patient’s level or even below.
Firstly check that the cover of the Droper Field has been closed correctly. Where necessary, open and
re-close the cover.
In the event that the cover is closed correctly, open the Droper Field, unfasten the mobile plate from
its tightening clips (see point «Cleaning » in point « 10. CLEANING / DISINFECTION »), check the
following points and implement the relevant actions:
Check that there are no objects blocking the mechanism. If this is the case, remove the object
Reinstall the mobile plate onto the mechanism by replacing the clips using vertical force.
Re-pressurise the system.
Check that one or several springs have not stopped working
Remove the bag of fluid and continue administration by gravity or manual pressure on
the bag, or change device. Send the Droper Field to the maintenance department for repair.
Check whether the roller clamp or flow regulator is not set to the OFF position
Reposition the roller clamp or flow regulator to the desired position.
Check whether the infusion / transfusion line is not being pinched by excessive bending of the
latter
Remove this bend.
Check whether the infusion / transfusion line is not being clamped by an object crushing the
line
Remove this object.
Check whether the infusion / transfusion line has not been clamped between the cover and
the plate when arming the Droper Field
Open the Droper Field and move the infusion / transfusion line.
Stop, insufficient or absence of administration due to a catheter obstruction
After checking the correct operation of the device, check whether the administration has stopped, is
insufficient or is absent by observing the slowing or absence of flow in the drip chamber, or - if the
drip chamber is not used - by the absence of blood reflux in the tubing if the Droper Field is disarmed
and installed at the patient’s level or even below. The issue is then generated by a catheter
obstruction.
Reinsert another catheter.

Instructions for use - Version 2 12/15
10. CLEANING / DISINFECTION
The device is made from plastic and metal materials that are not subject to either biodegradation or
corrosion under normal operating conditions. The device was designed to allow for its full cleaning in
the event of any leakage of bodily fluids, or of liquids being administered or by any other external
pollution.
Cleaning
To clean the device, place the Droper Field on a flat, stable surface. Open the
Droper Field and pivot the cover backwards as far as possible. Firmly grip the end
of the plate nearest the operator and pull obliquely upwards. This will result in the
tightening clips releasing the plate from the mechanism (see diagram).
Normal cleaning can then take place by spraying and rinsing with a jet of clear water,
possibly soapy and rinse with clear water before any disinfection, if necessary. Leave to dry in
the open air.
Disinfection
The Droper Field does not come into direct contact with the patient and therefore does not need to
be disinfected before use. The Droper Field is a "non-critical" medical device (low infectious risk). It
must be carefully cleaned, disinfected if necessary and dried.
After disassembly and cleaning, the various parts disassembled according to the procedure described
in the Cleaning section above can be disinfected by spraying with quaternary ammonium, aldehydes
or stabilised hydrogen peroxide disinfectants. The device should be left in the open air after
application.
Precautions:
1. Solvent-based disinfectants are prohibited.
2. Do not place in an autoclave. Avoid abrasive scrubbing which may damage the elements.
3. Avoid the use of products based on :
ALCOHOL SPRAYS (20% - 40% alcohol): they cause tarnishing and cracking of
synthetic materials
IODINE SOLUTIONS: they can irreversibly stain certain clear plastic parts.
PHENOLS: corrosive to rubber and some plastics and environmentally harmful.

Instructions for use - Version 2 13/15
Re-installing the components
After complete drying, reseat the plate by presenting it, as shown, opposite to
its clamping clips and making a strong pressure movement. Visually check that
the different elements are correctly positioned.
11. PERIODIC INSPECTION
The device is designed to operate more than 6,000 times under normal operating conditions.
However, the manufacturer advises that users perform annual maintenance and inspections to
ensure the correct operation of the device, either by sending it to the manufacturer or distributor, or
by using the method described below:
Place a 1,000 ml bag of NaCl 0.9%, the design of which corresponds to the plate's surface in the
Droper Field and introduce the spike of a classic infusion line without a catheter or needle, and with
the roller clamp in the OFF position. Open the infusion line into a recipient placed at the same height
as the device and measure the time required to drain the bag. The bag must be drained in less than
or equal to 10 minutes.
12. CONDITIONS OF TRANSPORT, STORAGE
AND USE
Storage of the device when not in use should be in a dry and temperate place
Relative humidity: 20% to 90%
Storage, transport and use temperature: - 10°C to + 50°C
13. WARRANTY CONDITIONS
The Droper Field is guaranteed against any part or manufacture defects for a period of 2 years from
its date of first use. To benefit from the parts and labour warranty from our After-Sales Service or
from an approved service, the following conditions must be complied with:
The device must have been used under the normal operating conditions described herein.
The device must not have suffered from any deterioration caused by its storage,
maintenance or incorrect handling.
The device must not have been modified or repaired by persons not authorized by the
manufacturer.
For item returns and repairs, please contact the After-Sales Service

Instructions for use - Version 2 14/15
14. LIFETIME and DISPOSAL
The Droper Field was designed to operate for a period of 2 years, calculated based on a daily usage
rate of 8 infusions per day from its commissioning date and for a period of 10 years from its date of
manufacture. The user is responsible for recording the date of first use by any means deemed
appropriate for traceability purposes.
Disposal of the device at the end of its life: the device does not require particular disposal
precautions.
15. SPECS
Type: Mechanical pressure infuser
Size of possible bags: from 250 ml to
1,000 ml
Infusion pressure: from ~ 100 mb
(with a 1,000 ml bag) up to ~ 190 mb
(with a 250 ml bag)
Drainage rate: ~ 95%
Closing force: ~ 36 kg
Power: mechanical only
Flow rate: adjustable by a flow
regulator external to the device.
With a NaCl 0,9% solution :
ofrom 0 to 8.3 litres / hour
following ISO 8536 –4
ofrom 0 to 5 litres / hour with
an 18 G needle
Power consumption other than
manual : none
L: 335 mm –W : 220 mm –H : 112
mm
Weight: 1,950 kg
16. SYMBOLS USED
The following symbols may appear on labels or on the product packaging :
Batch number Reference of product
Manufacturer’s contact details Reference to user manual
CE marking certification Storage/transport conditions
Weight Recommended transport Position

Instructions for use - Version 2 15/15
17. USEFUL CONTACTS
Sales Department and After-Sales Service:
Promovet sarl
1 ZAC de la Route de Beauraing, 1
08600 GIVET (France)
Tél.:+ 33 (0)3 24 42 15 71
E-mail: contact@promovet.fr
Website : www.droper.be
2854
Year of first commissioning: 2015
Instructions for use v.2 -02/2021
Other manuals for Field 1000
1
Table of contents
Other Droper Medical Equipment manuals
Popular Medical Equipment manuals by other brands

Chattanooga
Chattanooga Intelect Mobile 2 Ultrasound user manual

Eli Ezer
Eli Ezer ERK-5400A Operation manual

Civco
Civco Astra Tee Base installation manual

TekTone
TekTone NC403TS Installation and operation manual

bort medical
bort medical Select StabiloGen Instructions for use

M. Bartels
M. Bartels Stairclimber TRE-70 Operation manual