Drucker Diagnostics Horizon 6 FA User manual

HORIZON
Model 6FA RegenLab
Operator’s Manual
Operator’s Manual............................................................................................. 1
Bedienungsanleitung ........................................................................................ 12
Manual de instrucciones ................................................................................... 25
Manuale dell'operatore ...................................................................................... 37
Manuel d’utilisation............................................................................................ 50
Manual do operador .......................................................................................... 63
Uživatelská příručka .......................................................................................... 75
Εγχειρίδιο χειρισμού ........................................................................................ 88
Brukerhåndbok .................................................................................................. 101
Instrukcja obsługi .............................................................................................. 114

This page intentionally left blank.

RegenLab SA – Customer Service: +41 (0)21 864 0111 | Page 1
TABLE OF CONTENTS
Model Description ........................................................................................................................................... 2
Features ................................................................................................................................................................. 2
Intended Use ......................................................................................................................................................... 2
Warranty ................................................................................................................................................................ 2
Initial Setup ...................................................................................................................................................... 3
Quick Start ....................................................................................................................................................... 4
Settings ............................................................................................................................................................ 5
Standard Settings ................................................................................................................................................... 5
Review Cycle Time and Speed Settings ................................................................................................................. 5
Changing Cycle Time and Speed Settings .............................................................................................................. 5
Operation ......................................................................................................................................................... 6
Balancing Loads ................................................................................................................................................ 6
Care and Preventative Maintenance ............................................................................................................... 7
Cleaning and Disinfection ................................................................................................................................ 7
Troubleshooting ............................................................................................................................................... 8
General Specifications ..................................................................................................................................... 10
Calculating the G-Force .................................................................................................................................... 10

RegenLab SA – Customer Service: +41 (0)21 864 0111 | Page 2
MODEL DESCRIPTION
HORIZON 6FA RegenLab is a versatile line of centrifuges designed with 3 settings preprogrammed with the most
convenient settings for ease of use. The cycle settings can be changed to accommodate custom settings.
This general-purpose laboratory centrifuge may also be used to spin approved containers with biologics, chemicals
(non-flammable, non-explosive, non-volatile, and non-highly reactive), and environmental samples.
FEATURES
o
Three (3) cycles are conveniently preset and labeled for your lab’s most common applications. Use the default
cycles or customize them as needed. An LED light indicates the current selected setting.
o
If desired, the control panel can be locked on one preset cycle for error-free reproducibility.
o
Lid lighting indicates the centrifuge’s status (ready, running, done), informing the operator when tubes are ready
for the analyzer and preventing tubes from being left in the centrifuge longer than necessary (patent pending).
o
A traditional audible alert indicates the completion of the cycle.
o
Cool–Flow design prevents overheating of samples by using ambient air to keep specimens at room temperature.
o
The tube holders are fiber reinforced for high strength, durability, and years of trouble-free use.
o
A clear lid permits safe observation of samples and optical calibration of speed.
o
The lid safety system prevents the centrifuge from operating unless the lid is closed and latched.
o
The lid safety system only allows entry into the centrifuge after the rotor has completely stopped.
o
The high-power brushless motors provide years of operation with no routine maintenance.
INTENDED USE
General purpose laboratory centrifuge, intended for the density based separation of fluids through centripetal
acceleration.
WARRANTY
RegenLab warranties that this centrifuge is free from defects in workmanship and parts for 2 years.

RegenLab SA – Customer Service: +41 (0)21 864 0111 | Page 3
This device is intended to be operated by properly trained personnel who have carefully read the
operating manual and are familiar with the function of the device. [Refer to the clinical laboratory
method specified by the specimen receptacle manufacturer or established by the medical technology
for the products applications.]
WARNING: For the safety of both the operator and service personnel, care should be taken when using
this centrifuge if handling substances that are known to be toxic, radioactive or contaminated with
pathogenic microorganisms. Use appropriate personal protection equipment (PPE). When Risk Group II
materials are used, (as identified in the World Health Organization “Laboratory Bio-Safety Manual”), a Bio-
Seal should be employed. In the event that materials of a higher risk group are being used, more than one
level of protection must be provided. The use of flammable or explosive materials as well as those
materials which have a vigorous chemical reaction is prohibited.
Unplug the centrifuge before cleaning or performing maintenance.
WARNING: Inspect centrifuge for cracks or physical damage to cabinet, lid, rotor, or tube holders. Damage
may result in unsafe operation. Discontinue use until repairs have been performed.
This equipment generates, uses, and can radiate radio frequency energy, and if not installed and used in
accordance with this operator manual, may cause interference to radio communications.
Operation of this equipment in a residential area may cause interference, in which case the user will be
required to correct the interference at his own expense.
INITIAL SETUP
o
Unpack and verify that all the following are included:
Centrifuge
Power cord
Tube holders
Inserts
Operating manual
o
Setup the centrifuge on flat and level surface. A bench top clearance height of 21” (54 cm) is required to open
the lid.
o
The centrifuge should have 6” (15 cm) of clear space around the centrifuge. Proper ventilation is necessary to
prevent the overheating of samples as well as premature failure of the centrifuge. Choose an area which allows
unencumbered air flow, and where the temperature remains between 16°C and 32°C.
o
No hazardous material shall be permitted in the clearance envelope during operation.
o
The operator time within the envelope shall be limited to the time necessary for loading, unloading, and
centrifuge operation only.
o
Plug the line cord into the centrifuge.
o
Plug the line cord into an approved electrical outlet.
BE SURE THE ELECTRICAL OUTLET IS ALWAYS ACCESSIBLE AS THE LINE CORD IS THE
MEANS OF EMERGENCY
DISCONNECTION!

RegenLab SA – Customer Service: +41 (0)21 864 0111 | Page 4
QUICK START
The LED indicator light is on for the cycle currently selected:
(1) 5 Min This setting is factory preset to 3500 RPMs @1500xg for 5 minutes.
(2) 9 Min This setting is factory preset to 3500 RPMs @1500xg for 9 minutes.
(3) 30 Min This setting is factory preset to 3500 RPMs @1500xg for 30 minutes.
Indicator Lights
Start Begins running the cycle indicated by the cycle indicator LED light.
The lid must be closed.
Unlock Allows access into the rotor chamber by engaging the unlocking
mechanism. Entry is only possible when the rotor is stopped.
Stop Pressing the UNLOCK button during operation will terminate the run
and unlock the lid after the rotor has come to a stop.
Cycle Selection
The LED light is on for the cycle currently selected. To change the
selected cycle, press the UNLOCK button in succession until the
desired cycle is selected. Two seconds after selection, the button
reverts to its UNLOCK function.
Lock Cycle Selection Select desired cycle. Press and hold the UNLOCK button for 5
seconds. Two beeps will confirm that cycle selection is locked.
Unlock Cycle Selection
To re-enable cycle selection, press and hold the UNLOCK button for
5 seconds. Three beeps will confirm that cycle selection is now
unlocked.

RegenLab SA – Customer Service: +41 (0)21 864 0111 | Page 5
SETTINGS
STANDARD SETTINGS
(1) 5 min (2) 9 min (3) 30 min
HORIZON 6FA
RegenLab
RPM 3500 RPM 3500 RPM 3500 RPM
Time 5 minutes 9 minutes 30 minutes
G-Force 1500xg 1500xg 1500xg
REVIEW CYCLE TIME AND SPEED SETTINGS
Factory programmed cycles are shown on the rear of the centrifuge, on the Factory Set Cycles label. To review
current settings, follow this procedure:
o
The lid must be open to review the selected cycle time and speed.
o
Press and hold the START button until you hear a beep.
o
Release the START button. The centrifuge will beep and the LED light will flash once for each minute of run time
in the current cycle. 10 beeps / flashes equal 10 minutes of run time. Run time starts when the rotor reaches 90%
of desired speed and stops when the rotor starts decelerating.
o
Pressing the START button again will cause the unit to beep and the LED light to flash once for each 100 rpm in
the current cycle. 38 beeps / flashes equal 38 x 100 or 3,800 Revolutions per Minutes (RPM)
o
The centrifuge will automatically revert to normal mode at the end.
CHANGING CYCLE TIME AND SPEED SETTINGS
o
The lid must be open to change the selected cycle time and speed.
o
Select the cycle you wish to change.
o
Press and hold the START and UNLOCK buttons together until the LED light flashes.
o
Press the START button for each minute of run time.
o
Move to speed setting mode by pressing the UNLOCK button.
o
Press the START button once for each 100 rpm.
o
Press the UNLOCK button to exit setting mode.

RegenLab SA – Customer Service: +41 (0)21 864 0111 | Page 6
OPERATION
o
Place the tubes into the tube holders. Be sure to follow the rules for balanced loads as listed in the next section.
o
Close the lid and turn the lid knob clockwise to its complete stop position.
o
The front panel LED is illuminated for the currently selected cycle. To select another cycle, press the UNLOCK
button in succession until the desired cycle is selected.
o
Pushing the START button on the control panel will start the spin cycle.
o
When the cycle is completed, the rotor will slow to a complete stop and the lid light will flash.
o
The unlocking mechanism will engage for 60 seconds allowing entry into the rotor chamber. To unlock after more
than 60 seconds have elapsed, press the UNLOCK button. The lid will unlock for another 15 seconds.
o
Turn the lid knob counterclockwise and open the lid. The lid light will turn off.
o
You may now safely remove the samples.
BALANCING LOADS
Your centrifuge must contain a balanced load to work properly. Spinning balanced loads will extend the life of the
centrifuge and produce better results. Use the following rules when loading the rotor. If an odd number of samples
is to be spun, fill a tube with water to match the weight of the unpaired sample and place it across from this sample.
Opposing tube holders must be equally loaded or empty or loaded with equally weighted samples.
When loading only 3 tubes, they must be of equal weight.
Buckets can be placed around the rotor in any of the rotor loading configurations shown.
Each bucket must be loaded symmetrically with tubes as above.

RegenLab SA – Customer Service: +41 (0)21 864 0111 | Page 7
CARE AND PREVENTATIVE MAINTENANCE
With proper care and maintenance, your centrifuge will provide years of laboratory service. For proper care, the
following steps should be taken:
o
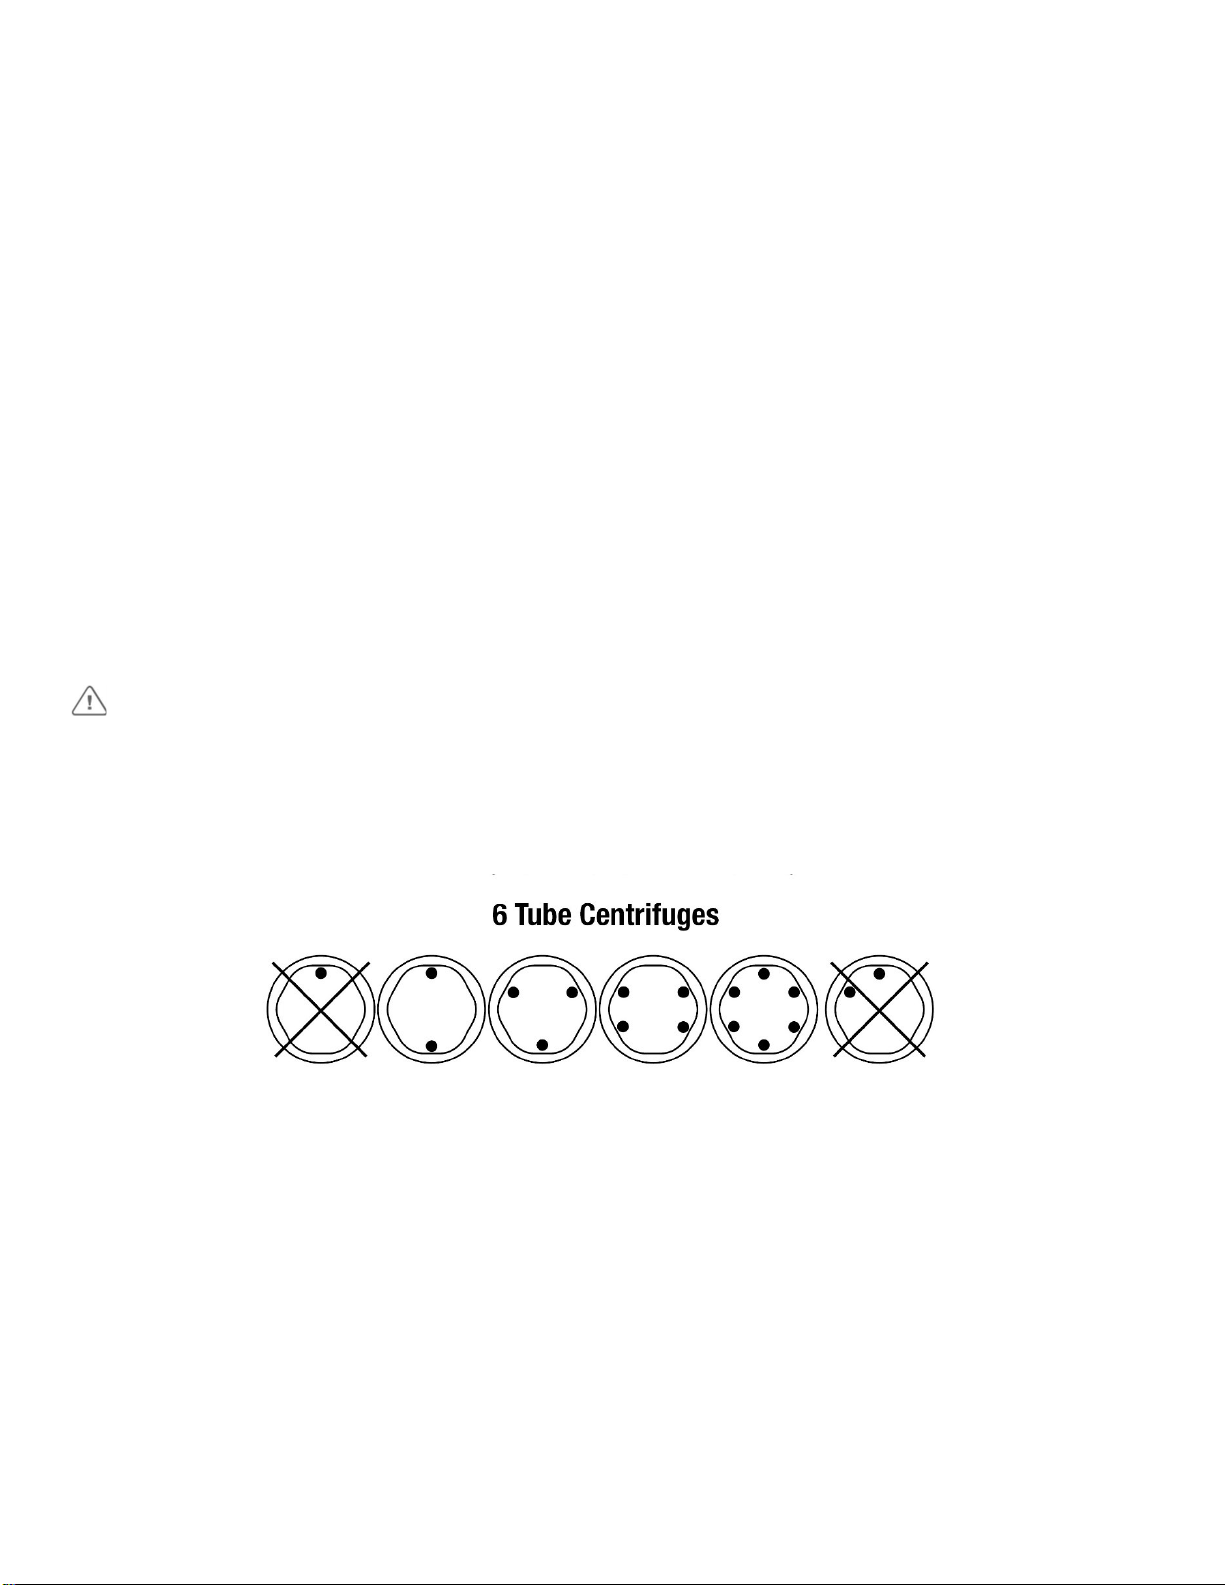
Always Spin Balanced Loads: Make certain that you are always spinning a balanced load, as shown in the
previous section. These centrifuges have a unique counter balanced motor mounting design which produces
excellent vibration dampening. However, out–of–balance loads may break glass test tubes and may produce
unsatisfactory separation results. Proper load balancing will improve sample separation and extend the life of
the centrifuge.
o
Motor and Electrical Maintenance: The highest quality electrical components have been selected for the
centrifuges and should not need maintenance or servicing for the life of the centrifuge.
o
Tube Holder Replacement: It is recommended that the tube holders be replaced after 24 months of use.
Inspect tube holders regularly for cracks. If cracks are discovered, replace immediately.
o
Remove Accessories Before Moving: All tube holders, samples, and caps must be removed from the rotor
chamber before transporting or storing the centrifuge to prevent damage and injury.
CLEANING AND DISINFECTION
To prolong the life of the centrifuge, cleaning and disinfection is recommended every six months or whenever there
is a spillage or tube breakage. Contaminants must be removed immediately or corrosion and premature
degradation of components can occur. Before using any cleaning or decontamination methods other than those
recommended by the manufacturer, users should verify with the manufacturer that the proposed method will not
damage the equipment.
o
Unplug the centrifuge before cleaning.
o
Use appropriate personal protective equipment (PPE).
o
Apply cleaning solutions with a towel or cloth. Do not submerge the centrifuge in water or other cleaning
solutions as this will cause damage and void the warranty.
o
ONLY isopropyl alcohol or a 10% (5500 PPM) bleach solution should be used to disinfect the centrifuge and its
accessories.
o
All surfaces must be dried immediately after cleaning and disinfecting.
TBQ GERMICIDAL PRODUCTS ARE NOT RECOMMENDED AS THEY MAY CAUSE DAMAGE
TO THE
CENTRIFUGE. WIPE OFF THOROUGHLY AFTER USE TO PREVENT VOIDING THE WARRANTY.
o
Fully/partially halogenated hydrocarbons, ketones, esters, ethers, benzyls, ethyl benzenes, and all other
chemicals not prescribed by the manufacturer shall not be used as they may cause damage to the rotor chamber,
rotor, tube holders, accessories and centrifuge exterior and void the warranty.

RegenLab SA – Customer Service: +41 (0)21 864 0111 | Page 8
TROUBLESHOOTING
NOTE: The latch must be turned completely clockwise to its stop position for
the centrifuge to operate.
The centrifuge does not run
o
Verify that the centrifuge is powered. One of the LED lights
should be on.
o
Make sure the lid latch is turned completely clockwise to its stop
position.
o
If the centrifuge still does not run, contact Customer Service.
The rotor does not spin freely o Make sure nothing has fallen into the rotor chamber,
following the procedure above.
o
If nothing obstructs the rotor, the rotor may be damaged.
Contact Customer Service for further assistance.
The centrifuge makes a rattling noise
when running
o
Stop the centrifuge. Open the lid.
o
Wearing PPE, remove tubes and tube holders/buckets and
look for fallen objects or debris. Carefully reach inside the
rotor chamber with a tool to remove them.
o
Inspect the rotor, tube holders or buckets for damage.
o
If the tube holders or buckets have any damage, even slight,
safely dispose of them and replace them.
o
If the rotor appears damaged, contact Customer Service for
further assistance.
Excessive noise or vibration when the
centrifuge is running
o
Verify that all four centrifuge feet are properly seated on a flat
surface.
o
Ensure that the load is balanced according to instructions in the
“Balancing Loads” section of this manual.
o
Make sure that nothing has fallen into the rotor chamber.
The centrifuge stops and beeps
continuously
The load is not balanced. Press the UNLOCK button, open the lid,
and balance the load as recommended elsewhere in this manual.
The centrifuge is stuck on one of the
settings Cycle selection is locked. Press the UNLOCK button for 5 seconds.
The cycle time and speed are not set to
the desired value
Check the setting by following the instructions in the section on
Changing Cycle Settings. If the preset is not the desired length,
follow the procedure on the same page to change the preset time.

RegenLab SA – Customer Service: +41 (0)21 864 0111 | Page 9
The centrifuge does not unlock after a
run is completed
o
Wait until the rotor has come to a complete stop. If the lid knob
still cannot be rotated, press the UNLOCK button and try again.
o
If no LED light is on, the unit is
not powered and the lid will not
unlock by conventional means.
Remove the latch label and use a pen
to manually disengage the locking
mechanism. Pull the mechanism
towards the control panel and then
unlatch and open the lid.
o
If the unit is damaged, contact Customer Service for assistance.
The lid does not open
o
E
nsure that the lid knob is
turned fully counterclockwise.
o
If the knob cannot be turned counterclockwise, turn it fully
clockwise, press UNLOCK, and turn counterclockwise.
o
If the lid remains locked after this and will not unlock, the
electronics may have been damaged. Contact customer service
for assistance.
Clicking noise during braking gets loud
o
Make sure that the screw in the center of the rotor is tight.
Lid does not stay up
o
Tighten the center screw on the lid hinge.

RegenLab SA – Customer Service: +41 (0)21 864 0111 | Page 10
GENERAL SPECIFICATIONS
The rotor and accessories are rated for the maximum rotation frequency shown in the table below.
HORIZON 6FA RegenLab
Tube Capacity 6 tubes – 22 mL or 11 mL w/insert
Dimensions (H
x W x D) 14 in x 12 in x 9 in (36 cm x 30 cm x 23 cm)
Weight 12 lbs. (5.4 kg)
Sound Level 64 dB A
Environmental
Range 16 – 32 degree C
Voltage 95 -253 VAC
Frequency 50/60 Hz
Power
Requirement 220 Watts
Centrifuge
Motor ½ H.P. Brushless
Max g-Force 1,500 xg
Max Speed 3,500 RPM
Cycle Time 1 to 30 minutes (+/- 2%)
CALCULATING THE G-FORCE
The I.F.U.s of tube manufacturers recommend cycles at a minimum G-Force, which can be calculated if you know
the RPM and the radius. Use the formula below or go to www.druckerdiagnostics.com/g-force-calculator/.
In Centimeters:
RCF or G-force = 0.00001118 x
Rotor Radius (cm) x (RPM)2
In Inches:
RCF or G-force = 0.0000284 x
Rotor Radius (in) x (RPM)2
HORIZON 6FA RegenLab
Radius 4.5 in (11.5 cm)

RegenLab SA – Customer Service: +41 (0)21 864 0111 | Page 11
Product Family: HORIZON 6FA RegenLab is part of the HORIZON Series (HORIZON 6, 6 FA, 12, & 24)
Complies with UL61010-1/CSA C22.2 No. 61010-1 and IEC61010-2-020
Protected by U.S. Patents #6,811,531, # 7,422,554, #D718,463, & #D734,489. Other Patents Pending
FDA LISTED
INSTRUCTIONS FOR DISPOSAL OF WEEE BY USERS IN THE EUROPEAN UNION
This product must not be disposed of with other waste. Instead, it is the user’s responsibility to
dispose of their waste equipment by handing it over to a designated collection point for the
recycling of waste electrical and electronic equipment. The separate collection and recycling of
your waste equipment at the time of disposal will help to conserve natural resources and ensure
that it is recycled in a manner that protects human health and the environment. For more
information about where you can drop off your waste equipment for recycling, please contact
your local city office, waste disposal service, or where you purchased the product.
REGENLAB SA, EN BUDRON B2, CH-1052 LE MONT-SUR-LAUSANNE, SWITZERLAND
+41 (0)21 864 0111
www.regenlab.com
REGEN LAB FRANCE S.A.S, 2 AVENUE DE LAPONIE
91940 LES ULIS, FRANCE
This operator’s manual is part number 03-0-0002-0220 Rev. B
RoHS
Compliant

RegenLab SA – Kundendienst: +41 (0)21 864 0111 | Seite 12
HORIZON
Modell 6FA RegenLab
Bedienungsanleitung

RegenLab SA – Kundendienst: +41 (0)21 864 0111 | Seite 13
INHALTSVERZEICHNIS
Modellbeschreibung ......................................................................................................................................... 14
Besonderheiten ..................................................................................................................................................... 14
Verwendungszweck ............................................................................................................................................... 14
Garantie ................................................................................................................................................................. 14
Inbetriebnahme ................................................................................................................................................ 16
Quick-Start ........................................................................................................................................................ 17
Einstellungen ..................................................................................................................................................... 18
Standardeinstellungen ........................................................................................................................................... 18
Überprüfen der Zykluslaufzeit und Drehzahleinstellungen ................................................................................... 18
Ändern der Zykluslaufzeit und Drehzahleinstellungen .......................................................................................... 18
Betrieb .............................................................................................................................................................. 19
Gleichmäßiges Beladen ..................................................................................................................................... 19
Pflege und vorbeugende Wartung .................................................................................................................... 20
Reinigung und Desinfektion .............................................................................................................................. 20
Problembehebung ............................................................................................................................................ 21
Allgemeine Anforderungen ............................................................................................................................... 23
Berechnung der g-Kraft ..................................................................................................................................... 23

RegenLab SA – Kundendienst: +41 (0)21 864 0111 | Seite 14
MODELLBESCHREIBUNG
HORIZON 6FA RegenLab ist eine vielseitige Zentrifugenreihe mit 3 vorprogrammierten Einstellungen, die eine
einfache und bequeme Bedienung ermöglichen. Die Zykluseinstellungen können verändert und an
benutzerdefinierte Einstellungen angepasst werden.
Diese Zentrifuge für allgemeine Laborzwecke kann auch zum Zentrifugieren zugelassener Behälter mit biologischen
Stoffen, Chemikalien (nicht brennbare, nicht explosive, nicht flüchtige und nicht hochreaktive Chemikalien) und
Umweltproben verwendet werden.
BESONDERHEITEN
o
Drei (3) Zyklen sind bereits anwenderfreundlich voreingestellt und benannt. Es handelt sich um die
gebräuchlichsten Anwendungen in Laboren. Sie können entweder die voreingestellten Zyklen verwenden oder
diese nach Bedarf anpassen. Eine LED-Leuchte zeigt die aktuell ausgewählte Einstellung an.
o
Das Bedienfeld kann, falls gewünscht, für einen voreingestellten Zyklus gesperrt werden, um eine fehlerfreie
Reproduzierbarkeit zu gewährleisten.
o
Die Deckelbeleuchtung zeigt den Status der Zentrifuge an (bereit, läuft, fertig), so weiß der Nutzer, wann die
Röhrchen für die Analyse bereit sind. Auf diese Weise wird verhindert, dass die Röhrchen länger als notwendig
in der Zentrifuge bleiben (Patent angemeldet).
o
Ein herkömmlicher akustischer Alarm signalisiert das Ende des Zyklus.
o
Der Kühlbetrieb mithilfe der Außenluft verhindert ein Überhitzen der Proben und hält die Proben auf
Raumtemperatur.
o
Die Röhrchenhalter sind faserverstärkt und ermöglichen somit eine hohe Festigkeit, lange Haltbarkeit und eine
jahrelange, störungsfreie Verwendung.
o
Der durchsichtige Deckel ermöglicht eine sichere Überwachung der Proben und eine optische Kalibrierung der
Drehgeschwindigkeit.
o
Das Deckelsicherheitssystem hält die Zentrifuge davon ab, zu starten, bevor der Deckel geschlossen und
verriegelt wurde.
o
Durch das Deckelsicherheitssystem kann nur in die Zentrifuge gegriffen werden, wenn der Rotor stillsteht.
o
Die bürstenlosen Hochleistungsmotoren ermöglichen einen jahrelangen Betrieb ohne Routinewartungsarbeiten.
VERWENDUNGSZWECK
Zentrifuge für allgemeine Laborzwecke für die Trennung von Flüssigkeiten verschiedener Dichte durch
Zentripetalbeschleunigung.
GARANTIE
RegenLab gewährleistet, dass diese Zentrifuge für einen Zeitraum von zwei Jahren frei von
Verarbeitungsfehlern und Fehlern in Teilen ist.

RegenLab SA – Kundendienst: +41 (0)21 864 0111 | Seite 15
Dieses Gerät darf nur von entsprechend geschultem Personal bedient werden, das die
Bedienungsanleitung sorgfältig gelesen hat und mit der Funktionsweise des Gerätes vertraut ist.
[Beachten Sie das klinische Laborverfahren, das vom Hersteller der Probenbehältnisse angegeben oder
von der Medizintechnik für die Anwendungen der Produkte festgelegt wurde.]
WARNUNG: Aus Sicherheitsgründen ist sowohl für den Bediener als auch für das Wartungspersonal bei
dieser Zentrifuge beim Umgang mit Substanzen, die giftig, radioaktiv oder durch pathogene
Mikroorganismen kontaminiert sind, Vorsicht geboten. Tragen Sie eine geeignete persönliche
Schutzausrüstung (PSA). Wenn Sie Materialien der Risikogruppe 2 verwenden (die im „Laboratory
Biosafety Manual“ der Weltgesundheitsorganisation aufgelistet werden), dann sollten Sie ein Siegel mit
dem entsprechenden Hinweis darauf verwenden. Falls Materialien einer höheren Risikogruppe eingesetzt
werden, muss mehr als eine Schutzstufe gewährleistet werden. Die Verwendung brennbarer oder
explosiver Materialien sowie solcher Materialien, bei denen eine starke chemische Reaktion auftritt, ist
untersagt.
Ziehen Sie vor Reinigungs- und Wartungsarbeiten den Netzstecker des Gerätes.
Warnung: Prüfen Sie die Zentrifuge auf Risse oder physische Schäden am Gehäuse, Deckel, Rotor oder an
den Röhrchenhalterungen. Ein ungesicherter Betrieb kann zu Schäden führen. Unterbrechen Sie die
Nutzung so lange, bis die Schäden repariert wurden.
Dieses Gerät erzeugt und nutzt Hochfrequenzenergie und kann solche ausstrahlen. Wenn es nicht gemäß
den Anweisungen dieser Bedienungsanleitung installiert und verwendet wird, kann es
Funkkommunikationen beeinträchtigen.
Der Betrieb dieses Gerätes kann in einer Wohngegend zu Störungen führen. In diesem Fall ist der Nutzer
dafür verantwortlich, die Störungen auf eigene Kosten zu korrigieren.

RegenLab SA – Kundendienst: +41 (0)21 864 0111 | Seite 16
INBETRIEBNAHME
o
Prüfen Sie nach dem Auspacken, ob die folgenden Teile enthalten sind:
Zentrifuge
Netzkabel
Röhrchenhalter
Einsätze
Bedienungsanleitung
o
Stellen Sie die Zentrifuge auf einer flachen und ebenen Fläche ab. Bei Tischgeräten wird ein Höhenabstand von
54 cm (21 in) benötigt, um den Deckel öffnen zu können.
o
Um die Zentrifuge herum sollte zu allen Seiten 15 cm (6 Zoll) Platz sein. Eine ordnungsgemäße Lüftung ist
notwendig, um ein Überhitzen der Proben sowie ein vorzeitiges Ausfallen des Gerätes zu verhindern. Wählen Sie
einen Ort mit ungehindertem Luftstrom, an dem die Temperatur konstant zwischen 16°C und 32°C beträgt.
o
Während des Betriebs sind im Sicherheitsbereich keine Gefahrenstoffe erlaubt.
o
Die Zeit, die der Benutzer im Sicherheitsbereich verbringt, ist auf die Zeit für das Befüllen, Leeren und Bedienen
der Zentrifuge zu begrenzen.
o
Verbinden Sie die Zentrifuge mit dem Netzkabel.
o
Verbinden Sie das Netzkabel mit einer zugelassenen Steckdose.
STELLEN SIE SICHER, DASS DIE STECKDOSE IMMER ZUGÄNGLICH IST, DA DAS NETZKABEL IM FALLE EINER
NOTABSCHALTUNG VON DER STROMQUELLE GETRENNT WERDEN MUSS.

RegenLab SA – Kundendienst: +41 (0)21 864 0111 | Seite 17
QUICK-START
Die LED-Anzeige leuchtet für den aktuell gewählten Zyklus:
(1) 5 min Dieser Zyklus ist werksseitig voreingestellt auf 3500 U/min bei 1500 xg für eine
Dauer von 5 Minuten.
(2) 9 Min Dieser Zyklus ist werksseitig voreingestellt auf 3500 U/min bei 1500 xg für eine
Dauer von 9 Minuten.
(3) 30 Min Dieser Zyklus ist werksseitig voreingestellt auf 3500 U/min bei1500 xg für eine
Dauer von 30 Minuten.
Kontrollleuchten
Start Startet den durch die LED-Leuchte angezeigten Zyklus. Der Deckel
muss geschlossen sein.
Entriegeln
Die Betätigung des Entriegelungsmechanismus ermöglicht den
Zugang zur Rotorkammer. Der Zugriff ist nur möglich, wenn der
Rotor stillsteht.
Stopp
Wenn Sie die Taste ENTRIEGELN während des Betriebs drücken,
wird der Durchlauf beendet und der Deckel entriegelt, nachdem
der Rotor angehalten hat.
Zykluswahl
Die LED-Leuchte ist für den aktuell gewählten Zyklus an. Um den
gewählten Zyklus zu ändern, drücken Sie die Taste UNLOCK so oft,
bis der gewünschte Zyklus gewählt ist. Zwei Sekunden nach der
Auswahl wechselt der Knopf wieder zu seiner
Entriegelungsfunktion.
Zyklusauswahl sperren
Wählen Sie den gewünschten Zyklus. Drücken und halten Sie
5 Sekunden lang die Taste ENTRIEGELN. Zwei Signaltöne erklingen
zur Bestätigung, dass die Zykluswahl gesperrt ist.
Zyklusauswahl entriegeln
Halten Sie die Taste ENTRIEGELN 5 Sekunden lang gedrückt, um die
Zyklusauswahl wieder zu ermöglichen. Zwei Signaltöne erklingen
zur Bestätigung, dass die Zykluswahl nun entsperrt ist.

RegenLab SA – Kundendienst: +41 (0)21 864 0111 | Seite 18
EINSTELLUNGEN
STANDARDEINSTELLUNGEN
(1) 5 min (2) 9 min (3) 30 min
HORIZON 6FA
RegenLab
U/min 3500 U/min 3500 U/min 3500 U/min
Zeit 5 Minuten 9 Minuten 30 Minuten
g-Kraft 1500 xg 1500 xg 1500 xg
ÜBERPRÜFEN DER ZYKLUSLAUFZEIT UND DREHZAHLEINSTELLUNGEN
Die werksseitig programmierten Zyklen sind auf der Rückseite der Zentrifuge auf dem Etikett der
Zykluswerkseinstellungen angegeben. Gehen Sie wie folgt vor, um die aktuellen Einstellungen zu überprüfen:
o
Der Deckel muss zur Überprüfung der gewählten Zykluslaufzeit und Drehzahl offen sein.
o
Drücken und halten Sie die Taste START, bis Sie einen Signalton hören.
o
Lassen Sie die Taste START los. Die Zentrifuge lässt einen Signalton erklingen und die LED für jede Minute der
Laufzeit des aktuellen Zyklus einmal blinken. 10 Signaltöne/10-maliges Blinken bedeutet 10 Minuten Laufzeit. Die
Laufzeit beginnt, sobald der Rotor 90 % der gewünschten Geschwindigkeit erreicht hat, und endet, wenn der
Rotor zu verlangsamen beginnt.
o
Durch erneutes Drücken der Taste START lässt die Einheit einen Signalton erklingen und die LED pro 100 U/min
im aktuellen Zyklus einmal blinken. 38 Signaltöne/38-maliges Blinken bedeutet 38 x 100 bzw. 3.800
Umdrehungen pro Minute (U/Min)
o
Die Zentrifuge geht am Ende automatisch in den normalen Modus über.
ÄNDERN DER ZYKLUSLAUFZEIT UND DREHZAHLEINSTELLUNGEN
o
Der Deckel muss zum Ändern der gewählten Zykluslaufzeit und Drehzahl offen sein.
o
Wählen Sie den Zyklus, den Sie ändern möchten.
o
Drücken und halten Sie gleichzeitig die Tasten START und UNLOCK, bis die LED-Leuchte blinkt.
o
Drücken Sie die Taste START einmal pro Minute Laufzeit.
o
Wechseln Sie durch Drücken der Taste UNLOCK in den Einstellungsmodus für die Drehzahl.
o
Drücken Sie die Taste START einmal pro 100 U/min.
o
Drücken Sie die Taste UNLOCK, um den Einstellungsmodus zu verlassen.
Other manuals for Horizon 6 FA
1
Table of contents
Languages:
Other Drucker Diagnostics Diagnostic Equipment manuals