DSE RH Series User manual

ANPR. MANUAL
RH SERIES - PLATE READING IP CAMERAS
Page:1
DSE SRL - ITALY - WWW.DSE.EU
IP ANPR cameras with OCR
How to install license plate reading cameras

ANPR. MANUAL
RH SERIES - PLATE READING IP CAMERAS
Page:2
DSE SRL - ITALY - WWW.DSE.EU
Introduction
Some models of cameras in the RH series have the license plate reading function with OCR,
which is managed with the CentroRH management software.
This manual indicates how to position and configure the camera to make the best use of the
ANPR function.

ANPR. MANUAL
RH SERIES - PLATE READING IP CAMERAS
Page:3
DSE SRL - ITALY - WWW.DSE.EU
Camera position
In order for the ANPR cameras to read the license plates, they must be positioned correctly.
INCLINATION ON THE HORIZONTAL PLAN
For the reading of the characters to work correctly, it is important that the plate is as horizontal
as possible. Be careful to rotate the camera appropriately so that the angle of the license plate in
the shot does not exceed 5 °
SIZE IN THE PLATE
Adjust the zoom so that the license plate is as large as possible in the frame. For the reading to
take place, the size in the image must be at least 130x70 pixels.
FRONT OR REAR PLATE
You can pick up both the front and rear license plates of the vehicles. If it is possible to choose,
the rear license plate is preferable because the rear lights give less glare.
INCLINATION WITH RESPECT TO THE SENSE OF RUNNING
It is necessary to maintain an angle of about 30 ° with respect to the direction of the vehicles. In
the optimal situation, the 30 ° angle should be maintained both horizontally and vertically. The
30% inclination with respect to the direction of travel is important to avoid the glare of the
headlights in the night shot.

ANPR. MANUAL
RH SERIES - PLATE READING IP CAMERAS
Page:4
DSE SRL - ITALY - WWW.DSE.EU
The minimum reading distance X depends on the positioning height of the camera according to
the formula X = Hx1.7. For example, if the camera is positioned at 3 meters, the minimum
reading distance is 5.1 m.
The maximum recommended reading distance is 30 meters
ZOOM ADJUSTMENT
These cameras have a motorized lens that you can adjust remotely. It is necessary to zoom in as
much as possible in order to obtain an image of the large plate, but without risking that the
vehicle can pass out of the shot. The automatic focus normally allows an excellent result both day
and night, but possibly it is also possible to resort to manual focus.
POSITION OF THE SUN
When positioning the camera, it is necessary to avoid directing it in directions that during the day
can frame the sun from the front. This situation can create camera glare and make the license

ANPR. MANUAL
RH SERIES - PLATE READING IP CAMERAS
Page:5
DSE SRL - ITALY - WWW.DSE.EU
plate reading more difficult.
ANPR. MANUAL
RH SERIES - PLATE READING IP CAMERAS
Page:6
DSE SRL - ITALY - WWW.DSE.EU
Camera adjustment
A license plate reading camera cannot function like a normal camera, which always uses the
automatic shutter adjustment, because it would be dazzled by car headlights at night. For this
reason, these cameras must be set up to use the fixed shutter in night mode
The camera is supplied with the base already configured for reading license plates in normal
conditions. However, it is necessary to set the logic with which the camera will switch from day to
night mode. This is done in the sensor configuration
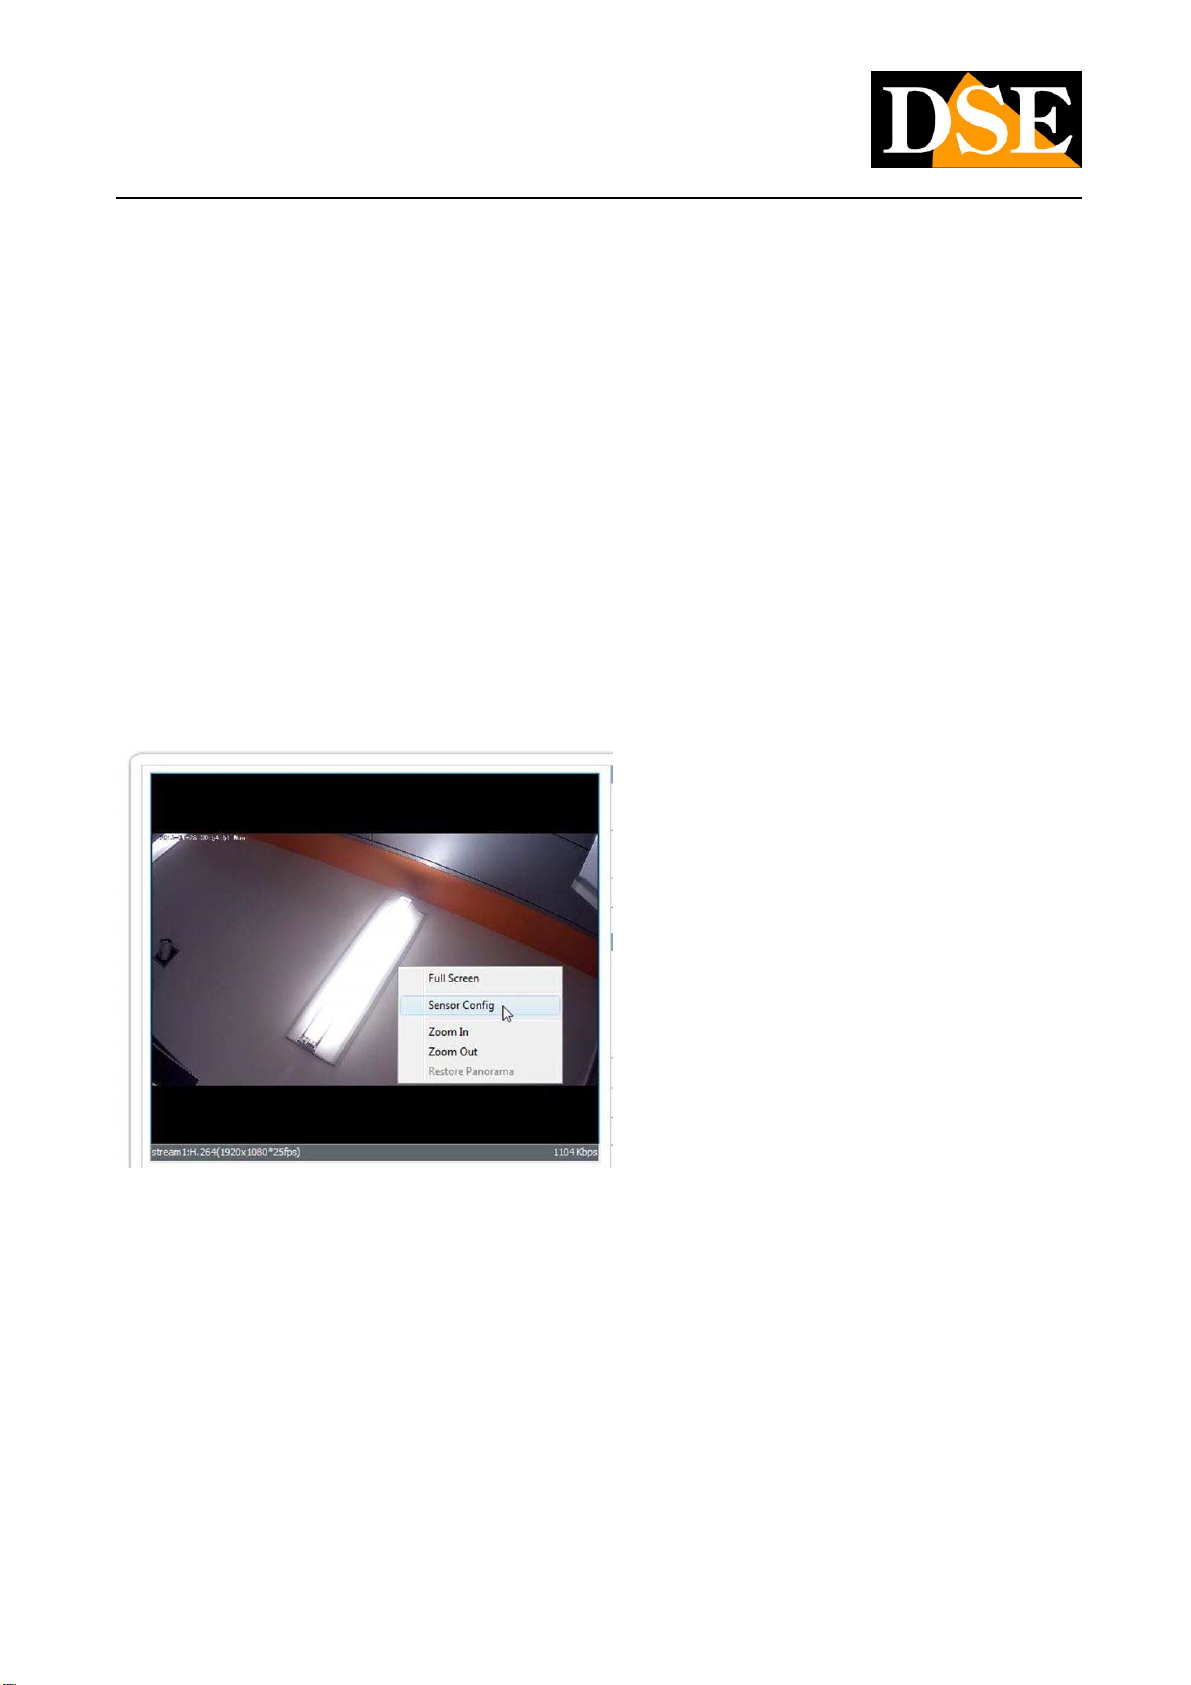
To adjust the sensor you need to connect with the Internet Explorer browser. Check the
installation manual of the RH Series cameras to find out how. Then you need to right click in the
live image and choose SENSOR

ANPR. MANUAL
RH SERIES - PLATE READING IP CAMERAS
Page:7
DSE SRL - ITALY - WWW.DSE.EU
In order to change these settings you must first change the mode in the lower left, from Standard
Mode to Debug mode as in the figure below. The debug mode allows you to modify the sensor
parameters and then save and return to the Standard operating mode.
The debug mode allows you to set up to 4 customized configurations (DIAGRAM 1,2,3,4) to be
activated according to the situation. These license plate cameras use the first 2 configurations:
SCHEMA1 during the day and SCHEMA2 at night which are already configured at the factory for
an optimal recovery in the two situations.
The recommended operating mode is to set the switch from SCHEMA1 TO SCHEMA2 by following
the illumination of the camera lights. To do this you need to activate the DNLinkageMode
function.

ANPR. MANUAL
RH SERIES - PLATE READING IP CAMERAS
Page:8
DSE SRL - ITALY - WWW.DSE.EU
Then press the SAVE button to save the setting
You can now close the configuration panel by answering YES to the window that reminds you to
return to STANDARD mode

ANPR. MANUAL
RH SERIES - PLATE READING IP CAMERAS
Page:9
DSE SRL - ITALY - WWW.DSE.EU

ANPR. MANUAL
RH SERIES - PLATE READING IP CAMERAS
Page:10
DSE SRL - ITALY - WWW.DSE.EU
Advanced adjustments
If you are not satisfied with the basic settings, you can customize them. Enter the sensor
configuration, as seen previously, and activate the DEBUG mode and the SCHEMA2 which is used
in night shooting.
Below we explain the fundamental parameters that come into play in the recovery of the night
license plates
In the EXPOSURE folder you find the shutter speed which is recommended at 1/1000. You can set
it to shorter values, such as 1/2000 if you plan the passage of vehicles at high speed. The area
can be set to CENTER AREA or even CENTER SPOT if you want more brightness in the center.
The manual IR power mode is set in the DAYNIGHT folder at the factory. With the slider you can
adjust the power of the LEDs which is factory set to 40. The power is adjusted according to the
distance of the vehicle, but in general it must be kept rather low to prevent the plate from being
bleached at night. On close-ups the best result is obtained with very low values even from 2 to 5.
Other manuals for RH Series
4
Table of contents
Other DSE IP Camera manuals


