Note: For Store on Demand or Record on Demand, you can only retrieve recordings of the day.
When prompting, you can press the key to go back to the previous menu. When listening,
you can press the key to skip the announcement of time stamp.
2
1
To a Distribution List
To a Mailbox
Modify Your
Distribution List
Record Your
Greetings
Edit Notification
Function
1
1
Mailbox Password
2
2
3
3
1
2
3
4
4
5
Mailbox Language
Message Play Order
Message Copy Target
Time Stamp
1
2
3
4
External
Notification Schedule
Urgent Messages
Notification
Phone and Pager
Notification
Personal
Notification Schedule
3
1
2
Your Name
Busy Greeting
Ring-No-Answer
Greeting
3
1
2
Conference
Telephone No.
External Notification
Internal Notification
Edit Members
Remove All Members
Review
Distribution List
3
2
56
9
Save & Next Delete
Reply
Fast Forward
#
Main Menu
Forward
4
7
1
Replay
Envelope Info
Rewind
Skip
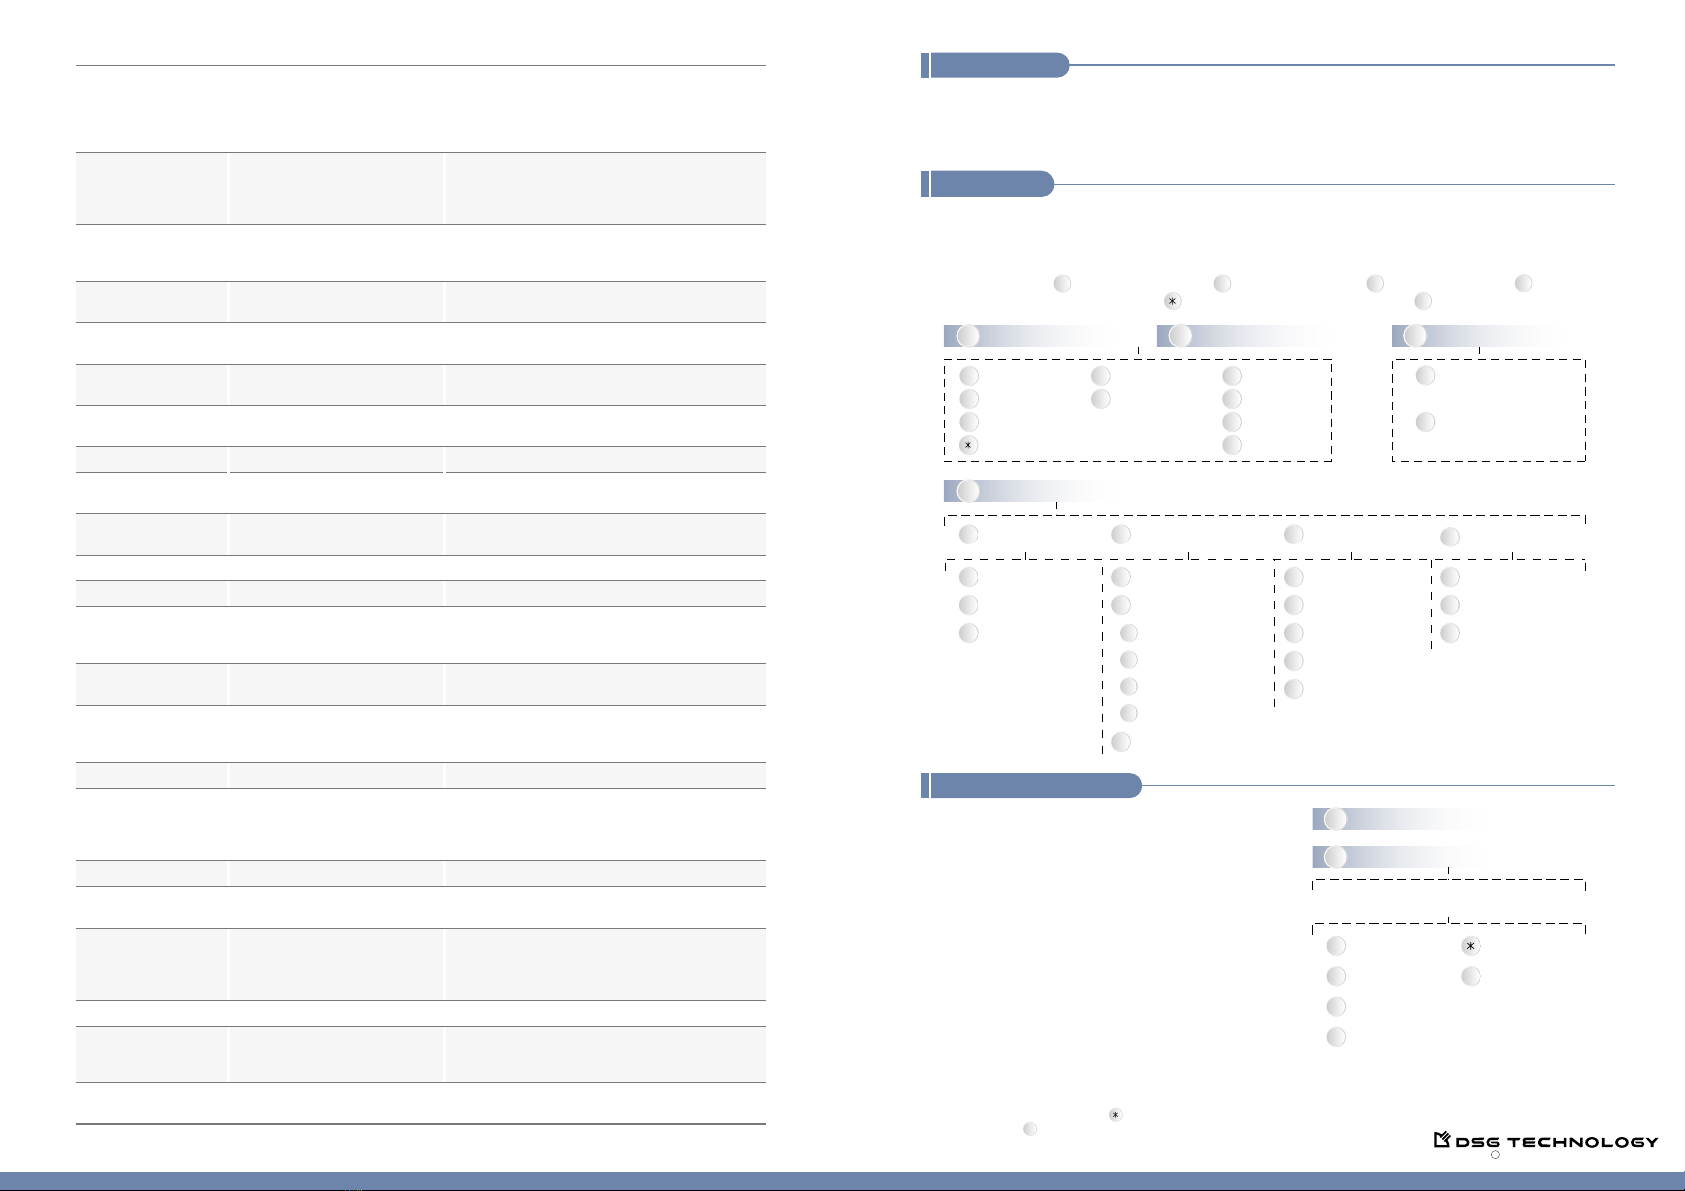
Voice Mail
1. Press "Message" button to access voice mail.ņOn analog phones, please press ##.Ň
2. Enter the password and press "#" key. (The default password is blank.)
3. The system will announce the number of messages received in the voice mail. By following the voice
guidance, press to play new messages, to play old messages, to send messages or to set the
preferred personal options. Press to go back to the previous option or to go back to the main menu.
Recording Function
Set Mailbox
Preferences
08IP5XR.EN3 DSG Technology, Inc. All rights reserved.
C
34
12
#
Search by Date/Time
1
2
Play the Latest Recording
Enter the Date (A.D. YYMMDD)
Enter the Time (24 Hours Format HHMM)
1
0
Play the Previous
Recording
2
Play the Next
Recording
3
4
Replay
Sends the voice messages to personal email
account (UMS function must be activated)
Return to the
Previous Option
#
Return to the
Extension Option
InterPBX
Telephone Reference Guide
IP590
IP580
To retrieve an incoming call placed on hold. (You
should be able to see the CO line extension number
when using this function.) If this CO line is set on the
programmable button, you can retrieve it by pressing
the flashing button directly.
Users can place the current call on Hold and answer
another incoming call. Press again to retrieve the
previous call on Hold. (Call Waiting function needs to
be enabled.)
To retrieve an internal call placed on hold. If this
extension number is set on the programmable key, you
can press the flashing button directly to retrieve the call.
To park a call to a specific slot. To retrieve, press
#15 and the specific slot number.
Enable or disable Do-Not-Disturb function.
To dial a number defined on the System Speed Dial
Number.
To dial a number defined on the Personal Speed Dial
Number.
To transfer a call to the extension's voice mailbox.
The call will be redirected to the AA Menu.
To access mailbox.
Broadcast through an external amplifier connected to
Voice Gateway. Please consult your administrator for
the external paging code.
Start Conference with callers placed on hold.
To save recorded calls or start recording. For Store on
Demand, recordings from the beginning of the call will
be saved. For Record on Demand, recording will start
after enable the function.
Login to be one of the members in the extension group.
#17 + 1 (Enable DND)
#17 + 0 (Disable DND)
Transfer + #15 + Slot No. (0-9)
#14 + Extension No.
#20 + System Speed Dial No.
(e.g. 000)
#21 + Personal Speed Dial No.
(e.g. 00)
Transfer + #24 + Extension No.
Message button or ##
(on analog phones)
Hold or Hook Flash
(on analog phones)
Call Hold Retrieve CO
Call Waiting
Call Hold Retrieve Ext.
Call Park
DND Set
System Speed Dial
Personal Speed Dial
Transfer to Ext VM
Transfer + #25 + AA Menu
Access Code
Transfer to AA Tree
Retrieve Message
#35 + Extension Group No.Member Login
Logout from the extension group.#36 + Extension Group No.Member Logoff
Check the login status of the extension group. A dial
tone represents you are logged-in successfully and a
busy tone means not logged-in.
#37 + Extension Group No.Ask Member Login
Broadcast through the extension or the extension group.
#38 + Extension No. or Extension
Group No.
Internal Paging
The External Paging Code of a
specific Voice Gateway
External Paging
Transfer + #40Conference Call
#41
Store on Demand/
Record on Demand
To play the saved recordings.
To forward all the incoming calls to a specific extension
automatically. To disable, off-hook and press #44#.
#42Retrieve Record
#44 + Extension Number + #Forward All Calls
Allow agents to notify the system stop assigning
incoming calls to their extensions so that the agents
can leave their seats temporarily without logging out
the system.
#45Auxiliary Time
Allow agents to pick up the next call automatically.#46Auto-In
Allow agents to pick up the next incoming call
manually by pressing the specific button of Manual-In
function.
#47Manual-In
To allow agents to have a period of after call work time
between two calls.
#48After Call Work
#13 + CO Line Extension No.
This function is available for extensions on Store on
Demand list or permitted to access recording systems.
Activate the Recording
1. During a call, press the specific programmable
button or REC/PLAY button or #41 to record.
2. When the call completes, the system will stop
recording automatically.
Play Recordings
1. Press the specific programmable button or REC/
PLAY button or #42 to play recordings.
2. Input the password followed by the # key to access
the system. (The default password is blank.)
3. Follow the system prompts to retrieve or search recordings.
2Review Old Messages 3Send A Message
1Review New Messages
Call Records
1. From your IP phone, press Menu to view missed calls, received calls and dialed calls.
2. Press Menu again to select the option. Or use the Menu arrow keys to scroll.
3. When selected, you may press Menu again to dial.
Set Personal Options
4


