DSG Technology IP1200 User manual

03IP12ME.D
Voice communication for Free
High Performance Embedded VoIP Gateway

Copyright Notice
Copyright © 1998-2003 DSG Technology Inc. All rights reserved.
This guide, the software and the hardware described herein are copyrighted with all rights reserved. This
document may not, in whole or in part be copied, photocopied, reproduced, translated into any language,
reduced to any electronic medium or machine-readable form with out prior written consent of DSG
Technology.
All examples with names, organizations or entities that appear in this manual are fictitious and do not refer
to or portray, in name or substance, any actual names, organizations or entities,. Any resemblance to any
real person, organization or entity, is purely coincidental.
Every effort has been made to ensure the accuracy of this guide. However, DSG Technology makes no
warranties with respect to this documentation and disclaims any implied warranties of merchantability and
fitness for a particular purpose. DSG Technology shall not be liable for any errors or for incidental or
consequential damages in connection with the furnishing, performance, use of this manual or the examples
herein. The information in this document is subject to change without notice.
Trademarks
DSG, the DSG logo, IP1200, IPStar, InterStar, InterPhone and IP1000 are registered trademarks of DSG
Technology Inc.
Windows is a registered trademark of Microsoft Corporation.
Other product names mentioned in this manual maybe trademarks or registered trademarks of their
respective companies and are hereby acknowledged.

Table of Contents
IP1200 Operation Manual 1
TABLE OF CONTENTS
Chapter 1 Understanding Your IP1200
Overview…………………………………………………………………………………..4
All-in-one Design…………………………………………………………………………4
Comprehensive Operation Modes………………………………………………….......4
VPN Mode……………………………………………………...…………………….4
ITSP Mode………………………………………………………………………….4
Terminology…………………………………………………………….………………5
Conventions……………………………………………………………………………….5
Chapter 2 Installing Your IP1200
Hardware Installation…………………………………………………………………....8
Connecting the DC Power Supply………………………………………………....8
Connecting the Line Ports…………………………………………………………8
Connecting to TCP/IP Network………………………………………………..8
Ports Definitions…………………………………………………………………………..9
Buttons Definitions……………………………………………………………………….9
LED Indicators………………………………………………………………………….9
Chapter 3 Configuring Your IP1200
Preparing to Configure IP1200…………………………………………………………12
Configuration Items………………………………………………………………….12
TCP/IP Setup……………………….………………………………………………….14
IP Address………………………………………………………………………….14
Gateway IP Address……………………………………………………………….15
Subnet Mask………………………………………………………………………...15
DNS………………………………………………………………….…………...15
DHCP……………………………………………………………….…………...16
ITSP Setup……………………………..….……………………………….…………….16
Device ID…………………………………………………………………………...16
ITSP Account…..…………………………….……………………………………..16
Check Account Balance…………………………………………………………...17
Long-distance Code……………….………….…………………………………..17
International Code…………………………………….…………………………...17
Country Code……………………………………….……………………………...18
Running Mode…………………………………….……………………………...18
Dial Plan Setup……………..……………………………………………………...18
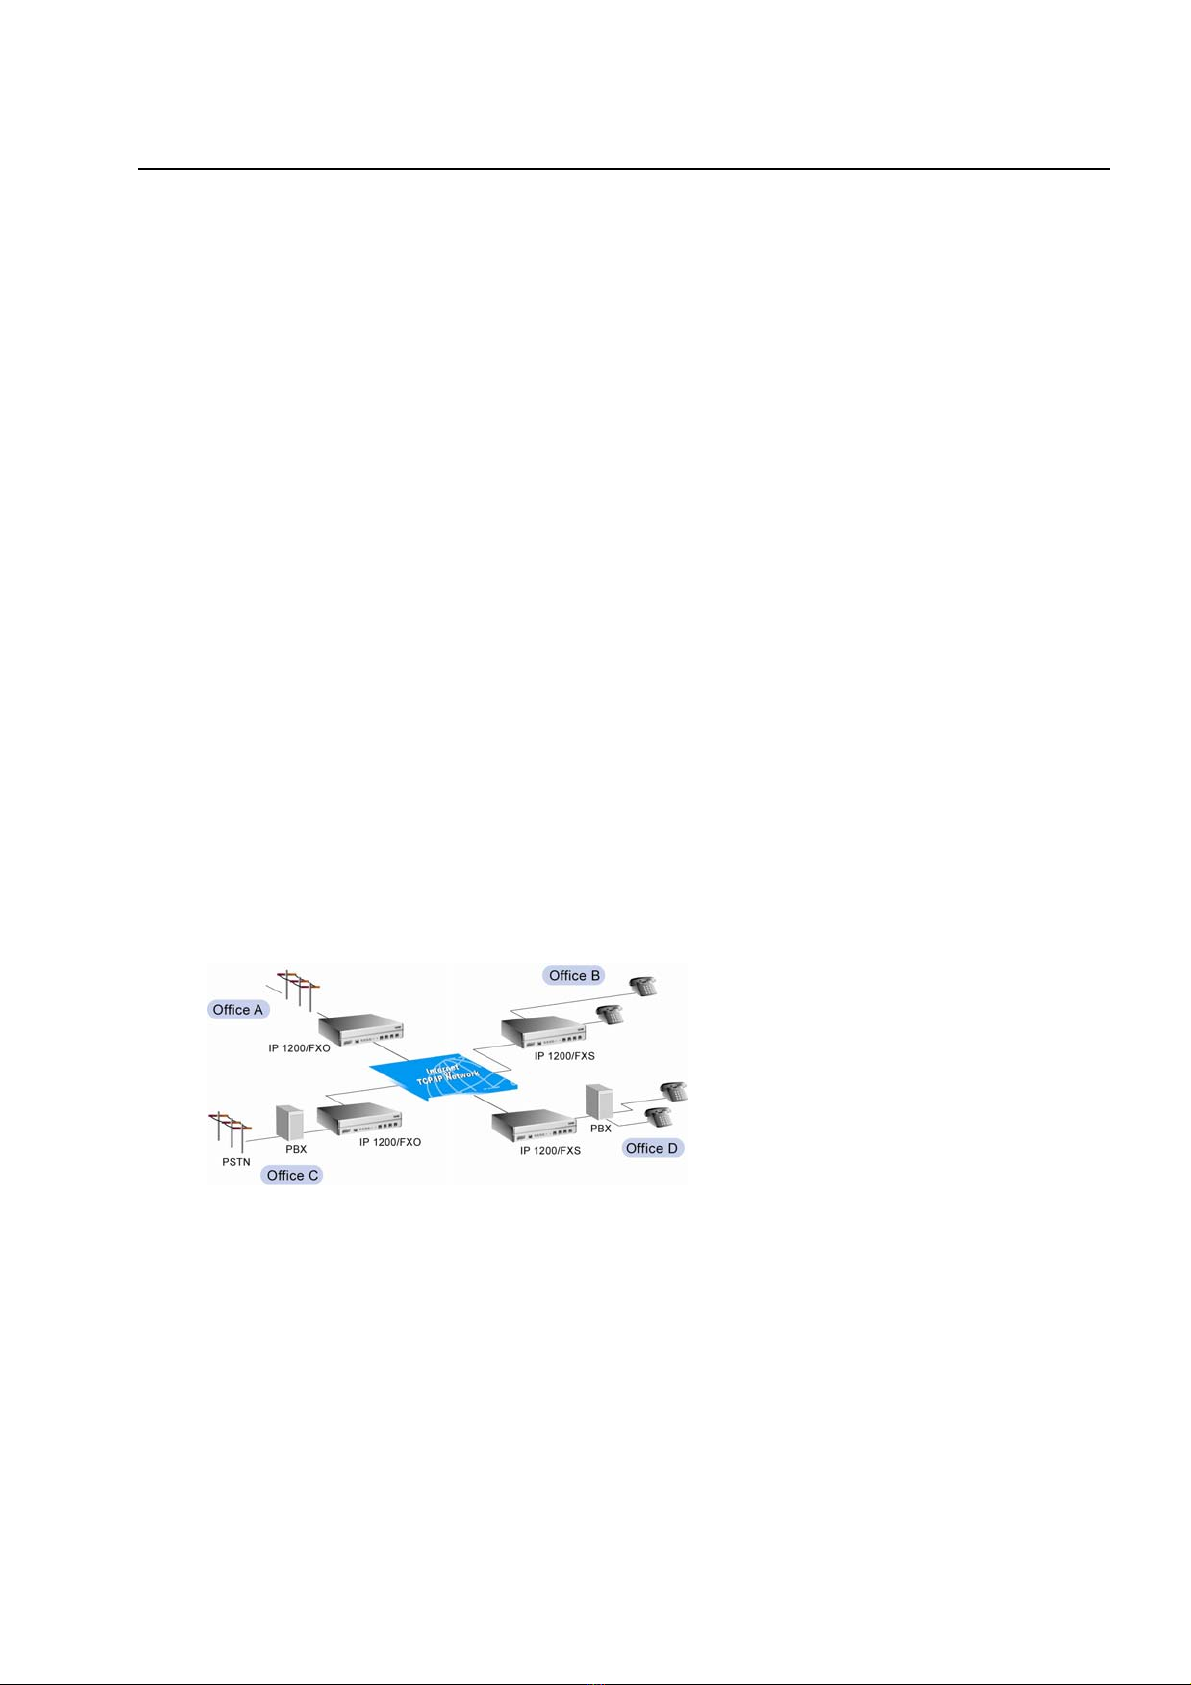
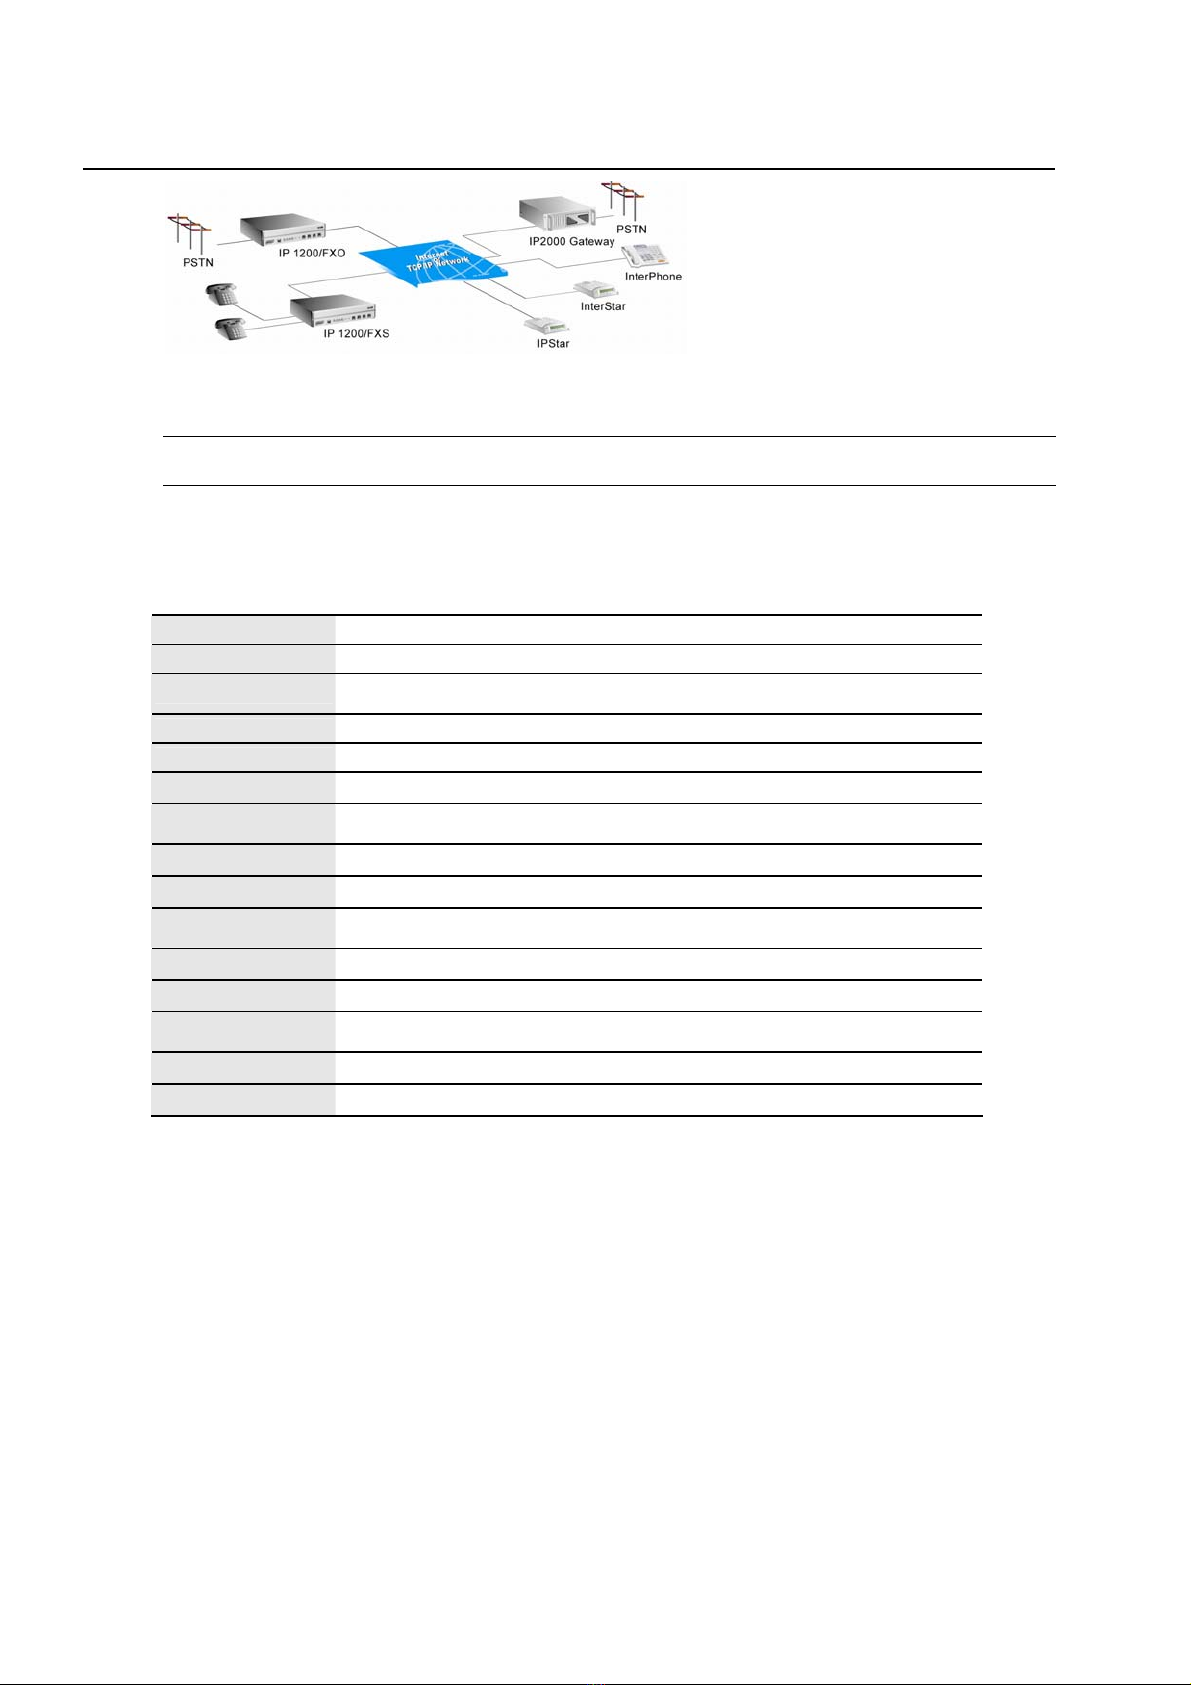
Pattern 1: FXO(with PBX)-FXO(with PBX)……………………………………....20
Pattern 2: Set Hot Keys………………………………………………………….....20
Pattern 3: FXO-FXO………………………….……………………………………..20
Pattern 4: FXS-FXS……………………………….………………………………....21
Pattern 5: FXO(with PBX)-InterStar……………………………………………....21
Security Setup……………………..……………………………………..………...21
Password for FXO………………………………………………………………...22
Password for FXS………………………………………………………………...22
Telnet Password………………………………………………………………...22
Disable Telnet Function………………………………………………………...23
Authorized Devices Setup………………………………………………………...23
Connecting Setup……………………..…………………………………………....23
Rings to Answer………………………………………………………………...23
Connected Type……….…………………………………………………………...24

Table of Contents
2 IP1200 Operation Manual
Alternative Device IP……………………………………………………………...24
Port Configuration………………………………………………………………...25
Voice Quality & Hang-up Settings………………………..……………………...25
Play Volume………………………………………………………………………..25
Record Volume………………………………………………………………….....26
Echo Cancellation………………………………………………………………......26
Busy Tone Setup……………………………………………………………......26
Advanced Options…………………………………………………………….....27
Upgrade Software On-line………………………………………………………….....28
Exit Configuration………………………………………………….…………………....29
Restoring to Default Settings…………………………………………………………...29
Chapter 4 Making Internet Phone Calls
Make Sure You Are Online…………………………………………………………...32
In VPN Mode……………………...…………………………………………………...32
Scenario 1: FXO (with PBX)-FXO (with PBX).………..….……………………...32
Scenario 2: FXO-FXO……………..………………..………………………..……...33
Scenario 3: FXS-FXS…..……………………..……………………………………...33
Scenario 4: FXS-FXS (with PBX)……………………………………………..…...33
Scenario 5: FXO (with PBX)-DSG VoIP Devices………………………………...34
In ITSP Mode………………………………….………………………………………...34
Scenario 1-4: Local IP1200-Remote IP1200…………………..…………………...34
Scenario 5: FXO (with PBX)-DSG VoIP Devices…………………………….…..34
Scenario 6: FXO (with PBX)-Regular Phone Users……………………………...34
Scenario 7: DSG VoIP Devices-Local IP1200…………..………………………..34
In DHCP Environment……………..…………………………………………………...35
Appendix A: Troubleshooting the IP1200
Appendix B: Specifications
Appendix C: Quick Installation Guide

Chapter 1 Understanding Your IP1200
IP1200 Operation Manual 3
CHAPTER 1
Understanding Your IP1200
Congratulations! You have selected the advanced Voice over IP Telephony product.
IP1200 Gateway is an innovative and standards-compliant Voice over Internet Protocol
(VoIP) solution for enterprises. IP1200 is a new generation VoIP gateway carries voice
traffic over TCP/IP networks. By deploying IP1200, you can consolidate voice and data
traffic for more efficient use of bandwidth, reduce international and long-distance phone
call charges, connect to remote premises easily, and gain access regardless of where you
are.
IP1200 is an embedded gateway combining hardware, software and operating system for
plug-and-play simplicity. It provides a seamless interface between TCP/IP networks and
the Public Switched Telephone Network (PSTN). Users can place Internet calls to a
remote IP1200 and via it to the remote PSTN. Moreover users can also place Internet calls
directly to PSTN networks. IP1200 is an outstanding gateway delivering the new way of
communications.

Chapter 1 Understanding Your IP1200
4 IP1200 Operation Manual
Overview
In the past, real-time voice communication can only be done on the PSTN. With the circuit switched technology,
every call takes up a dedicated bandwidth. End-to-end calls are established on the basis of a sequence of digits,
and the PSTN dedicates a physical path between callers. The telephone equipment establishes the call path at the
beginning of a call and occupies the dedicated path till the end of the call.
Compared to the PSTN, an Internet Protocol (IP) network has a packet-switched architecture. Data is transmitted
in packets, and the path from end to end can vary within an established session. The data packets also contain the
destination IP address information, with which packets are routed. As networking environments change, routing
devices are updated with dynamic protocols.
IP1200 is a high performance embedded VoIP Gateway that transmits voice over packet switched networks and
route it to circuit switched networks.
All-in-one Design
IP1200 contains its own processor, memory, and network interface; it works independently and intelligently!
Simply connect it to your IP network and PSTN, and then you are ready to talk via the Internet and Intranet. All of
the communication costs will be eliminated except the local networks connection charge. IP1200 is the most
convenient embedded VoIP gateway for users to make Internet phone calls without the hassle of changing the
existing infrastructure.
Comprehensive Operation Modes
IP1200 is a reliable bridge between two different locations. The FXO/FXS telephone interface provides the system
with an ultra flexible PSTN connection. Moreover, IP1200 is supported by DSG Global Internet Telephony
Network; users can also talk to any regular phone users anywhere.
VPN Mode
IP1200 enables decentralized enterprises to make phone calls to branches easily and efficiently. IP1200 constructs a
point-to-point communication structure in a Private Network (PN) or a Virtual Private Network (VPN) and
functions perfectly in any TCP/IP environment. With a specially designed user-definable dial plan function,
IP1200 provides a flexible on-site and remote access to connect to branches and PSTN.
Figure 1: VPN Mode Diagram
ITSP Mode
IP1200 allows you to talk to anyone anywhere with ultra low rates. Supported by DSG Global Internet Telephony
Network, IP1200 provides an immediate connection to worldwide regular phone users as well as any users of
DSG VoIP devices, InterPhone, IPStar and InterStar.

Chapter 1 Understanding Your IP1200
IP1200 Operation Manual 5
Figure 2: ITSP Mode Diagram
Note: IPStar is a Modem-based Internet Phone Device. InterStar is an Ethernet-based Internet Phone Device.
InterPhone is a full-featured Ethernet Key Phone.
Terminology
In this manual, there are some terminologies you might not be acquainted with. The following is a list of
commonly used voice technology terms.
Terms Definitions
C.O. Line Central Office Line
DTMF Dual Tone Multi Frequenc
y
. Dialin
g
si
g
nals transmitted as two simultaneous voice
band tones.
IP Internet Protocol
LAN Local Area Network
FXO Foreign Exchange Office. A FXO interface connects to PSTN.
FXS Foreign Exchange Station. A FXS interface connects to the standard telephone, fax
machine, modem and conventional PBX.
ITSP Internet Telephony Service Provider
PBX Private Branch Exchange. Privately switching equipment in an office.
POTS Plain Old Telephone Service. Telephone services supplying standard single lines
and access to the public switching telephone network.
PSTN Public Switched Telephone Network
VAD Voice Activity Detection
VoIP Voice over Internet Protocol. A technology of transmitting voice as packets over
TCP/IP networks.
VPN Virtual Private Network
TCP/IP Transmission Control Protocol/Internet Protocol
Conventions
This manual uses the following conventions to convey instructions and information.
Italic boldface Prompts displayed on the screen.
< > Information or command you have to input.
bold letters Notes, cautions and helpful information.
xxx Examples of alphabet or numeric.


Chapter 2 Installing Your IP1200
IP1200 Operation Manual 7
CHAPTER 2
Installing Your IP1200
Connecting IP1200 is easier than connecting a laptop PC.
In your IP1200 package, you will find:
zAn IP1200 main unit
zA DC 5V/12V power adapter and power cord
zA RJ-45 network cable
zAn operation manual
zYour warranty card

Chapter 2 Installing Your IP1200
8 IP1200 Operation Manual
Hardware Installation
As shown in the following diagram, connecting an IP1200 is very quick and simple.
Figure 3: IP1200 Connecting Diagram
Connecting the DC Power Supply
Plug the power adapter into a power outlet. Plug the DC adapter connector into IP1200 power socket at the back
labeled PWR. The LED light labeled PWR will light up and keep blinking.
Note: Please use ESD-preventive tools and maintain safety with electricity when you plug the power cord.
Connecting the Line Ports
For IP1200 FXO Model
IP1200 provides FXO interface. When power on, the LED color is red. The FXO module is designed for connecting
to CO lines provided by your telephone company (PSTN)or a PBX extension-side. Plug a telephone line
connected to PSTN or a PBX’s extension-side into a FXO RJ11 port.
If you connect the IP1200 FXO ports to the PBX’s extension side, each port will obtain an extension number, just
like the other extensions in your office.
For IP1200 FXS Model
IP1200 provides FXS interface. When power on, the LED color is green. The FXS module is designed for
connecting to analog telephone sets or a PBX trunk-side. Plug a telephone line connected to an analog phone or a
PBX’s trunk-side into a FXS RJ11 port
If you connect the IP1200 FXS ports to the PBX’s trunk side, each port will obtain an access code or a line indicator
can be viewed from phone sets.
Connecting to the TCP/IP Network
Plug a network cable connected to your Ethernet into RJ45 jack labeled ETHERNET.
Notice that it is recommended that you should provide a permanent Internet connection for IP1200, such as from
Leased Line, xDSL (not include PPPoE) or Cable Modem, and assign a static IP address (real IP address if
applicable) to IP1200.
If your LAN is in the DHCP network environment, you can enable IP1200 DHCP function.
If you assign pseudo IP address to IP1200, either static or dynamic IP addresses, you need to open the TCP and
UDP ports of the IP address assigned to IP1200 and the network equipment connected to WAN.
For 4-port IP1200, open TCP 1100 port and UDP 1101-1104 ports.

Chapter 2 Installing Your IP1200
IP1200 Operation Manual 9
For 8-port IP1200, open TCP 1100 port and UDP 1101-1108 ports.
Note: Misplacing FXO equipment into FXS interface and vice versa may damage IP1200. Be sure that the
FXO/FXS interfaces are connected to the adequate telephone lines and equipment.
Ports Definitions
Ports Definition
CONSOLE A RS232 communication port provides connection to a terminal directl
y
using a cross-over cable. Baud rate: 9600 bps.
ETHERNET An Ethernet 10 BaseT RJ45 port provides connection to LAN
L1 to L8
Line 1 to Line 8. Analog RJ11 jacks support FXO or FXS interfaces, each
4-wire for 2 lines. To identify port types, power on the device and the
LED will be lit up. Red LED indicates FXO type. Green LED indicates
FXS type. You can also press S1 button to view the colors at any time.
Buttons Definitions
Buttons Definition
DEFAULT button
Reset the IP1200 system. Press and hold the DEFAULT button; switch
off the power and turn on; after the MODE LED starts blinking, release
the DEFAULT button. The setting items of IP Address, Gateway IP,
Subnet Mask, DNS and Telnet Password will be reset to the default
value.
SECURITY button Press the SECURITY button to disable the Telnet function so as to
prevent the device been connected from the Internet or Intranet.
S1 button Press the S1 button to view the port types of L1 to L8. Red color
represents FXO; Green color represents FXS.
S2 button Reserved for the future function.
LED Indicators
LED Color Activity Definition
PWR Red Blinking Power is supplied.
MODE No color
Red
Green
The system is in ITSP Mode and registered
to DSG ITSP network.
The system is in VPN Mode and not
registered to DSG ITSP network.
LINK Red On
A connection is established to the hub or
switch on LAN.
L1 to L8 (FXO interface) No color Red Calls are being transmitted or received on
the port.
L1 to L8 (FXS interface) No color Green Calls are being transmitted or received on
the port.


Chapter 3 Configuring Your IP1200
IP1200 Operation Manual 11
CHAPTER 3
Configuring Your IP1200
With these easy steps, the IP1200 is ready to use in no time.
Before You Start
To use IP1200 as a VoIP gateway, you need to subscribe an Internet access line from your
local ISP. It could be xDSL, Cable Modem access or Leased Line. You will need the
following information to set up your IP1200.
1) IP Address: _ _ _ . _ _ _ . _ _ _ . _ _ _
2) Gateway IP Address: _ _ _ . _ _ _ . _ _ _ . _ _ _
3) Subnet Mask: _ _ _ . _ _ _ . _ _ _ . _ _ _

Chapter 3 Configuring Your IP1200
12 IP1200 Operation Manual
Preparing to Configure IP1200
After you connect IP1200 to your LAN, you can enter the configuration mode by Telnet.
Step 1 Select a PC connected to the same subnet of IP1200 and run the Telnet program. Refer to IP1200’s default
settings to change your PC’s IP settings if necessary.
Step 2 Connect to IP1200 using its default setting of IP Address: 192.168.1.200
Step 3 Input the default Telnet Password: 0000
Step 4 The prompt will display the setting items of IP1200. You can then start configuring your IP1200.
Note: If you would like to connect a PC directly to your IP1200 to configure, you can use a crossover network
cable connecting one end to the ETHERNET port on IP1200 and the other end to the LAN port on your PC.
Note: You can also use a crossover cable connecting one end to the CONSOLE port on IP1200 and the other end to
your PC’s COM port. After connecting the cable, from Windows Start menu, select Program> Accessories>
Communications> HyperTerminal. Run HyperTerminal program and set the baud rate at 9600 bps. Switch off the
power of IP1200 and turn it on to establish the connection. You will be able to adjust the settings of IP Address,
Gateway IP, Subnet Mask, DHCP and DNS.
Note: If your computer’s OS is Windows98, after Telnet IP1200, you can press ESC at any time to view the setting
items page by page.
Configuration Items
After you enter Telnet program, you will find the configuration items as below.
Items Functions Format Default settings
(0) Device ID The ID Number of your IP1200.
Non-editable.
6-digit Device ID
Number
xxxxxx
(1) IP Address A static IP address assigned to
IP1200
xxx.xxx.xxx.xxx 192.168.1.200
(2) Gateway IP The IP address of the gateway
on your LAN
xxx.xxx.xxx.xxx 192.168.1.254
(3) Subnet Mask The subnet of your IP1200 xxx.xxx.xxx.xxx 255.255.255.0
(4) DNS Your Domain Name Service xxx.xxx.xxx.xxx 168.95.1.1
(5) DHCP Used when your network is in
DHCP environment.
0: Off 1:On Off
(6) Play Volume Adjust the playing volume level 1 to 9 5
(7) Record Volume Adjust he recording volume
level
1 to 9 5
(8) Echo Cancellation
Adjust the echo cancellation
level. If it is set as 0, this
function is disabled.
0 to 2 2
(9) ITSP Account
Used when subscribe DSG ITSP
Network Services. Do not input
anything if your credit is stored
in Device ID Number.
10-digit ITSP
Account (shown as
xxxxxxx****)
-
(10) Long Distance Code Your long distance code -
(11) International Code Your international access code -
(12) Country Code Your country code -
(13) Password for FXO
Password for accessing FXO
ports. If empty, no password is
required.
Maximum 10 digits -
(14) Password for FXS
Password for accessing FXS
ports. If empty, no password is
required.
Maximum 10 digits -
(15) Rings to Answer Ringing cycles required for
IP1200 to pick up a call
1 to 20 1
(16) Connected Type Assign ringing sequences. For
example, if set as Auto, calls
0:All Auto
1:All Cyclic
All Auto

Chapter 3 Configuring Your IP1200
IP1200 Operation Manual 13
will always be transmitted
starting from Port 1. When set
as Cyclic, calls will be
transmitted to Port 2 if the
previous call was picked by
Port 1.
2:FXO Auto
3:FXO Cyclic
4:FXS Auto
5:FXS Cyclic
6:Forbidden
(17) Running Mode
Set operation modes. VPN
Mode supports point-to-point
communications. ITSP Mode
supports point-to-point and
device-to-phone features.
0:ITSP 1:VPN VPN
(18) Telnet Password
Password of accessing IP1200
via Telnet. To disable the Telnet
function, press the SECURITY
button.
Maximum 10
characters and/or
digits
0000 (four zero,
shown as ****)
(19) Alternative Device
IP
When all ports are busy,
forward incoming calls to the
other IP1200.
The IP address of
the other IP1200
-
(20) Dial Plan Setup Set dialing patterns to the other
IP1200
Maximum 100
entries
-
(21) Port Configurations
To enable or disable ports. Used
when specific ports are broken
down.
Port Status
1:Enable 0:Disable
All enable
(22) Busy Tone Setup
1. Busy tone cycles
hangup
2. Minimum busy tone
length
3. Maximum busy tone
length
4. Busy tone length
tolerance
1. After detecting set busy tone
cycles, connection will be
released.
2. Set the minimum length of a
busy tone.
3. Set the maximum length of a
busy ton.
Using the above 2 and 3 to set
the valid range of a busy tone.
4. The tolerance between two
valid busy tones.
2 to 9
100 to 1200 ms
100 to 1200 ms
20 to 400 ms
4 cycles
200 ms
600 ms
80 ms
(23) Authorized Devices
Setup
Allowing the set IP addresses or
Device ID numbers to get
connected to your IP1200.
Maximum 50 entries. If there is
no entry, this function is not
enabled.
0: None (Delete)
1: IP 2: ID
When granting the
permission to all IP
addresses in a
subnet, set like
192.168.1.*
-
(24)Advanced Options
1. Max. One-Wa
y
silence
to hangup
2. Max. Two-Way
silence to hangup
3. Max. dial tone to
hangup
4. Fixed Rx Gain (FXO)
5. Fixed Tx Gain (FXO)
6. Fixed Rx Gain (FXS)
7. Fixed Tx Gain (FXS)
8. VAD Level
9. DTMF Level
10. DTMF Length
1. When the silence of any side
exceeds this duration, calls will
be terminated.
2. When the silence of both
sides exceeds this duration, calls
will be terminated.
3. After off-hook but no dialing
action been made within this
duration, lines will be released.
4. Used when your IP1200
cannot receive good voice
quality. After adjusting the local
(7) Record Volume or remote (6)
Play Volume but the voice is
still no good, raise the value.
5. Used when your IP1200
cannot transmit good voice
quality. After adjusting the
local (6) Play Volume or remote
10 to 720 min
10 to 300 sec
0 to 300 sec
-20 to 20
-20 to 20
30 min
30 sec
30 sec
1
0

Chapter 3 Configuring Your IP1200
14 IP1200 Operation Manual
(7) Record Volume but the
remote IP1200 still cannot get
good voice quality, raise the
value.
6. Refer to the above 4.
7. Refer to the above 5.
NOTICE: The above 4-6 items
have severe impacts on echo
cancellation and voice quality.
DO NOT adjust the default
values if not necessary.
8. Voice activity detection level.
When voice is below this value,
it is deemed as silence.
9. When local PSTN network is
no good, raise this value to get a
better dialing quality.
10. When local PSTN network
is no good, raise this value to
get a better dialing quality.
-20 to 20
-20 to 20
0 to 8
1 to 5
0: 100 ms, 1: 200 ms,
2: 300 ms
-3
-3
3
2
<100 ms>
(25) Upgrade Software
On-Line
Download the latest software
version
- -
(26) Check Balance
View the credit of your
accounts. After refreshing, you
can view the balance of
accounts at (0) Device ID or (9)
ITSP Account
Balance xxxx /
Expired / Wrong
Account
-
(27) Save and Exit
(28) Exit (Without save)
TCP/IP Setup
Before you start using your IP1200, you must have an Internet access line from your local ISP. It could be xDSL,
Cable Modem access, or Leased Line. You will be given the information of IP Address, Gateway IP and Subnet
Mask from your network administrator. If your network is in the DHCP environment, you may enable the DHCP
function.
IP Address
IP Address is an identifier for device on a TCP/IP network. Your IP Address allows other VoIP devices on the
Internet to find your location. The format of an IP address is a 32-bit numeric address written as four numbers
separated by periods.
Step 1 At the prompt displays Select the option to setup:, input <1> and press ENTER to edit IP Address.
Step 2 At the prompt displays New IP Address (press ESC to exit):, input the IP Address <xxx.xxx.xxx.xxx>
obtained from your ISP or network administrator and then press ENTER.
Prompt example:
If your IP address is 192.168.200.100, input it as follows.
Select the option to setup : 1
New IP Address (Press ESC to exit): 192.168.200.100
Press any key to continue ...
IP1200 supports the Internet connection from Leased Line, xDSL (not include PPPoE) or Cable Modem. To ensure
the performance of IP1200, it is recommended that you assign a static and real IP address to IP1200.
If you assign pseudo IP address to IP1200, you need to open the TCP and UDP ports for the IP address assigned to
IP1200 from your router.
For 4-port IP1200, open TCP 1100 port and UDP 1101-1104 ports.

Chapter 3 Configuring Your IP1200
IP1200 Operation Manual 15
For 8-port IP1200, open TCP 1100 port and UDP 1101-1108 ports.
Note: If your network is in the DHCP environment, please skip the IP address, gateway IP and subnet mask
settings and go to (5) DHCP and enable it.
Gateway IP Address
The purpose of a gateway is to link two different types of networks. For example, the Gateway IP Address for a
LAN to connect to the WAN is the IP Address of the router.
Step 1 At the prompt displays Select the option to setup:, input <2> and press ENTER to edit Gateway IP.
Step 2 At the prompt displays New Gateway IP (press ESC to exit):, input the Gateway IP <xxx.xxx.xxx.xxx>
and then press ENTER.
Prompt example:
If your Gateway IP address is 192.168.200.254, input it as follows.
Select the option to setup : 2
New Gateway IP (press ESC to exit) : 192.168.200.254
Press any key to continue ...
Subnet Mask
Subnet Mask is a mask used to determine which subnet an IP address belongs to. It enables the network
administrator to divide the host part of the address into two or more subnets.
Step 1 At the prompt displays Select the option to setup:, input <3> and press ENTER to edit Subnet Mask.
Step 2 At the prompt displays New Subnet Mask (press ESC to exit):, input the Subnet Mask information
<xxx.xxx.xxx.xxx> and then press ENTER.
Prompt example:
If your Subnet Mask is 255.255.255.0, input it as follows.
Select the option to setup : 3
New Subnet Mask (press ESC to exit): 255.255.255.0
Press any key to continue ...
DNS (Optional)
DNS (Domain Name Service) is an Internet service that translates domain names into IP addresses. If one DNS
server doesn't know how to translate a particular domain name, it asks another one, and so on, until the correct IP
address is returned.
Step 1 At the prompt displays Select the option to setup:, input <4> and press ENTER to edit DNS Address.
Step 2 After the prompt displays New DNS (press ESC to exit):, input the DNS Address information
<xxx.xxx.xxx.xxx> and then press ENTER.
Note: IP1200 has a preset DNS address as 168.95.1.1. Unless your ISP requires a specific DNS Address, you may
keep the default setting.
Prompt example:
If your ISP requires its DNS to be 168.6.1.1, you may edit this item as below.
Select the option to setup : 4
New DNS (press ESC to exit): 168.6.1.1
Press any key to continue ...

Chapter 3 Configuring Your IP1200
16 IP1200 Operation Manual
DHCP (Required for DHCP Environment)
IP1200 supports DHCP (Dynamic Host Configuration Protocol), a protocol for assigning dynamic IP addresses to
devices on a network. Because a device can be assigned a different IP address every time it connects to the
network, a new device can be added to a network without the hassle of manually assigning it a unique IP address.
Step 1 If your network supports DHCP, at the prompt displays Select the option to setup:, input <5> and press
ENTER to edit DHCP function.
Step 2 After the prompt displays New DHCP (0:Off, 1: On, press ESC to exit):, input <1> to enable or <0> to
disable DHCP function and then press ENTER.
Prompt example:
If your network supports DHCP, you may enable this function.
Select the option to setup : 5
New DHCP (0:Off, 1:On, press ESC to exit) : 1
Press any key to continue ...
If you assign pseudo IP address to IP1200, you need to open the TCP and UDP ports for the IP address assigned to
IP1200 from your router.
For 4-port IP1200, open TCP 1100 port and UDP 1101-1104 ports.
For 8-port IP1200, open TCP 1100 port and UDP 1101-1108 ports.
Note: After you enable the DHCP function, IP1200 will reboot automatically.
Note: When you enable the DHCP function, do not input anything on IP address, gateway IP and subnet mask
setup items.
ITSP Setup (Required for ITSP Mode)
An Internet Telephony Service Provider (ITSP) provides telephony services over the Internet. If you would like to
call a regular telephone number, instead of someone equipped IP1200 or other DSG VoIP products, you will have
to subscribe DSG ITSP Network services. You will be given calling points stored in a 10-digit ITSP Account or
associated with your 6-digit Device ID Number. With a valid account, you can make Internet phone calls to any
regular telephone within available service areas.
Device ID (Non-editable)
Every DSG VoIP Device has its unique 6-digit Device ID Number. You may find it from (0) Device ID or at the
back of your IP1200 device.
Device ID helps you a lot when placing calls. In addition to use Dial Plan to make calls, when you are in ITSP
Mode, you can talk to the other DSG VoIP Devices (e.g. IPStar, InterStar, InterPhone) by simply dialing the
receiver’s Device ID Number with a prefix “ ” and a suffix “ ” if they are online.
Note: The default account to store calling points is the Device ID Number preset in DSG VoIP products. You may
ask your distributor to credit the default account so you can use it instantly. You may also send a mail to
ITSP Account
If you would like to call someone not equipped any VoIP device, you will have to subscribe DSG Internet
Telephony Services. You will be given calling points stored in a 10-digit ITSP Account or associated with your 6-
digit Device ID Number. With a valid account, you can make Internet phone calls to any regular telephone within
available service areas.
Step 1 At the prompt displays Select the option to setup:, input <9> and press ENTER to edit ITSP Account.
Step 2 After the prompt displays New ITSP Account (digits, press ESC to exit):, input the 10-digit ITSP Account
number <xxxxxxxxxx>obtained for DSG compatible ITSPs and then press ENTER.
Prompt example:

Chapter 3 Configuring Your IP1200
IP1200 Operation Manual 17
If your ITSP Account is 1234567890, input it as follows.
Select the option to setup : 9
New ITSP Account (digits, press ESC to exit) : 1234567890
Press any key to continue ...
In order to protect your account information, after the refresh the last 4 digits of your ITSP Account will be
encrypted as star signs “****”.
Note: If your calling points are stored directly into your Device ID Number, you don’t have to input anything in
the ITSP Account item.
Note: The default account to store calling points is the Device ID Number preset in IP1200. You may ask your
distributor to credit the default account so you can use it instantly. You may also send a mail to [email protected]
for more information.
Check Account Balance
If you subscribe DSG ITSP Services, you can check the balance of your Device ID Number or ITSP Account when
your IP1200 is online. Before checking balance, make sure your (17) Running Mode is set to ITSP.
Step 1 At the prompt displays Select the option to setup:, input <26> and press ENTER to check account balance.
Step 2 The prompt will show Connecting Billing Server, please wait… When it shows Press any key to
continue… press any key and the setting items will be refreshed.
Step 3 You can view the balance of your Device ID or ITSP Account at the setting item (0) Device ID or (9) ITSP
Account.
Prompt example:
Select the option to setup : 26
Connecting Billing Server, please wait…
Press any key to continue…
(0) Device ID : 123456 (Balance xxxx)
(9 ) ITSP Account : 123456**** (Balance xxxx)
The effective period of calling points is 9-month from the initial use. When it expires, it shows as Expired. When
the account is not correctly input or it is an invalid account, it shows as Wrong account.
Long-distance Code
Step 1 At the prompt displays Select the option to setup:, input <10> and press ENTER to edit the Long-distance
Code.
Step 2 After the prompt displays New Long-distance Code (digits, press ESC to exit):, input your long-distance
code <xx...> and then press ENTER.
Prompt example:
If you are in the US, your long-distance code is 1. Input it as follows.
Select the option to setup : 10
New Long Distance Code(digits, press ESC to exit) : 1
Press any key to continue ...
International Code
Step 1 At the prompt displays Select the option to setup:, input <11> and press ENTER to edit International
Code.
Step 2 After the prompt displays New International Code (digits, press ESC to exit):, input your international
access code <xx...> and then press ENTER.
Prompt example:

Chapter 3 Configuring Your IP1200
18 IP1200 Operation Manual
If you are in the US, your international access code is 011. Input it as follows.
Select the option to setup : 11
New International Code(digits, press ESC to exit) : 011
Press any key to continue ...
Country Code
Step 1 At the prompt displays Select the option to setup:, input <12> and press ENTER to edit Country Code.
Step 2 After the prompt displays New Country Code (digits, press ESC to exit):, input your country code <xx...>
and then press ENTER.
Prompt example:
If you are in the US, your country code is 1. Input it as follows.
Select the option to setup : 12
New Country Code (digits, press ESC to exit) : 1
Press any key to continue ...
Running Mode
This item allows you to switch the operation mode between ITSP and VPN mode. In ITSP Mode, with a valid
ITSP Account or Device ID Account, you can make phone calls to any regular phone user in addition to connect to
remote IP1200 by Dial Plan. When your IP1200 is in ITSP Mode, the MODE LED is in Red color. If there is any
interruption of registration, IP1200 will try to register again every 10 minutes.
In VPN Mode, you can make peer-to-peer phone calls to a remote IP1200 as patterns set in the Dial Plan. In VPN
Mode, the MODE LED will be in Green color. In this mode, if you try to make phone calls to any regular phone
users not via a Remote IP1200, you will hear double busy tone.
Step 1 At the prompt displays Select the option to setup:, input <17> and press ENTER to edit Running Mode.
Step 2 At the prompt displays New Running Mode (0:ITSP, 1:VPN, press ESC to exit) : , input <0> or <1> and
then press ENTER.
Step 3 Press any key to continue.
Prompt example:
If you would like to operate IP1200 under ITSP mode, input it as follows.
Select the option to setup : 17
New Running Mode (0:ITSP, 1:VPN, press ESC to exit): 0
Press any key to continue ...
Dial Plan Setup (Required for VPN and ITSP Mode)
Dial Plan is a pre-determined pathway to reach a specific port of your IP1200, remote IP1200 or other DSG VoIP
devices. It helps multi-site enterprises establish voice channels between IP1200s and furthermore better utilize the
remote IP1200 to save a lot on long-distance or international calls.
Before you start the setting of Dial Plan, prepare the IP address assigned to the Remote IP1200.
Note: When connecting to a remote IP1200, make sure your IP1200’s IP address or Device ID is on the list of
Remote IP1200’s Authorized Devices Setup.
You can input up to 100 entries of paths for peer-to-peer communications. Hereunder “Your IP1200” means the
IP1200 deployed in your office and “Remote IP1200” means the IP1200 installed in your branch office or other
location. “Local PSTN” means the traditional telephone networks connecting to Your IP1200 and “Remote
PSTN” means the traditional telephony networks connecting to the Remote IP1200.
Table of contents
Other DSG Technology IP Phone manuals
Popular IP Phone manuals by other brands

comfortel
comfortel 1400 IP Advanced information

Planet Networking & Communication
Planet Networking & Communication VIP-2020PT quick guide

Panasonic
Panasonic KX-T7720 Quick reference guide

cogeco
cogeco SoundPoint IP 650 quick start guide

Avaya
Avaya J189 quick reference

Vertical
Vertical Xcelerator IP2007 Configuration guide