manuals.online logo
Brands
  1. Home
  2. •
  3. Brands
  4. •
  5. DTM Print
  6. •
  7. Printer Accessories
  8. •
  9. DTM Print 74398 User manual

DTM Print 74398 User manual

Container Holder Kit
for use with the AP550e Label Applicator
Instruction Manual
© 2019 All rights reserved.
For the most recent version of this manual please
visit dtm-print.eu
The AP550e Container Holder Kit can be used to securely hold any size container in a consistent position on the Container
Platform. This ensures accurate labeling. This kit is highly recommended for any odd-shaped container or any small container
that would be difficult to hold in place during labeling without interference from the Application Arm. The Kit comes in “small
tray” and “large tray” versions. The following parts are included in the kits:
Section 1: Prepare the Container
To account for shrinkage of the molding compound and for subtle variations from container-to-container, you must put a
layer of the included UHMW Tape over the portion of the container that will come in contact with the molding compound.
This tape also allows the container to easily release from the molding compound.
Apply the tape to the container without overlapping the tape.
It may be necessary to cut the tape to fit the container using
a utility knife.
Do not overlap tape edges.
Example Container
Press & Mold
Molding Compound
Small Tray - 15 x 20 cm
(#74398 includes 2 Small Trays)
Large Tray - 25.4 x 30.4 cm
(#74399 includes 2 Large Trays)
UHMW Tape
Section 2: Prepare the Tray
1. Choose the appropriate size tray for your container.
2. Fill the tray completely full with the Press & Mold Molding Compound.
3. Place the tray in an oven. Set the oven temperature to 65°C. Do not microwave!
4. Bake at this temperature for up to 2 hours or until the molding compound pellets have melted together and turned clear.
Periodically check the pellets during the rst two hours.
5. Due to oven temperature variations, you may need to bake the pellets longer. If after two hours the pellets have not
turned clear, increase the oven temperature by 16°C. Check the pellets every 10 minutes until they have turned clear.
WARNING! For your safety as well as the proper functionality of this product, do NOT heat to more than 71°C.
Serious burns or other injuries can be caused by higher temperatures.
Section 3: Create the Mold
1. Using oven mitts, remove the tray from the oven and place it on a wood or metal cooling rack with holes or spaces to
accommodate the pins on the bottom of the tray. Caution! The tray will be hot!
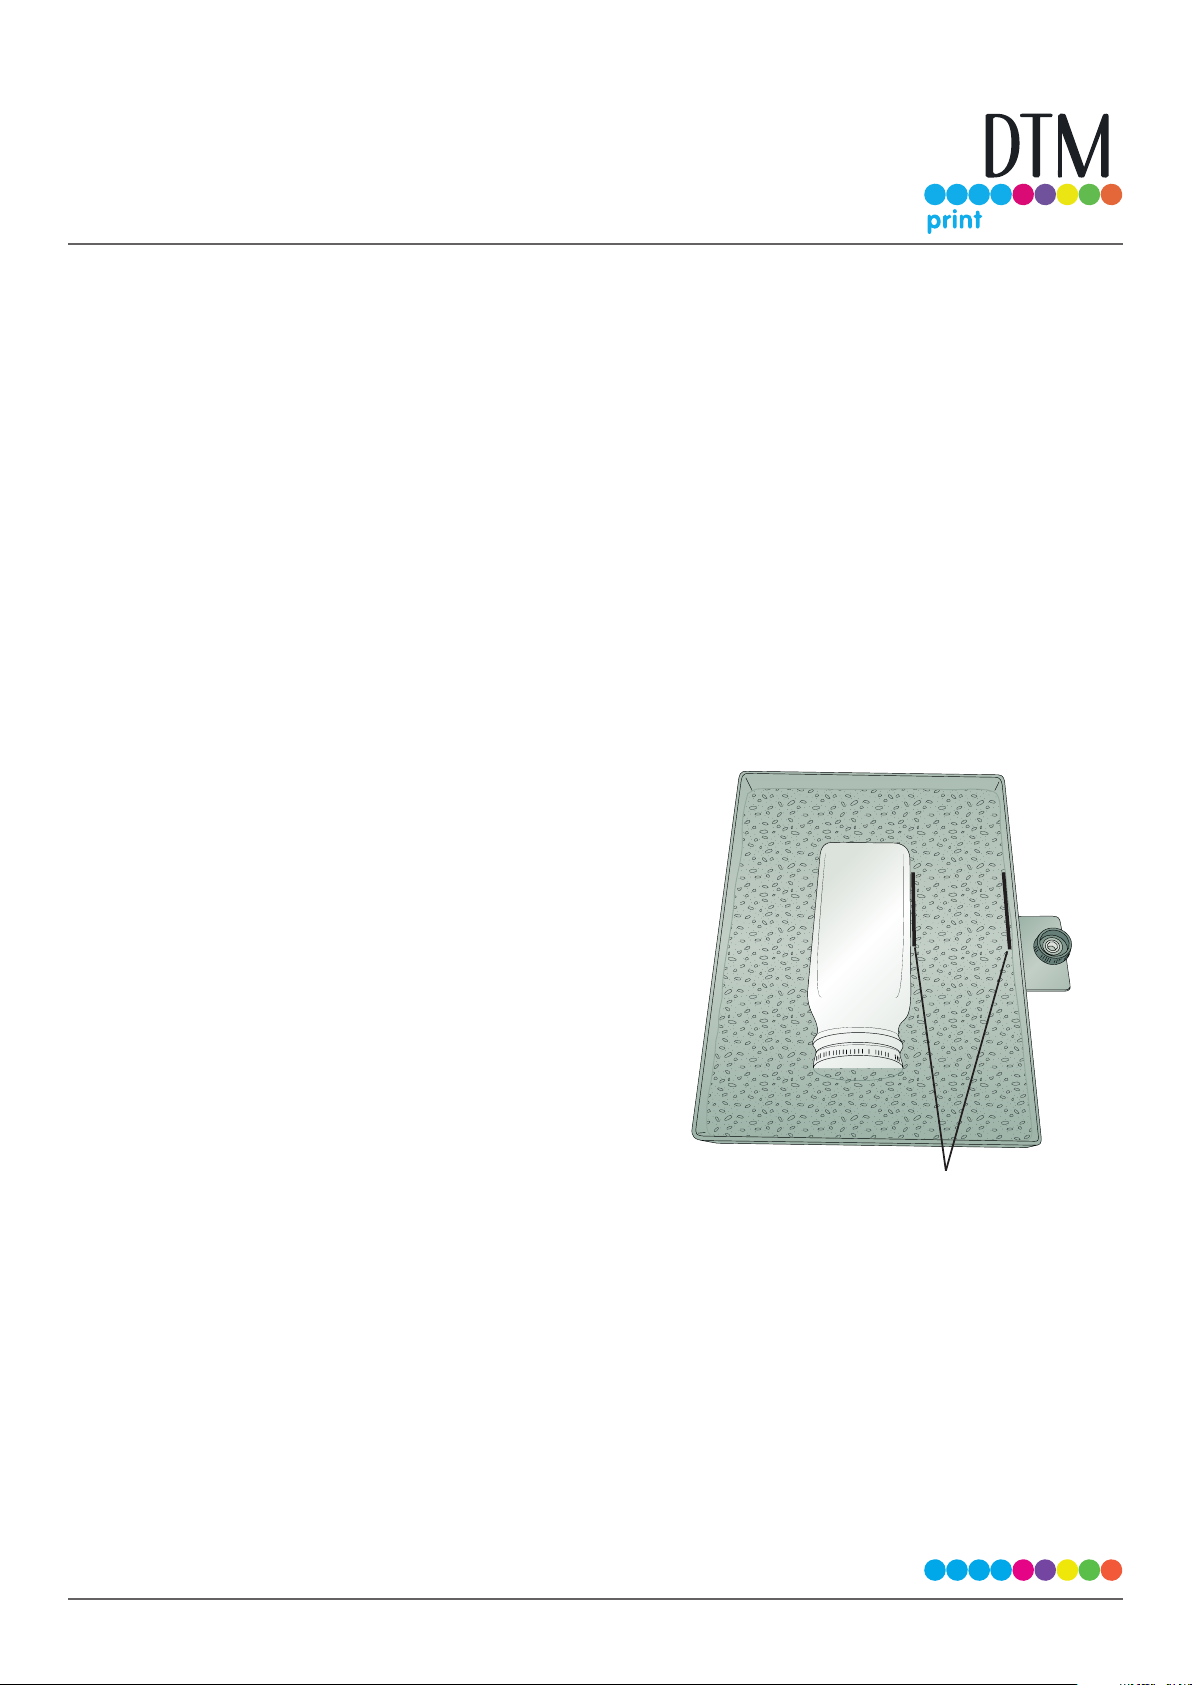
2. Place the UHMW tape-covered container tape side down in the
molding compound. Note the orientation of the labels coming o
the roll and position your container accordingly.
3. Firmly press down on your container so that it becomes imbedded
in the mold. Align the container so that it is parallel with the tray
edges.
4. The molding compound may push away from the container when
you press it down. While holding the container in place, push the
molding compound back against the container. You may touch the
molding compound with your bare hands right out of the oven,
but the tray itself will remain very hot for several minutes. If your
container has indentations on any side, do not press the molding
compound into these areas as it will make it dicult to place and
remove containers for labeling. During the forming process make
sure to keep the container parallel with the tray. The molding
compound will remain workable for approximately 10 minutes.
5. Allow the molding compound to cool. The molding compound has
“cooled” when it has turned completely white. This will take about
an hour.
6. Remove the container from the molding compound. Make sure the compound has cooled before removing the container
or the shape of your mold may become distorted.
Parallel
Section 4: Place the Tray on the Applicator Platform
1. The tray has pins on the bottom that correspond to holes on the movable Container Guide attached to the AP550e
Container Platform. Place the tray on the platform so the pins drop into the corresponding holes.
2. If the container does not sit square to the platform (labels will be applied crooked), adjust the angle of the tray. Loosen the
thumb screw. Adjust the angle as needed. Retighten the thumb screw. You may also adjust the side-to-side position of
the tray by following the instructions for adjusting the Container Guides in Section 3 of the AP550e Operator’s Guide.
Congratulations! You are now ready to label your containers.
Mode
Thumb Screw
Pins
Molding
compound and
container not
shown to reveal
tray detail.
Holes

This manual suits for next models

1

Popular Printer Accessories manuals by other brands

Star Micronics TSP800 Series install guide

Star Micronics

Star Micronics TSP800 Series install guide

Konica Minolta LU-204 installation manual

Konica Minolta

Konica Minolta LU-204 installation manual

Uninet XEROX WORKCENTER 3210 Cartridge Remanufacturing Instructions

Uninet

Uninet XEROX WORKCENTER 3210 Cartridge Remanufacturing Instructions

Duplo DC-10 mini instruction manual

Duplo

Duplo DC-10 mini instruction manual

Ricoh LCIT RT5000 Service manual

Ricoh

Ricoh LCIT RT5000 Service manual

Lanier 480-0083 Material safety data sheet

Lanier

Lanier 480-0083 Material safety data sheet

Intermec EasyCoder 601XP installation instructions

Intermec

Intermec EasyCoder 601XP installation instructions

Canon Color Network Printer Unit-D1 Service bulletin

Canon

Canon Color Network Printer Unit-D1 Service bulletin

Verity Audio Print Field guide

Verity Audio

Verity Audio Print Field guide

Epson T059820 Material safety data sheet

Epson

Epson T059820 Material safety data sheet

Canon Inner Finisher-K1 Service manual

Canon

Canon Inner Finisher-K1 Service manual

HP Designjet 10000s series user guide

HP

HP Designjet 10000s series user guide

Panasonic Jetwriter KX-CLPF1 install guide

Panasonic

Panasonic Jetwriter KX-CLPF1 install guide

HP Ink Tank 110 series user guide

HP

HP Ink Tank 110 series user guide

Epson T059320 Material safety data sheet

Epson

Epson T059320 Material safety data sheet

Lexmark X7500 Stand Assembly instructions

Lexmark

Lexmark X7500 Stand Assembly instructions

Carl Valentin SPE II Quick reference guide

Carl Valentin

Carl Valentin SPE II Quick reference guide

Rutishauser TowerFeed HL-7050 Installation and user guide

Rutishauser

Rutishauser TowerFeed HL-7050 Installation and user guide

manuals.online logo
manuals.online logoBrands
  • About & Mission
  • Contact us
  • Privacy Policy
  • Terms and Conditions

Copyright 2025 Manuals.Online. All Rights Reserved.