Dualsky Track&Field XC500TF User manual

No.45618
No.45619
No.45617
45HJ12F1420 使用产品前,请仔细阅读本使用说明书,并妥善保管!
http://www.dualsky.com
Please read these Instructions carefully before using
this product in order to avoid incorrect operation which
may cause damage to the product.
Shanghai Dualsky Models co.,Ltd.
Rm.1016,No.201,Xin Jin Qiao Rd.,Shanghai,China.
Tel: +86 21 50322162 Fax: +86 21 50322163
Brushless Electronic
Speed Controller
无刷速度控制器
XC500TF/XC550TF/
XC550TF-MJ

1. Introduction
2. Usage Warning
After the successful launch of the industry-leading Track&Field
XC800TF competition ESC, Dualsky rapidly developed the new
XC500TF, XC550TF and XC550TF-MJ brushless competition
Electronic Speed Controls for 1/10 and 1/12 racing cars. ESC product
line covers the high and low levels.
Thank you for choosing Track&Field ESC. Please read these
Instructions carefully before using this product in order to avoid
incorrect operation which may cause damage to the product.
You will find warranty information for this product at the end of
these instructions.
●The Electronic Speed Control is not a toy. It should only be used by
RC drivers above the age of 14, or with adult supervision.
●DO NOT exceed the specified limits of the ESC as it may cause
damage to the product.
●Do NOT let the ESC come in contact with any liquids as it may cause
permanent damage to the product.
●Do NOT cut off or change the original leads and connectors.
●Do NOT disassemble the product, or modify any of the components
as it will void your warranty.
●Do NOT use any defective products (e.g. faulty motors), as it may
cause a short in the ESC.
●Do NOT wrap the ESC with any material which will lead to poor heat
Dissipation.
●Do NOT connect the battery polarity in reverse, as it will short out the
ESC.
●Do NOT solder one part of the ESC for more than 5 seconds as it
1

3. Quick Start Guide
may damage the product due to overheating. A minimum of a 60W
soldering iron is recommended.
●Do NOT let the power connectors come in contact with any metals as
this may short out the ESC or Battery.
●Make sure the leads are fixed securely, and avoid any rotating parts
like gears or drive shafts.
●Keep hair and clothing away from any rotating parts on your RC
model.
●Never cycle the unloaded system at wide open throttle as it may
cause damage to bearings and other rotating parts.
●Make sure the tyres are well bonded to the rims. Tyre trouble whilst
running the car can also be very dangerous.
●Always disconnect the battery from the ESC after operation.
●Always turn on the transmitter first, then switch on the ESC,to avoid
signal interference. Do the opposite when turning off the system.
Note: The Manufacturer will not be responsible for any damage
caused by Non-compliance with the above instructions.
●Firmly fix the ESC on the RC model’s chassis with a double-sided,
adhesive. Fix the on and off switch to a convenient place.
●Insert the throttle signal cable into the throttle channel of the receiver.
●Remove the motor gear. Ensure the ESC switch is OFF, and connect
the battery to the esc.
●Turn on the power for the transmitter and check the servo direction
setting for the throttle channel.
●JR systems use the NOR setting for throttle. Futaba systems use the
REV setting for throttle.
●Switch on the ESC power, test acceleration of the motor and check
the running direction. If all is correct, you can shut down the ESC and
4. Features
install the motor gear. If the motor rotates in the wrong direction,
please switch the A and C wires from the ESC to the Motor.
●After you have properly configured your motor and ESC you may
re-install the pinion gear and start driving your RC model.
Hardware
●ICE Core Technology
●New low-resistance power transistor
●Control Module Overhead
●Super mini design
●Full Metal Shell for XC550TF-MJ
●Thermal overload protection
●Built-in programmable key switches
●Support fan
Software
●Support Sportman rules
●Intelligent Dual-mode driver
(Applicable for XC550TF and XC550TF-MJ)
●D2RP Tech - Dualsky Digital Racing Profiles
●AutoCell Tech
●Quick Restart Technology
●Most simplified settings
●Support Dualsky LINK technology
2
3

5. Parameters
Name
Item NO. XC550TF
45618
38g
60A
400A
0.0006Ohm
2S LiPo,4-6 NiMH
6V,2A Linear
8.5T and higher
34.5x33x15.5mm
1:10&1:12
on-road&off-road
Y
Y
DC3A/DB3F
XC550TF-MJ
45619
42g
65A
400A
0.0006 Ohm
2S LiPo,4-6 NiMH
6.5T and higher
6V,2A Linear
34.5x33x15.5mm
1:10&1:12
on-road&off-road
Y
Y
DC3A/DB3F
XC500TF
45617
38g
45A
300A
0.0008 Ohm
Up to 3S LiPo,
4-10 NiMH
10.5T and higher
6V,2A Linear
34.5x33x15.5mm
STOCK Race,
sportsman
Y
Y
DC3A/DB3F
Weight
1
Rated current
2
Instantaneous current
Resistance
Battery
3
B.E.C
Motor limit
Fan interface
4
Applicable models
Sportman
5
Battery/Motor plug
6
Dimensions(LxWxH)
1. The weight does not include wire and capacitor.
2. Rated current testing environment: Airflow through the ESC to
10KM/h, the full throttle runs 5 minutes.
3. If you upgrade the HV capacitor, 3S Lipo is applicable.
4. The optional fan can be controlled by switch. Note: The voltage is
not regulated.
5. Support 0 Timing programming, the blue LED flashes.
6. DC3A-Dualsky DC3 large current plug, DB3F-Dualsky
DB3F (Female) 3pcs.
●The order of input and output wires:
ESC has been soldered with different
colors of input and output wires in the
factory. If you need to replace input /
output wires, please be sure to follow
the picture carefully.
●Battery: The input wire of ESC can be
soldered to the terminals of battery
directly. The preferred method is to
add a plug
which matches
the output wire
of battery. In
order to ensure
optimal system
performance,
the plug’s
continuous rated
current capacity should be greater than 40A. We recommend the
Dualsky DC3 Heavy Duty plug. In the current market for
competition, it is popular to use a battery with female sockets
4MM x 2 on the output wires. For this battery system, you have to
solder 2pcs male plugs of same kind (4mm) on the input wires of
the ESC. They possess a higher conductivity (lower resistance),
but it is also very easy to mistake the positive and negative
terminals when connecting the battery to the ESC, which will burn
out the ESC. So please check the polarity carefully.
●Brushless Sensorless motor: Through the ABC three power wires,
the ESC delivers power to the sensorless motor. The combination is
6. ESC installation
t
e
RedOrange
Black
Blue Yellow
ESC
ABC
To RX
To Battery
To Fan
Switch
A (Blue)
B (Yellow)
+ (Positive)
(Negative)
C (Orange)
45

7. ESC setting
Futaba, throttle channel set to REV. Meantime, the ESC has the
capacity of continuous power supply at 6V 2A, that can supply the
power to a current high-torque digital servo for steering function.
●Enter into operation mode
The ESC will enter into operation mode under three circumstances:
I) ESC is turned on without touching the buttons of the switch.
II) at the end of throttle calibration.
III) quit from the running programming mode.The ESC will sound a
longer tweet, meaning the ESC has entered operation mode. The
XC850TF has two operation modes of sensed and sensorless, at
any time the system will automatically select the operating mode,
with the priority of sensed mode being higher than sensorless
mode. Note: XC500TF is special for sensorless
●Indicator LED meaning
There are two LED indicator lights on the ESC, one red and one
green.The red light indicates an error and failure during working time;
for details please refer to “Trouble shooting". Without abnormality,
the red light is in the off state. Green light indicates throttle state:
When the throttle is at Neutral, the green light is off (except Neutral
Brake @100% when the green light will be on) ; when the throttle is
in forward, the green light flashes; when braking, the green light will
be half bright; when in full throttle forward or maximum braking, the
green light stays on.
●ESC / Radio Calibration
You should perform this function when you receive your new Dualsky
ESC, update firmware using Dualsky link or when replacing the
receiver.
First Step: Turn on the transmitter and set throttle channel to reverse
very simple. ABC power wires can be soldered directly to the motor
terminals with a 60W electric soldering iron. The ABC power wires
can also be soldered to plugs which match the motor outlet plugs,
and the rated current capacity of the plugs should be greater than
40A. We recommend the use of a Track & Field original motor, and
make it A-A, B-B, C-C. The phase of other brands motors may be
different, which will result in the motor rotating in reverse. If reverse
rotation happens, you can exchange any two poles to change the
direction of rotation.
●Brushless Sensed motor: There is one more sensor wire between
the sensed motor and ESC, this is the only difference from the
connection of a sensorless motor. It makes the ESC drive the
sensed motor through the Hall signal, and greatly enhances
low-speed driving torque and acceleration. The XC550TF,
XC550TF-MJ have the ability to work in two modes, and can
automatically identify the mode of sensed or sensorless. Please use
Track & Field original motors or motors that are IFMAR approved.
Otherwise, in the sensed mode, it may lead to the motor or ESC
working incorrectly or burning out. Sensor wires are consumables;
they may be broken or have intermittent connections due to a poor
working environment and possible vibration. We recommend to use
high-quality original Dualsky sensor wires, and replace them after
every 20 runs.
●Brushed motor: The hardware of XC500TF,XC550TF,XC550TF-MJ
have the ability to drive a brushed motor, but the software does not
support it. This allows a better optimization of the brushless function
which gives you better performance.
●Remote Controller - XC500TF,XC550TF, XC550TF-MJ support the
main remote controllers currently in the market. It works perfectly
with 2.4GHZ systems. Insert the ESC signal cable into the Throttle
channel of RX. For JR, the throttle channel is set to NOR; for
67

(futaba) and set throttle trim to zero. Set throttle EPA to 100% and
turn off ABS function.
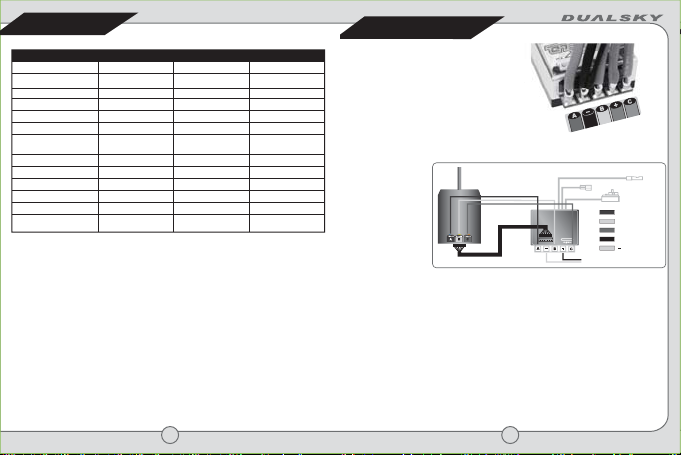
Second Step : Connect battery to ESC. Then while holding down red
set key on power switch turn the ESC on. The Red light will blink
immediately and the motor will tweet, ESC is now in throttle
calibration mode and you can release set button.
Third Step: With throttle trigger at neutral position press the set 、
button once to record neutral position. Green light will flash indicating
successful recording.
Fully depress throttle trigger and press the set button once to record
full throttle position. Green light will flash twice indicating successful
recording.With trigger at full brake/reverse press the set button once
to record full brake/reverse position. Green light will flash 3 times
indicating successful recording.
Fourth Step: After 3 seconds the ESC will go into operation mode.
●Running Programming
Differing from throttle calibration, running programming operates
entirely through the ESC itself, and does not need the involvement of
the transmitter. In order to ensure security, the transmitter is
indicating you have entered into the setting item, then you can
change the value. If you have not chosen any item by the last
flashing, the ESC will quit the programming mode automatically.
How to check the current value of the setting items?
After entering into the setting item, the times of green light flashes
first time represents the current setting value, then the green light will
flash circularly to indicate different setting values.
How to change the value of setting items?
When you see the times of green light flashes for your desired
settings, press the SET button, and the value is automatically saved.
Meantime return to setting options, the green light will be off, and the
red light starts flashing.
How to quit from the running programming mode?
Wait for the red light to flash the last setting item and the ESC will
automatically quit from programming mode. Or, you can simply switch
off and then switch on to return to operation mode.
Note: when the red and green light flashes, the motor will tweet
synchronously.
suggested to be ON (but not used/controls not moved).
How to enter the mode of Running Programming?
Turn on the ESC, allow it enter the operation mode, then press the
SET button and hold it more than 3 seconds. The red light starts
flashing, indicating that the ESC has entered into the running
programming mode.
How to choose the setting item?
Under programming mode, red light flashing means the setting item,
flash one time, on behalf of Item1; flash two times, on behalf of Item2,
and so on. Red light will flash in turn automatically to indicate different
setting items. When you see the setting item you want to enter, press
the SET button, the red light is off, the green light starts flashing,
8. Meaning of setting items
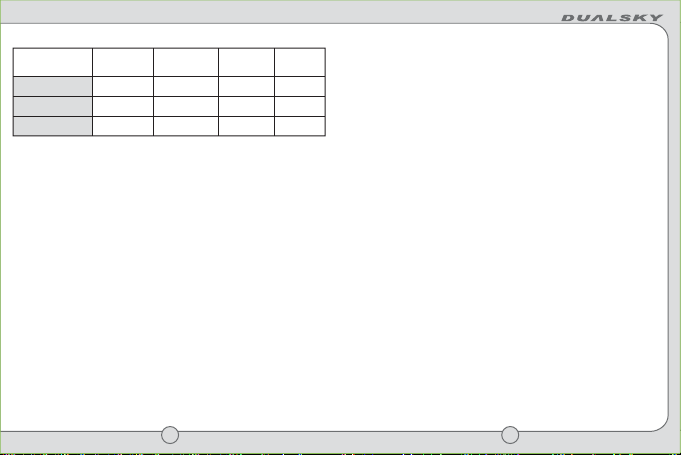
D2RP – Dualsky Digital Racing Profiles
Operating parameters are composed of the throttle curve, start mode
and timing advance. We need to consider the applied situation and
power system features to arrange them accordingly. It is sometimes
difficult and time-consuming for users to determine these settings.
Dualsky joined with top drivers and have done extensive testing in
many different conditions, and these settings are shown as D2RP, and
are very easy to use and understand (see the table below). Of course,
advanced racers can make their own settings that may be more
suitable using the optional Dualsky USB LINK.
8 9

Profile 1
Default
Sportsman Profile 2 Profile 3
Modified Profile 4
STOCK
Throttle Profiles Linear Linear“-EXP”
“+EXP”
Start Mode 7899
Timing Advance 1346
D²RP
Operation Mode
Firmware V1.5.2 - Sports for XC500TF, XC550TF, XC550TF-MJ
■
Throttle Profiles: -EXP means at the beginning throttle is gentle,
Linear means original linear output, + EXP means at the beginning
throttle is rapid and fierce.
■
Start Mode is divided into a total of 9 grades, the higher grade, the
greater burst of power at the start. It is not always correct for burst
power that greater is better. It also depends on the tire grip and
battery characteristics.
■
Timing advance is divided into 8 grades. The higher timing advance
will help improve the output power, but also makes the motor run
hotter. Applied with the latest dynamic variable timing technology, it
can enhance the system efficiency significantly under high and low
speed dynamic conditions. The first grade timing advance is 0
degree. The ESC’s green LED light is flashing when the throttle out
of neutral point to remind user the timing advance is 0 degree at the
moment.(Comply with Sportsman competition rules)
■
These profiles were preset for D2RP, users can set them
individually by Dualsky LINK.
■
D2RP programming settings and default values may be changed
without notice.
Auto Cell
This ESC supports the popular LiPos (default), NiMH or even LiFe
batteries that are currently in the market, and it is able to judge the
number of battery cells automatically, protecting the battery from
over-discharging.
Neutral Brake
Neutral Brake can adjust the brake force when the throttle is in neutral.
Usually, for off-road cars, we set the brake to be of a lower force.
While for the Modified cars, we will set it higher due to the weakness
of motor braking force. (lower wind motor typically)
Brake Amount
Brake amount shows the braking force when the throttle is in the
maximum braking position. Braking force is linear, before it reaches
the maximum braking, the brake force will increase in linear
increments. Too small or too large a braking force will affect
performance in turning and the speed of car. Please adjust according
to your driving style.
10 11

10. Troubleshooting Guide
Problem: No throttle response, Red LED flashes continuously.
Solution: This means there is no connection to the transmitter. Check
that the transmitter is turned on and the lead from the ESC
is correctly plugged in to the receiver.
Problem: Throttle response cuts in and out, and the Red LED is
flashing.
Solution: This is the Low Voltage Cut Off. Allow the esc to cool then
plug in a freshly charged pack.
Problem: The motor and ESC stop operating and the Red LED
repeatedly flashes 2 consecutive times.
Solution: ESC has gone into thermal overload protection, reduce the
load appropriately (gear ratio) and wait for the ESC to cool
then continue to run your RC.
Problem: The system is running, but the Red LED stays on.
Solution: The system switched from sensored mode to sensorless
mode. First, check if the sensor wire is off or damaged.
Second, check if the motor sensor port is damaged.
9. Quick setting form
3
2
4
AutoCell
Neutral Brake
Brake
1
34
12
*Profile 1
None
0%
25%
Profile 2
*LiPo
*10%
*50%
Profile 3
NiMH
15%
75%
Profile 4
LiFe
20%
100%
Programming
D²RP
Operation Mode
●The bold text is the ESC default value.
●The user can set the value from Track&Field Firmware on a PC
connected through the optional Dualsky USB LINK.
12 13

12. Company information
www.dualsky.com
© 2008 Dualsky. All rights reserved, the Dualsky logo, and other
Dualsky marks are owned by Dualsky and may be registered. All
other trademarks are the property of their respective owners.
Dualsky assumes no responsibility for any errors that may appear
in this manual. Information contained herein is subject to change
without notice.
11. Warranty Information
●Dualsky Track&Field speed controllers are covered against defects
in material and workmanship to the original owner for six months
from the original date of purchase. During this period Dualsky will
repair or replace, at our discretion, the defective component.
●This warranty does not apply to improperly installed, abused,
damaged in crash, or any units which have been repaired or altered
by unauthorized agencies.
●Under no circumstances will the buyer be entitled to consequential
or incidental damages. This limited warranty gives you specific legal
rights; you may have other rights which vary from country to country.
●This warranty applies only to Dualsky products purchased from
authorized dealers/distributors.
14
15
无刷速度控制器
No.45618
No.45619
No.45617
XC500TF/XC550TF/
XC550TF-MJ

●
本产品不是玩具,不适合14岁以下儿童使用。
●
不可采用超出产品最大允许电压/电流来驱动系统。
●
不可让ESC接触到水,油或导电液体,这可能造成永久性损伤,甚至烧毁ESC。
一旦接触,请立即停止使用,并设法使它干燥。
●
不可剪断或修改原装导线和插头。
●
不可拆开产品,更不要修改焊接PCB上的器件。
●
不可使用发生破损的产品,这会导致严重的后果,甚至短路。
●
不可用任何材料裹覆产品,会影响产品散热,也不可用金属材料包裹,容易短路。
●
不可反接电池极性,这会导致ESC烧毁。
●
不可焊接一处超过5秒,产品部件会因过热导致损坏。建议采用至少60W以上的烙铁。
●
确保接线柱没有与金属零件触碰,这会直接导致短路。
●
确保导线固定稳固,剧烈晃动会使插头松动。并且不会触碰到齿轮等旋转部件。
●
本产品和与之连接的马达属于大功率系统,为了安全起见,强烈建议调整系统是
不要安装马达齿轮。头发、衣服以及零件要与动力系统和车体旋转部件保持距离。
●
不要全功率空转动力系统,以免导致轴承及一些旋转部件的损坏。
●
认真检查车辆轮胎是否粘好,模型车辆跑动中发生轮胎故障同样危险。
●
总是在使用结束后断开电池和ESC的连接,即使开关已经关闭,也会有很小的电
流消耗,经过一段较长时间,会导致电池完全深度放电,造成不可修复的损坏。
●
总是先开遥控器电源,再开ESC开关,以免信号干扰导致系统误动作。关机则步
骤相反。注意:由于不遵守以上注意事项而导致的损坏,生产商概不负责。
如今,无刷浪潮正迅速地席卷整个遥控车领域。在比较高级别的比赛中,几
乎已经看不到有刷马达的身影。在成功推出业界领先水平的Track&Field车用竞
赛级无刷马达后,Dualsky迅速推出用于1/10,1/12遥控车XC500TF、XC550TF、
XC550TF-MJ,使ESC产品线涵盖了高中低各层面。
感谢您选择Track&Field ESC产品,请在使用本产品之前,完整细致地阅读
本说明书,避免操作不当发生危险或损坏产品。说明书将帮助您了解更多关于无
刷系统的知识。本产品的使用方法与有刷ESC存在很大不同,即使与其他无刷ESC
相比,也有很多不同。
注意:请妥善保管说明书,如果说明书缺失,请不要使用本产品。说明书后部有
保修条款,请仔细阅读。
2.注意事项
1.介绍
●
将ESC预先摆放在遥控车上,确定合适的安装位置。在导线上标记下合适的长短。
在不碰到运动部件的前提下,导线越短越好。
●
取出ESC,采用60W烙铁将红黑输入线与电池插头焊接,注意极性不要搞错。
●
将ABC输出线焊接至马达对应Phase,ABC相位与马达必须对应(注意:此处所说
的马达为Track&Field车用系列,不同厂家的马达ABC顺序可能不同)。
●
用双面胶将ESC牢固固定在车模底板上。在方便开关的地方固定开关,将油门信
号线插入RX油门通道。再次确认导线没有触碰运动部件的可能。
●
拆卸掉马达齿轮。确保ESC开关处于OFF,连接ESC和电池。
●
先开发射机电源。JR系统,油门为NOR。Futaba油门设为REV。
●
接通ESC电源。测试马达加减速和运行方向。正常的话可以关闭系统,安装马达
齿轮。
●
到目前为止,你可以驱动赛车了。油门的校准以及高级设定请参考后续章节。
●
ICE Core技术:采用低内阻功率板,度身定做的纯铜导电散热片,进一步降低
内阻,增强散热。
●
新型低内阻功率管:可以承受更高冲击电流,内核采用贴片技术,使热量可以
快速散出。
●
控制模块顶置:借助ICE Core技术和新型MosFET,XC500TF、XC550TF、
XC550TF-MJ具备更低发热和更好散热。这使得控制模块可以放置在MosFET上面,
利用ESC顶部宝贵的区域,给LED指示灯和感应线接口的布置提供了极大便利。
●
超小型设计:极端最小化的体积,同样得益于控制模块顶置的专利技术。
●
XC550TF-MJ为全金属外壳:散热良好,散热面积超过一般的散热片。甚至不需
要风扇散热。
●
过温保护。提供对系统过载的温度保护,确保系统在过温条件下不至于损坏。
●
内置编程设定按键的开关。结合顶部LED显示和马达鸣叫,设定变成一种乐趣。
●
支持风扇。提供受开关控制的外置风扇供电接口,可以选择Dualsky的升级风
扇产品提升系统的功率级别。
4.特点
硬件方面
3.快速入门
软件方面
●
支持Sportsman规则:为该系列ESC开发的程序默认支持0度进角设定,并可以通
过LED灯的闪烁分辨,使得玩家可以将注意力集中在车辆的设定和操纵上。
●
智能双模式驱动(XC550TF, XC550TF-MJ适用):同时兼具有感和无感驱动程序,
16 17

名称
货号
重量
1
额定电流
2
瞬时电流
电阻
电池
3
B.E.C
对应电动机
尺寸(长x宽x高)
风扇接口
4
适用车型
Sportman
5
电池/马达插头
6
XC550TF
45618
38g
60A
400A
0.0006Ohm
2S LiPo,4-6 NiMH
6V,2A Linear
8.5T and higher
34.5x33x15.5mm
1:10&1:12
on-road&off-road
Y
Y
DC3A/DB3F
XC550TF-MJ
45619
42g
65A
400A
0.0006 Ohm
2S LiPo,4-6 NiMH
6.5T and higher
6V,2A Linear
34.5x33x15.5mm
1:10&1:12
on-road&off-road
Y
Y
DC3A/DB3F
XC500TF
45617
38g
45A
300A
0.0008 Ohm
Up to 3S LiPo,
4-10 NiMH
10.5T and higher
6V,2A Linear
34.5x33x15.5mm
STOCK Race,
sportsman
Y
Y
DC3A/DB3F
并自动切换。有感起步不拖泥带水,动力紧跟你的手指,在残酷的竞赛场上,当
感应线不小心脱落,无感驱动将确保你顺利完成比赛。
●
D²RP 技术–Dualsky 数码赛车资料:通过大量测试和实战,工程师对启动模式,
进角,油门曲线甚至频率进行了优化,制定出适合不同用途的几个配置,用户
不再需要耗时的测试,便可以获得最优的性能。
●
AutoCell 技术:无需设定电池类型和电压,基于最新的锂电池水平优化电压保护。
●
动态数字进角技术:根据车速高低,自动调节电子进角,以满足马达在不同转速
下对扭矩的要求。
●
快速重启技术:在4-5节NiMH的比赛中或某些极端情况下,重负载会拖低电池电压,
甚至低于MCU的工作电压,导致整个系统重启。一旦发生这种情况,电调必须有迅
速恢复的能力,保证顺利完成比赛。而且,按键编程方式较油门编程能更有效避
免在重启后误入编程模式。
●
最简化的设定:Dualsky已经通过自己的经验和测试将最简单的设定呈现给用户,
四个必要设定项,简单明了。
●
支持Dualsky LINK 技术:通过DualskyLINK USB连接线(单独购买),我们会将
更多的技术细节呈现给专业用户,用户可以完美配置自己的动力系统。
5.参数
1. 重量不包括电线和电容。
2. 额定电流测试环境:气流以10KM/h通过ESC,全油门运行5分钟。
3. 如果升级HV电容,可以使用3S锂电。
4. 可选择(选配的)风扇可以用开关控制,注意:风扇电压未被降压。
5. 支持零进角程序,此时蓝色LED灯闪烁。
6. DC3A–Dualsky DC3大电流插头,DB3F–Dualsky DB3F(母头)3个。
●
输入输出线的顺序:ESC在出厂前已
经焊接了标注为不同颜色的输入输
出线。如果需要自己更换输入/输出
线,请务必按照图示顺序。
●
电池:ESC输入线可以直接焊接在电
池两极使用,常用的做法是加装一个
与电池输出线匹配的插头,为保证系
统的性能,插头的连续电流能力应大
于40A,建议采用Dualsky DC3 Heavy
Duty 插头。竞赛
市场,目前比较流
行用4MM x 2母插
输出的电池,如果
你采用这种电池,
需要在ESC的输入
端焊接2颗粒一样
的4mm公插。他们
具备较高的导流能
力,但是也很容易
在连接时搞错正负极,这将导致ESC烧毁,请务必特别仔细确认极性。
●
无刷无感马达(Sensorless)ESC通过ABC三根动力线将动力输出给无感马达,
结构简单。动力线可以用60W电烙铁直接焊在马达极片上,也可以焊接与马达
匹配的插头,插头的电流能力应大于40A。请采用Track&Field原装马达,并且
做到A-A,B-B,C-C。第三方马达相位的定义可能不同,会造成马达反转。如
果反转,可以通过对换任意两极来改变旋转方向。
●
无刷有感马达(Sensored):ESC与有感马达的接线唯一的区别在于有感马达
6.ESC安装
兰黑黄红橙
ESC
ABC
To RX
To Battery
To Fan
Switch
A (Blue)
B (Yellow)
+ (Positive)
(Negative)
C (Orange)
18 19

●
遥控器和ESC的油门调校
为什么要进行油门调校?
调校有利于更高效的使用ESC和您的遥控器。未经调教即盲目使用,可能导致系
统性能无法正常发挥,甚至造成危险。
何时需要油门进程调校?
第一次使用ESC,更换遥控器或者变更模型数据时需要调校遥控器和ESC。通过
Dualsky LINK更新ESC软件后也需要重新调校油门。
第一步:首先打开发射机电源,此时不要连接ESC和电池。将中立点(Sub Trim)
和微调(Trim)设为0,将油门行程(ATV/End Point)设为正负100%,油门敏感度
设为0%,关闭ABS功能。如果是简单的遥控器,只需要将微调归零,油门行程
设为100%。注意:Futaba体系的遥控器,需要将油门通道的Reverse设为REV。
第二步:保持发射机为ON的状态,连接电池与ESC,按住开关上的SET按键,此
时将开关拨到ON。红灯立即开始闪烁,同时马达发出鸣叫声,表明已进入ESC的
油门调校模式,松开按键。
第三步:接下来让ESC记录中立点,最高点和最低点三个数据:
将油门放在中立点处,按一次SET键,绿灯闪烁1次,表示已记录中立点位置;
将油门放到全油门处,按一次SET键,绿灯闪烁2次,表示已记录最高点位置;
将油门放到最大刹车处,按一次SET键,绿灯闪烁3次,表示最低点已被记录;
此过程红灯熄灭,绿灯闪烁,马达发出同步鸣叫声。
第四步:3秒后自动退出调校模式,ESC进入运转状态。
●
运行参数编程设定
与油门调校不同,运行参数编程完全通过ESC本身进行,不需要遥控器的配合,
但为了确保安全,遥控器应处在ON的状态。
如何进入运行参数编程模式?
ESC开机,在运行模式下,按下SET键并保持3秒以上,红灯开始闪烁表示已经进
入运行参数编程模式。
如何选定设定项(Item)?
编程模式中,红灯的闪烁代表设定项,闪烁1次,代表Item1,闪烁2次,代表 Item2,
以此类推。红灯会自动依次闪烁提示不同的设定项。当看到想要进入的设定项
时,按一下SET键,红灯熄灭,绿灯开始闪烁,表示进入了设定项,可以更改设
定值。如果到了最后一项闪烁结束还没有选择,ESC会自动退出运行编程模式。
如何查看当前项的设定值?
进入设定项后,第一次绿灯闪烁的次数就代表当前项的设定值,之后绿灯将循
环闪烁不同的设定值。
马达必须符合IFMAR规范,使用不符合IFMAR规范的马达导致ESC损坏,不属于
质保范畴。不同的马达齿轮比、不同的运行模式的选择,甚至不同的轮胎,场地
等,会导致ESC的发热量不同。所以,请遵循马达说明书上对齿轮比的建议,并将
ESC的运行模式设置在较低档位。ESC的温控保护模式是开启的,如果曾通过USB
LINK关闭,在使用新马达时请开启保护。
7.适用的马达
8.ESC设定
●
进入运行模式
三种情况会进入运行模式:I) 在不触碰开关上按键的情况下开机。II) 油门调
校结束。III) 退出运行参数编程模式。
ESC会发出较长鸣叫声,表示ESC已进入运行模式。ESC具备有感和无感双模运行
能力,此时系统会自动选择运行模式,有感模式的优先级高于无感模式。
注:XC500TF为无感专用ESC。
●
LED指示灯含义
ESC上面有2个LED指示灯,一红一绿。运行模式下,红灯指示错误和故障,具体
参考“故障解决”,没有异常时,红灯处于熄灭状态,绿灯指示油门状态。当油
门处在中位(Neutral)时,绿灯灭(Neutral Brake为100%除外,此时绿灯亮)。
当油门处于前进时,绿灯闪烁。刹车时,绿灯半亮。当全油门前进或最大力度刹
车时,绿灯长亮。
在编程模式中,红灯指示设定项,绿灯指示设定项的值。
多了一条与ESC连接的感应线,这使得ESC可以通过霍尔信号驱动马达旋转,
大大提升低速驱动扭矩和加速度。XC550TF、XC550TF-MJ具备双模工作能力,
自动识别有感或无感工作模式。请采用Track&Field原装马达或IFMAR认定马达,
否则在有感模式下,可能导致马达或ESC烧毁。感应线属于耗材,由于恶劣的
工作环境和剧烈的震动,导致线材重现断裂和接触不良,建议采用高品质
Dualsky原装感应线,同时每隔20轮更换。
●
有刷马达--XC500TF,XC550TF,XC550TF-MJ硬件具备驱动有刷马达的能力,但是
软件上不支持它,以便让爱好者获得更纯正完善的无刷驱动功能。
●
遥控器–XC500TF,XC550TF,XC550TF-MJ支持市面上的主流遥控器。支持2.4GHZ
系统。将ESC的信号线插入RX的Throttle通道,JR用户油门通道保持NOR,Futaba
设备油门通道设置为REV。同时,ESC提供6V 2A的连续供电能力,满足当前大
扭矩数字舵机的供电需要。
20 21

●
这些项目为D
2
RP预设,用户可以通过Dualsky LINK对它们进行单独设定。
●
D
2
RP对应的设定值和默认值可能会变化,恕不另行通知。
Auto Cell
ESC支持当下流行的LiPo(默认),NiMH甚至LiFe电池,并具备自动电池节数
判断功能,保护电池不会过放电。
Neutral Brake
中立点刹车调节油门在中位时的刹车力度。通常Off-road考虑到跳跃采用较低
力度,而Modifiled由于马达制动力较弱需要采用较高数值。
Brake Amount
刹车力度表示油门处于最大刹车位置的制动力。刹车力度是线形的,在没有到
达最大制动位置时,刹车力度线形递增。过小或过大的刹车力度都会降低弯道
的表现,影响车速。
故障:系统不工作,红灯5S定期闪烁1次,马达同步鸣叫。
解决:这是由于ESC上电后,没有遥控信号。打开遥控器即可。
故障:系统不工作或跑动停止工作,红灯持续闪烁。
解决:电池组电压过低。即电池电压低于当前设定电池的最低工作电压。检查电
池组是否正常,是否充足电。
故障:跑动中途停止运行,红灯重复2次连闪。
解决:ESC过温保护,适当降低负载,等待ESC冷却后再运行。
故障:系统可以运行,但红灯一直亮着。
解决:系统中途自动由有感模式切换到了无感模式。首先,查看感应线是否脱落
或损坏。其次,检查马达的感应器是否损坏。
10.故障解决
右图打叉带轮垃圾桶是根据欧盟废旧电气电子回收指令
要求使用的回收图标,这说明产品在使用完毕后必须分类回
收。不可当做未分类城市垃圾来处理。
11.环保信息
D²RP–Dualsky Digital Racing Profiles
运行参数由油门曲线,启动模式和进角组成。它们之间的合理搭配需要考虑到应
用场合和动力系统的特点。确定这些对于用户来说有些困难和耗时。Dualsky联
合车手在不同条件下作了大量的测试,并将这些设定以D
2
RP的方式呈现出来,非
常易于使用和理解(下表)。当然,高级玩家可以通过Dualsky USB LINK连接电
脑实现更适合自己的设定。
D²RP
运行模式 Profile 1 默认
Sportsman Profile 2 Profile 3
Modified
Profile 4
STOCK
Throttle
Profiles Linear Linear“-EXP”“+EXP”
Start Mode
启动模式 7899
Timing Advance
进角 1346
●
Throttle Profiles:-EXP表示油门初段细腻,Linear为原始线形输出,+EXP设
定初段偏向迅猛。
●
Start Mode:共分为9档,档位越高,启动时的爆发力越大。但并不是爆发力越
大越好,这取决于轮胎抓地力和电池的情况。
●
Timing Advance:进角分为8档。较高的进角有利于提高输出功率,同时也会使马
达更热。采用最新的动态可变进角技术,使系统在高低速动态环境下的效率得以
大幅提升。第一档进角为0度进角,当油门处于中立点时,ESC的绿色LED指示灯闪
烁,提示用户此时ESC的Timing为0度。(符合Sportsman比赛规则)
固件 V1.5.2 - Sports for XC500TF, XC550TF, XC550TF-MJ
如何改变设定值?
当看到绿灯闪烁次数为所需要的设定值,按一下SET键,该值自动保存。同时返
回设定项选择,绿灯熄灭,红灯开始闪烁。
如何退出运行参数编程模式?
等待红灯闪烁完最后一个设定项,ESC会自动退出编程模式。当然,关闭开关再
打开也可以回到运行模式。
说明:红灯和绿灯闪烁时,马达会同步发出鸣叫声。
9.设定项含义
22 23

24
我们保留对说明书及产品的所有权利,Dualsky logo以及其他Dualsky标志
归Dualsky公司所有。所有其他的商标产权归各自所有者所有。对此手册中可能
出现的错误,Dualsky不承担任何责任。本文所含信息如有更改,恕不另行通知。
13.版权及公司信息
14.设定快速对照表
●
黑体(Bold)设定值为对应编程项目的默认值;
●
通过Dualsky USB LINK 连接PC机Track&Field 设定软件,可以对以上参数进
行更细致的设定。
3
2
4
编程项目
D²RP
运行模式
AutoCell
电池类型
Neutral Brake
拖刹力度
Brake
刹车力度
1
34
12
*Profile 1
None
0%
25%
Profile 2
*LiPo
*10%
*50%
Profile 3
NiMH
15%
75%
Profile 4
LiFe
20%
100%
12.维修和有限质保
●
Dualsky Track&Field调速器对原始购买者自购买日起六个月内发现的材质
和工艺缺陷进行担保。在这段期间,Dualsky将自行判断并对有缺陷的部件进行
修理或赔偿。
●
本担保不适用于错误安装,错误处理,滥用,撞击所引起的损坏,也不适用于
由任何未经授权的机构擅自修理或更改的部件。
●
在任何情况下,买方都有权对必然的或偶然的损坏要求赔偿。本担保有限地赋
予您特定的法律权利,你可能因国家不同而拥有其他的权利。
●
本担保只适用于从合法授权的经销商或者批发商处购买的Dualsky产品。
This manual suits for next models
2
Table of contents
Other Dualsky Controllers manuals