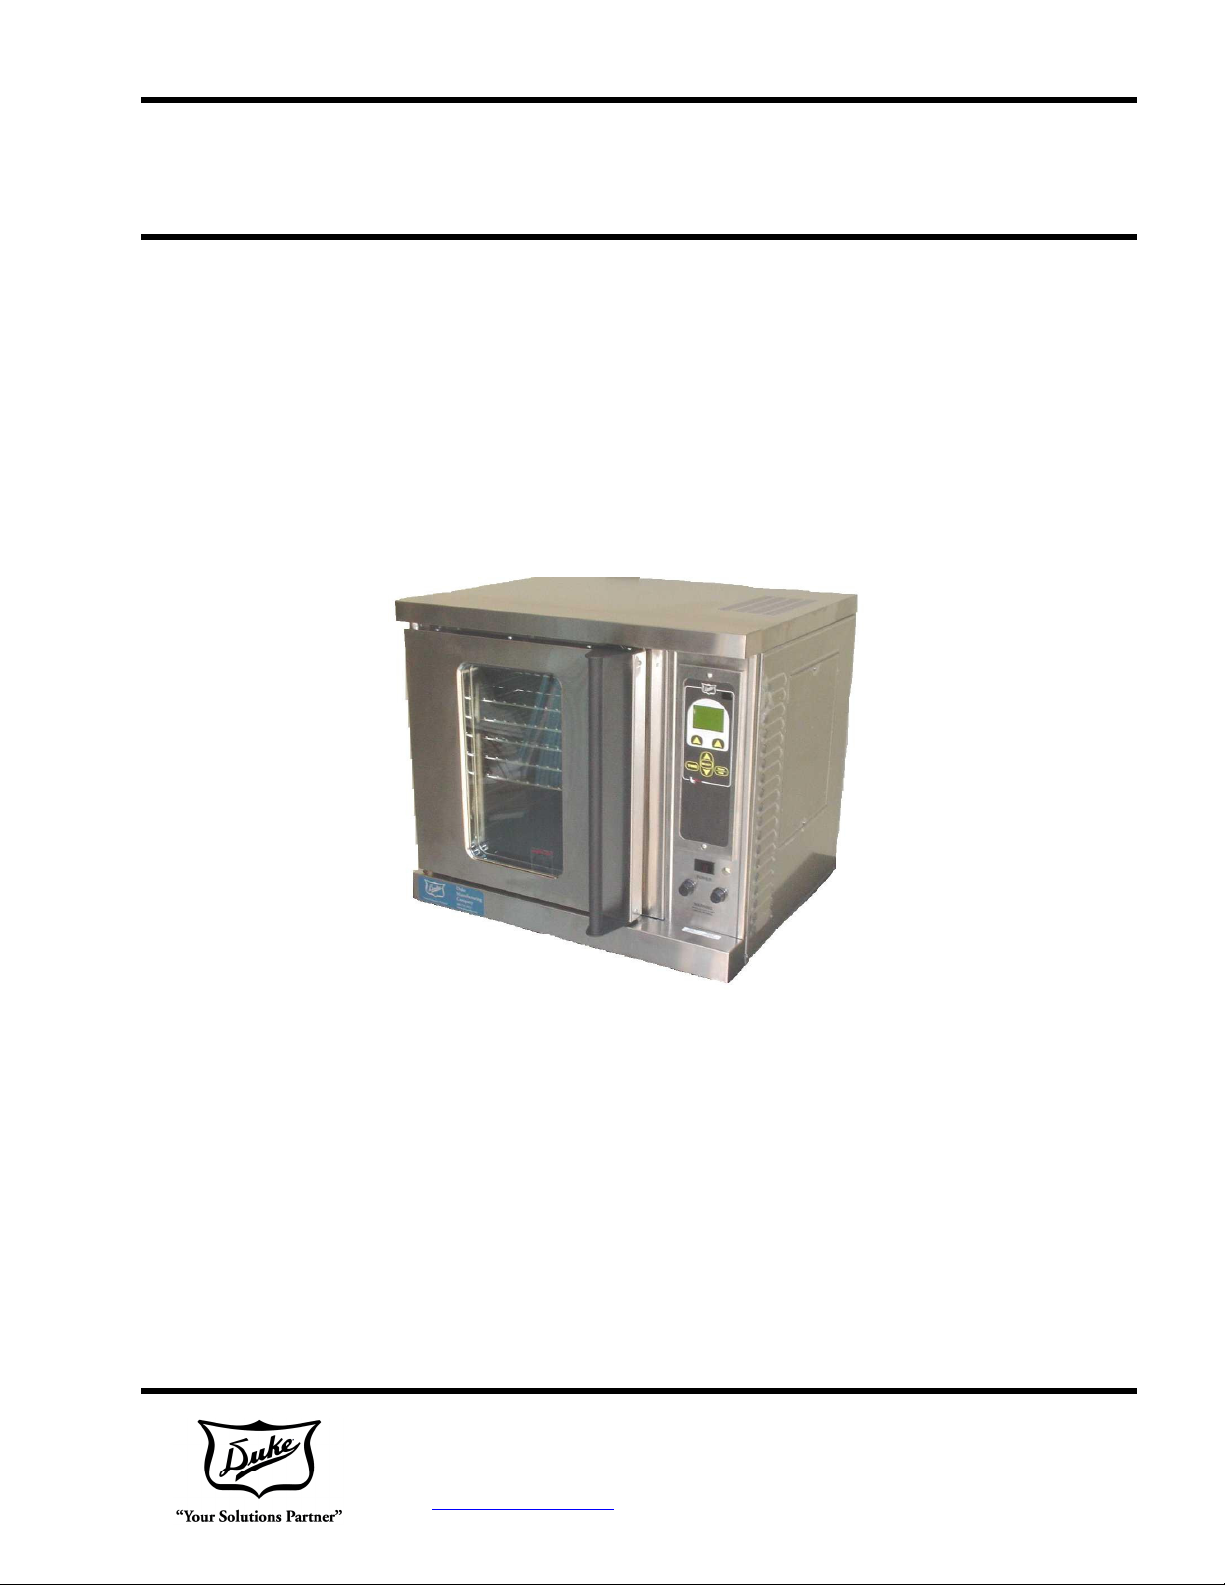
Duke 59 Series User manual

DUKE MANUFACTURING CO. 156879J
2305 N. Broad ay • St. Louis, MO 63102
800.735.3853 • 314.231.1130 • 314.231.5074 Fax
www.dukemfg.com
5/9 Series Ovens
with
“ZP” CONTROL PANEL
OWNER’S MANUAL

2
TABLE OF CONTENTS
PAGE
Electrical Specifications 2
Installation Instructions
A. Qualified Personnel 3
B. Delivery and Inspection 3
C. Location of the Oven 3
D. Electrical Connections 3
E. Oven Asse bly 4
F. Leg Attach ent 4
G. Caster Installation 4
H. Double Sections 4
I. Adjust ents Associated with Installation 4
Maintenance Instructions
A. Adjust ents 5
B. Door Adjust ents 5
Cleaning of Oven 5
Operation Instructions
Operating the Controller 6 - 14
Suggested Times and Settings 15 - 16
Repair Parts List 17-18
Electrical Schematic 19
Please supply the Model Number and the Serial Number when ordering
replacement parts or requesting service.
We recommend service by Duke Authorized Service Agencies during and
after the arranty period.
FOR YOUR SAFETY
Do not store gasoline or other flammable liquids in the vicinity of this appliance.
WARNING
Improper installation, adjustment, service or maintenance can cause property damage, injury or death.
Read all installation, operating and maintenance instructions thoroughly before installing or servicing
this appliance.
ELECTRICAL SPECIFICATIONS
Total KW VOLTS 1 PHASE 3 PHASE
8.0 208 41 amps 24 amps/ph
8.0 240 36 amps 21 amps/ph

3
INSTALLATION INSTRUCTIONS
A. Qualified Personnel
These installation instructions are for the use of
qualified installation and service personnel only.
Installation or service by other than qualified personnel
ay result in da age to the oven and/or injury to the
operator.
Qualified installation personnel are those individuals,
fir s, co panies or corporations which either in
person or through an agent are engaged in and
responsible for:
•The installation of electrical wiring fro the
electric eter, ain control box or service outlet
to the electrical appliance. Qualified installation
personnel ust be fa iliar with all precautions
required and have co plied with all
require ents of state and local authorities
having jurisdiction. See: National Electrical
code, ANSI/ NFPA 70-1990.
B. Delivery and Inspection
Duke Manufacturing Co., does everything within its
power to insure you receive your oven in good
condition. They are strapped down on heavy wooden
skids and surrounded by heavy “tri-wall” cartons to
prevent shipping da age. They have all been carefully
inspected before they were packaged and consigned to
the carrier.
Upon Delivery of your Duke oven:
•Look over the shipping container carefully noting
any exterior da age on the delivery receipt
which ust also be signed by the driver/
delivery person.
•Uncrate and check for any da age which was
not evident on the outside of the shipping
container. This is called concealed da age. The
carrier ust be notified within fifteen (15) days
of the delivery of the oven and the carton, skid
and all packaging aterials ust be retained for
inspection.
Duke Manufacturing Co. cannot assu e liability for
loss or da age suffered in transit. The carrier assu es
full responsibility for delivery in good order when the
ship ent was accepted. However, we are prepared to
assist you in filing any freight clai .
C. Location of the Oven
Proper planning and place ent of the oven will give
you the best results in ter s of long ter user
convenience and satisfactory perfor ance. We urge
you to give adequate thought in the place ent of your
oven prior to its arrival.
•The oven should be placed in an area which is
free fro drafts and accessible for proper
operation and servicing.
•The area around the oven ust be kept clear of
co bustible aterials. A ini u of one (1)
inch fro the left or right side, three (3) inches
fro the rear and eight (8) inches fro the floor
ust be aintained between the oven and any
co bustible or non-co bustible surface.
It is also i portant not to obstruct the natural flow of
ventilation air if the oven is to operate properly. This
oven should not be installed on a curb base or sealed to
the wall. Either condition can prevent proper
ventilation of the blower otor. The blower otor has
a ther al protection device which will trip because of
excessive a bient te peratures at the side of the oven.
If the device trips continually, this condition should be
corrected i ediately to avoid da aging the oven
per anently.
Before aking any connections to the oven, check the
rating plate to be sure the oven specifications concur
with the voltage and phase to be supplied to the oven.
The rating plate and serial nu ber data are located
behind the otor access cover on the right side panel.
D. Electrical Connections
Each Duke 5/9 Half-Size Convection Oven is rated at
8.0 KW.
Your oven is supplied for connection to a 208, or 240
volt grounded circuit. The electric otor and control
circuits are powered internally and do not have a
separate power supply.
Before aking any connections to these units, check
the rating plate to assure that the voltage and phase
rating of the oven is co patible with the electrical
supply. When installing, all ovens ust be electrically
grounded in accordance with local codes or in the
absence of local codes, with the National Electrical
Code, ANSI/NFPA 70-1990 (in Canada - CSA Std.
C22.1).
Wiring diagra s are located on the inside of the otor
access panel on the right side of the oven.

4
E. Oven Assembly
Before asse bling and installing the oven, please check
to ake sure that all necessary parts are present. In
addition to the oven itself, there will also be legs, feet or
casters. (For double sections, retaining clips, flue
connector and iscellaneous hardware.) Please check
the interior of all oven sections for the parts needed to
asse ble and install your oven(s).
F. Leg Attachment
• Once the oven has been removed from the
carton, lay it on its left side (the side
ithout the controls).
• Hold the leg and align ith the matching
holes in base and leg flange. Carefully
start the 5/16-18 bolts, (avoid cross-
threading), by turning clock ise and
tighten to the nearest full turn. A total of
(12) 5/ 16-18 x 3/4 bolts, flat ashers and
lock ashers are required to secure all
legs.
• Once legs are secured, add t o (2) storage
shelves bet een the four (4) legs. Secure
these by using the 1/4-20 x 3/4 self-
threading scre s. After completion
carefully lift the oven to an upright
position.
To level the unit, raise or lower the adjustable feet as
required.
G. Caster Installation
• Casters are available as an option for
double oven sections. They are packed
inside the oven for shipment.
• To install follo same procedures as for
leg attachment. Position and secure the
casters to the four (4) insert nuts in the
base bottom.
NOTE:
They have 1/2-13 threads and will only fit
the large insert nuts in the botto . The two
locking casters should be installed on the front
legs for easy access and better stability.
H. Double Sections
The necessary short legs, storage shelves and hardware
are shipped with these sections. Follow sa e
procedures for leg attach ent as described above.
Once legs and shelves are in place and the oven is
placed in an upright position install the stacking
brackets that secure the top oven to the botto oven.
The stacking brackets ount at the rear corners of each
section. Re ove the screws fro the corner of the
oven that atches the holes in the stacking brackets.
Install the brackets with the new screws provided.
I. Adjustments Associated ith
Installation
Each oven section and all its co ponent parts have
been tested thoroughly and inspected before your oven
was shipped fro the factory. However, it is so eti es
necessary to further test or adjust the oven once it has
been installed. Such adjust ents are the responsibility
of the Dealer or Installer. These types of adjust ents
are not considered defects, rather a nor al and routine
part of the proper installation of the equip ent.
These adjust ents include but are not li ited to:
• adjustments and recalibration of the
thermostat
• adjustment to the doors, leveling
• and tightening of fasteners.
Note: No installation should be considered
co plete without proper inspection and, if
necessary, any adjust ents by qualified service
or installation personnel.

5
MAINTENANCE INSTRUCTIONS
These aintenance instructions are for the use of
qualified service personnel only. Service by other than
qualified personnel ay result in da age to the oven
and/or injury to the operator.
Qualified service personnel are those individuals, fir s,
co panies or corporations which either in person or
through an agent are engaged in and responsible for
repair or servicing of co ercial food preparation
equip ent, who are experienced in such work, fa iliar
with all precautions required, and have co plied with
all require ents of state and local authorities having
jurisdiction.
If you should require assistance in the selection of a
qualified service agency, please contact Duke
Manufacturing Co.’s Service Depart ent at 800-735-
3853.
A. Adjustments
Quite often alfunctions which are attributed to
defects ay be repaired by adjusting certain parts rather
than replacing the .
B. Door Adjustment
The door switch is located behind the lower front
cover, on the right or left side. (Fig. 1) The door switch
(A) is activated by a ca (B) which is ounted to the
door’s hinge pin with a set screw. Position the door so
it is nearly closed but not latched. To adjust the ca :
• Loosen the set scre and rotate the cam
until you hear the s itch click.
• Tighten the set scre in the cam.
• Test the door to make certain the s itch
ill make contact ith the doors closed.
• Replace the compartment cover.
Cleaning of the Oven
The stainless steel on your oven can be kept clean with a good stainless steel cleaner, an of which are on the arket.
The painted surfaces should be wiped clean regularly with a MILD detergent. Moisten a cloth and wipe down the oven
while it is COLD. Wiping down an oven while it is hot will cause streaking and otherwise unsatisfactory results. Once
the oven is clean, it can be wiped down with light oil.
Porcelain oven interiors should be cleaned regularly using a degreasing agent. For heavier deposits a co ercial oven
cleaner such as Dow Oven Cleaner, Easy-Off, or Mr. Muscle can be used. Care ust be taken to prevent these alkaline-
type cleaners fro co ing in contact with any alu inized steel surfaces in the oven, including the blower wheel.
The racks and rack supports can be re oved and soaked in a solution of a onia and water.
Make certain that all parts are thoroughly rinsed before returning to use.
NOTE: Never steam clean or hose do n ith ater. Electric component ill fail due to moisture.

6
OPERATION OF CONTROL
The ZP Convection Oven Controller is designed to
si plify your cooking process and allow your
foodservice operators to spend ore ti e with the
custo ers and other i portant responsibilities. Quality
control of your food product is assured through the
various features, notification displays and alar s
designed into the controller.
There are two ethods of baking with the ZP control:
Shelf Timer Baking
Event Baking
SHELF TIMER BAKING
The ZP Convection Oven Controller provide five
individual shelf ti ers. Shelf ti er baking allows the
user to add product to the oven as needed and set
individual ti ers for each new ite .
NOTE: You ay add si ultaneous or subsequent trays
of the sa e or different products to the oven if they
bake at the sa e te perature and fan setting. Products
which are set up for event baking will not have shelf
ti er baking available.
EVENT BAKING
The ZP Convection Oven Controller provides one-
touch control of the entire baking process by allowing
you to divide each product bake cycle into six distinct
stages or “events”. Each stage can be progra ed for
ti e, te perature, fan speed, controller-co pensated
ti e, or straight ti e countdown ode.
Using event baking with uffins, for exa ple, yields
excellent results. Here is an exa ple of a typical
controller bake cycle for an oven load of uffins, half
corn and half blueberry:
Event 1: Begin at 400•F for 5 inutes with fan on.
Event 2: After 5 inutes, when the uffin batter has
risen to the top of the cups, we’ll progra the
fan off for the next 10 inutes to allow the
uffins to rise high and evenly.
Event 3: We’ll now turn the fan back on and set oven
te perature to 375•F for the next 5 inutes,
per itting an even bake through the center of
the product.
Event 4: During the last 5 inutes of the bake cycle, we
want to set the uffin peaks and finish the
off to a golden color, so we’ll increase the
te perature to 400•F.
NOTE: When event baking is to be used, the
countdown ti e displayed is the su of all the stages.
CONTROLLER RESET
In rare situations such as a lightening strike near
the facility, the controller may lose its program or
become “locked”. To reset the controller simply
turn the po er s itch off, ait several seconds and
turn the unit back on.
Ti e progra ing Button
Te perature/Fan Speed Progra ing Button
Display
Select Button
Up/Do n Arro s
Left Function
Key
Right Function
Key

7
A. PRE HEAT AND OVEN READY MODE OF OPERATION
Oven Ready
2
•Preheat te perature has been reached and there are no recipes cooking.
•Oven keeps te perature at displayed te perature.
•Change Preheat temperature by pressing the TEMP/FAN key.
•Press SELECT to display the MANUAL RECIPE (Screen B1)
Pre Heat
1
•Displayed after power up.
•The Pre Heat Set te perature is displayed to the right of the
ther o eter.
•Current oven te perature is displayed under Pre Heat.
•To adjust Pre Heat temperature:
oPress the TEMP/FAN key while preheating to highlight the Pre
Heat te perature.
oUse the UP-and-DOWN arrow keys to change the te perature.
oPress the SELECT or SAVE key to set the Pre Heat te perature
for the next power up.

8
B. RECIPE SELECT SCREENS
Manual Cooking
1
•Fro the OVEN READY display (Screen A2), press SELECT or one
of the UP-and-DOWN arrow keys to display the MANUAL RECIPE.
•Set Cook Time by pressing the TIME key. Adjust with the UP-and-
DOWN arrow keys.
•Set Cook Temperature by pressing the TEMP/FAN key ONCE and
adjusting with the arrow keys.
•Set Fan Speed by pressing the TEMP/FAN
key TWICE and adjusting
with the arrow keys.
Recipe Select
2
•Press one of the UP or DOWN arrow keys to display RECIPE
selections.
•Scroll through the recipes using the UP-and-DOWN arrow keys.
•Edit the TIME by pressing the TIME key. Adjust with the UP-and-
DOWN arrow keys.
•Edit the TEMP by pressing TEMP/FAN. Adjust with the UP-and-
DOWN arrow keys.
•Begin Cooking by pressing SELECT to advance to the SHELF
display (See Screen B3) or pressing both the SELECT and TIME keys
for EVENT COOKING that involves a ti e sequence of te perature,
fan speeds, and stea (See Screen E1).
Shelf Select
3
•
Shelf ti ers are used to cook ite s that have the sa e cook te perature
and fan speed.
•Use the UP-and-DOWN arrow keys to select one of five shelf ti ers.
•Use SELECT to start cooking using the SHELF TIMER shown.
•Shelf ti ers are not used when cooking recipes with events.

9
C. RECIPE EDITING SCREENS
Edit Recipe Time
1
•The recipe ay be changed when it is being selected. (See Screen B2 –
RECIPE SELECT.)
•Set Cook Time
oPress the TIME key to highlight unit of ti e. Each success
ive
press of the TIME key will highlight HOURS, MINUTES or
SECONDS.
oPress the UP-and-DOWN arrow keys to adjust the ti e.
oPress SELECT to set the ti e.
•Cook Compensation – Auto atically co pensates when opening the
door to add other products to the oven. Press the COOK COMP key
(LEFT FUNCTION KEY) to enable the Cook Co pensation feature.
Edit Recipe Fan Setting
3
•The recipe ay be changed when it is being selected. (See Screen B2 –
RECIPE SELECT)
•Set Fan Speed by pressing TEMP/FAN TWICE to highlight the fan
setting which can be set as follows:
oHigh or Low – Fan runs continuously at high or low speeds.
oHigh H or Low H – Fan runs at speed shown only when
heating ele ents are on.
oHigh P or Low P – Fan is pulsed at the pulse setting. (See
Screen C4 for setting fan pulsing.)
Edit Recipe Temperature
2
•The recipe ay be changed when it is being selected. (See Screen B2 –
RECIPE SELECT.)
•Set Cook Temperature
oPress TEMP/FAN to highlight the te perature.
oPress the UP-and-DOWN arrow keys to adjust the
te perature.
oPress SELECT to set the te perature.

10
C. RECIPE EDITING SCREENS (CONTINUED
)
Set Fan Pulse Time
4
•When the Low P or High P fan speed is selected, the screen to the right
is shown. The ON TIME is the ti e that the fan will run. The OFF
TIME is the ti e the fan will stop. Whenever the heating ele ents turn
on the fan turns on to the set speed.
•Set Fan ON TIME using the UP-and-DOWN arrow keys.
•Set Fan OFF TIME using the UP-and-DOWN arrow keys.
•Press TEMP/FAN to exit the screen.
Pulse Fan
On Off
Cycle 1 0:00 0:00
Save
Exit
Edit Recipe Name
5
•The recipe may be changed when it is being selected. (See
Screen B2 – RECIPE SELECT.)
•Set Recipe Name – Press both TEMP/FAN and the TIME
keys
together to highlight the recipe name.
•Use the UP-and-DOWN arrow keys to change the character.
•Press SELECT to move the cursor to the left.
•Press both TEMP/FAN and TIME keys together TWICE to exit
the RECIPE NAME screen.
Select Recipe Picture Display
6
•Enter this display fro EDIT RECIPE NAME display (Screen C5
above) by pressing both TIME/FAN and TEMP keys.
•Use the UP-and-DOWN arrow keys to change the picture.
•To use default settings, SELECT the “X” picture.

11
B.
COOKING DISPLAYS
Cooking in Progress
1
•While cooking is in progress the screen to the right is shown on the
display. If several shelf ti ers are running, the next product to be
re oved is shown.
•Cancel Cook – Press the CANCEL key (LEFT FUNCTION KEY).
•Other Products Cooking Display – The REVIEW key (RIGHT
FUNCTION KEY) scrolls through the status of the other shelf ti ers.
•If no products are cooking on the shelf the screen will show NOT
RUNNING.
Cooking Done
2
•When SHELF COOKING is co pleted, the screen to the right is
displayed. The sounder indicates the product is done.
•Press the SILENCE (LEFT FUNCTION KEY) to stop the sound.
•Press the +1 MIN (RIGHT FUNCTION KEY) or the UP arrow key
to add cooking ti e.
•Press SELECT to restart the cooking.
•The display shows the screen to the right when cooking is done.
•Add Cooking Ti e – Press the RIGHT FUNCTION KEY
labeled +1
in to increase the ti e to cook.
•The UP-and-DOWN arrow keys can also be used to adjust the add
cook ti e.

12
E. EVENTS
Events – Cooking Complete
2
•When EVENT COOKING is co pleted, the screen to the right is
displayed. The sounder indicates the product is done.
•Press the SILENCE (LEFT FUNCTION KEY) to stop the sound.
•Press the +1 MIN (RIGHT FUNCTION KEY) or the UP arrow key
to add cooking ti e.
•Press SELECT to restart the cooking.
Editing Events
1
•Events are a ti e sequence of te perature, fan speeds and stea .
•Enter the EVENT SCREEN fro the RECIPE SELECT SCREEN
(Screen B2) by pressing both SELECT and TIME keys.
•Use the UP-and-DOWN arrow keys to change highlighted nu ber.
•Press SELECT to save the highlighted nu ber and advance to the next
nu ber.
•When events are running an “e” is displayed in the picture.
EVENTS
EV TIME TMP FAN STM
1 0:00 350 Hi 0
2 0:00 350 Hi 0
3 0:00 350 Hi 0
4 0:00 350 Hi 0
5 0:00 350 Hi 0
Save Exit

13
F. OTHER SCREENS
Call for Service
2
When the OVEN READY display is shown (Screen A2), press CALL
NUMBER (LEFT FUNCTION KEY) to display the nu ber to call for
service help.
Door Open
1
•The display at right appears any ti e the door is open.
•Cool Do n – Press the COOL DOWN key (RIGHT FUNCTION
KEY) to turn the fan to high, cooling down the oven.
•Te perature is displayed during cool down.

14
Change Temperature Units
•Enter the MENU screen by pressing both the
TIME and Right Function Keys.
•Use the UP and Down Arrows to select Item 5
(Change to °C).
•Press the SELECT key to change temperature
units to degrees Celsius. Subsequent presses
of the SELECT key will toggle between degrees
Celsius and degrees Fahrenheit.
•Press the EXIT Function Key to save the setting
and exit the MENU screen.
Changing to Lock Mode
(Note: This function is useful to keep employees from
accidentally changing settings).
•Simultaneously press TEMP/FAN + TIME + Left
Functions keys to enter the "Lock" mode.
•When the "Lock" mode is active, a "Locked"
icon is displayed on the right side of the Recipe
Screen title bar and recipe values cannot be
changed.
•To exit the "Lock" mode, simultaneously press
the Temp/Fan + Time + Left Function keys.
This will result in an "Unlocked Lock" icon
displayed on the right side of the Recipe Screen
title bar and the ability to edit recipes will now be
provided.
•Simultaneously pressing Temp/Fan + Time +
Left Function keys will return the control to the
"Locked" condition.
•Note: The Lock Mode can also be changed
from the MENU Screen.
MENU
1-Set Temp Offset
2-Calibrate Probes
3-Change to Timer
4-Change to Serial
5-Change to °C
6-Change to Lock
EXIT
Recipe01
Bread St
Time 0:07:00
Temp 425°F
Fan Hi
Exit
Lock Mode
Symbol

15
COOK & HOLD/ROAST & HOLD RECOMMENDED TIMES & TEMPERATURES
PRODUCT
QTY
COOK
TEMP
HOLD
TEMP
COOK TIME
HOLD TIME
MINIMUM
TOTAL TIME
PRIME RIB 1 3 HRS. 1 HR. 4 HRS.
BONE IN 200°F 140°F
CAP OFF 3 3-1/4 HRS. 1-1/2 HRS. 4-3/4 HRS.
14 - 18 LBS. 93°C 60°C
(6.4 - 8.1 KG)
PRIME RIB 1 3-1/2 HRS. 1 HR. 4-1/2 HRS.
BONE IN 200°F 140°F
CAP ON 3 4 HRS. 1-1/2 HRS. 5-1/2 HRS.
18 - 22 LBS. 93°C 60°C
(8.1 - 10 KG)
TOP OR 1 3-1/2 HRS. 1 HR. 4-1/2 HRS.
BOTTOM 200°F 140°F
ROUNDS 3 4 HRS. 1-1/2 HRS. 5-1/2 HRS.
10 - 12 LBS. 93°C 60°C
(4.5 - 5.4 KG)
PORK ROAST 2 4 HRS. 1 HR. 5 HRS.
OR HAM 250°F 170°F
10 - 12 LBS. 4 4-1/4 HRS. 1-1/2 HRS. 5-3/4 HRS.
(4.5 - 5.4 KG) 121°C 76°C
TURKEY 1 250°F 170°F 3-3/4 HRS. 1 HR. 4-3/4 HRS.
20 - 22 LBS.
(9.1 - 10 KG) 121°C 76°C
LEG OF LAMB 2 2-1/2 HRS. 1 HRS. 3-1/2 HRS.
BONE IN 225°F 160°F
8 - 10 LBS. 4 2-3/4 HRS. 1-1/2 HRS. 4-1/4 HRS.
107°C 71°C

16
COOK & HOLD/ROAST & HOLD RECOMMENDED TIMES & TEMPERATURES
PRODUCT °F °C COOK TIME RACKS YOUR
TEMP
YOUR
TIME
BEEF HAMBURGER PATTIES (3.3 OZ.) 400 205 8 - 10 MIN. 5
MEATLOAF 325 165 40 - 45 MIN. 2 OR 3
STEAMSHIP ROUND (80 LBS. QUART) 275 135 2-3/4 HR. 1
ROLLED BEEF ROAST (12 - 15 LBS.) 275 135 2-1/2 HR. 2 OR 3
STANDING RIB ROAST (20 LBS. RARE) 235 115 2-3/4 HR. 1
SHELL STEAKS (10 OZ.) 450 234 7 - 8 MIN. 4 OR 5
POT PIES 400 205 30 - 35 MIN. 4 OR 5
STUFFED PEPPERS 350 175 15 - 20 MIN. 2 OR 3
LASAGNA 260 125 90 MIN. 2 OR 3
HOT DOGS 325 165 10 - 15 MIN. 5
PORK BAKED, STUFFED PORK CHOPS 375 190 25-30 MIN. 5
VEAL
BONED VEAL ROAST (15 LBS.) 300 150 3 HRS. 10 MIN. 1 OR 2
LAMB LAMB CHOPS 400 205 7-8 MIN. 4 OR 5
BACON 400 205 5-7 MIN. 5
POULTRY CHICKEN BREASTS & THIGHS 350 175 40 MIN. 4 OR 5
CHICKEN BACKS & WINGS 350 175 35 MIN. 4 OR 5
CHICKEN, QUARTERED 350 175 30 MIN. 4 OR 5
TURKEY ROLL (18 LB.) 310 155 3-3/4 HRS. 2
POT PIES 400 205 30-35 MIN. 5
FISH FISH STICKS 335 170 16-18 MIN. 5
SEAFOOD COD, HALIBUT (FROZEN) 350 175 20 MIN. 5
SHRIMP, BAKED STUFFED 400 205 6-7 MIN. 5
LOBSTER, BAKED STUFFED 400 205 10 MIN. 2 OR 3
LOBSTER TAILS (FROZEN) 425 220 9 MIN. 5
CHEESE MACARONI & CHEESE CASSEROLE 350 175 30 MIN. 5
CHEESE SANDWICHES, GRILLED 400 205 8 MIN. 5
POTATOES POTATOES, BAKED (120 COUNT) 400 205 50 MIN. 5
POTATOES, SLICED OR DICED 325 165 10 MIN. 5
FRENCH FRIES (FROZEN) TIMES & TEMPS WILL VARY AS TO CUT
PIES FROZEN BERRY PIES (36 - 22 OZ. EA.) 325 150 35 MIN. 5
FROZEN FRUIT PIES (24 - 46 OZ. EA.) 325 150 45-50 MIN. 5
FRESH APPLE PIE (36 - 20 OZ. EA.) 350 175 25-30 MIN. 5
PUMPKIN PIE 300 150 30-50 MIN. 5
FRUIT CRISP 300 150 25 MIN. 5
FRUIT COBBLER 300 150 30 MIN. 5
APPLE TURNOVERS
350 175 15 MIN. 5
BREADS BREAD (32 - 1 LB. LOAVES) 325 160 30 MIN. 2 OR 3
CORN BREAD (NORTHERN) 325 160 25 MIN. 3 TO 5
CORN BREAD (SOUTHERN) 375 190 15-20 MIN. 3 TO 5
HAMBURGER ROLLS 275 125 15 MIN. 5
YEAST ROLLS
300 140 25 MIN. 5
BISCUITS 400 205 6 MIN. 5
ROLLS, BROWN & SERVE 350 175 15 MIN. 5
CAKES SHEET CAKES (5 LBS. BATTER PER PAN) 325 160 16-18 MIN. 5
COOKIES CHOCOLATE CAKE 325 160 20 MIN. 5
BROWNIES 325 150 15 MIN. 5
DANISH PASTRY 325 160 12 MIN. 5
CINNAMON BUNS 325 160 20 MIN. 5
SUGAR COOKIES 275 125 15 MIN. 5
CREAM PUFFS 325 160 20-25 MIN. 5
CHOCOLATE CHIP COOKIES 325 160 10 MIN. 5
PEANUT BUTTER COOKIES 300 150 10 MIN. 5
NOTE: Your times and temperatures may vary from those sho n on this chart. Your results depend on
eight per pan, temperature of the product
before loading, the recipe, type of pan, and calibration of the thermostat. If your recipes vary from these, rite in your proven times and
temperatures for your future use.

17
Repair Parts List
Part # Description
153036 Motor, 208/240v, 2-speed, 1/2 HP
153210 Ter inal block
153156 Contactor, 208/240v, 3-pole, 50 a p
155077 Ele ent, inner, 240v, 2.667 KW
155078 Ele ent, center, 240v, 2.667 KW
155079 Ele ent, outer, 240v, 2.667 KW
155074 Ele ent, inner, 208v, 2.667 KW
155075 Ele ent, center, 208v, 2.667 KW
155076 Ele ent, outer, 208v, 2.667 KW
153093 Blower wheel
155132 Door glass
153056 Bearing, door
155404 Door handle
148077 Door icro switch
153200 Fuse holder
153201 Fuse, 10 a p, ti e delay
155006 Gasket, door botto
155007 Gasket, door top
155008 Gasket, door side (2 required)
155197 Baffle, fan
155115 Screws, thu b
155113 Support rack, oven
155114 Rack, oven
155107 Actuator, door
155406 Door, with glass hinged right
155454 Door, with glass hinged left
153416 Catch, door
153801 Latch, roller asse bly
154379 Probe, te perature
156841 Control, Oven , ZP
156949 Board, Relay, Z
512289 Switch, ON/OFF
153368 Blower asse bly, electric, 2-speed
153156 Contactor, 3 pole, 50 a p, 208/240 volt
155749 Transfor er, 208/240 volt
600100 Kit, Flue Guard (Optional)
155125 Bracket, Stacking

18
FLUE GUARD
1.) On rear of top oven remove two existing
screws that are located at the lower right
hand corner.
2.) On rear of bottom oven remove two
existing screws that are located at the
upper right hand corner.
3.) Install stacking bracket using the
existing screws as shown in figure.
4.) Repeat steps to install 2
nd
stacking
bracket on left hand side.
Securing
Double Stacked Ovens

19
5/9 “ZP” Wiring Sche atic 208/240 VAC

Other manuals for 59 Series
1
Table of contents
Other Duke Oven manuals