Duramaxx D40B2 User manual

2900112/ 2900212/ 2900312
(D40B2/D40B4/D40UC)
EN
40V LITHIUM-ION RECHARGEABLE BATTERY&CHARGER 2
DE
40V LITHIUM-IONEN AKKU UND LADEGERÄT 7
ES
40V ION LITIO BATTERY*CHARGER RECARGABLE 13
IT
BATTERIA RICARICABILE DA 40V AGLI IONI DI LITIO E CARICATORE 18
FR
BATTERIE RECHARGEABLE 40V LITHIUM-ION& CHARGEUR 23
PT
BATERIA LÍTIO-IÃO DE 40V RECARREGÁVEL E CARREGADOR 28
NL
40V LITHIUM-ION HERLAADBARE ACCU & OPLADER 33
RU
38
FI
40 V LADATTAVA LITIUMIONIAKKU JA LATURI 45
SV
40 V LITIUMJON UPPLADDNINGSBART BATTERI MED LADDARE 50
NO
40 V LITIUM-ION OPPLADBAR BATTERI OG LADER 55
DA
40V LITHIUM-ION GENOPLADELIGT BATTERI& OPLADER 60
PL
65
CS
71
SK
76
SL
40-V LITIJ-IONSKA BATERIJA ZA PONOVNO POLNJENJE IN POLNILNIK 81
HR
86
HU
91
RO
96
BG
101
EL
107
AR
40 113
TR
117
HE
40 122
LT
126
LV
131
ET
LIITIUM-IOONAKU40 V JA LAADIJA 136

2
English (Original Instructions)
EN DE ES IT FR PT NL RU FI SV NO DA PL CS SK SL HR HU RO BG EL AR TR HE LT LV ET
BATTERY
SPECIFICATIONS
D40B2
Battery: 36V 2.0AH, 72Wh, 40V MAX
Voltage per cell: 3.6V ; Number of cells: 10
Charge time: 60 min. (use D40UC Charger)
D40B4
Battery: 36V 4.0AH, 144Wh, 40V MAX
Voltage per cell: 3.6V ; Number of cells: 20
Charge time: 120 min. (use D40UC Charger)
For the proper use, maintenance and storage
of this battery, it is crucially important that you
read and understand the instructions given in
this manual.
To avoid serious injury, risk of fire, explosion
and danger of electric shock or electrocution:
If the battery pack case is cracked or
damaged, DO NOT insert into the charger.
Replace with a new battery pack.
DO NOT charge these battery packs with
any other type of charger.
DO NOT try to short circuit any terminals
of battery pack.
WARNING
rinse immediately with clean water for
at least 15 minutes. Get immediate
medical attention. Do not charge the
battery pack in rain or in wet conditions.
Do not immerse the tool, battery pack,
or charger in water or other liquid.
Do not allow the battery pack or charger
to overheat. If they are warm, allow them
to cool down. Recharge only at room
temperature.
Do not place the battery pack in the sun
or in a warm environment. Keep at normal
room temperature.
Keep in shady, cool and dry condition, if
the battery is not charged for a long time;
charge the battery for 2 hours every 2
months.
The battery pack cells may develop a small
leak under extreme usage or temperature
conditions. If the outer seal is broken and
the leakage gets on your skin:
– Use soap and water to wash
immediately.
– Neutralize with lemon juice, vinegar, or
other mild acid.
If leakage gets in your eyes, follow
instructions above and seek medical
attention.
Please check prior use, if output voltage
and current of the battery charger is
suitable for the charging battery pack.
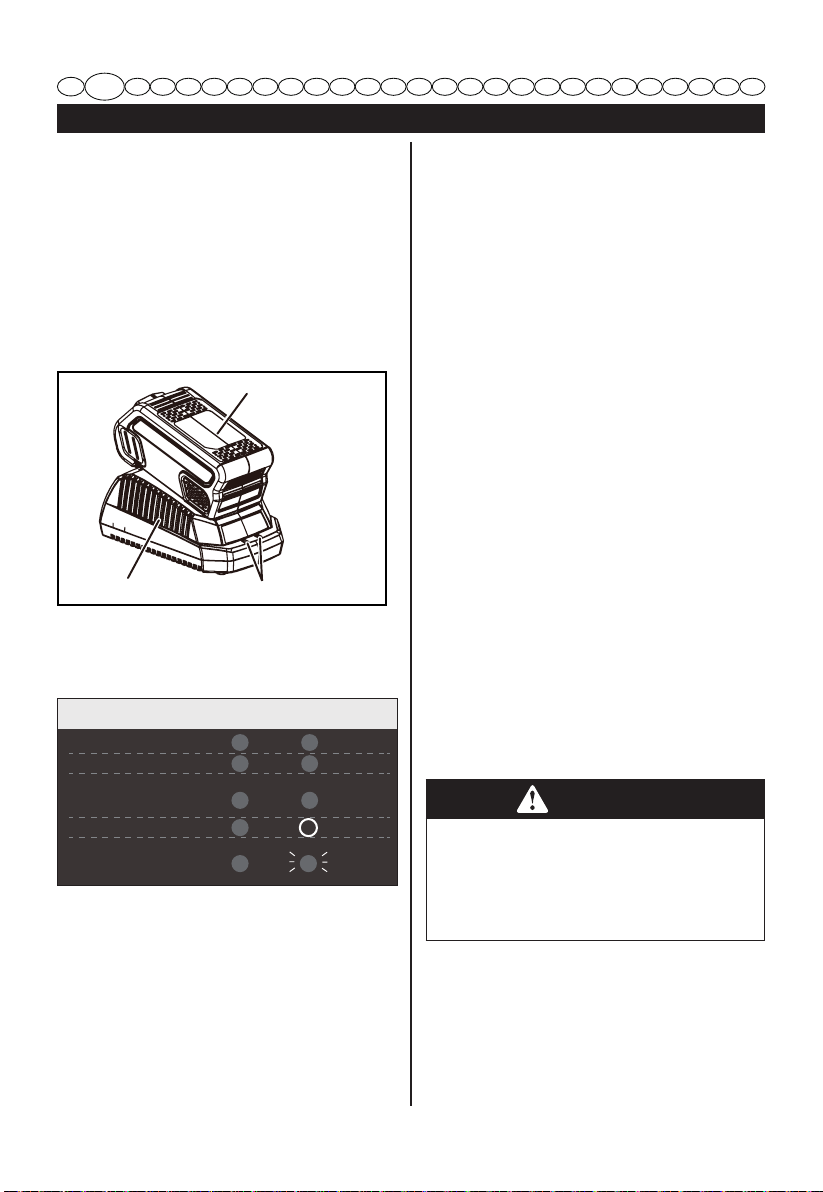
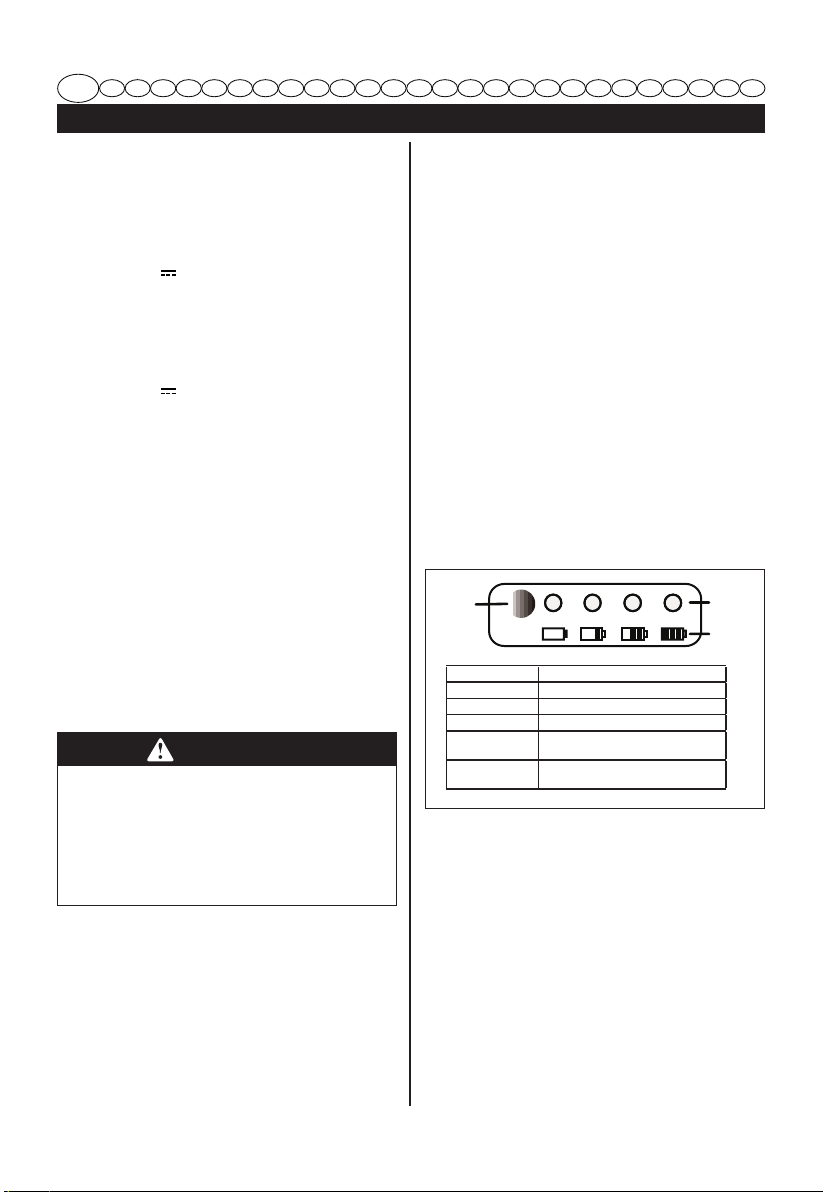
CHECKING BATTERY CAPACITY
Press the battery capacity indicator (BCI)
button. The lights will illuminate according to
the batteries capacity level. See chart below:
BCI
BUTTON
LIGHT
METRE
BATTERY
METRE
Lights Capacity
4 Green Lights The battery is at full capacity
3 Green Lights The battery is at 70% capacity
2 Green Lights The battery is at 45% capacity
1 Green Light The battery is at 10% capacity and
requires charging soon
Lights go out The battery is under 10% capacity and
requires charging immediately
SAFETY NOTES AND PRECAUTIONS
1. Do not disassemble the battery.
2. Keep away from the children.
3. Do not expose the battery to water or salt
water, battery should be stored in a cool
and dry location and should place the
battery in cool and dry environment.
4. Do not place the battery in high-temperature
5. Do not reverse the positive terminal and
the negative terminal of the battery.
6. Do not connect the positive terminal and
the negative terminal of the battery to each

3
English (Original Instructions)
EN DE ES IT FR PT NL RU FI SV NO DA PL CS SK SL HR HU RO BG EL AR TR HE LT LV ET
other with any metal objects.
7. Do not knock, strike or step on the battery.
8. Do not solder directly onto the battery and
pierce the battery with nails or other edge
tools.
9. In the event that the battery leaks and the
eye. Rinse well with water. Immediately
discontinue use of the battery, if, while
using the battery emits an unusual smell,
feels hot, changes color, changes shape,
or appears abnormal in any other way.
BATTERY CHARGER
SPECIFICATIONS
40V Charger: D40UC
Input: 100-240V 50-60Hz, 1.9A Max
Output: 40V 2.2A
DO NOT probe the charger with conductive
materials.
DO NOT allow liquid inside the charger.
DO NOT try to use the charger for any
other purpose than what is presented in
this manual.
Unplug the charger before cleaning and
when there is no battery pack in the
charger.
Do not try to connect two chargers
together.
Do notusethe chargerin thecircumstances
that the output Polarity does not match the
load polarity.
For indoor use only.
The cover may under no circumstances
be opened. If the cover is damaged, then
the charger may no longer be used.
Do not recharge non-rechargeable
batteries.
WARNING
electrocution:
Do not use a damp cloth or detergent on
the battery or battery charger.
Always remove the battery pack before
cleaning, inspecting, or performing any
maintenance on the tool.
CLEANING
Wipe the outside of the charger with a dry,
soft cloth. Do not hose down or wash with
water.
Class II
For indoor use only
Before charging, read the
instructions
T3.15A Fuse

4
English (Original Instructions)
EN DE ES IT FR PT NL RU FI SV NO DA PL CS SK SL HR HU RO BG EL AR TR HE LT LV ET
WARNING
If the battery pack cracks or breaks, with
or without leaks, do not recharge it and do
not use. Dispose of it and replace with a
new battery pack. DO NOT ATTEMPT TO
REPAIR IT!
or electric shock, and to avoid damage to
the environment:
Cover the battery's terminals with heavy-
duty adhesive tape.
DO NOT attempt to remove or destroy
any of the battery pack components.
DO NOT attempt to open the battery
pack.
WARNING
If a leak develops, the released
electrolytes are corrosive and toxic. DO
NOT get the solution in the eyes or on
skin, and do not swallow it.
DO NOT place these batteries in your
regular household trash.
DO NOT incinerate.
DO NOT place them where they will
municipal solid waste stream.
disposal centre.
CHARGING PROCEDURE
NOTE: The battery is not shipped fully
charged. It is recommended to fully charge
before use to ensure that maximum run time
can be achieved. This lithium-ion battery will
not develop a memory and may be charged
at any time.
1. Plug the charger into an AC power outlet.
2. Insert the battery pack (1) into the charger
(2).
WARNING
This appliance can be used by
children aged from 8 years and above
and persons with reduced physical,
sensory or mental capabilities or lack of
experience and knowledge if they have
been given supervision or instruction
concerning use of the appliance in a
safe way and understand the hazards
involved.
Children shall not play with the appliance.
Cleaning and user maintenance
should not be made by children without
supervision.
If the supply cord is damaged,it must
be replaced by manufacturer, its service
order to aviod a hazard.
Do not cover the ventilation slots on the
top of the charger. Do not set the charger
on a soft surface i.e. blanket, pillow. Keep
the ventilation slots of the charger clear.
Do not allow small metal items or
material such as steel wool, aluminum
foil, or other foreign particles into the
charger cavity.
Use only D40B2/D40B4 rechargeable Li-
ion batteries.
ENVIRONMENTALLY SAFE BATTERY
DISPOSAL
WARNING
All toxic materials must be disposed of in a
of the environment. Before disposing of
damaged or worn out Lithium-ion battery
packs, contact your local waste disposal
agency, or the local Environmental
Protection Agency for information and
a local recycling and/or disposal centre,

5
English (Original Instructions)
EN DE ES IT FR PT NL RU FI SV NO DA PL CS SK SL HR HU RO BG EL AR TR HE LT LV ET
3
1
2
This is a diagnostic charger. The Charger
to communicate the current battery status.
They are as follows:
CHARGING PROCEDURE (LED INDICATOR)
BATTERY IS CHARGING:
FULLY CHARGED:
BATTERY IS TOO WARM:
(REMOVE FOR APPROX. 30
MINUTES TO ALLOW TO COOL)
DEFECTIVE BATTERY:
(REMOVE AND REPLACE WITH
NEW BATTERY IF THIS OCCURS)
NO BATTERY PRESENT
GREEN
ORANGE
OFF
RED
RED RED
RED
RED
RED RED
BLINKING
False Defect Note:
When the battery is inserted into the charger,
battery from the charger for 1 minute, then
reinsert. If the status LED indicates normal
than the battery pack is good. If the status
LED is still blinking, remove the battery pack
and unplug the charger. Wait 1 minute and
plug the charger back in and reinsert the
battery pack. If the status LED indicates
normal than the battery pack is good. If the
status LED is still blinking then the battery
pack is defective and needs to be replaced.
NOTE: When the red indictor ickers, pull out
the battery from the charger and insert again
within 2 hours. If the indictor shows charging,
that means the battery is good. After 2 hours,
please pull out the battery and also pull
out the AC power plug of the charger for 1
miniute, and then insert the AC power plug
and the battery again. If the indictor shows
charging, that means the battery is good. If
not, the battery needs to be changed.
CHECKING THE CHARGER
If the battery pack does not charge properly:
Check the current at the power outlet with
another tool. Make sure that the outlet is
not turned off.
Check that the charger contacts have not
been shorted by debris or foreign material.
If the surrounding air temperature is not
normal room temperature, move the
charger and battery pack to a location
WARNING
If the battery is inserted into the charger
when warm or hot, the CHARGING LED
indicator light on the charger may switch
on and illuminate ORANGE. If this occurs
allow the battery to cool outside of the
charger for approximately 30 minutes.
CHARGER MOUNTING
1. This charger can be installed hanging on a
wall using two screws (not supplied)
2. Locate the placement for the charger to be
wall mounted.
3. If fastening to wood studs use 2 wood
screws.
4. Drill two holes 2 3/8” (6 cm) on center
ensuring they are level.
5. If fastening to drywall use wall anchors and
screws to secure the charger to the wall.
NOTE: If the battery and the charger won’t
be used for a long time, please remove the
battery from the charger and pull out the AC

6
English (Original Instructions)
EN DE ES IT FR PT NL RU FI SV NO DA PL CS SK SL HR HU RO BG EL AR TR HE LT LV ET
power plug.
DETACHABLE POWER CORD
The power cords of the charger are
detachable. They can be removed from the
charger and used interchangeably. (See the
①②
③
④IMPORTANT SAFETY INSTRUCTIONS
1. SAVE THESE INSTRUCTIONS -
DANGER: TO REDUCE RISK OF FIRE
OR ELECTRIC SHOCK CAREFULLY
FOLLOW THESE INSTRUCTIONS.
2. Confirm the voltage available at each
country location before using the charger.
3. If the shape of the plug does not fit the
power outlet, use an attachment plug
adaptor of the proper configuration for the
power outlet.
CORRECT DISPOSAL OF THIS PRODUCT:
This marking indicates that this product should
not be disposed with other household wastes
throughout the EU. To prevent possible
harm to the environment or human health
from uncontrolled waste disposal, recycle it
responsibly to promote the sustainable reuse
of material resources. To return your used
device, please use the return and collection
systems or contact the retailer where the
product was purchased. They can take this
product for environmental safe recycling.
REMOVAL OF WASTE BATTERIES AND
ACCUMULATORS
Li-ion
Member States shall ensure that
manufacturers design appliances in such a
way that waste batteries and accumulators
can be readily removed. Where they cannot
be readily removed by the end-user. Member
States shall ensure that manufacturers design
appliances in such a way that waste batteries
and accumulators can be readily removed by
of the manufacturer. Appliances in which
batteries and accumulators are incorporated
shall be accompanied by instructions on
how those batteries and accumulators can
be safely removed by either the end-user
Where appropriate, the instructions shall also
inform the end-user of the types of battery or
accumulator incorporated into the appliance.

Deutsch(Übersetzung der originalen Anleitungen)
EN DE ES IT FR PT NL RU FI SV NO DA PL CS SK SL HR HU RO BG EL AR TR HE LT LV ET
7
AKKU
TECHNISCHE DATEN
D40B2
Akku: 36V 2,0Ah, 72Wh, 40V Maxi
Spannung pro Zelle: 3,6V ;
Anzahl der Zellen: 10
Ladezeit: 60 Min. (Benutzen Sie Ladegerät
D40UC)
D40B4
Akku: 36V 4,0Ah, 144Wh, 40V Maxi
Spannung pro Zelle: 3,6V ;
Anzahl der Zellen: 20
Ladezeit: 120 Min. (Benutzen Sie Ladegerät
D40UC)
Für ordnungsgemäße Benutzung und
Lagerung dieses Akkus ist es von
entscheidender Wichtigkeit, dass Sie die
Anweisungen in dieser Bedienungsanleitung
lesen und verstehen.
Zur Vermeidung schwerer Verletzungen,
Feuer, Explosionen und Stromschlag:
Stecken Sie den Akkupack NICHT in
das Ladegerät, wenn er gerissen oder
beschädigt ist. Mit einem neuen Akkupack
ersetzen.
Laden Sie diese Akkus NICHT mit einem
anderen Ladegerät.
Versuchen Sie NICHT die Kontakte des
Akkupacks kurz zu schließen.
WARNUNG
gerät, spülen Sie sofort mit sauberem
Wasser für mindestens 15 Minuten.
Suchen Sie sofort medizinische Hilfe auf.
Laden Sie den Akkupack nicht im Regen
oder in nasser Umgebung. Tauchen Sie
das Werkzeug, den Akkupack oder das
Ladegerät nicht in Wasser oder eine
andere Flüssigkeit.
Lassen Sie den Akkupack oder das
Ladegerät nicht überhitzen. Wenn Sie
warm sind, lassen Sie sie abkühlen. Nur
bei Zimmertemperatur aufladen.
Setzen Sie den Akkupack nicht der Sonne
oder warmer Umgebung aus. Bei normaler
Zimmertemperatur halten.
Schattig, kühl und trocken halten, wenn
der Akku für lange Zeit nicht benutzt wird;
laden Sie den Akku alle 2 Monate für 2
Stunden.
Die Zellen des Akkupacks können bei
extremer Benutzung oder Temperaturen
kleine Lecks entwickeln. Wenn die äußere
Hülle beschädigt ist und die Flüssigkeit auf
Ihre Haut gerät:
– Waschen Sie sofort mit Seife und
Wasser.
– Mit Zitronensaft, Essig oder
einer anderen schwachen Säure
neutralisieren.
Wenn die Flüssigkeit in Ihre Augen
gelangt, befolgen Sie die oben genannten
Anweisungen und suchen Sie
medizinische Hilfe auf.
Überprüfen Sie bitte vor der Benutzung,
ob Ausgangsspannung und Strom
des Ladegerätes zum Aufladen des
Akkupacks geeignet sind.
ÜBERPRÜFEN DER AKKUKAPAZITÄT
Drücken Sie die Taste für die Akkuanzeige
(BCI). Die Lampen leuchten gemäß dem
Ladezustand des Akkus auf. Siehe Tabelle:
BCI
TASTE
LEUCHTA-
-NZEIGE
AKKUANZEIGE
Lampen Kapazität
4 grüne Lampen Der Akku ist vollgeladen
3 grüne Lampen Der Akku ist zu 70% geladen
2 grüne Lampen Der Akku ist zu 45% geladen
1 grüne Lampe Der Akku ist zu 10% geladen und muss
bald neu aufgeladen werden
Lampen leuchten
nicht
Der Akku ist unter 10% geladen und
muss sofort aufgeladen werden
SICHERHEITSHINWEISE UND
VORSICHTSMASSNAHMEN
1. Zerlegen Sie den Akku nicht.
2. Von Kindern fernhalten.
3. Setzen Sie den Akku nicht Wasser oder

Deutsch(Übersetzung der originalen Anleitungen)
EN DE ES IT FR PT NL RU FI SV NO DA PL CS SK SL HR HU RO BG EL AR TR HE LT LV ET
8
Salzwasser aus, der Akku sollte an einem
kühlen und trockenen Ort aufbewahrt
werden.
4. Setzen Sie den Akku keinen hohen
Temperaturen aus, wie in der Nähe von
Feuer, Heizkörpern usw.
5. Vertauschen Sie nicht den positiven und
negativen Anschluss des Akkus.
6. Verbinden Sie den positiven und den
negativen Anschluss des Akkus nicht mit
einem Metallgegenstand.
7. Stoßen oder schlagen Sie den Akku nicht,
oder stellen sich darauf.
8. Löten Sie nichts an den Akku oder
durchbohren den Akku mit Nägeln oder
anderem spitzen Werkzeug.
9. Reiben Sie nicht das Auge, falls der Akku
undicht ist und Flüssigkeit in Ihr Auge
gelangt ist. Gut mit Wasser spülen. Hören
Sie sofort mit der Benutzung des Akkus
auf, wenn der Akku bei der Benutzung
ungewöhnlich riecht, heiß wird, Farbe
oder Form ändert oder auf eine andere Art
ungewöhnlich aussieht.
AKKU-LADEGERÄT
TECHNISCHE DATEN
40V Ladegerät: D40UC
Eingang: 100-240V 50-60Hz, 1,9A Maxi
Ausgang: 40V 2,2A
Stecken Sie KEINE elektrisch leitenden
Materialien in das Ladegerät.
Lassen Sie KEINE Flüssigkeit in das
Ladegerät eindringen.
Benutzen Sie das Ladegerät NICHT
für andere Aufgaben, als die in dieser
Bedienungsanleitung genannten.
Ziehen Sie den Netzstecker des
Ladegerätes, bevor Sie es reinigen,
und wenn sich kein Akkupack in dem
Ladegerät befindet.
Versuchen Sie nicht zwei Ladegeräte zu
verbinden.
Benutzen Sie das Ladegerät nicht,
wenn die Ausgangspolarität nicht zu der
Spannungs-Polarität passt.
Nur für den Innengebrauch.
Die Abdeckung darf unter keinen
Umständen geöffnet werden. Wenn
die Abdeckung beschädigt ist, darf das
Ladegerät nicht weiter benutzt werden.
Nicht zum Aufladen von nicht-aufladbaren
Batterien.
WARNUNG
Zur Vermeidung von Feuer oder
Stromschlag:
• Wenden Sie kein feuchtes Tuch oder
Reinigungsmittel an dem Akku oder
Ladegerät an.
• Entfernen Sie vor dem Reinigen,
Überprüfen oder Warten des Werkzeugs
immer den Akku.
REINIGUNG
mit einem weichen, trockenen Tuch ab. Nicht
abspritzen oder mit Wasser waschen.
Klasse II
Nur für den Innengebrauch.
die Bedienungsanleitung.
T3.15A Sicherung

Deutsch(Übersetzung der originalen Anleitungen)
EN DE ES IT FR PT NL RU FI SV NO DA PL CS SK SL HR HU RO BG EL AR TR HE LT LV ET
9
WARNUNG
Alle giftigen Materialien müssen
auf eine bestimmte Weise entsorgt
werden, um Umweltverschmutzung
zu verhindern. Befragen Sie Sie Ihre
örtliche Abfallentsorgungsbehörde oder
Umweltschutzbehörde zu besonderen
Anweisungen, bevor Sie beschädigte
oder verbrauchte Akkupacks entsorgen.
Bringen Sie die Akkus zu dem
örtlichen Recyclingcenter und/oder
Entsorgungscenter, das zur Entsorgung
WARNUNG
Wenn der Akkupack reißt oder zerbricht,
mit oder ohne Leckage, laden Sie ihn nicht
auf und benutzen ihn nicht. Entsorgen
Sie ihn und ersetzen ihn mit einem neuen
Akkupack. VERSUCHEN SIE NICHT IHN
ZU REPARIEREN!
Zur Vermeidung von Feuer, Explosion
oder Stromschlag und Umweltschäden:
• Decken Sie die Kontakte des Akkus mit
dickem Klebeband ab.
• Versuchen Sie NICHT Teile des
Akkupacks zu entfernen oder zu
zerstören.
• Versuchen Sie NICHT den Akkupack zu
öffnen.
WARNUNG
• Wenn ein Leck auftritt, können die
austretenden Elektrolyte ätzend und
giftig sein. Lassen Sie die Lösung
NICHT in Ihre Augen oder auf Ihre Haut
gelangen und schlucken Sie sie nicht.
• Geben Sie diese Akkus NICHT in den
normalen Haushaltsabfall.
• NICHT verbrennen.
• NICHT dort platzieren, wo sie in eine
Mülldeponie oder die Entsorgung von
Haushaltsabfall gelangen können.
• Bringen Sie sie zu einem zugelassenen
Recycling- oder Entsorgungscenter.
WARNUNG
Dieses Gerät darf von Kindern ab 8
Jahren und Personen mit verminderten
physischen, sensorischen oder geistigen
Fähigkeiten oder fehlender Erfahrung
und Wissen benutzt werden, wenn sie
beaufsichtigt werden oder über die sichere
Benutzung aufgeklärt wurden und die
damit verbundenen Gefahren verstehen.
• Kinder dürfen nicht mit dem Gerät
spielen.
• Reinigung und Wartung sollte nicht von
unbeaufsichtigten Kindern durchgeführt
werden.
• Falls das Stromkabel beschädigt
ist, muss es zur Vermeidung einer
Gefährdung durch den Hersteller,
dessen Kundendienst oder ähnlich
werden.
• Decken Sie die Ventilationsschlitze auf
der Oberseite des Ladegerätes nicht ab..
Stellen Sie das Ladegerät nicht auf einen
weichen Untergrund, z.B. Decke, Kissen.
Halten Sie die Ventilationsschlitze des
Ladegerätes frei.
• Lassen Sie keine kleine Metallteile
oder Materialien wie Stahlwolle,
Aluminiumfolie oder andere
Fremdkörper in das Gehäuse des
Ladegerätes gelangen.
• Benutzen Sie nur D40B2/D40B4 Li-
Ionen Akkus.
UMWELTGERECHTE ENTSORGUNG
DER AKKUS

Deutsch(Übersetzung der originalen Anleitungen)
EN DE ES IT FR PT NL RU FI SV NO DA PL CS SK SL HR HU RO BG EL AR TR HE LT LV ET
10
LADEVORGANG
HINWEIS: Der Akku wird nicht vollgeladen
verschickt. Es wird empfohlen den Akku
vor der Benutzung voll aufzuladen, um die
maximale Laufzeit zu erreichen. Dieser
Lithium-Ionen Akku entwickelt keinen
Memory-Effekt und kann jederzeit aufgeladen
werden.
1. Stecken Sie das Ladegerät in eine
Wechselstrom-Steckdose
2. Legen Sie den Akkupack (1) in das
Ladegerät (2).
3
1
2
Das ist ein Diagnose-Ladegerät. Die LED
Lampen des Ladegerätes (3) leuchten in
einer bestimmten Reihenfolge auf, um den
aktuellen Akkuzustand anzuzeigen. Sie sind
wie folgt:
LADEVORGANG (LED ANZEIGE)
AKKU LÄDT AUF:
VOLL AUFGELADEN
AKKU IST ZU WARM:
DEFEKTER AKKU:
KEIN AKKU EINGELEGT
ROT
ROT
ROT
ROT
ROT
(ENTFERNEN UND UNGEFÄHR 30
MINUTEN ABKÜHLEN LASSEN)
(ENTFERNEN UND MIT
NEUEM AKKU ERSETZEN)
ROT
AUS
ROT
BLINKEN
GRÜN
ORANGE
Falsche Defektanzeige:
Wenn der Akku in das Ladegerät eingelegt
wird und die LED blinkt, entfernen Sie
den Akku für ungefähr 1 Minute aus dem
Ladegerät und legen ihn dann wieder ein.
Wenn die LED den Normalzustand anzeigt ist
der Akku in Ordnung. Wenn die LED immer
noch blinkt, entfernen Sie den Akkupack und
ziehen den Netzstecker des Ladegerätes.
Warten Sie 1 Minute und schließen das
Ladegerät wieder an und legen den Akku ein.
Wenn die LED den Normalzustand anzeigt ist
der Akku in Ordnung. Wenn die LED immer
noch blinkt, ist der Akkupack defekt und muss
ersetzt werden.
HINWEIS: Wenn die rote Anzeige ackert,
nehmen Sie den Akku aus dem Ladegerät
und legen ihn innerhalb von 2 Stunden wieder
ein. Wenn die Anzeige den Ladevorgang
anzeigt, ist der Akku in Ordnung. Nehmen Sie
nach 2 Stunden bitte den Akku heraus und
ziehen den Netzstecker für 1 Minute, legen
Sie dann den Akku wieder ein und schließen
das Ladegerät an das Stromnetz an. Wenn
die Anzeige den Ladevorgang anzeigt, ist der
Akku in Ordnung. Wenn nicht, muss der Akku
gewechselt werden.
ÜBERPRÜFEN DES LADEGERÄTES
• Überprüfen Sie den Strom der Steckdose
mit einem anderen Werkzeug. Stellen
Sie sicher, dass die Steckdose nicht
ausgeschaltet ist.
• Überprüfen Sie, dass die Ladekontakte
nicht durch Schmutz oder Fremdkörper
kurzgeschlossen sind.
• Wenn die Umgebungstemperatur nicht die
normale Zimmertemperatur ist, bringen
Sie das Ladegerät und den Akkupack an
WARNUNG
Wenn der warme oder heiße Akku in das
Ladegerät eingelegt wird, leuchtet die
LADEN LED an dem Ladegerät ORANGE.
Wenn das passiert, lassen Sie den Akku
ohne das Ladegerät für ungefähr 30
Minuten abkühlen.
BEFESTIGUNG DES LADEGERÄTES
1. Dieses Ladegerät kann mit zwei Schrauben
(nicht mitgeliefert) an eine Wand montiert
werden
2. Legen Sie den Ort für die Montage des
Ladegerätes fest.

Deutsch(Übersetzung der originalen Anleitungen)
EN DE ES IT FR PT NL RU FI SV NO DA PL CS SK SL HR HU RO BG EL AR TR HE LT LV ET
11
3. Benutzen Sie 2 Holzschrauben, wenn sie
es an Holz befestigen.
4. Bohren Sie zwei 6 cm Löcher in die Mitte
und stellen sicher, dass sie waagerecht
sind.
5. Benutzen Sie bei Montage an einer
Trockenwand Maueranker und Schrauben
zum Befestigen des Ladegerätes an die
Wand.
6.
HINWEIS: Wenn der Akku und das Ladegerät
für lange Zeit nicht benutzt werden, entfernen
Sie bitte den Akku von dem Ladegerät und
ziehen den Netzstecker.
ABNEHMBARES NETZKABEL
Die Netzkabel des Ladegerätes sind
abnehmbar. Sie können von dem Ladegerät
entfernt und abwechselnd benutzt werden.
(siehe Abbildungen unten)
①②③④WICHTIGE SICHERHEITSANWEISUNGEN
1. HEBEN SIE DIESE ANWEISUNGEN
AUF - GEFAHR: BEFOLGEN SIE DIESE
ANWEISUNGEN SORGFÄLTIG, UM
DIE GEFAHR VON FEUER ODER
STROMSCHLAG ZU VERRINGERN.
2. Bestätigen Sie in jedem Land die
verfügbare Spannung, bevor Sie das
Ladegerät benutzen.
3. Wenn die Form des Steckers nicht in
den Stromanschluss passt, benutzen
Sie einen passenden Adapter für den
Stromanschluss.
Richtige Entsorgung Dieses Produktes:
Diese Kennzeichnung zeigt an, dass dieses
Produkt in der gesamten EU nicht zusammen
mit dem Haushaltsmüll entsorgt werden
darf. Um eine mögliche Schädigung der
Umwelt oder der menschlichen Gesundheit
durch unkontrollierte Entsorgung zu
vermeiden, recyceln Sie es verantwortlich
um eine nachhaltige Wiederverwendung
von Rohstoffen zu unterstützen. Um dieses
Gerät zurückzugeben, nutzen Sie bitte das
Rückgabe und Sammelsystem oder wenden
Sie sich an den Händler, bei dem Sie das
Produkt erworben haben. Der kann das
Produkt für ein umweltfreundliches Recycling
entgegennehmen.
Entfernen Von Batterien Und Akkus Zur
Entsorgung
Li-ion
Mitgliedsstaaten stellensicher, dassHersteller
Geräte so entwickeln, dass Batterien und
Akkus einfach zur Entsorgung entfernt
werden können. Wo sie nicht einfach von dem
Endkunden entfernt werden können, stellen
Mitgliedsstaaten sicher, dass Hersteller
Geräte so entwickeln, dass Batterien und
die unabhängig von dem Hersteller sind, zur
Entsorgung entfernt werden können. Geräte,
die Batterien und Akkus enthalten, werden
mit Anweisungen zur sicheren Entfernung
von Batterien und Akkus durch den

Deutsch(Übersetzung der originalen Anleitungen)
EN DE ES IT FR PT NL RU FI SV NO DA PL CS SK SL HR HU RO BG EL AR TR HE LT LV ET
12
begleitet. Gegebenenfalls informieren die
Anweisungen den Endverbraucher über die
Art der in dem Gerät enthaltenen Batterien
oder Akkus.

Español(Traducción de las instrucciones originales)
EN DE ES IT FR PT NL RU FI SV NO DA PL CS SK SL HR HU RO BG EL AR TR HE LT LV ET
13
BATERÍA
SPECYFIKACJE
D40B2
Batería: 36V 2.0Ah, 72Wh, 40V Máx.
Voltaje por célula: 3.6V ; Número de células: 10
Tiempo de precio: 60 minuto.
(use D40UC Cargador)
D40B4
Batería: 36V 4.0AH, 144Wh, 40V Máx.
Voltaje por célula: 3.6V ; Número de células: 20
Tiempo de precio: 120 minuto.
(use D40UC Cargador)
Para un uso, mantenimiento y
almacenamiento adecuados de la batería,
es sumamente importante que lea y entienda
las instrucciones incluidas en este manual.
Para evitar lesiones graves, riesgo de
incendio, explosión y peligro de descarga
eléctrica o electrocución:
Si el caso batería está roto o dañado, no
introduzca en el cargador. Reemplazar
con una batería nueva.
NO cargue las baterías con cualquier otro
tipo de cargador.
NO intente cortocircuitar los terminales de
la batería.
ADVERTENCIA
Si el líquido de la batería entra
en contacto con sus ojos, lávelos
inmediatamente con agua limpia durante
al menos 15 minutos. Busque atención
médica inmediata. No cargue la batería
a la lluvia o en condici nes húmedas.
No sumerja el instrumento, la atería o el
cargador en agua u otro líquido.
No permita que la batería o el cargador
se sobrecalienten. Si están calientes,
deje que se enfríen. Recargue sólo a
temperatura ambiente.
No coloque la batería al sol o en
un ambiente cálido. Manténgalos a
temperatura ambiente normal.
Mantener alejada de la luz directa, en un
lugar fresco y seco. Si la batería no se
ha cargado durante un periodo largo de
tiempo, cargue la batería durante 2 horas
cada 2 meses.
Lascélulasde labatería puedendesarrollar
una pequeña fuga en condiciones
extremas de uso o de temperatura. Si la
junta exterior se rompe y la fuga entra en
contacto con la piel.
– Lávela de inmediato con agua y jabón.
– Neutralícela con zumo de limón,
vinagre u otro ácido suave.
Si una fuga de la batería entra en contacto
con sus ojos, siga las instrucciones
anteriores y busque atención médica.
Antes de usarlo, compruebe si la tensión
de salida y la corriente del cargador de la
batería son adecuadas para la batería de
carga.
COMPROBACIÓN DE LA PILA
Pulse el indicador de capacidad de la batería
(BCI). Las luces se encenderán según el
nivel de capacidad de las baterías. Consulte
la siguiente tabla:
Luces Capacidad
4 luces verdes La batería está a plena capacidad
3 luces verdes La batería está al 70% de su capacidad
2 luces verdes La batería está al 45% de su capacidad
1 luz verde La batería está al 10% de su capacidad y
será necesario cargarla pronto
Las luces se
apagar
La batería está por debajo del 10% de
su capacidad y es necesario cargarla
inmediatamente
BOTÓN
BCI
MEDIDA
DE LUZ
MEDIDAELA
BATERÍA
NOTAS Y PRECAUCIONES DE
SEGURIDAD
1. No desmonte la batería.
2. Mantenga la herramienta alejada de los
niños.
3. No exponga la batería al agua, dulce o
salada. La batería debe guardarse en un

Español(Traducción de las instrucciones originales)
EN DE ES IT FR PT NL RU FI SV NO DA PL CS SK SL HR HU RO BG EL AR TR HE LT LV ET
14
lugar fresco y seco y debe colocarse en un
entorno fresco y seco.
4. No coloque la batería en lugares con altas
temperaturas, como cerca de un fuego,
radiador, etc.
5. No invierta el terminal positivo y el terminal
negativo de la batería.
6. No conecte los terminales positivo y
negativo de la batería con objetos de metal.
7. No golpee ni pise la batería.
8. No realice soldaduras directamente en la
batería ni perfore la batería con clavos u
otras herramientas de corte.
9. En caso de que la batería presente fugas
y el líquido entre en el ojo, no se frote
los ojos. Enjuágue los bien con agua.
Suspenda inmediatamente el uso de la
batería si, durante el uso, la batería emite
un olor raro, se calienta, cambia de color,
cambia de forma o presenta cualquier otra
anomalía.
CARGADOR DE BATERÍA
ESPECIFICACIONES
40V cargador: D40UC
Entrada: 100-240V 50-60Hz, 1.9A Máx.
Salida:40V 2.2A
NO pruebe el cargador con materiales
conductores.
NO permita que entre líquido en el interior
del cargador.
NO intente usar el cargador para cualquier
propósito que no sea el presentado en
este manual.
Desenchufe el cargador antes de limpiarlo
y cuando no esté instalada la batería en
el cargador.
No intente conectar dos cargadores
juntos.
No utilice el cargador en circunstancias en
las que la polaridad de salida no coincida
con la polaridad de carga.
Sólo para uso en el interior.
La cubierta no debe abrirse bajo ninguna
circunstancia. Si la cubierta se daña, el
cargador no debe volver a utilizarse.
No intente recargar baterías recargables.
ADVERTENCIA
Para evitar riesgos de incendio, shock
eléctrico o electrocución:
No utilice tejidos humedos ni detergentes
que puedan entrar en contacto con la
bateria o con el cargador.
Retire siempre la bateria antes de
limpiar, inspeccionar o efectuar cualquier
operación de mantenimiento en la
herramienta.
LIMPIEZA
Limpie el exterior del cargador con un paño
mangueras
Clase II
Para uso de interior sólo
Antes del cobro, lea la
instrucción.
Fusible
T3.15A

Español(Traducción de las instrucciones originales)
EN DE ES IT FR PT NL RU FI SV NO DA PL CS SK SL HR HU RO BG EL AR TR HE LT LV ET
15
ADVERTENCIA
Si la batería se agrieta o se rompe, con
o sin escapes, no la recargue ni la utilice.
Deséchela y sustitúyala por una batería
nueva. ¡NO INTENTE REPARARLA!
Para evitar lesiones y riesgos de incendio,
explosión o shock eléctrico, así como
dañar el medio ambiente:
• Cubra los terminales de la cubierta de la
batería con cinta adhesiva resistente.
• NO intente retirar ni destruir componentes
de la batería.
• NO intente abrir la batería.
ADVERTENCIA
• Si aparece una grieta, los electrolitos que
se liberan son corrosivos y tóxicos. NO
permita que la
solución entre en contacto con los ojos o
la piel y no la ingiera.
• NO tire estas baterías a la basura.
• NO las incinere.
• NO las ponga donde puedan acabar en
el basurero o en una línea de tratamiento
de residuos
municipal.
recogida de desechos.
PROCEDIMIENTO DE CARGA
NOTA: La batería no se envía completamente
cargada. Se recomienda cargarla
completamente antes de usarla por primera
vez para garantizar que se pueda obtener
el máximo tiempo de funcionamiento. Esta
batería de ión de litio no desarrolla memoria
y se le puede cargar en cualquier momento.
1. Enchufe el cargador en un tomacorriente
de CA.
2. Coloque el paquete de baterías (1) en el
cargador (2).
ADVERTENCIA
Este aparato puede ser utilizado por niños
de 8 años o más y por personas con
discapacidad física, sensorial o mental
o falta de experiencia y conocimiento, si
se les ha supervisado o instruido acerca
del uso del aparato de manera segura y
comprenden los riesgos implicados.
· Los niños no deben jugar con el aparato.
· Los niños no deben realizar la limpieza y
mantenimiento de usuario sin supervisión.
· Si el cable de alimentación está dañado,
deberá ser reemplazado por el fabricante,
su agente de servicio o por personal
de peligro.
· Recargue sólo a temperatura ambiente.
· No cubra las ranuras de ventilación de la
parte superior del cargador. No coloque el
ejemplo, manta o almohada. Mantenga las
rejillas de ventilación del cargador libres
de obstáculos.
· Use solamente baterías recargables de
ion-litio D40B2/D40B4.
ELIMINACIÓN SEGURA DE LA BATERÍA
ADVERTENCIA
Todos los materiales tóxicos deben ser
evitar contaminar el medio ambiente.
Antes de desechar una batería de litio-
ión estropeada o gastada, póngase en
contacto con el organismo encargado
del tratamiento de residuos más
próximo o con su agencia de protección
medioambiental para informarse y
Recicle las baterías en un centro o
dispositivo adecuado, autorizado para el
tratamiento de ión-litio.

Español(Traducción de las instrucciones originales)
EN DE ES IT FR PT NL RU FI SV NO DA PL CS SK SL HR HU RO BG EL AR TR HE LT LV ET
16
3
1
2
Este es un cargador con diagnóstico. Las
lámparas LED (3) del cargador se iluminan
indicar el estado actual de la batería. Ellos
son los siguientes.
LA BATERÍA SE ESTÁ
CARGANDO: ROJO
ROJO
ROJO
ROJO
ROJO
ROJO
VERDE
ANARANJADO
APAGADO.
VERDE
PARPADEANDO
COMPLETAMENTE CARGADA:
NO HAY BATERÍA PRESENTE:
LA BATERÍA ESTÁ MUY CALIENTE
MINUTOS PARA PERMITIR QUE SE
ENFRÍE:
BATERÍA DEFECTUOSA:
(SI ESTO PASA QUÍTELA Y
REEMPLÁCE LA POR UNANUEVA)
PROCEDIMIENTO
(
PARA CARGAR
)
Nota de defecto falso:
Cuando la batería esté insertada en el
cargador yel LEDde estado parpadee,retire la
batería del cargador durante 1 minuto y luego
vuelva a insertarla. Si el LED de estado i ndica
normal, la batería está en correcto estado. Si
el LED de estado sigue parpadeando, retire
la batería y desenchufe el cargador. Espere
1 minuto, vuelva a enchufar el cargador de
nuevo y, a continuación, reinserte la batería.
Si el LED de estado indica normal, la batería
está en correcto estado. Si el LED de estado
es defectuosa y necesita reemplazarse.
NOTA: Cuando el indicador rojo parpadee,
saque la batería del cargador e vuelva a
insertarla en el plazo de 2 horas. Si el indicador
indica que se está cargando, signica que la
batería está en correcto estado. Después
de 2 horas, retire la batería y desconecte el
enchufe de alimentación de CA del cargador
durante 1 minuto. A continuación, vuelva a
insertar el enchufe de alimentación de CA y
la batería. Si el indicador indica que se está
cargando, signica que la batería está en
correcto estado. Si no, la batería necesita
reemplazarse.
COMPROBACIÓN DE LA CARGA
Si la batería no se recarga adecuadamente:
· Compruebe la corriente de la toma con otro
aparato electrico. Asegúrese de que la toma
está encendida.
· Compruebe que no haya residuos ni
conexiones del cargador.
· Si la temeperatura ambiental no es una
temperatura normal, lleve el cargador y la
batería a unlugar con una temperatura de
entre 7ºC y 40ºC.
ADVERTENCIA
Si se inserta la batería en el cargador
estando caliente, se enciende la luz LED
del indicador de CARGA del cargador
y se pone NARANJA. Si esto sucede,
deje enfriar la batería fuera del cargador
durante aproximadamente 30 minutos.
MONTAJE DEL CARGADOR
1. Este cargador se puede instalar en una
pared atornillándolo con dos tornillos (no
incluidos).
2. Localice el lugar en el que quiere co lgar
el cargador.
3. Si la pared es de madera, utilice dos
tornillos especiales para madera.
4. Perfore dos agujeros a unos 6 cm del
centro asegurándose de que están al
mismo nivel.
5. Si la pared es de yeso, utilice anclajes y
tornillos especiales para colgarlo.

Español(Traducción de las instrucciones originales)
EN DE ES IT FR PT NL RU FI SV NO DA PL CS SK SL HR HU RO BG EL AR TR HE LT LV ET
17
NOTA : Si no va a utilizar la batería y el
cargador durante un periodo largo de tiempo,
retire la batería del cargador y desenchufe el
cable de alimentación de CA.
CABLE DE ALIMENTACIÓN
DESMONTABLE
Los cables de alimentación del cargador
son desmontables. Se pueden remover del
cargador y utilizar indistintamente. (Véase la
figura abajo)
①②③④INSTRUCCIONES DE SEGURIDAD
IMPORTANTES
1. GUARDE ESTAS INSTRUCCIONES
- PELIGRO PARA REDUCIR EL
RIESGO DE INCENDIO O DESCARGA
ELÉCTRICA, SIGA ATENTAMENTE
ESTAS INSTRUCCIONES.
2. Compruebe el voltaje disponible en cada
país antes de usar el cargador.
3. Si la forma del enchufe no encaja en la
toma de corriente, utilice un adaptador con
corriente.
:
Esta marca indica que este producto no
debería ser dispuesto con otras basuras
de la casa en todas partes de la Unión
Europea. Para prevenir el daño posible al
ambiente o salud humana de la eliminación
de desperdicios incontrolada, recíclelo con
responsabilidad para promover la reutilización
sostenible de recursos materiales. Para
devolver su dispositivo usado, por favor
use los sistemas de colección y vuelta o
póngase en contacto con el detallista donde
el producto fue comprado. Ellos pueden
tomar este producto para el reciclaje seguro
ambiental.
ELIMINACIÓN DE BATERÍAS Y
ACUMULADORES USADOS
Li-ion
Los Estados miembros se asegurarán que
los fabricantes diseñarán aparatos, de tal
manera que los residuos de baterías y
acumuladores se pueden eliminar fácilmente.
Cuando no se pueden eliminar fácilmente
se asegurarán que los fabricantes diseñarán
aparatos, de tal manera que los residuos de
baterías y acumuladores se pueden eliminar
que son independientes de los fabricantes.
Aparatos en los que se incorporan baterías
y acumuladores deberán ir acompañados de
instrucciones sobre cómo estas baterías y
acumuladores se pueden eliminar de manera
En su caso, las instrucciones también
batería o acumulador incorporado en el
aparato.

Italiano(Traduzione dalle istruzioni originali)
EN DE ES IT FR PT NL RU FI SV NO DA PL CS SK SL HR HU RO BG EL AR TR HE LT LV ET
18
BATTERIA
SPECIFICHE
D40B2
Batteria:36V 2.0AH, 72Wh, 40V Massimo
Voltaggio per cella: 3.6V ; Numero di celle: 10
Tempo di carica: 60 min.
(utilizzare un caricatore D40UC)
D40B4
Batteria: 36V 4.0AH, 144Wh, 40V Massimo
Voltaggio per cella: 3.6V ; Numero di celle: 20
Tempo di carica: 120 min.
(utilizzare un caricatore D40UC)
Per un corretto utilizzo, manutenzione
e riponimento della batteria, leggere e
comprendere tutte le istruzioni nel presente
manuale.
Per evitare lesioni gravi, rischi d'incendio,
esplosioni e pericolo di gravi scosse
elettriche:
Se la scatola del gruppo batterie è
rotta o danneggiata, NON inserire nel
caricatore. Sostituire con un nuovo
gruppo batterie.
NON caricare questi gruppi batteria con
un altro tipo di caricatore.
NON cercare di cortocircuitare i terminali
del gruppo batterie.
AVVERTENZE
Se il liquido della batteria entra neglio
occhi, lavarsi immediatamente con
acqua pulita per almeno 15 minuti.
Rivolgersi immediatamente a un medico.
Non ricaricare il gruppo batterie sotto
la pioggia o in condizioni umide. Non
immergere l'utensile, il gruppo batterie o
il caricatore in acqua o in altri liquidi.
Non permettere che il gruppo batterie
o il caricatore si surriscaldino. Se sono
caldi, lasciarli raffreddare. Ricaricare
solo a temperatura ambiente.
Non posizionare il gruppo batterie sotto
la luce diretta del sole o in un ambiente
caldo. Tenere sempre a temperatura
ambiente.
Se la batteria non verrà caricata per
un lungo periodo di tempo, conservarla
sempre all'ombra, al fresco e in luoghi
asciutti; charicare la batteria per 2 ore
ogni 2 mesi.
Le celle del gruppo batteria potranno
sviluppare piccole perdite se utilizzate
troppo o a temperature estreme. Se il
sigillo esterno si rompe e il liquido entra
in contatto con la pelle:
– Lavarsi immediatamente con acqua e
sapone.
– Neutralizzare con succo di limone,
aceto o altri acidi medi.
Se il liquido entra in contatto con gli
occhi, seguire le istruzioni di cui sopra e
rivolgersi a un medico.
Prima dell'utilizzo controllare che il
voltaggio in uscita e la corrente del
caricatore della batteria siano adatti per
caricare il gruppo batterie.
CONTROLLARE LA CAPACITÀ DELLA
BATTERIA
Premere il tasto indicatore di capacità
batteria (BCI - battery capacity indicator).
Le luci si accenderanno a seconda del
livello di capacità della batteria. Vedere lo
schema seguente:
Luci Kapazität
4 luci verdi La batteria è stata completamente
3 luci verdi La batteria è stata ricaricata al 70%
2 luci verdi La batteria è stata ricaricata al 45%
1 luce verde La batteria è stata ricaricata al 10% e
richiede nuova carica
Le luci si
spengono
La batteria ha una carica inferiore al
10% e richiede di essere ricaricata
immediatamente
TASTO
SEGNAL-
ATORE
BATTERIA
MISURA-
ZIONE
MISURA-
ZIONE
CARICA
BATTERIA
NOTE DI SICUREZZA E PRECAUZIONI
1.Non smontare la batteria.
2.Tenere lontano dai bambini.

Italiano(Traduzione dalle istruzioni originali)
EN DE ES IT FR PT NL RU FI SV NO DA PL CS SK SL HR HU RO BG EL AR TR HE LT LV ET
19
3.Non esporre la batteria all'acqua o
all'acqua salata, riporla in un luogo e in
un ambiente fresco e asciutto.
4.Non posizionare la batteria in luoghi
troppo caldi, come accanto a un fuoco o
a un radiatore, ecc.
5.Non invertire i terminali negativo e
positivo della batteria.
6.Non collegare il terminale positivo e
quello negativo della batteria con altri
oggetti metallici.
7.Non colpire, far cadere, nè camminare
sulla batteria.
8.Non svolgere operazioni di saldatura
sulla batteria, nè perforarla con chiodi o
con altri oggetti appuntiti.
9.Nel caso in cui la batteria perda liquidi
che entrano in contatto con gli occhi, non
di utilizzare la batteria e se la batteria
emette odori inusuali, si surriscalda,
cambia colore o forma e ha un aspetto
anormale, smettere di utilizzarla.
CARICATORE BATTERIA
SPECIFICHE
Caricatore da 40V: D40UC
Entrata: 100-240V 50-60Hz, 1.9A Massimo
Uscita: 40V 2.2A
NON sondare il caricatore con materiale
conduttivo.
Non lasciare che del liquido penetri
all'interno del caricatore.
NON tentare di utilizzare il caricatore
per scopi diversi da quelli indicati nel
presente manuale.
Scollegare il caricatore prima di pulirlo o
quando non c'è alcun gruppo batterie al
suo interno.
Non cercare di collegare assieme due
caricatori.
Non utilizzare il caricatore in circostanze
in cui la polarità in uscita non sia pari a
quella di carica.
Solo per uso in interni.
Non aprire in alcuna circostanza il
coperchio. Se il coperchio è danneggiato,
il caricatore potrà rompersi e non essere
più utilizzato.
Non ricaricare le batterie non ricaricabili.
AVVERTENZE
Per evitare rischi d'incendio, o scosse e
scariche elettriche:
· Non passare panni umidi o detergenti
sulla batteria o sul caricatore della
batteria.
· Rimuovere sempre il gruppo batterie
prima di pulire, ispezionare o svolgere le
operazioni di manutenzione sull'utensile.
PULIZIA
Pulire l'esterno del caricatore con un panno
eventuali pompe nè pulire con acqua.
Classe II
Solo per uso interno.
Prima di caricare leggere le
istruzioni
Fusibile
T3.15A

Italiano(Traduzione dalle istruzioni originali)
EN DE ES IT FR PT NL RU FI SV NO DA PL CS SK SL HR HU RO BG EL AR TR HE LT LV ET
20
AVVERTENZE
Se il gruppo batterie si rompe o cade,
con o senza perdita di liquidi, non
ricaricarlo e non utilizzarlo. Smaltirlo e
sostituirlo con un nuovo gruppo batterie.
NON TENTARE DI RIPARARLO!
Per evitare lesioni e rischi d'incendio,
esplosioni o scosse elettriche ed evitare
di arrecare danni all'ambiente:
· Coprire i terminali della batteria con
nastro adesivo resistente.
· NON tentare di rimuovere o distruggere
i componenti del gruppo batterie.
· NON tentare di aprire il gruppo batterie.
AVVERTENZE
·Gli elettroliti rilasciati da eventuali
perdite di liquidi del gruppo batterie sono
corrosivi e tossici. Fare in modo che il
liquido NON entri in contatto con occhi o
pelle e non ingerirlo.
· Non posizionare le batterie nella
spazzatura domestica.
· NON bruciare.
· NON posizionare le batterie in luoghi
dove potranno diventare parte di una
· Portarle presso un centro riciclaggio
autorizzato.
PROCEDURA DI CARICA
NOTE: La batteria non viene inviata
completamente carica. Si raccomanda di
caricarla prima dell'utilizzo per assicurarsi
che si raggiunga il massimo tempo di carica.
La batteria agli ioni di litio non svilupperà
una memoria e può essere ricaricata in un
qualsiasi momento.
1. Collegare il caricatore a una presa AC.
2. Inserire il gruppo batterie (1) nel
caricatore (2).
AVVERTENZE
Questo dispositivo può essere utilizzato
da bambini dagli 8 anni in su e da persone
mentali o senza la necessaria esperienza
e conoscenza purchè abbiano ricevuto
le dovute istruzioni riguardanti l'utilizzo
del dispositivo in modo sicuro e abbiano
compreso i rischi impliciti
·I bambini non devono giocare con il
dispositivo.
·Le operazioni di manutenzione e pulizia
non dovranno essere svolte da bambini
non supervisionati.
· Se il cavo dell'alimentazione è
danneggiato dovrà essere sostituito dalla
ditta produttrice, da un suo rappresentante
autorizzato o da persona ugualmente
· Non coprire le griglie di ventilazione
sulla parte superiore del caricatore. Non
morbida come una coperta o un cuscino.
Tenere le griglie di ventilazione pulite.
· Non lasciare che piccoli oggetti in
metallo o materiali come lana d'acciaio,
fogli d'alluminio o altre particelle estranee
entrino nelle cavità del caricatore.
· Utilizzare solo batterie ricaricabili agli ioni
di litio D40B2/D40B4.
SMALTIMENTO ECO-COMPATIBILE
DELLA BATTERIA
AVVERTENZE
Tutti i materiali tossici dovranno essere
smaltiti in maniera adeguata per
prevenire la contaminazione ambientale.
Prima di smaltire gruppi batterie agli
ioni di litio danneggiati o rotti, contattare
l'agenzia locale per lo smaltimento
dell'Ambiente locale per eventuali
Portare le batterie presso un centro di
la gestione di materiali agli ioni di litio.
This manual suits for next models
5
Table of contents
Languages:
Popular Batteries Charger manuals by other brands

Opticon
Opticon CHG-3101 quick start guide

ChargePoint
ChargePoint CPF50 installation guide

Eaton
Eaton SKYCHARGE user manual

PowerTraveller
PowerTraveller POWERMONKEY EXPLORER instructions

Polaroid
Polaroid PLCHUNIK instructions

Applied Energy Solutions
Applied Energy Solutions Maverick Installation and operating instructions