Duronic VC7020 User manual

Creative
Consumer
Products
VC7020 Vacuum Cleaner

2

3
Features and Specications
Safety Instructions
Assembling the vacuum cleaner
How to use
Using the Attachments
Cleaning and Maintenance
Emptying the dust container
Cleaning the lters
Warranty
4
5
7
7
8
9
9
11
12
Contents

4
1
2
3
4
5
6 7 8 9 10
11
12
13 14
1. Floor brush
2. Telescopic tube
3. Flexi hose
4. Hose connector
5. Dust container handle
6. Dust container
7. Dust container release button
8. Speed/power control dial
9. Power button
10. 2-in-1 Handle & Cable rewind button
11. 2nd HEPA Air lter
12. Back wheels
13. 2-in-1 tool
14. Turbo brush
Features and Specications
Model Power Voltage Rating Unit Size Unit Weight
VC7020 700W 220-240V, 50/60Hz

5
This appliance is for indoor/household use only. Do not use outdoors.
This appliance is not intended for use by persons (including children) with
reduced physical, sensory or mental capabilities, or lack of experience and
knowledge, unless they have been given supervision or instruction
concerning use of the appliance by a person responsible for their safety.
Children should be closely supervised at all times to ensure that they do not play
with the appliance.
Do not operate this appliance if the power cable or plug is damaged. If either is
damaged return it to Duronic for service or repair by professional technician.
Please ensure the mains power supply is 220-240V / 50Hz
Never try to replace the parts and repair the unit by yourself.
Do not use this vacuum cleaner outside or on wet surfaces.
Do not use any attachments or parts that are not manufacturer approved.
Always carry the vacuum with the carry handle. Do not carry by the hose or the
power cable.
Do not unplug the vacuum by pulling on the power cable. To unplug, simply grip
the plug and pull.
Do not handle the plug or vacuum cleaner with wet hands.
Do not immerse any part of the vacuum cleaner into water or any other liquids.
Always ensure there are no blocked or obstructed openings that restrict air ow.
Keep hair, loose clothing, ngers and all body parts away from air vents and
openings.
Do not obstruct the air vents/lters.
Safety Instructions

6
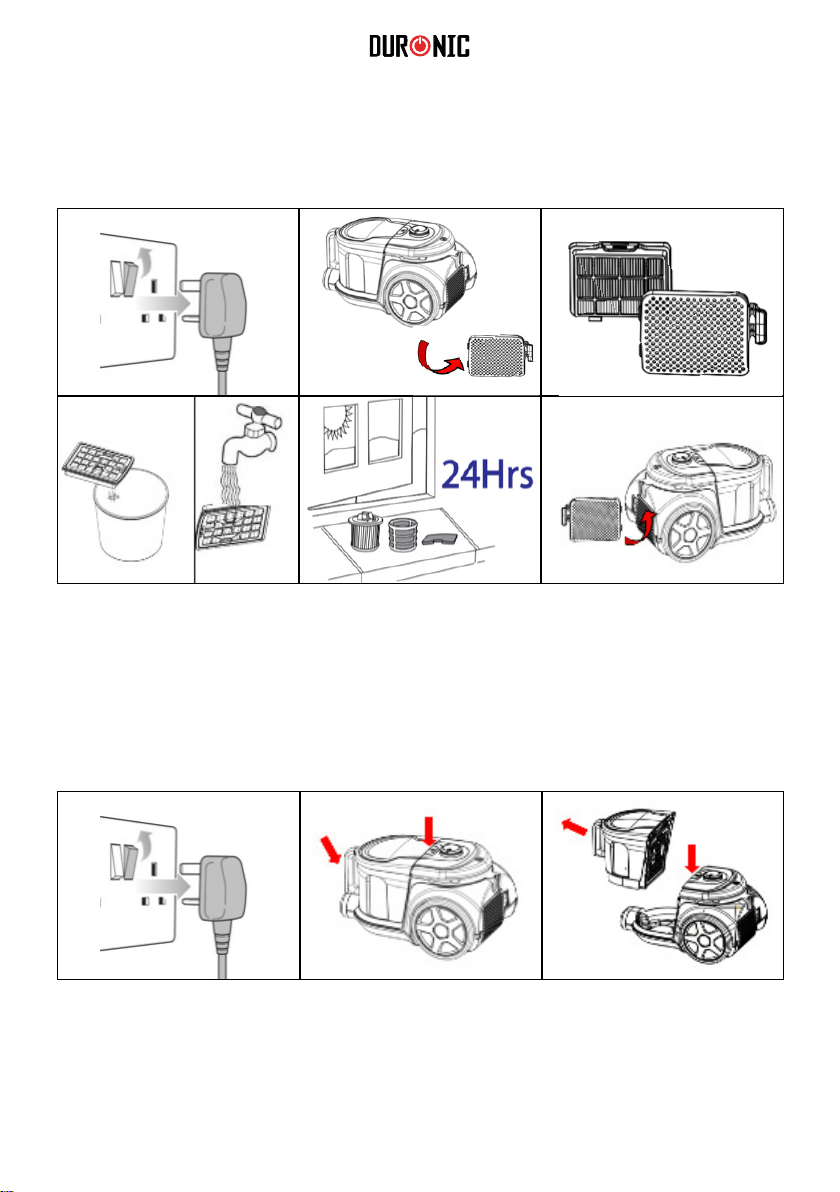
The VC7020 is a bagless vacuum cleaner which has two HEPA lters and
one sponge lter. These lters are crucial to the vacuum’s performance so we
recommend that the user ensures they are cleaned at least once a month.
This will ensure that the vacuum performs at an optimal level of suction and
cleaning power. For more guidance on cleaning and maintenance,
please see page 8.
Do not use the vacuum cleaner without air lters in place.
Do not pick up hard or sharp objects such as glass, nails, screws, coins etc.
Take extra care when vacuuming on stairs.
Do not use the vacuum to pick up ammable or combustible materials (lighter
uid, gasoline etc.) or use in the presence of explosive liquids of vapour.
Do not use in an enclosed space lled with vapours given off of oil-based paints,
paint thinner, moth proong, ammable dust or any other explosive or toxic
vapours.
Do not vacuum burning material and ashes
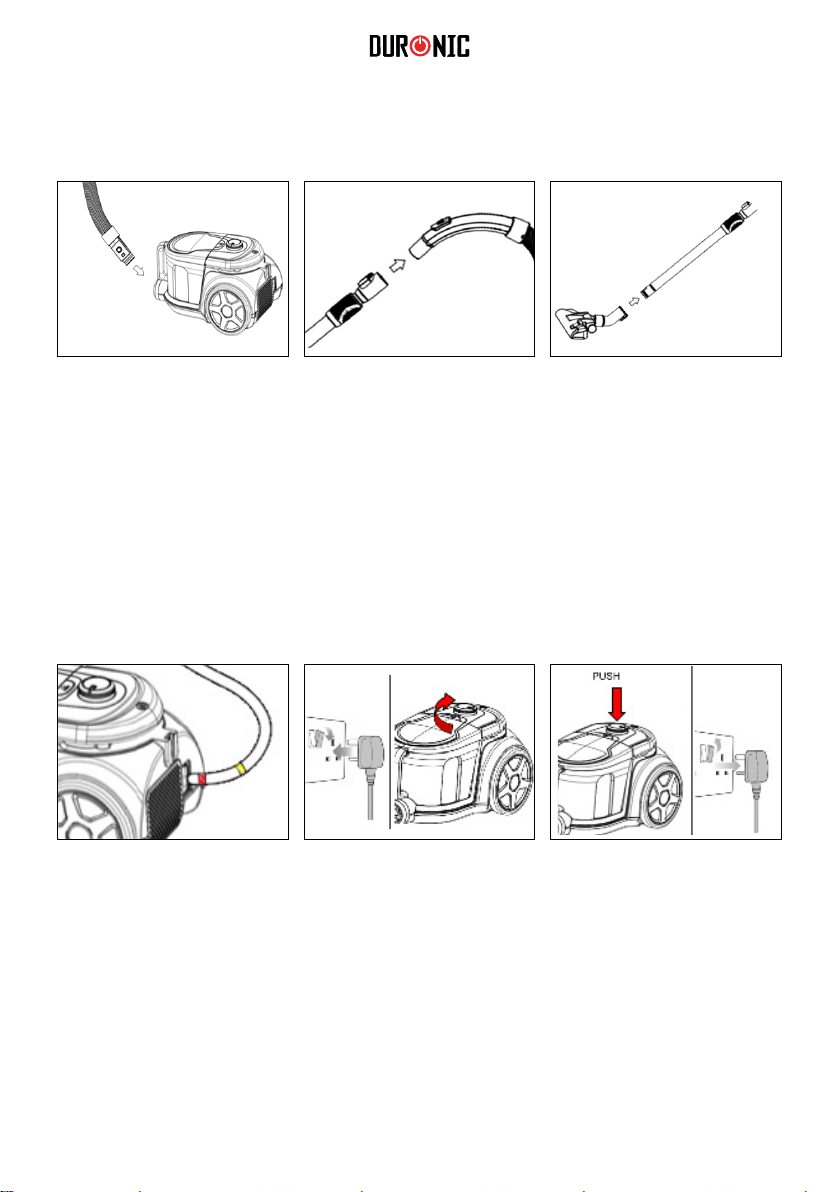
Always unplug the vacuum cleaner before connecting or disconnecting the hose.
Do not allow the plug to whip when rewinding it.
Store your vacuum indoors in a cool, dry place.
Do not use the vacuum to clean your pets or any other animal.
If the dust cup gets damaged, change immediately before the next use.
If the HEPA lter/s get damaged in any way, please ensure these are replaced
before the next use.
If any abnormal noise, smell, smoke or any other failure or breakage is found
during the operation, you should turn off the switch and unplug the vacuum from
the mains socket. Then contact Duronic directly to enquire about repair - do not
repair it by yourself.

7
Assembling the Vacuum Cleaner
How to Use
Insert the hose connector in
front of the vacuum cleaner
into the inlet hole, then turn it
to the right (clockwise) to lock
it in place.
If you ever need to
disassemble the vacuum, you
can turn the hose connection
back to the left and pull it out.
Pull the power cable out of
the vacuum, ensuring that you
stop when you see the yellow
mark.
Make sure that the red mark is
not visible; if it is, this means
you have pulled the cable out
too far.
Attach the telescopic tube to
the exi hose.
If you ever need to
disassemble the vacuum,
you can pull these apart to
separate them.
Attach the telescopic tube to
the exi hose.
If you ever need to
disassemble the vacuum,
you can pull these apart to
separate them.
Insert the telescopic tube into
the opening on the oor brush
(or turbo brush if preferred).
Rotate the brush to fasten it
on securely.
When you nish vacuuming,
turn off the power and unplug
from the mains socket. Push
down the rewind handle/
button to wind the cable back
into the machine.
Use your other hand to guide
the cable to ensure it doesn’t
whip back and cause injury.
1
4
2
5
3
6

8
Using the Attachments
2-in-1 Tool
Floor Brush
Turbo Brush
This nozzle attachment is used for reaching
all the difcult places that the larger brush
cannot.
The at end is a crevice tool which is perfect
for reaching small crevices and hard-to-
reach areas such as corners or down the
back of furniture.
The brush end is perfect for cleaning
upholstery, curtains and delicate areas such
as bookshelves, keyboards and window
ledges.
The oor brush can be used on both carpet
and hard oor surfaces.
For hard ooring:
Use your foot to press the pedal on the top
of the brush to let the bristles out.
For carpets:
Use your foot to press the pedal again to
retract the bristles.
The turbo brush can be used on both carpet
and hard oor surfaces.
It provides a deeper clean for carpeted
oors.

9
Cleaning and Maintenance
Emptying and cleaning the dust container
It is important to look after your vacuum cleaner to prolong its working life and to
keep it working optimally. We recommend that if the vacuum is used regularly,
that the sponge lter is cleaned at least once a month to ensure optimal
performance and prolong the longevity of the device.
It is important to empty the dust container regularly, particularly when the dust
inside reaches the MAX indicator on the container.
Hold the dust container with one hand
and push the release button with the
other hand.
Take the dust container to the rubbish
bin and hold the container over it.
Push the release button to open and
remove the bottom of the dust container.
Tip the dust container upside down to
empty the contents directly into the bin.
Close the dust container by securing the
lid back on top of the cup.
Put the dust container back onto the
vacuum and click back into place.
Take the dust container out of the
machine.
1
3
2
4

10
Cleaning the HEPA lters
Cleaning the 1st HEPA Filter
Cleaning the 2nd HEPA and Sponge Filters
Carefully remove any obvious
deposits of dust and hair on the
lter and wash in warm water.
Leave to air-dry naturally. When completely dry
throughout, replace back into the
vacuum cleaner and close the
back cover.
Ensure that the vacuum is
unplugged from the mains
electric socket before
undergoing any cleaning.
Hold the dust container with
one hand and push the release
button with the other hand.
Take the dust container out of
the machine.
1
1
4
2
2
5
3
3
6

11
Remove the lter casing and
separate the sponge lter from
the HEPA lter.
Carefully remove any obvious
deposits of dust and hair on the
lters and wash both in warm
water.
Leave to air-dry naturally.
When completely dry
throughout, replace back into
the vacuum cleaner and close
the back cover.
4 5 6
Please note:
• The VC7020 vacuum has two HEPA lters; one on the underside of the dust
container jug, the other on the base of the vacuum. If the vacuum is used
lightly/less often, these lters should be cleaned properly at least twice a year.
If, however, the vacuum is in frequent/heavy use, we recommend the lters
are cleaned monthly.
• If a lter becomes too dirty or clogged it can reduce the suction level of the
vacuum.
• Do not ever put a wet lter back into the vacuum; always ensure the lters
are completely dry before inserting them back into the vacuum.
Putting a wet lter into the vacuum will result in suction loss and can damage
the motor.
• Do not wash the lters in a washing machine or put them in a tumble dryer.
They are to be washed by hand and air dried only.
• Do not use hot water or detergents of any kind. Wash only in water.
• Always ensure that the lters are xed back into place properly before
using the vacuum. Do not use the vacuum without any lters inside.
Replacement lters are available for purchase separately directly from
Duronic.

12
Warranty
1 Year Guarantee from Shine-Mart Ltd, Trademark owners of Duronic Products.
NOTE: THESE STATEMENTS DO NOT AFFECT YOUR STATUTORY RIGHTS AS A
CONSUMER
This product has been manufactured under the strictest or quality control procedures, and
using the highest quality of materials, to ensure excellent performance and reliability. It will
give very good and long lasting service, provided it is properly used and maintained. The
product is guaranteed for 1 years from the date of original purchase. If any defect arises due
to a faulty materials or poor workmanship, the faulty product must be returned to the original
place of purchase. Refund or replacement is at the discretion of that company.
Duronic Products are offered with a 1 year guarantee under the following conditions:
1. The product must be returned to the retailer with original proof of purchase.
2. The product must be installed and used in accordance with the instructions
contained in this operating manual.
3. It must be used only for domestic purposes.
4. It does not cover wear and tear, malicious damage, misuse, neglect,
inexpert repairs or consumable parts.
5. Shine-Mart Ltd has no responsibilities for accidental or consequential loss or damage.
6. Shine-Mart Ltd are not liable to carry out any type of servicing work,
under the guarantee
7. Valid in the UK only
Imported by Shine-Mart Ltd, RM3 8SB
Information on waste Disposal for Consumers of
Electrical & Electronic Equipment.
This mark on a product and/or accompanying documents indicates that when it
is to be disposed of, it must be treated as Waste
Electrical & Electronic Equipment, (WEEE).
Any WEEE marked products must not be mixed with general household waste,
but kept separate for the treatment, recovery and recycling of the materials used.
For proper treatment, recovery and recycling; please take all WEEE marked
waste to your Local Authority Civic waste site,
where it will be accepted free of charge.
If customers dispose of Waste Electrical & Electronic Equipment correctly, they
will be helping to save valuable resources and preventing any potential negative
effects upon human health and the environment, of any hazardous materials that
the waste may contain.

13

Table of contents
Other Duronic Vacuum Cleaner manuals