Durr Dental Touchless T 400 User manual

EN
2014/07
Universal-Dispenser
Touchless T 400 / T 1000
Installation and Operating instructions

Rear
Sensor area
Mounting plate
Mounting
tongue
Please read through carefully these operating instructions prior to initial operation and keep it.
In case of a resale of the apparatus, please pass on these operating instructions to the buyer.
Lower sensor
area
Upper sensor area
Strap of the battery
box cover
Batterie-
fachdeckel
The following symbols are used in the instructions:
1. Indications for the use of the manual
Safety reference:
Non-observance may
cause damage to persons
or defects to the device.
Notice:
Supplementary
information about the
operation of the unit.
The manufacturer does not assumy any liability for damages in the case of:
• Defects at the appliance caused by mechanical influences or overvoltage
• Changings at the appliance without express approval of the manufacturer
• Use for the other purposes than that mentioned in the application
2. Safety information
14
Emergency operating
lever
LED
Touchless pump
Dismounting
opening
Face shield
Base angle
Strap of the battery box
cover
Shroud
Front
1. Indications for use of the manual, 2. Safety information
EN

15
2. Safety information, 3. Intended use
2.1 General safety and safety during operation of the appliance
• Repairs at the appliance mey exclusively be carried out by persons authorized by the manufacturer.
Important dangers may occur by unexpected repairs. In case of a necessary repair please contact
the the manufacturer service department.
• Suspend the appliance on a dry and splash-proof place. Keep dry and never drown the appliance
under water.
• This appliance is not a toy. Keep and use it out of the reach of children.
• The appliance is not suitable for the metering of other than the indicated media.
• Exclusively operate the appliance with leakproof batteries of the same manufacturer and type and
with the same charging condition. Only use batteries with indicated size / type D.
• Do not operate the appliance with rechargeable batteries (accumulators).
• Never use force. The appliance needs not be disassembled, no repairable parts.
• Do not expose the appliance to thermal radiation and heat.
• Only foll the appliance with the indicated substances in accordance with the intended use.
• There are no dismountable parts wioth the exception of pump, receptacle, battery cover, mounting
plate, batteries, locking plate (accessories)
• The appliance is not autoclavable and cannot be cleaned in the dishwasher.
• The apparatus must not be cleaned with water jets or by means of a high-pressure cleaner.
3. Intended use
The appliance is suitable for the touchless hands’ disinfection. Furthermore the appliance can be
used for the dispensing of liquid soaps for washing one’s hands.
The apparatus is exclusevely designed for battery operation.
Always hang the dispenser upright onto the wall. The dispenser must not be placed freely. The ap-
pliance is designed for indoor use only.
Use the appliance for hands’ disinfection and cleaning with the usual application cycles.
Ambient conditions:
• Only use the appliance in a dustless environment.
• Pay attention to that the apparatus is only used at a relative air moisture of <90%
(not condensing).
• Only use this apparatus at room temperature.
EN

16
3. Intended use, 4. Dispenser components
Media to be used:
• The used medium has to be free-flowing at room temperature.
In case of doubt please test your medium for suitability.
• The appliance is designed for operation with disinfectants or with liquid soap.
• The appliance is not suitable for operation with abrasive and aggressive media.
• Foodstuff as medium is not permissible.
3.1 Operation of the dispenser according to the regulations
In order to always guarantee an optimum functioning of the dispenser the following has to be
observed:
• Only use disinfectants or thin liquid soap.
• The dispenser may not be located close to radiation-emitting or statically charged objects while it
is used.
• The dispenser only meters with closed faceshield.
• The emergency lever has to be actuated exclusively in case of a breakdown of automatic function!
4. Dispenser components / scope of delivery
EN
Model No.
Universal-Dispenser
Touchless T 400 . . . . . . . . . . . . . . . . . . . . . . . . . . . . . 6000-049-27
Universal-Dispenser
Touchless T 1000 . . . . . . . . . . . . . . . . . . . . . . . . . . . . 6000-049-28
4.1 Asseccories
Accessory for Touchless:
Drip tray . . . . . . . . . . . . . . . . . . . . . . . . . . . . . . . . . . . . 6000-049-29
4.2 Filling goods for the Universal Dispenser Touchless T 400
HD410 hand disinfection
400-ml bottle . . . . . . . . . . . . . . . . . . . . . . . . . . . . . CDH410B3150
HD412 essential hand disinfection
400-ml bottle ..............................CDH412C3150
HD435 wash lotion
400-ml bottle ..............................CCH435C3150
HD440 skin care lotion
400-ml bottle ..............................CCH440C3150
4.3 Filling goods for the Universal Dispenser Touchless T 1000
HD410 hand disinfection
800-ml bottle .............................. CDH410B4750
HD412 essential hand disinfection
800-ml bottle ...............................CDH412A4750
HD435 wash lotion
800-ml bottle ...............................CCH435A4750
4.
4.2
4.3
4.1

17
5. Technical description, 6. Mounting of the dispenser
5. Technical description
The appliance recognizes by means of a touchless sensor technique and a hand ap-
proaching the outlet and, thus, automatically releases a pump stroke.
The appliance meters free-flowing media by means of a removalbe suction pump from an
exchangeable receptacle which is inserted into the dispenser.
6. Mounting of the dispenser
6.1 Preparation of the installation
One has to take care by means of adequate equipment that no medium pours out on
the floor.
• Prior to use of new filling media, tests are required!
• Please pay attention to that during innstallation, no
radiation-emittent object (i. e. X-ray apparatus,
mobile telephone, ultrasound device, direct
illumination over the dispenser, etc.,...)
is in the near proximity.
Electromagnetic interference sources and/or
radiating electric fields may impair the function!
Prior to the mounting of the dispenser
please observe the following
•Required place above the dispenser:
40 mm (for putting on and removing from the
mounting plate).
Please take the required place below the
dispenser from the dimensioned sketch.
• Suitalbe mounting height:
130–135 cm, measured from the floor up
to the upper edge of the dispenser.
130 - 135 cm
EN

18
6. Mounting of the dispenser
Open faceshield. Therefor,
pull it slightly to front and
guide it upwards.
When delivered, mounting
plate is in the dispenser.
For the removal of the
mounting plate slightly lift
the receptacle in the dis-
penser and remove it from
the dispenser.
Remove the pump (see
“pump change”, and leave
the faceshield open.
Insert screwdriver through
the dismounting opening
and press down mounting
tongue of the mounting
plate.
Pull dispenser upwards
with pressed mounting
tongue.
6.2 Mounting
For the mounting and going into operation of the Universal Dispenser Touchless please
keep the following steps in sequence.
Fix mounting plate at the
wall in desired position
by means of dowels and
crews. Drilling diagram
see “technical data”.
Slide the dispenser from
above onto the mounting
plate till the locking tongue
snaps in.
Reinsert first the pump
and then the receptacle.
Close faceshield.
EN
Install drip tray by hanging
up above the dispenser.
Ready.

19
7. Going into operation
Open faceshield. Open battery cover by releas-
ing the lower strap an the front
side underneath the base
angle. Open the batt. cover.
7. Going into operation
7.1 Insert the batteries
The back of the dispesner must therefor be accessible (mounting plate removed).
Insert the batteries in the
dispenser. Pay attention
to correct polarity and
sequencs as above!
1
24
3
5
• If the dispesner is not used for a longer period than 3 months, batteries should be
removed in order to prevent unwanted discharge.
Unhinge the cover and put it
beside.
• After correct insertion of the batteries an acoustic signal sounds.
• Slide the dispenser from the above onto the mounting plate.
• Close the faceshield: now the dispenser starts with the first gauging.
• The noise level of the unit is below 70 dB (A).
• If the batteries have not been inserted with closed face shield, the measuring procedure has to
be carried out once again after having put the dispenser on the mounting plate by shortly
opening and closing the faceshield such as with the change of the pump.
This procedure is explained below in more detail.
7.2 Use of the appliance
• Prevent unwanted pump strokes by opening the face shield and keeping it open during
exchange. Body parts as well as objects have to be removed immediately for about
10 seconds after having closed the faceshield because dispenser adjusts itself.
The LED lights while the dispenser gauges. As soon as the light is out the dispenser is
ready for operation.
After change of receptacle or pump, the medium has to be primed with several pump
strokes (repeated pumping operation necessary).
•With the correct opening and closing of the faceshield, a (different) acoustic signal
sounds.
• After sliding dispenser onto mounting plate, insert pump and close the faceshield.
The dispenser will adjust to the pump stroke size and the environment.
• Insert a receptacle filled with medium of your choice into the dispenser.
• Make sure that receptacle is in correct safe position and cannot fall out the dis
penser.
• Now you can use the appliance.
EN

8. Basic operation, 9. Pump change
20
8. Basic operation
Approach the upper hand
up to a distance of approx.
4 cm to the face shield - the
dispenser actuates several
times.
The dispenser meters as long
as one of both hands is not
removed - up to 5 times.
The complete action can be
repeated as many times as
you like.
For further dispensing ac-
tions keep holding your
hand below the outlet and
approach the second hand
from above to the face shield
(‘virtual operating lever’).
This works only when having
your other hand first under
the outlet!
• If you approach with
only one hand from above
without holding the other had
below the outlet, the appli-
ance does not pump!
The actuation of the
dispenser is effected if a
hand appproaches from
below under the outlet. At a
distance of approx. 4 cm the
dispenser releases automati-
cally a pumping process.
9. Pump change
• The pump must only be changed if the emergency operating
lever is in upper position!
Otherwise serious damages on the appliance my occur.
• Please take care tha only original Universal Dispenser Touchless
pumps will be used.
The Universal Dispenser Touchless pump can be pressed down very easily.
Touchless pump
EN

9. Pump change, 10. Exchange of receptalce, 11. Use of emergency operation lever
21
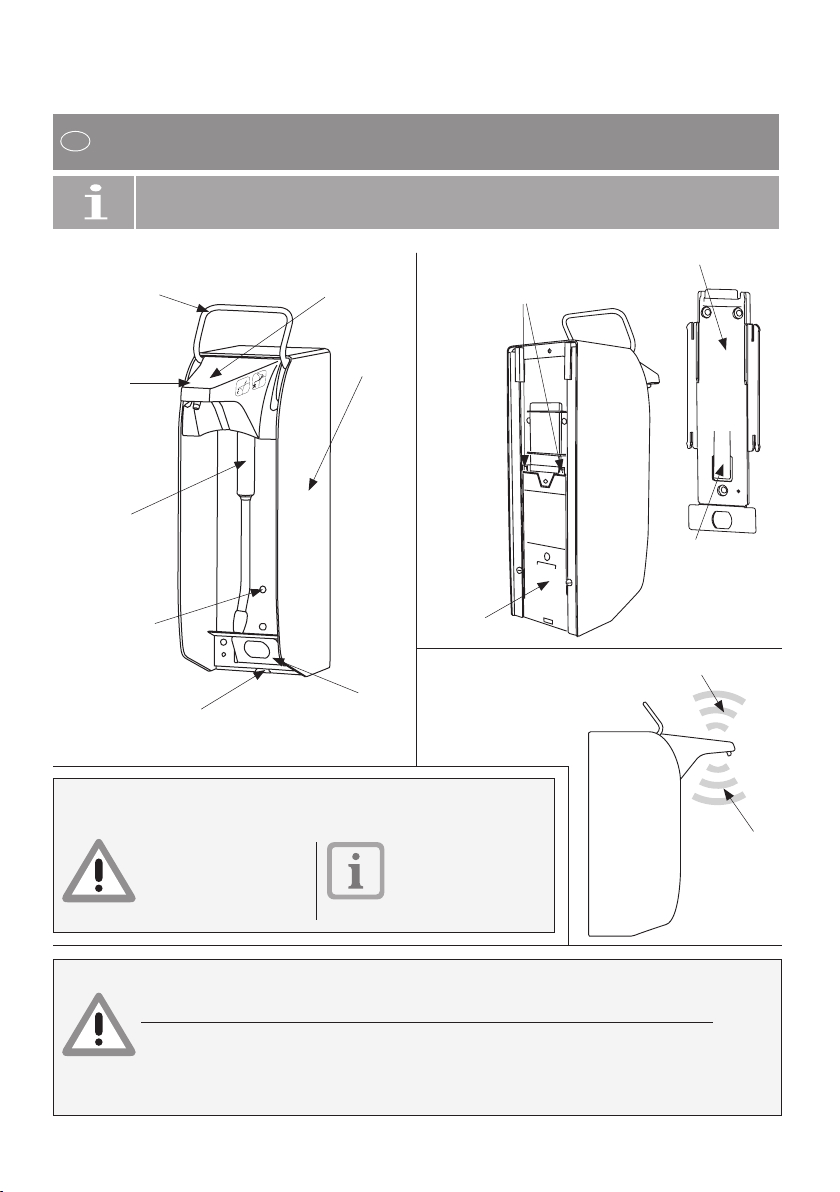
Lift the faceshield.
When opening, approach the
facshield always from above
in order to prevent unwanted
pumping action.
After opening, an acoustic
signal sounds.
b
e
e
p
b
e
e
p
b
e
e
p
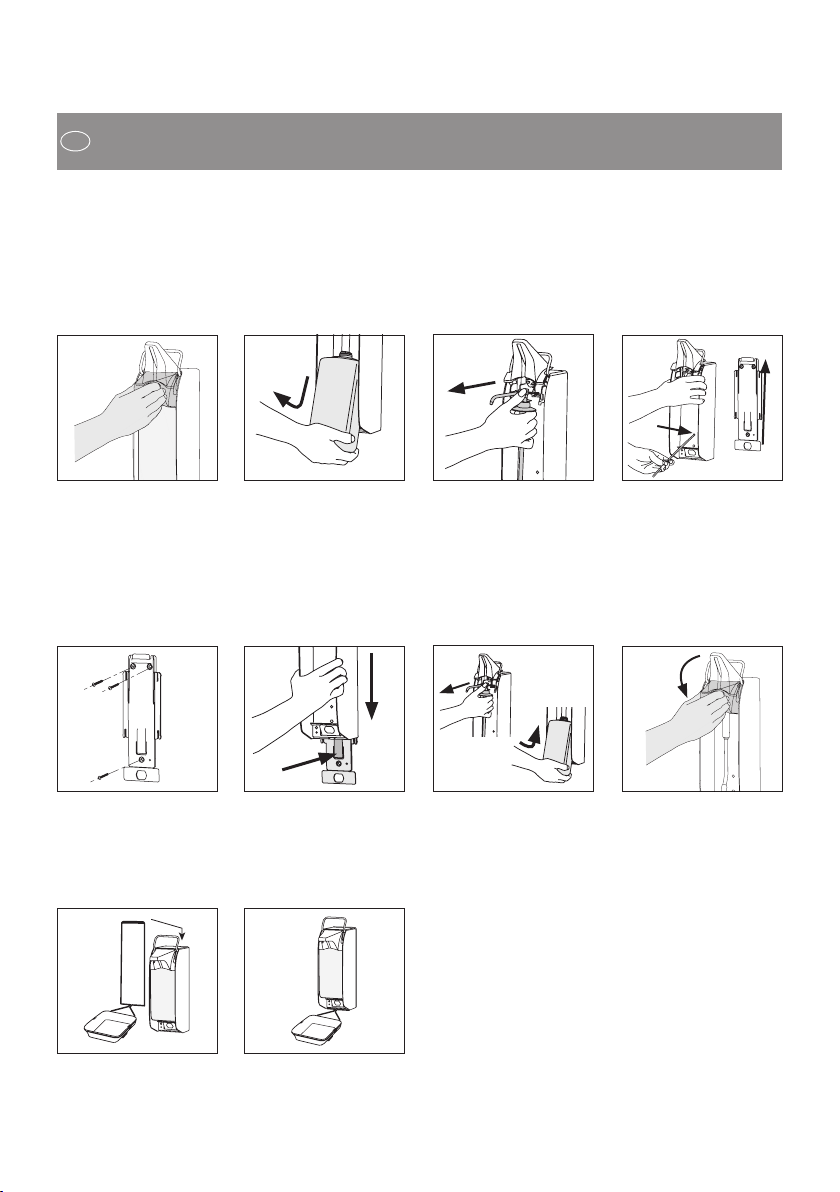
Reinsertion: Push in the pump
from the front side into the in-
tended guidance until it snaps
in. Reclose the faceshield.
9.1 Change of the
dosage
The dosage of the pump is
adjusted to the maximum
of approx. 1,5ml / stroke. If
required, the dosage can be
reduced in stages by turning
the dosage piece (part of the
pump) up to approx. 0,75 ml
/ stroke.
For this remove the pump
from the dispenser.
Push and hold the pump catch
(“PUSH” button) with the
finger and pull out the pump
towards the front.
10. Exchange of receptacle
• Lift up the empty receptacle from below, draw it to the front and remove it from the dispenser.
• Insert the filled-up receptacle from below into the dispenser. Please pay attention to the correct
position of the receptacle.
• If necessary, remove the locking plate before.
• Please take care that only receptacle with an opening width of max. 45mm is used. Make sure
that the bottle adapter sits tight onto the opening, so that no gas can exhaust from the receptacle.
• In order to avoid uninteded pumping actions, take care that the faceshield is opened.
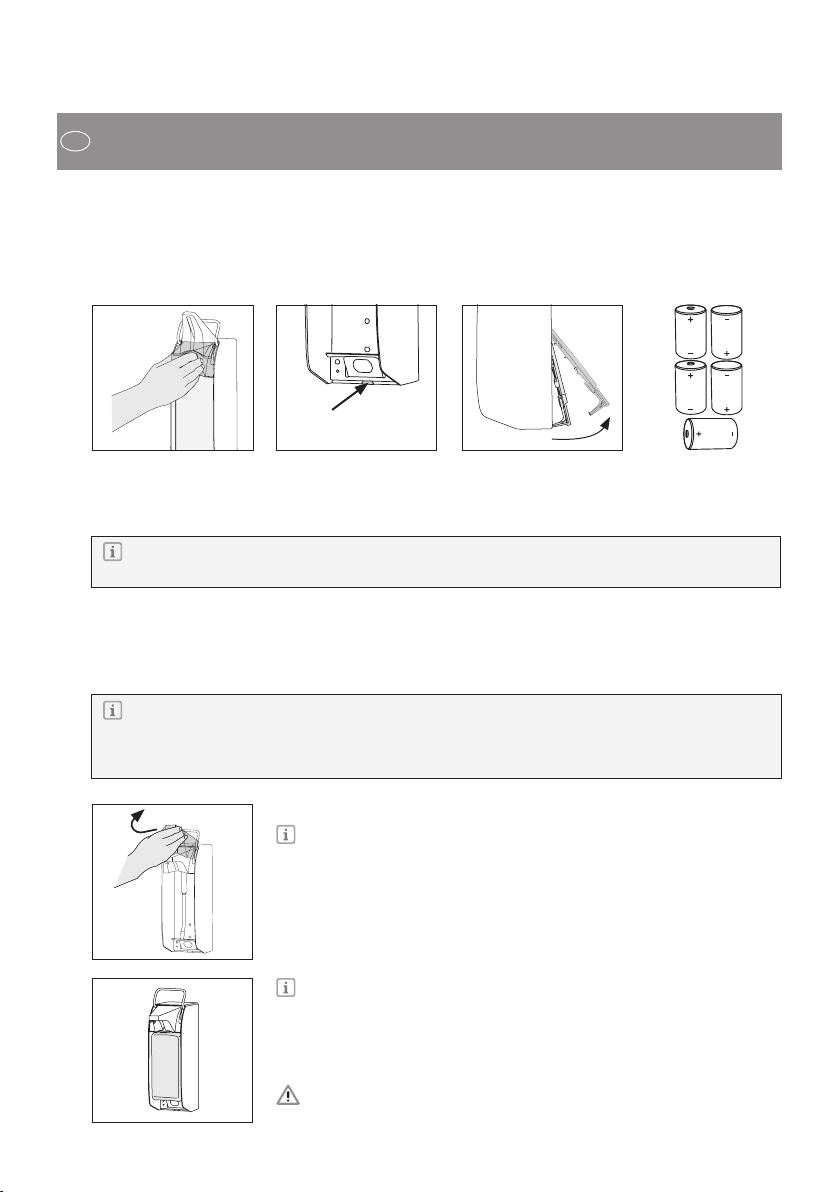
11. Use of the emergency operating lever
In case of a failure of the automatic funtions (for instance batteries low) an operation by means of
the emergency operating lever is possible.
Operation: For this purpose pull down the lever to the lower limit stop and return it again manually
back up in the initial position.
• Only actuate the emergency operating lever in case of a
failure of the automatic funtion !
• Use only pumps with the silicone bottle adapter! Please also take
care that the bottle adapter sits always tight onto the bottle’s
opening so that no gas can exhaust.
EN

12. LED-display
22
12. LED display
For protection against unintetioned actuation, electromagnetic interference sources and false
handling are recognized and indicated by the lighting up of the LED. As long as the LED
lights up, the automatic pumping action is suppressed.
• The LED also lights up during gauging.
When it expires, the dispenser is ready for operation.
EN

13. Maintainance & serice / cleaning
23
13. Maintainance & service / cleaning
13.1 Cleaning and attendance
The dispenser itself is maintainance-free with the exception of the battery exchange.
For cleaning the dispenser remove the mounting plate and dismount the batteries. Cleaning of the
dispenser only from the outisde. Wipe the apparatus with a humid cloth.
Exchange the empty receptacle in time. If the suction valve is nevertheless clogged, please only
pump hot water through it in order to restore the function.
Please only use hot water and do not use caustic (chlorous) purifiers or scouring pow-
ders !
• By no means disassemble the appliance!
• Please pay attention to that the applicance
is not submerged or exposed to water jets.
•The appliance can not be cleaned in a washer-disinfector
and is not dishwasher-proof and is not autoclavable.
• The Touchless pump can be cleaned in a washer-disinfector and
is dishwasher-proof and autoclavable. However it must rest for 6 hours after such
a treatment before it is reinserted in the dispenser.
13.2 Exchange of battery
Test the battery level:
First of all approach one hand to the upper sensor and then the other hand to the lower sensor. Remain
in this attitude for at least 3 seconds until the acousitc signal sounds:
• In case fo weak batteries during normal use a short acoustic signal sounds instead of the pumping
action to indicate that the battery has to be replaced.
13.3 In time refill of the medium
For an interruption-free hygienic supply the receptacle has to be exchanged in time.
4 x = battery full
3 x = 3/4 full
2 x = 1/2full
1 x = 1/4full
b
e
e
p
b
e
e
p
b
e
e
p
EN

14. Risks, 15. Disposal, 16. Technical data
24
14. Risks
In dealing with the Universal Dispenser Touchless please take notice of some important differ-
ences compared to our manually operated dispensers.
• The Universal Dispenser Touchless is not autoclavable.
• Never try to remove or exchange the pump when the emergeny operation lever
is not in the upper position!
• Use the emergency operating lever only in case of a failure of the automatic function!
• Do not carry out any repair at the appliance!
15. Disposal
Dispose of packing material into the corresponding recycling plants. At the end of the lifecycle pls
contact the next recycling centre or ask your specialized dealer about applicable disposal regulations.
16. Technical data
Shroud aluminium, anodized
Lever stainless steel
Mounting plate plastic
Drip tray plastic, stainless steel
Pump plastic and stainless steel, removable
Wall mounting with dowels and screws
Conformity RoHS compliant, according to machinery directive 2006 / 42 / EC & EMC directive 2004 / 108 / EC
Manufacturer Ophardt Ireland, Tubbercurry Road, Ballymote, Co. Sligo, Ireland
Voltage 7,5 Volt DC
Batteries 5 mono-cells type ANSI D
Safety class IP22
Dimensions in mm W 92 x H 330 x D 210 mm
(with drip tray in mm W 150 x H 410 x D 310 mm)
Total weight 1250 gram
(without Batteries)
T 400/ T1000 | measures (approx.) in mm|
Technical modifications preserved.
Prior to use of new filling media tests are required!
92
330
290ca. 170
210
130 40
20351
Drill pattern
EN

17. Troubleshooting
25
Characteristic
1.| After insertion of the batteries
no acoustic signal sounds
2.| During opening and closing of the
faceshield no signal sounds
3.| The LED lights up if a hand is held
below the outlet and no media is
dispensed
4.| The appliance seems to function
normally but no medium is
dispensed
5.| An acostic signal onyl sounds if
the hand is held below the outlet
and no media is dispensed
6.| After insertion of the locking plate
the appliance does not function
as usual
7.| The appliance doses too much or
not enough medium
possible cause
|Batteries are low.
| Batteries were not inserted correctly.
| Faceshield is closed while insertion.
| Batteries are low.
| No batteries inserted.
| Battery contact interrupted.
| Appliance defective.
| Operating error.
| Appliance recognized a disturbance
(unwanted radiation influance or
electric field).
| No receptacle is inserted.
| No pump is inserted.
| Pump is clogged.
| Receptacle is empty.
| Pump lost contact to the medium.
| An unsuitalbe medium has been used.
| Batteries are low.
| Appliance has not yet adjusted to the
locking plate.
| Dosage adjustment is not adjusted
correctly.
solution
| Insert new batteries.
| Open the battrey box, insert batteries
according to the diagram. Pay attention
to polarity and the sequence.
| Remove batteries, open faceshield,
insert new batteries again.
| Insert new batteries.
| Insert batteries.
| Restore battery contact.
| Call after-sales service.
| Operate appliance as described above.
Pay attention to the sequence of
actuation in the sensor areas. Avoid
contact with the faceshield.
A) Remove all electromagnetically charged
or emitting appliances out of the reach
of the sensor.
B) Open and close the face shield
and quickly remove hands and / or
other disturbing objects.
Wait for a short time until the dis-
penser has gauged. Then actuate the
dispenser as usual.
C) Remove receptacle and pump and
reinsert them.
D) Make sure that pump sits correctly.
| Insert full receptacle.
| Insert Touchless
pump into the dispenser.
| Remove pump and clean it.
| Replace receptacle.
| Carry out the dosage process several
times. If it dones’nt function, the pump
is possibly clogged.
| Use different medium.
Clean pump thoroughly before.
| Replace batteries.
| Wait (max for a few minutes).
| Carry out dosage adjustment on the
pump.
EN


DÜRR DENTAL AG
Höpfigheimer Strasse 17
74321 Bietigheim-Bissingen
Germany
Fon: +49 7142 705-0
www.duerr.de
This manual suits for next models
1
Table of contents