DXV AT200 LS SpaLet User manual

- 1 - 7302348-100 (11/17)
AT200
®
LS SpaLet
®
INSTALLATION MANUAL

- 2 - 7302348-100 (11/17)
This manual consists of two parts; the rst part
contains safety precautions and descriptions of the
procedures when installing the SpaLet®, and the
second part contains visual installation methods.
Please use this manual in reference to each part.
SAFETY PRECAUTIONS
For safe installation and use of the product,
please read the precautions thoroughly
before installing the product.
DANGER An imminently hazardous situation
which, if not avoided, will result in death
or serious injury
WARNING A potentially hazardous situation which,
if not avoided, could result in death or
serious injury.
CAUTION
A potentially hazardous situation which,
if not avoided, may result in minor or
moderate injury or damage to the
product or other property.
DANGER
Improper connection of the power plug or
socket can result in a risk of electric shock.
All electrical installation work must be carried
out by a qualied electrician.
There is a danger of short circuit and/or
electric shock.
WARNING
Follow the instructions described in this
manual, and install the product properly.
Failure to do so may cause electric shock,
re, injury, water leakage, and/or ooding.
Do not allow anyone except a certied
electrician to disassemble, repair, or modify
the product.
There is a danger of electric shock or re,
and the product could malfunction, causing
injury.
Do not connect or disconnect the power plug
or socket or power cord with wet hands.
There is a danger of electric shock.
Hold the plug or socket when connect-
ing or disconnecting the power plug or
socket.
If the plug or socket is connected or
disconnected by holding the cord, there
is a danger of re or electric shock due
to the plug or socket or cord becoming
damaged.
Do not pour water or the cleanser inside
or onto the SpaLet seat unit, remote
control, or power plug or socket.
It may cause electric shock or re.
Do not use any power supply other than
AC120V. Also, do not use any other
method to connect the plug or socket to
an improperly congured receptacle,
Exceeding the rated voltage for use.
Be sure to use a VVF cable (with solid
copper wires 20 AWG each) for the power
cord. If a power cord other than the one
specied above is used (such as
strand wires, strand wires attached
with terminals, etc.), it may result in
overheating due to bad connection and
cause corrosion, burnout, re of the prod-
uct and cord.
Connect the power completely. There is a
danger of re or electric shock due to the
cord becoming damaged.
Do not damage, bend, modify,
excessively twist, bind, sandwich, or
place heavy objects on the power cord.
There is a danger of re or electric shock
due to the cord becoming damaged.
Do not install this product in a wet or
damp location, such as inside a shower
room or steam room.
There is a danger of electric shock or re.

- 3 -
7302348-100 (11/17)
Do not attach the product to any water
source other than potable water.
It may cause electric shock, re and skin
inammation due corrosion of electronic
parts inside the seat unit.
Do not disassemble or modify the product.
It may cause electric shock or re.
Do not use loose outlet.
It may cause electric shock or re.
CAUTION
Install a high-sensitivity, high-speed ground
fault circuit interrupter (with a rated current
value of 15 mA or below) on the primary side
of the power supply.
There is a danger of electric shock.
The SpaLet®bowl is made of ceramics, and
ceramics are fragile. Note the following when
handling the SpaLet bowl:
–– Prior to installation, make sure that the
SpaLet bowl is in a good condition and
not damaged.
–– After installation, check the SpaLet
bowl for any damages.
Failure to do so may cause injury, water
leakage and/or ooding.
Wash out foreign materials or rust inside the
pipes before connecting the product.
Failure to do so could damage the internal
parts of the product, which may cause water
leakage and/or ooding.
Note the following when using the strainer:
–– Close the water shutoff valve when
removing the strainer.
–– When installing the strainer, tighten it
fully so there is no gap.
–– Check that the O-ring is free from
foreign materials when attaching it.
If foreign materials are attached to the
O-ring, it may cause ooding due to water
leakage.
Adjust the water shutoff valve and check for
water leakage after the installation.
It may cause water leakage and/or ooding.
If the water is expected to be frozen,
drain the water out from the product.
Failure to do so may cause re, water
leakage, and/or ooding due to damage
from freezing.
Drain the air from the pipes after any
building construction or renovation, or
when water supply is restored after an
interruption.
If the water supply contains air, it may
cause damage or malfunction to the
product or pipes. There is a danger of
injury or damage to the building or
furniture due to ooding.

- 4 -
7302348-100 (11/17)
41-5/16" min.
(1050 mm)
27-9/16"
min.
(700 mm)
14-3/4"
(375 mm)
19-5/16"
(491mm) 15-3/4"
(400 mm)
5-15/16"
(150 mm)
1*
2-3/4"
min.
(70 mm)
2*
2" min.
(50 mm)
9/16" min.(15 mm)
1*
2-3/4"
min.
(70 mm)
25-13/16"
(655 mm)
14-3/4"
(375 mm)
9-1/16"
(230 mm)
3-9/16"-3-15/16" (90-100 mm)
Drainage Pipe
Finish
Wall
7-1/2" (190 mm)
12" (305 mm)
Finish
Wall
26-9/16"
(674 mm)
3-1/4" (82 mm)
7-1/16" (179 mm)
POWER SUPPLY
Install the cord and outlet according to the
specications below.
The power distribution work should be done by an
electrical contractor.
• Use an AC120V power supply with a
consumption rating.
If the product is used with other electric appliances,
set the corresponding number of outlets.
• The wiring should be appropriate for the rated
power consumption.
• Set the outlet within the reach of the cord and
high enough from the oor so that water does
not reach it. The length of the power cord
is 39-3/8".
Do not insert the power plug into the outlet until
the installment is complete. There is danger of
malfunction.
WATER SUPPLY
• Only use potable water as the water supply.
Using a different water supply (industrial water,
well water, etc.) may cause the durability of the
electrical and mechanical components to
deteriorate, resulting in an accident or malfunction.
• The water pressure must be more than 14.5 PSI
(when ows) or 109 PSI (hydrostatic pressure).
If the water pressure is lower than the above,
please consult your plumber.
• If the water pressure is higher than 109 PSI,
decompress the pressure by using a
decompression valve.
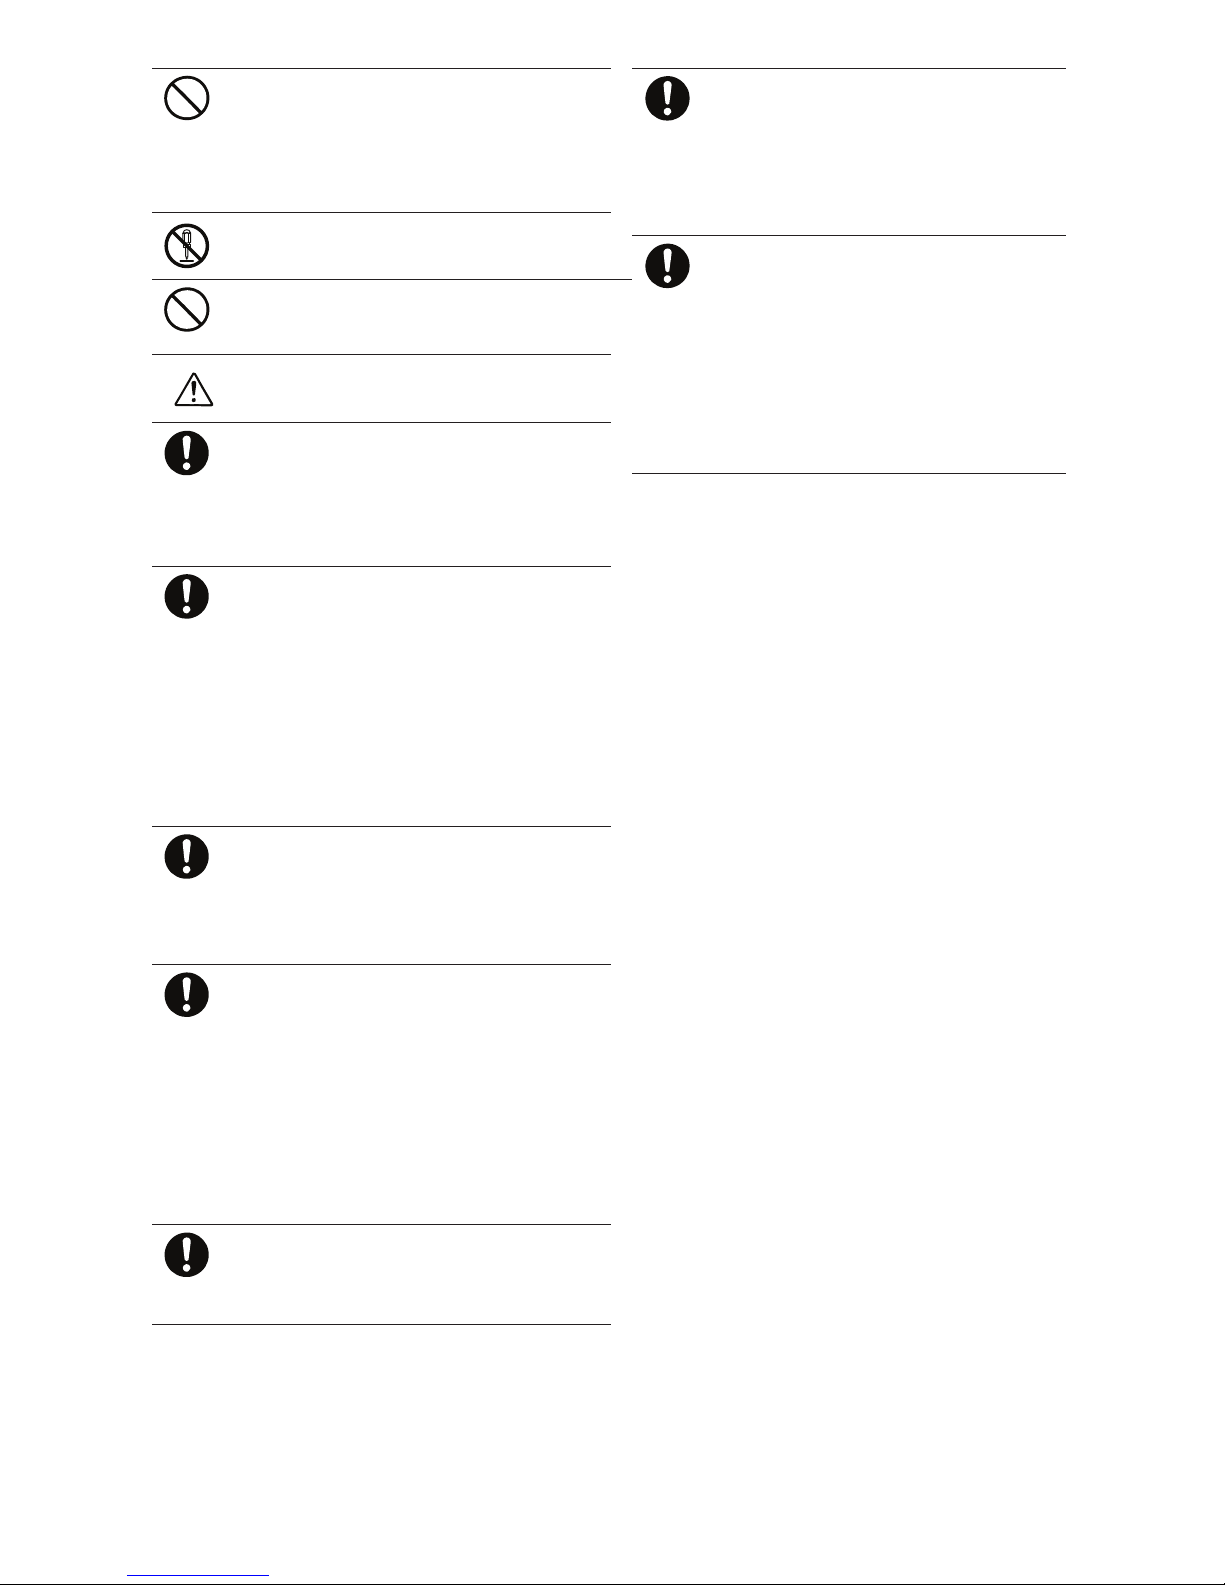
MINIMUM INSTALLATION CLEARANCE
For the required minimum installation clearance,
refer to the gure below.
*1 A space of 2 -3/4"or more on each side of the
product is recommended. If it is less than
2 -3/4", it may hinder the operation.
*2 Place the water shutoff valve to 2" from the wall.
FIRMLY FIX THE WATER SUPPLY PIPE
An impact applied to the hose due to high water
pressure may cause vibrations.
Fix the water supply pipe rmly so that it does not
loosen.There is a danger vibration or ooding.
TECHNICAL DATA
Rated voltage
AC120V 50/60Hz
Rated power consumption
850 W (environment 68°F, water 59°F)
Max rated power consumption
1440 W (environment 68°F, water 59°F)
Length of the power cord
39-3/8"
Length of the water supply hose
26-3/8"
Waterproof grade
IPX4
Water pressure range
0.1MPa{1.0 bar} [when ows 14.5PSI] ~
0.75MPa{7.5 bar} [hydrostatic pressure 109 PSI]
Water connection cross section
R1/2
Operating temperature range
30°F - 104°F
Units
V = volt, Hz = hertz, W = watt, m = meter,
MPa =mega pascal, in = inch,
°C = degrees Celsius, °F = degrees Fahrenheit,
PSI = pounds square inch
Flushing water volume
P-trap: full 1.32 gallons, light .90 gallons

- 5 -
7302348-100 (11/17)
l
m
PSW-1238 k
ASUPPLIED ITEMS
aBidet seat and Water Supply Hose
bWater Shutoff Valve and Clip
cRemote Control
dScrews, Anchors, and AA Batteries
(For Remote Control)
eAnti-theft Nut, Screw, and Washer
(For Remote Control)
fWater Drain Socket
gSecuring Member
hScrew, Washer, Anchor, Screw with Cap
iPaper Template
jInstallation Support Base
kFront Securing Member / Adhesive material
lManual Set
mWall Protection Cover

- 6 -
7302348-100 (11/17)
19 mm No. 2 5mm No. 0
p
q
2.5 mm
BNECESSARY TOOLS
aOpen End Wrench (19 mm)
bPhillips Head Screwdriver (No. 2)
cFlat-blade Screwdriver (5 mm)
dPhillips Head Precision Screwdriver (No. 0)
eSaw
fLevel
gFile
hTape
iRuler
jPen
kHammer
lUtility Knife
mAdhesive
nColored Tape
oCaulking Material
pAdjustable Wrench
(For Water Shutoff Valve, etc.)
qFlat-blade Precision Screwdriver

- 7 -
7302348-100 (11/17)
13"
(330 mm)
13"~
(330 mm)
3-15/16"±10
(100 mm)
9-1/16"±10
(230 mm)
5-15/16"±10
(150 mm)
5-15/16"±10
(150 mm)
90°
FL
60°
WL
3-15/16"±10
(100 mm)
11"±10
(280 mm)
12"
(305 mm)
C-1 ATTACHING THE WATER
SHUTOFF VALVE
1Wrap teon tape around the screw of
water shutoff valve.
Adjust the direction of the joint outlet
of the water supply hose and attach the
water shutoff valve.
Rotate the open/close lever and conrm
that the water shutoff valve is closed.
▲For a wall supply
Tilt the joint outlet of the water supply hose at
a 90°angle to the oor.
■For a oor supply
Tilt the joint outlet of the water supply hose at
a 60° angle to the wall.

- 8 -
7302348-100 (11/17)
No.2
Φ8×55
2-3/16"
(55 mm)
Φ5/16"
(8 mm)
WL
Φ6×40
Φ
6×63
Φ6×40
Φ6×63
C-2 INSTALLING THE DRAIN SOCKET
1Attach the gasket to the drain socket.
2Secure the drain socket.
*For tile or concrete oors, drill a smaller hole and
use an anchor.

- 9 -
7302348-100 (11/17)
2-3/16"
(55 mm)
Φ5/16"
(8 mm)
WL
No.2 Φ6×40
Φ6×40
Φ8×55
Φ8×55

- 10 -
7302348-100 (11/17)
C-3
DECIDE THE INSTALLATION
POSITION OF SECURING MEMBER
1Place the paper template in line with the base of
the water drain socket and secure it with colored
tape. Mark screw position of securing member.
2Cut off the paper template along the right and left
dotted line and secure the securing member.
*For tile or concrete oors, drill a smaller hole and
use an anchor.
Note: If there is a gap or looseness, bond the drain
socket with caulking.
3Place the mounting adhesive on top of the
mounting base with contoured surface facing down.
• Ensure that the mounting adhesive is placed in
the center of the plate.
• Prevent moisture or impurities from getting on the
mounting base.
4Take out the supplied installation support base
5Lift up the front edge of the SpaLet®bowl and
insert the installation support base under the
ceramic bowl.
Note: Do not put the ceramic bowl all the way down
to the oor. Failure to do so may crush the
water supply hose.
6Place the ceramic bowl onto the installation support
base.

- 11 -
7302348-100 (11/17)
92 lbs.

- 12 -
7302348-100 (11/17)
No.2
7
②
①
C-4 INSTALLING THE SpaLet®BOWL
1Set wall protection cover against the wall.
2Move the SpaLet bowl with installation support
base to just before the drain socket.
3Attach colored tape vertically from the screw hole
on the lower side of the SpaLet bowl.
4Insert your hand in the space of the installation
support base and lift up the SpaLet bowl.
Adjust the tape position on ceramic bowl to the
▲mark position on the oor.
Set the drain socket on the drain outlet
5Lower the SpaLet bowl. Make sure that the
position of the ▲mark on the template paper on
the oor coincides with the position of the tape on
the ceramic bowl.
6Insert the screw into the SpaLet bowl side, secure
the securing member and SpaLet bowl, and then
attach the screw cap. Remove the wall protection
cover.
7Push the front edge of the ceramic bowl
downward.

- 13 -
7302348-100 (11/17)
C-5 CONNECTING THE WATER
SUPPLY HOSE
1Remove the protective cap and insert the water
supply hose into water shutoff valve.
2Fasten with the clip. Rotate the clip and check if the
water supply hose is properly secured with the clip.
Note:
• Secure the clip by folding it.
• If the clip is not secured properly, remove and
secure again. Insert the tool to open the clip and
unlock it.
3Fully open the lever of the water supply hose and
rotate it 90°in reverse.
Note: To prevent anchoring, be sure to rotate
the lever 90°in reverse.
C-6 CONNECTING THE POWER
SUPPLY
1Connect the power cord to the AC outlet.
Turn on the power at the power breaker.
90°

- 14 - 7302348-100 (11/17)
31.5" - 47.3"
31.5" - 47.3"
23.5" - 35.4"
No.2
No.2
No.2
3.9"
.24"
Max.
.2"
1
2
.24"
1.3"
1
2

- 15 -
7302348-100 (11/17)
7
No.0
C-7
INSTALLING THE REMOTE
CONTROL
1Remove the remote control from the holder and
insert the batteries.
Note: Vertical lines may appear on the screen
when the batteries are removed. This is not
a malfunction. These vertical lines will
disappear when batteries are inserted into
the remote control.
2Determine the installation position of the remote
control.
Note: Leave a space above the remote
control’s mounting position
3Press the ( ) button and register to the SpaLet®
unit.
4Mount the remote control holder onto the wall.
a
For plasterboard or plywood that is thinner
than 3/16".
b
For concrete
5Insert the anti-theft nut into the groove on the re-
mote control.
6Attach the remote control to the holder.
7Secure the remote control to the holder with the
anti-theft washer and screw.

- 16 - 7302348-100 (11/17)
D-1
CHECK FOR WATER LEAKAGE
1Press the ( ) button and check for water leakage.

- 17 -
7302348-100 (11/17)
DRYER
D-2
TEST OPERATION
1Cover the seat sensor with a piece of paper or rag and
lower the seat.
2Conrm that water sprays for posterior and
feminine washing.
3Lift the seat and conrm that warm air blows.

- 18 - 7302348-100 (11/17)
D-3
CLEANING UP
1Remove the tape on the SpaLet®bowl side
and on the oor, and the paper template.

- 19 -
7302348-100 (11/17)
LIMITED WARRANTY
This SpaLet comes with a three year warranty on all parts of the SpaLet. If inspection of this DXV plumbing product,
inclusive of the chinaware and all mechanical parts, confirms that it is defective in materials or workmanship,
DXV will repair or, at its option, exchange the product for the same or a similar model.
This limited warranty applies only to the original non-commercial purchaser and installation of the products.
In the event of a limited warranty claim, proof of purchase will be required—save sales receipts.
For this warranty to become effective, the warranty registration process must be completed via the internet or
telephone per the warranty registration instructions.
This limited warranty does not apply to commercial installations. The warranty for commercial installations is
two years on the SpaLet.
This warranty does not apply to local building code compliance. Since local building codes vary considerably, the
purchaser of the product should check with a local building or plumbing contractor to ensure local code compliance
before installation.
This warranty will be void if the product has been moved from its initial place of installation; if it has been subjected
to faulty maintenance, abuse, misuse, accident or other damage; if it was not installed in accordance with DXV’s
instructions; or if it has been modified in a manner inconsistent with the product as shipped by DXV. The warranty will
be void if the product has failed as a result of worn-out of consumable parts such as packing, fuses, batteries.
WARNING: This warranty DOES NOT COVER any damages caused by the use of harsh cleaners. These products can
seriously corrode the product components. This damage can cause leakage and property damage. DXV will not be
responsible or liable for any damage caused by the use of in-tank cleaners.
DXV’s option to repair or exchange the product under this warranty does not cover any labor or other costs of removal
or installation including any costs of any surrounding material such as tile or marble. DXV is not responsible for any
other incidental or consequential damages attributed to a product defect. (Some states or provinces do not allow the
exclusion or limitation of implied warranties, so this exclusion may not apply to you.)
This warranty gives you specific rights.You may have other statutory rights that may vary from state to state
or province to province, in which case this warranty does not affect such statutory rights.
How to register the warranty:
PLEASE COMPLETE DXV WARRANTY REGISTRATION AND SAVE THIS WARRANTY INFORMATION.
IMPORTANT: Registration of the SpaLet must be completed for this warranty to become effective.
Your registration will make it easier to service your product.
INSTRUCTIONS: Register your SpaLet at www.DXV.com. Please save your point of purchase (sale receipt).
IF YOU HAVE ANY QUESTIONS, OR PARTS ARE DAMAGE OR MISSING, DO NOT CONTACT, OR RETURN, THIS
PRODUCT TO THE STORE. CONTACT CUSTOMER SERVICE AT DXVCustomerCare@DXV.com
OR TOLL FREE AT OUR GLOBAL HEADQUARTERS.
CUSTOMER SPARE COMPONENTS PAGE CAN BE FOUND AT www.DXV.com.
DXV
One Centennial Avenue
Piscataway, New Jersey 08855
Attention: Director of Customer Care
For residents of the United States, warranty
information may also be obtained by calling
the following toll free number: (800) 227-2734
www.DXV.com

- 20 -
7302348-100 (11/17)
How to register the warranty:
PLEASE COMPLETE DXV WARRANTY REGISTRATION AND SAVE THIS WARRANTY INFORMATION.
IMPORTANT: Registration of the SpaLet must be completed for this warranty to become effective.
Your registration will make it easier to service your product.
INSTRUCTIONS: Register your SpaLet at www.DXV.com. Please save your point of purchase (sale receipt).
IF YOU HAVE ANY QUESTIONS, OR PARTS ARE DAMAGE OR MISSING, DO NOT CONTACT, OR RETURN,
THIS PRODUCT TO THE STORE. CONTACT CUSTOMER SERVICE AT DXVCustomerCare@DXV.com
OR TOLL FREE AT OUR GLOBAL HEADQUARTERS.
CUSTOMER SPARE COMPONENTS PAGE CAN BE FOUND AT www.DXV.com.
DXV
One Centennial Avenue
Piscataway, New Jersey 08855
Attention: Director of Customer Care
For residents of the United States, warranty
information may also be obtained by calling
the following toll free number: (800) 227-2734
www.DXV.com
PCW-1355
Other manuals for AT200 LS SpaLet
2
Table of contents
Languages: