dymax BlueWave AX-550 User manual

AX Light Shield Kit
User Guide

1 |D YM AX .C OM
U SE R G UI DE |AX -550 L I G HT S H IE L D K I T
About Dymax
UV/Visible light-curable adhesives. Systems for
light curing, fluid dispensing, and fluid packaging.
Dymax manufactures industrial adhesives, light-curable
adhesives, epoxy resins, cyanoacrylates, and activator-cured
adhesives. We also manufacture a complete line of manual
fluid dispensing systems, automatic fluid dispensing systems,
and light-curing systems. Light-curing systems include LED
light sources, spot, flood, and conveyor systems designed for
compatibility and high performance with Dymax adhesives.
Dymax adhesives and light-curing systems optimize the
speed of automated assembly, allow for 100% in-line
inspection, and increase throughput. System designs enable
stand-alone configuration or integration into your existing
assembly line.
Please note that most dispensing and curing system
applications are unique. Dymax does not warrant the fitness
of the product for the intended application. Any warranty
applicable to the product, its application, and use is strictly
limited to that contained in the Dymax standard Conditions of
Sale. Dymax recommends that any intended application be
evaluated and tested by the user to ensure that desired
performance criteria are satisfied. Dymax is willing to assist
users in their performance testing and evaluation by offering
equipment trial rental and leasing programs to assist in such
testing and evaluations. Data sheets are available for valve
controllers or pressure pots upon request.

3
2|D YM AX .C OM
U SE R G UI DE |A X L I GHT S HI EL D K I T
Contents
Introduction................................................................................4
Intended Audience...............................................................................4
Where to Get Help ...............................................................................4
Safety..........................................................................................4
Specific Safety Considerations ..........................................................4
Safety Symbol Index............................................................................4
Product Overview .....................................................................5
Description of the AX Light Shield Kit ...............................................5
System Components ...........................................................................5
Special Features & Benefits ...............................................................6
Assembly and Setup ................................................................7
Unpacking and Inspecting Your Shipment .......................................7
System Interconnection ......................................................................7
Operation .................................................................................11
Cleaning & Maintenance........................................................11
General............................................................................................... 11
Light Shield........................................................................................ 11
BlueWave®AX-550 LED Curing System........................................ 11
Troubleshooting ......................................................................12
Spare Parts and Accessories................................................12
Specifications ..........................................................................13
Warranty...................................................................................14
Index .........................................................................................15

3 |DY MAX .C OM
U SE R G U ID E |A X L I GH T S H IE L D K I T
Introduction
This guide describes how to set up, use, and maintain
a Dymax AX Light Shield safely and efficiently.
Intended Audience
Dymax prepared this user guide for experienced
process engineers, technicians, and manufacturing
personnel. If you are new to UV light curing and do
not understand the instructions, contact Dymax
Application Engineering for answers to your questions
before using the equipment.
Where to Get Help
Dymax Customer Support and Application
Engineering teams are available by phone and email
in the United States, Monday through Friday, from
8:00 a.m. to 5:30 p.m. Eastern Standard Time. You
information for additional Dymax locations can be
found on the back cover of this user guide.
Additional resources are available to ensure a trouble-
free experience with our products:
•Detailed product information on www.dymax.com
•Dymax adhesive Product Data Sheets (PDS) on
our website
•Safety Data Sheets (SDS) provided with shipments
of Dymax adhesives
Safety
WARNING! If you use this light shield
without first reading and understanding
the information in this user guide, injury can result
from exposure to high-intensity light. To reduce the
risk of injury, read and ensure you understand the
information in this user guide before assembling
and operating a Dymax BlueWave®AX-550 LED
curing system with light shield.
Specific Safety Considerations
The light shield is designed to maximize
operator safety and minimize exposure to
light-curing energy. To use the shield
safely, it must be set up and operated in
accordance with the instructions in this
user guide. Please also read and
understand the safety considerations
unique to LED flood light-curing systems.
Safety Symbol Index
The following symbols are displayed on
the Dymax light shield. Please see below
for their meanings.
Refer to Manual
Gloves Required
Eye Protection Required
Warning!
Caution! Hot Surface
Warning! UV Light Hazard

4 |DY MAX .C OM
U SE R G U ID E |AX L I G HT S H IE L D K IT
Product Overview
Description of the AX Light Shield Kit
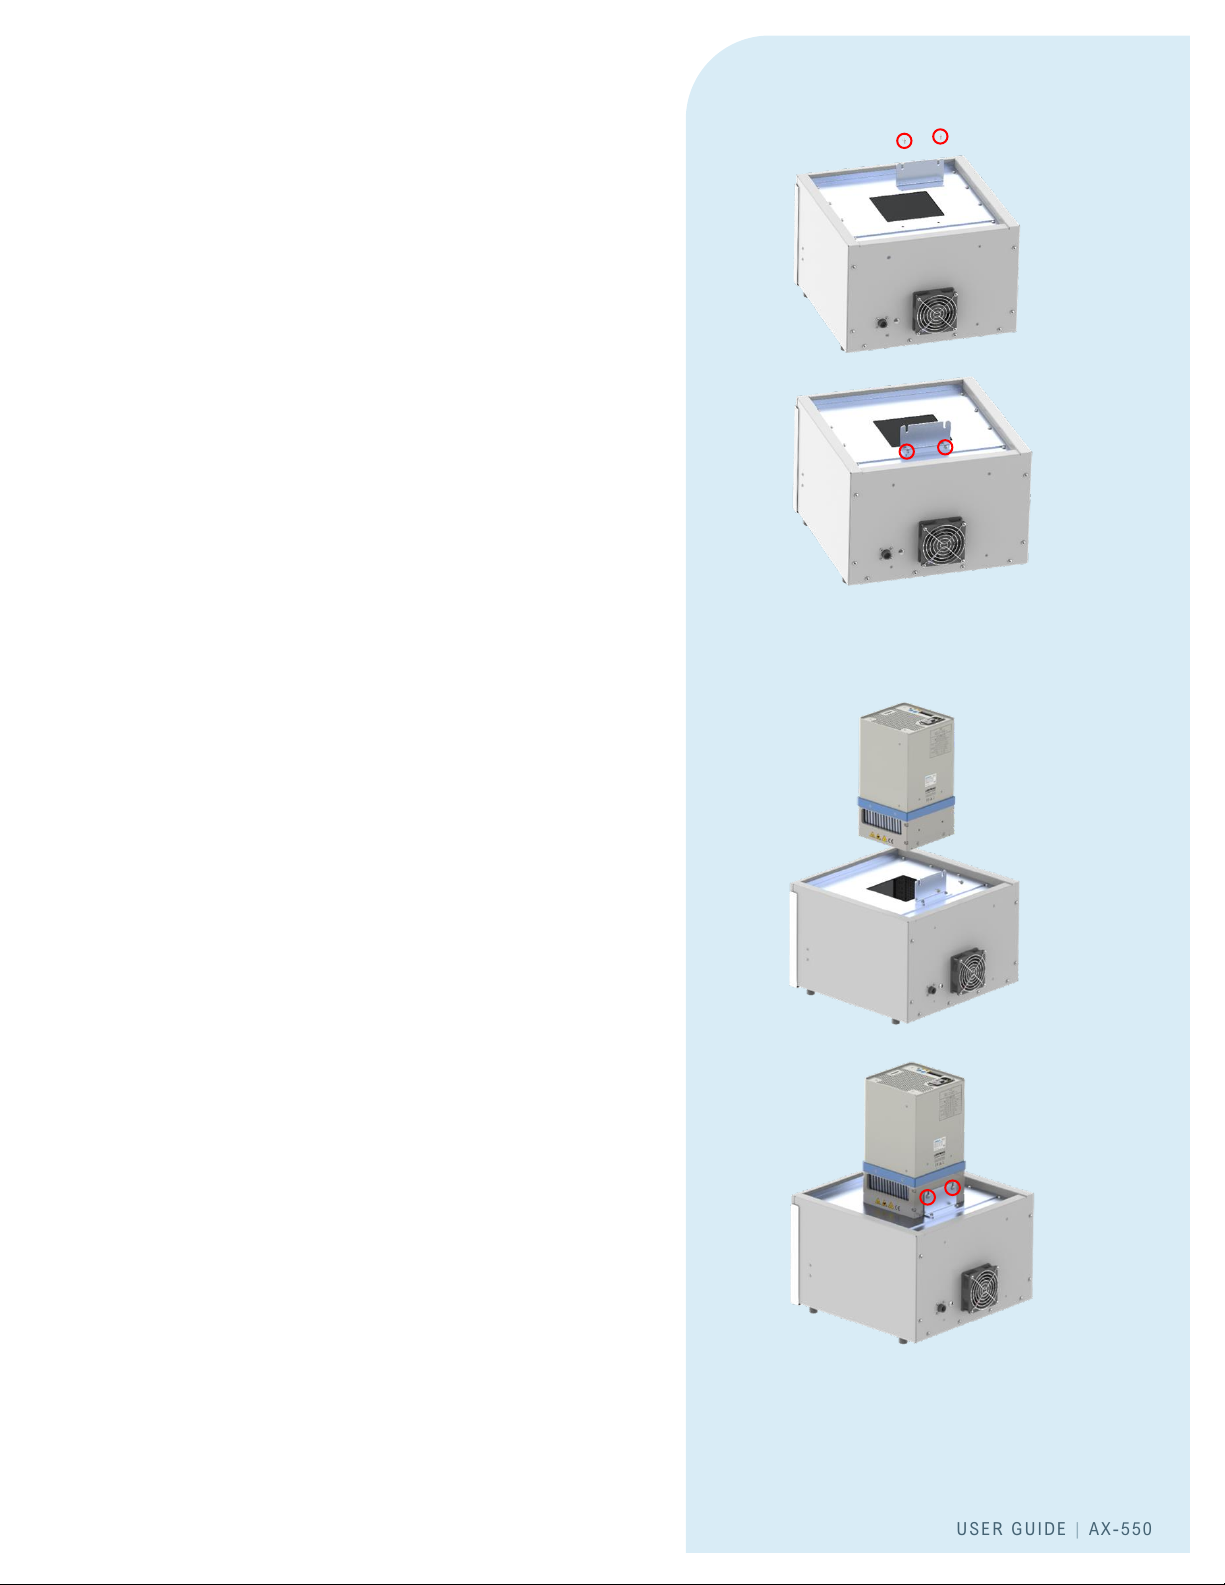
The AX light shield is designed to prevent worker
exposure to high-intensity light when used in
conjunction with the BlueWave®AX-550 LED curing
system. Together these components create a
unique bench-top LED light-curing system that can
be used to cure photosensitive adhesives, coatings,
and inks applied to various size and shape parts.
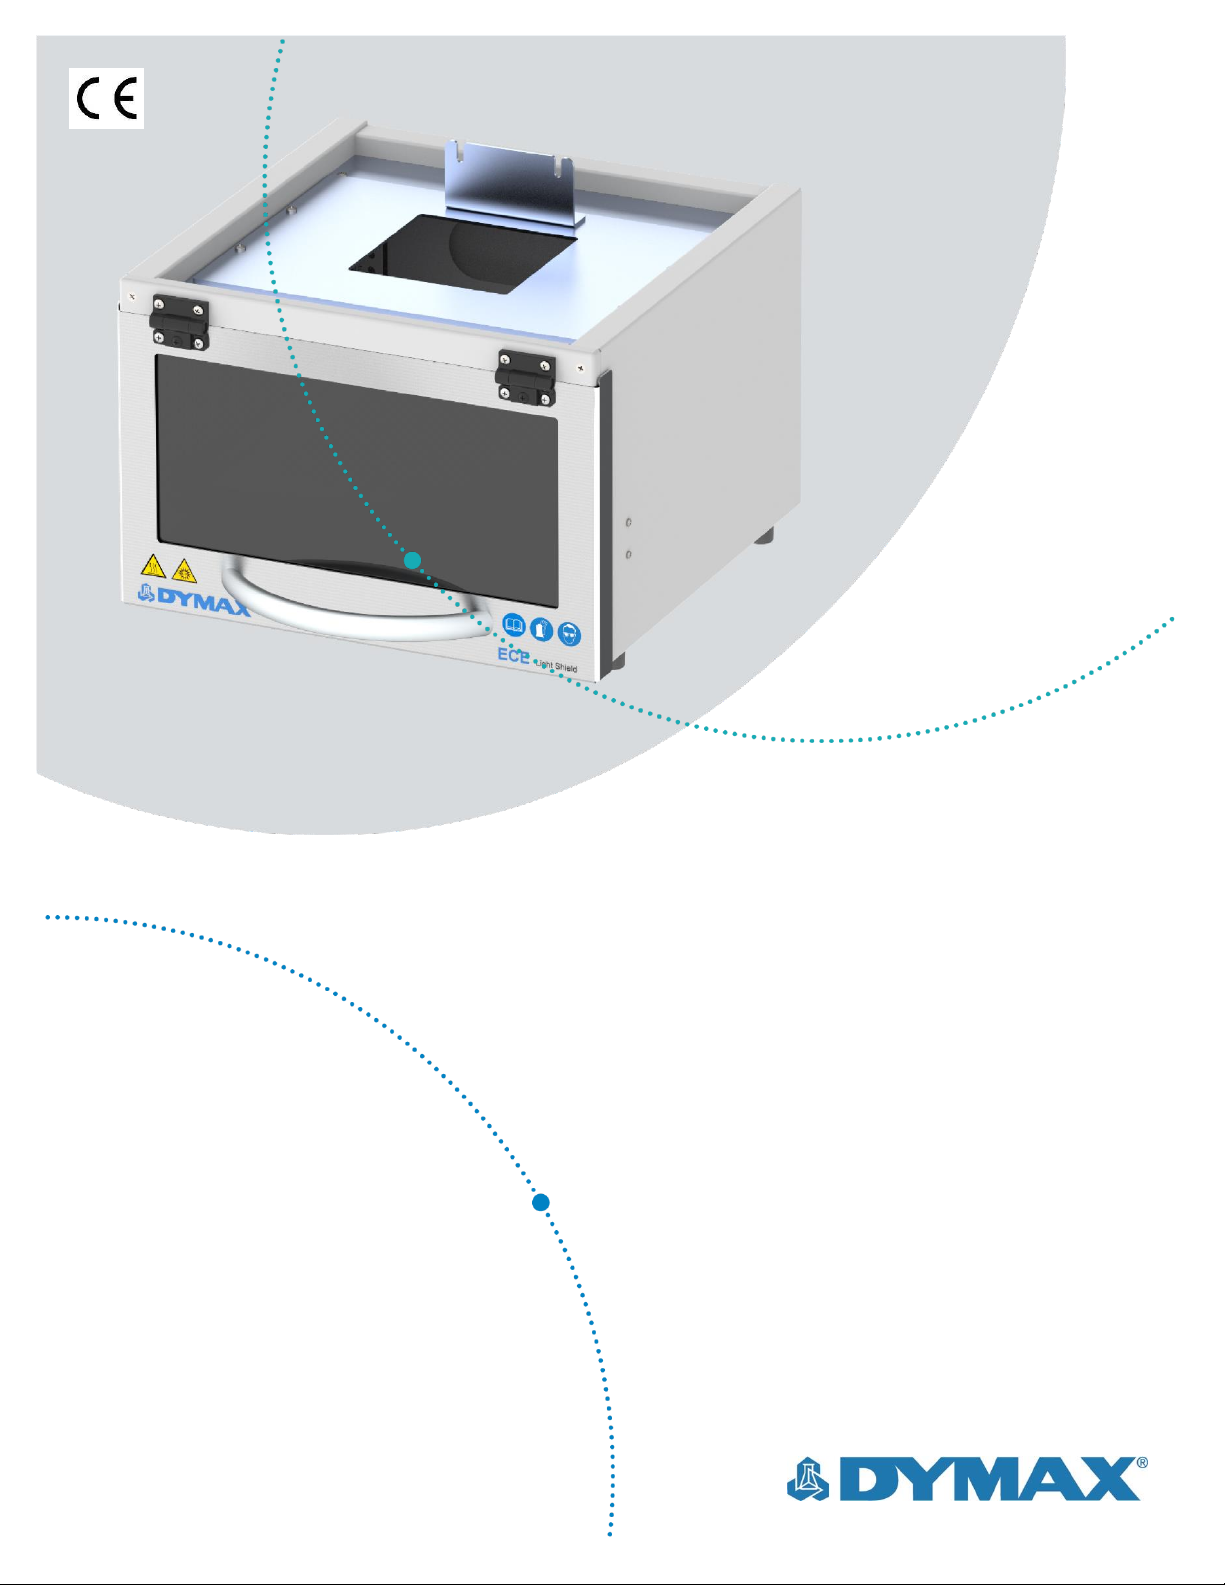
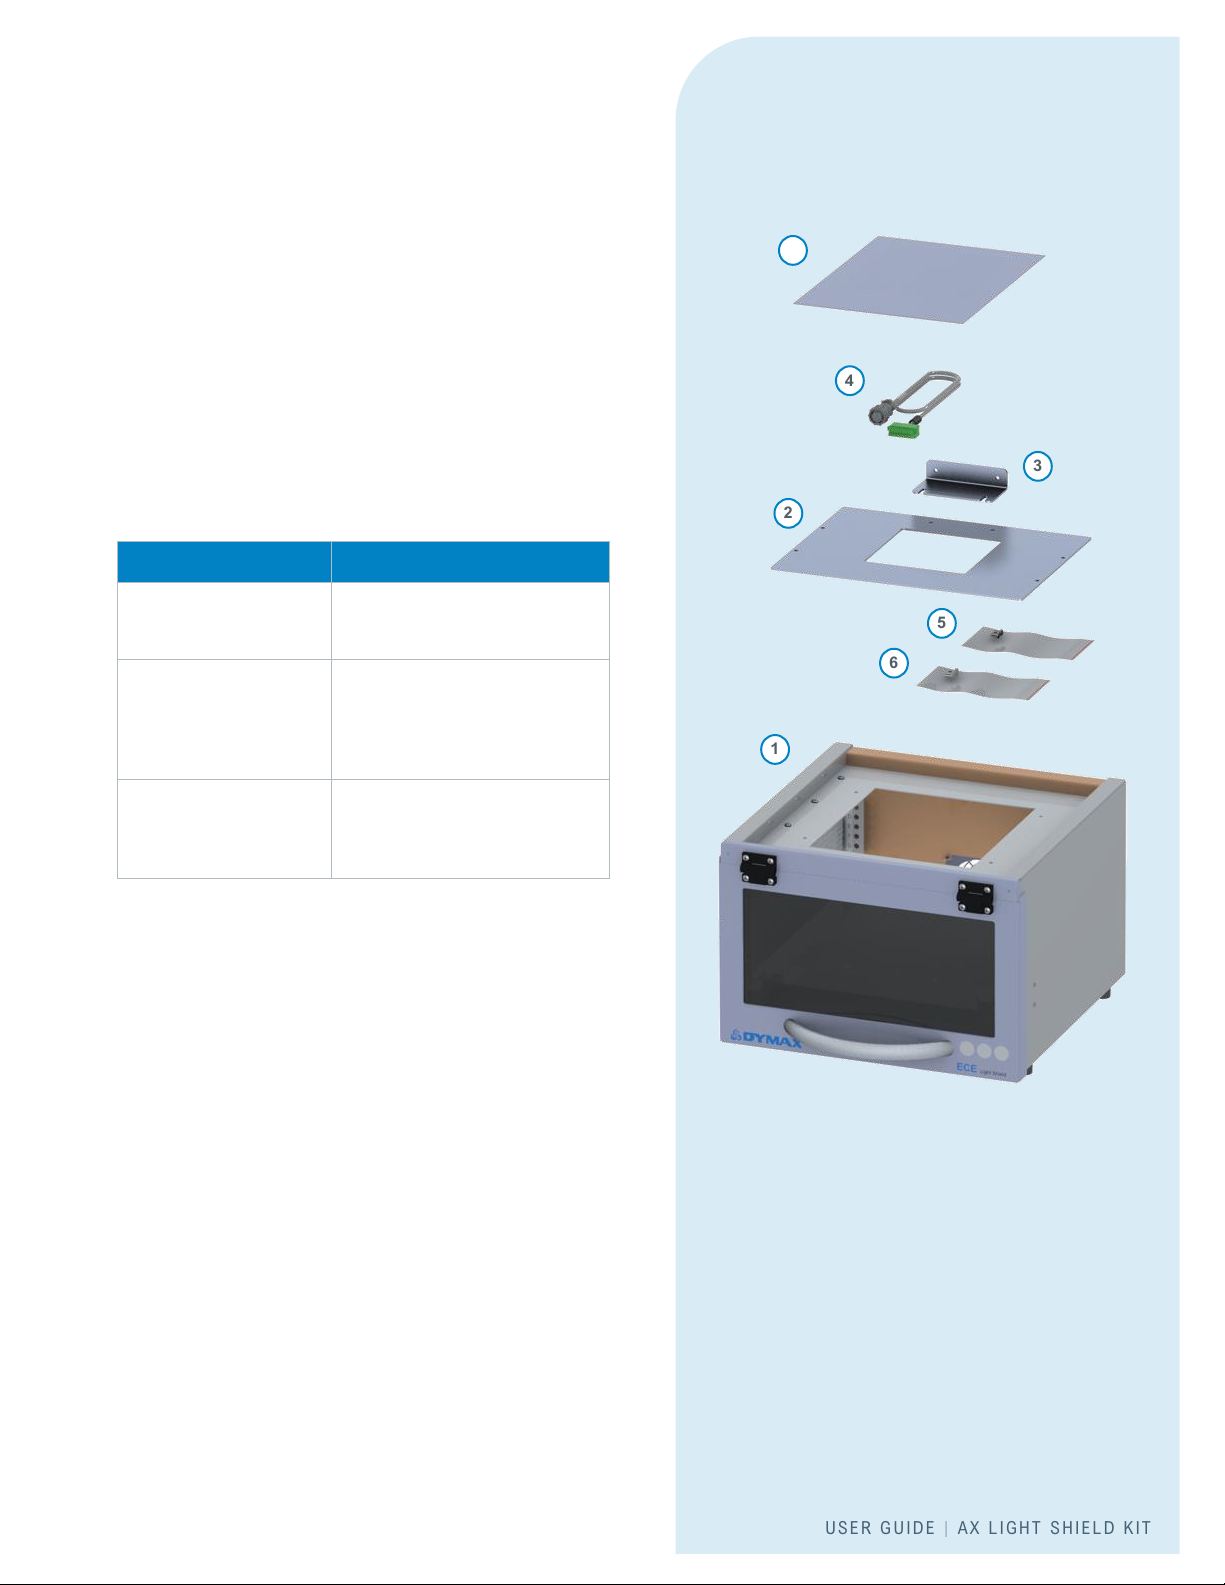
The AX Light Shield Kit (PN 60419) features an ECE
light shield and an adapter plate that allows the
BlueWave®AX-550 LED curing system to be easily
mounted onto the light shield.
NOTE: Users considering special or customized
configurations should contact Dymax Application
Engineering for recommendations and/or guidance
to prevent equipment malfunction. Dymax cannot
foresee every possible use of these light sources and
reserves the right to invalidate warranties, expressed
or implied, due to non-recommended installation or
use of this equipment.
System Components
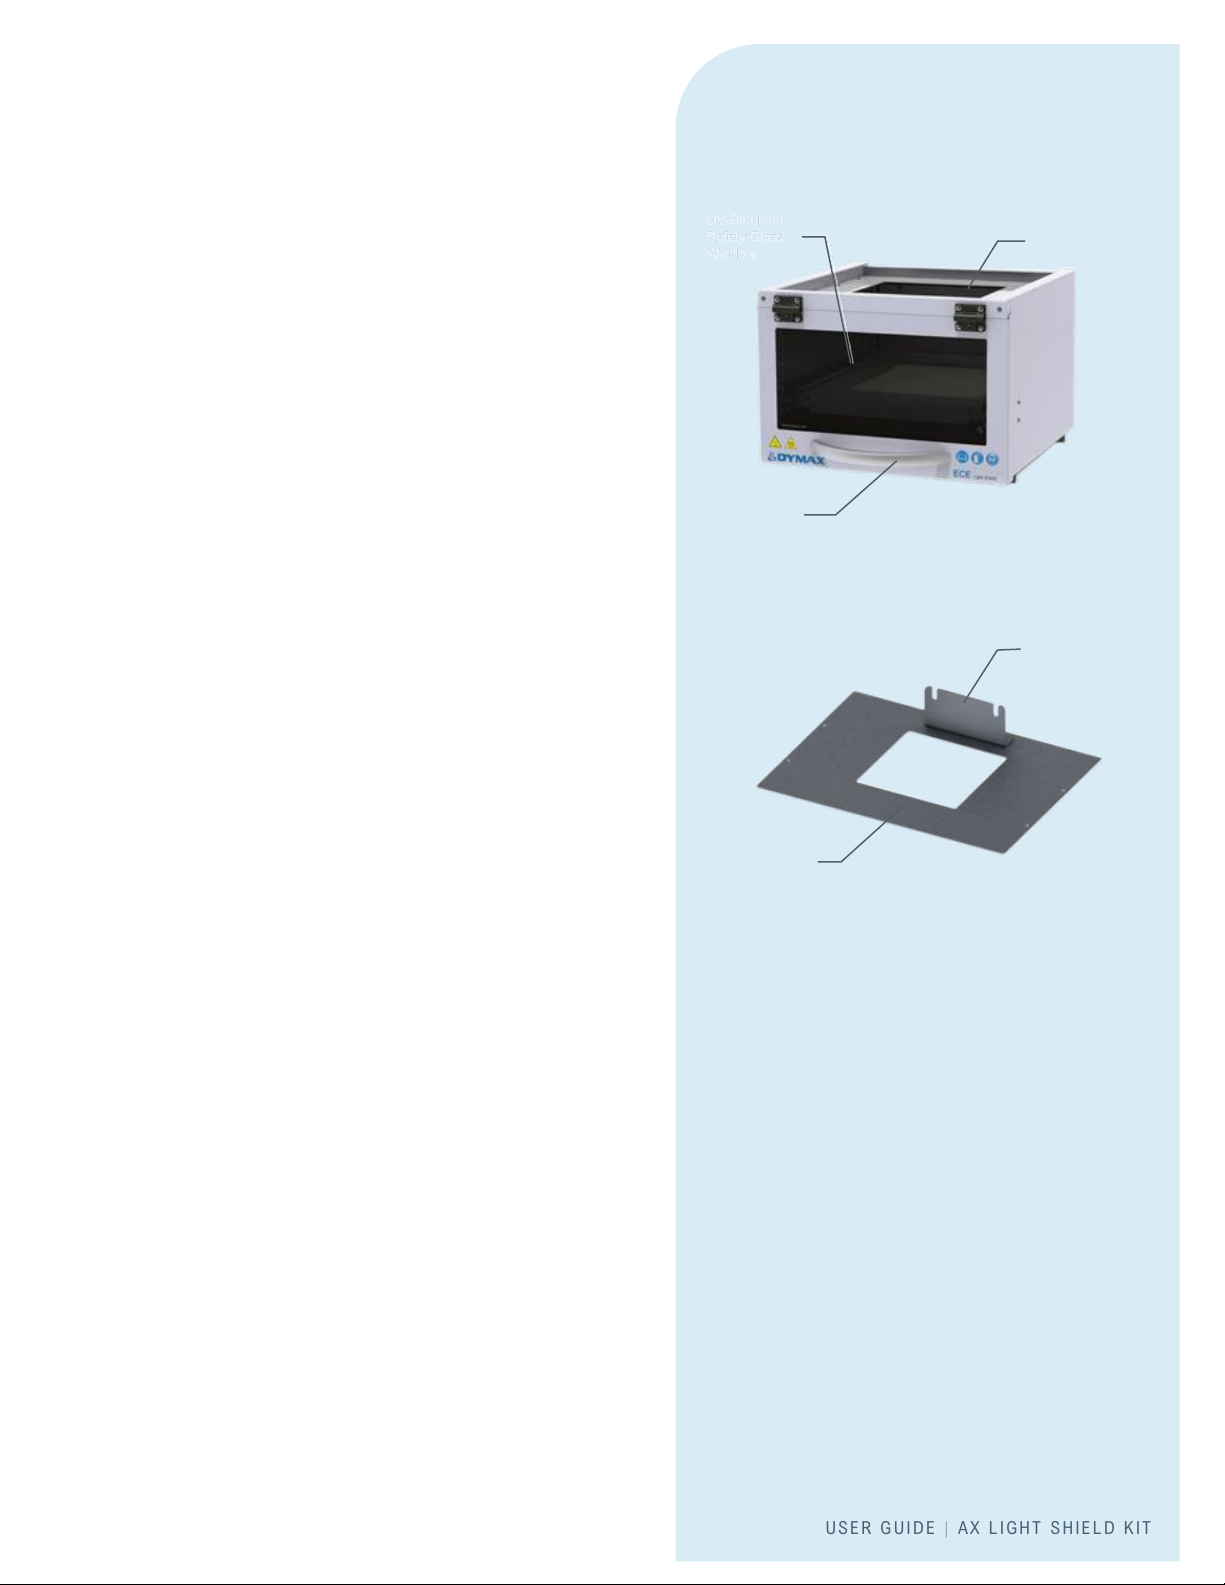
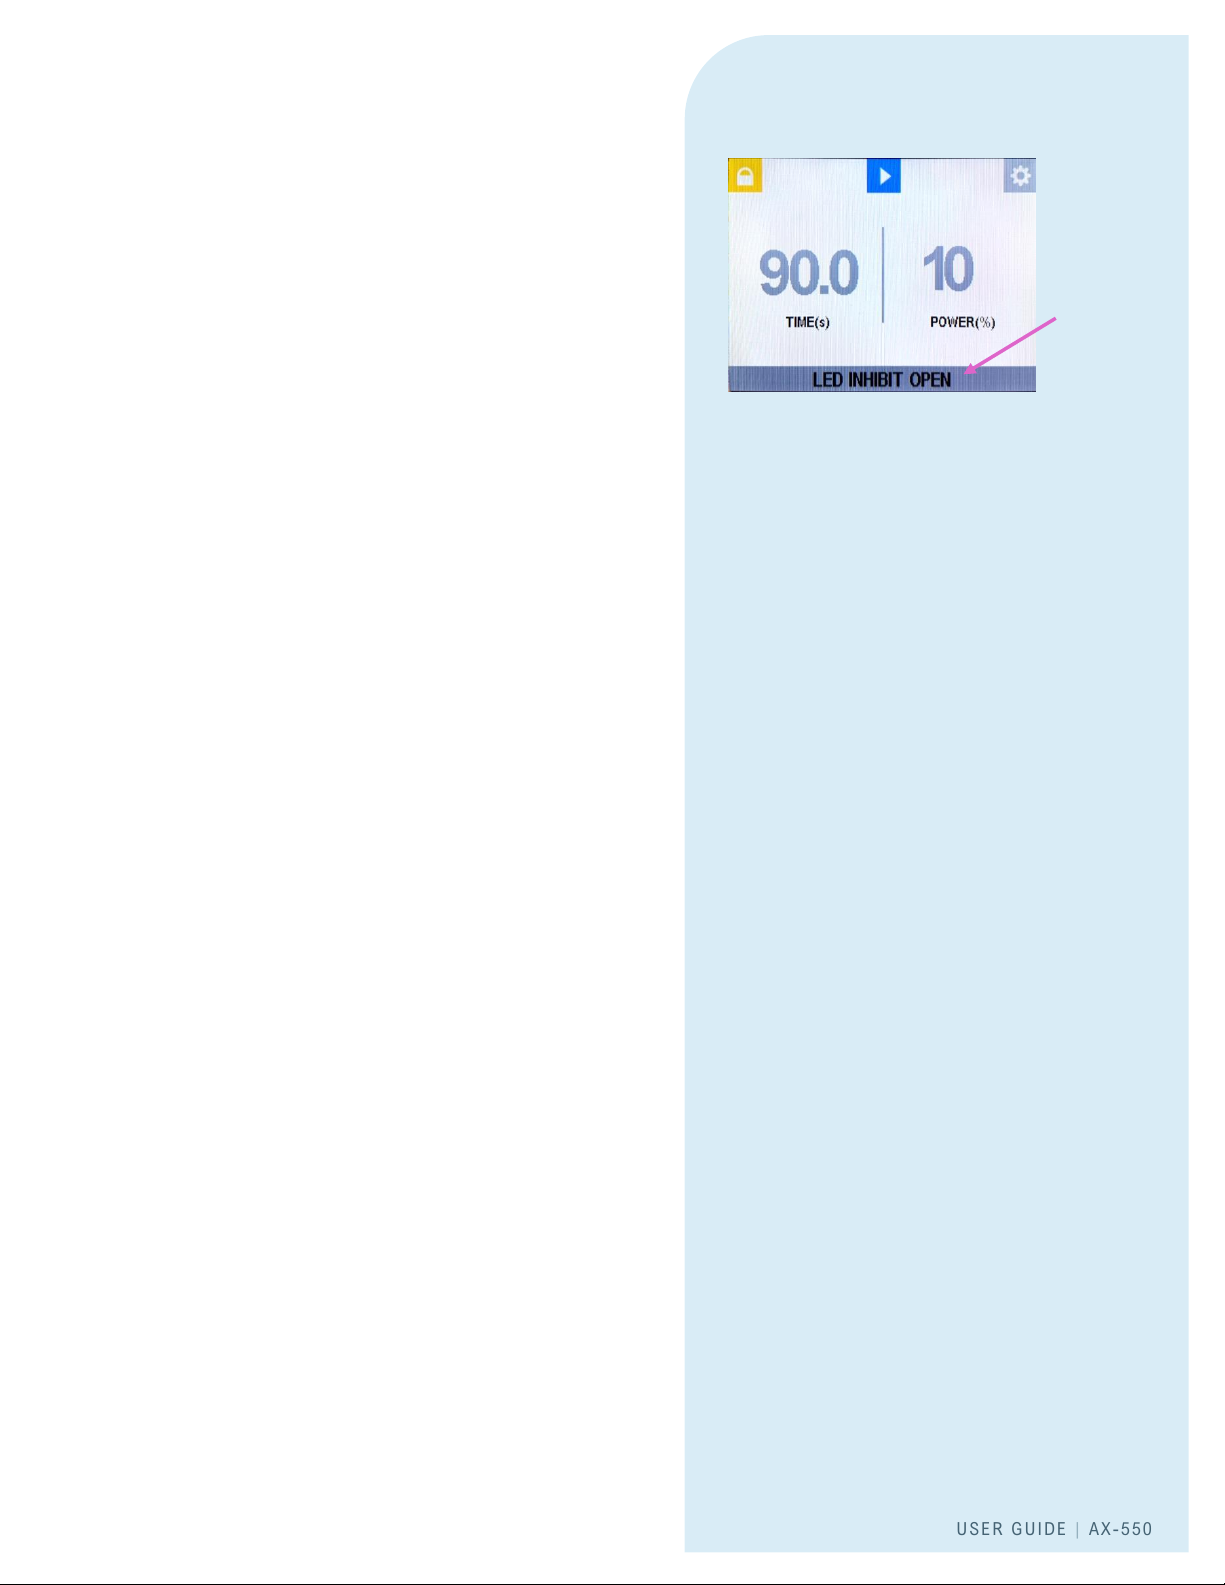
ECE Light Shield (Figure 1) - The light shield is the
base of the flood system and is constructed so the
operator can safely observe objects during the
curing process. Its front-loading door swings up and
down on dual supporting hinges and has an interlock
switch that prevents the LED flood array from
activating when the light shield door is open. Inside
the unit is a fireproof tray that slides along adjustable
height rails and can be easily removed and replaced.
Adapter Plate Assembly (Figure 2) - The adapter
plate is the interface between the BlueWave®AX-
550 LED curing system and the ECE light shield
enabling a safe, secure bond between the two
components.
Figure 1.
Main Components of the AX Light Shield Kit
Figure 2.
Adapter Plate Assembly
Adapter Plate
L-Bracket
UV-Blocking
Safety Glass
Window
Cover
Door Handle

5|D YM AX .C O M
U SE R G U ID E |AX L I G HT S H IE L D K IT
Parts Included in the AX Light Shield Kit (PN 60419)
1Light Shield with Tray, PN 40807
2Interface Adapter Plate, PN 43632
3L-Bracket, PN 60401
4Interlock Cable, PN 60471
5Screws, M4 x 8 mm, PN 41688
6Screws, M5 x 8, PN 39166
7Dymax AX Light Shield User Guide, PN 60482
Special Features & Benefits
Feature
Benefit
Accommodates parts
for curing up to 7.5"
[19.05 cm] high
Can be used for a variety of part
configurations.
Work surface may be
adjusted from 1.5"- 5.5"
[3.81 cm - 13.97 cm]
from the cover of the
enclosure.
The light shield tray can be used
with light-curing applications for
a variety of size products.
Door interlock
Extra safety precaution
preventing the LED unit from
being activated when the light
shield door is open.
Figure 3.
AX Light Shield Kit Parts List (PN 60419)
1
2
3
6
5
4
7

6 |D YM AX .C O M
U SE R G U ID E |AX L I G HT S H IE L D K IT
Assembly and Setup
Unpacking and Inspecting Your Shipment
When your AX light shield arrives, inspect the boxes
for damage and notify the shipper of box damage
immediately.
Open each box and check for equipment damage. If
parts are damaged, notify the shipper and submit a
claim for the damaged parts. Contact Dymax so that
new parts can be shipped to you immediately.
Check that the parts included in your order match
those listed below. If parts are missing, contact your
local Dymax representative or Dymax Customer
Support to resolve the problem.
System Interconnection
Place the light shield on the designated workbench.
Remove all packaging used for securing the unit
during shipping and save it in the event you need to
repackage the unit for return.
Suggested Sequence of BlueWave®AX-550 LED Curing
System Connection
1. Remove the (4) M4 x 8 Screws from the middle
of the outer perimiter of the Top Plate. (Figure 4)
Place the Adapter Plate onto the Top Plate with
the two L-Bracket Mounting Holes toward the
rear, PEMs facing downward, and align the 4
mounting holes along the edge.
2. Secure the Adapter Plate to the Top Plate by
reinstalling the (4) M4 x 8 Screws removed in
the previous step. (Figure 5)
Figure 4.
Remove Screws
Figure 5.
Mounting the Adapter Plate

7|D YM AX .C O M
U SE R G U ID E |AX-550
3. Place the L-Bracket onto the Adapter Plate, flat
side facing toward the front of the Light Shield
and align the mounting holes.
(Figure 6)
4. Place the BlueWave®AX-550 LED Curing
System onto the Adapter Plate, aligning the rear
mounting holes with the slots in the L-Bracket.
Insert the (2) M5 x 8 Screws through the L-
Bracket Slots into the BlueWave®AX-550
Emitter Mounting Holes and tighten. (Figure 7)
Figure 6.
Installing the L-Bracket
Figure 7.
Mounting the BlueWave AX-550 LED Curing System

8|D YM AX .C O M
U SE R G U ID E |AX-550
5. Connect all components with appropriate
cables. (Figure 8)
Figure 8.
BlueWave AX-550 LED Curing System Interconnect Diagram
A. Interlock Cable - Connects the rear of the light
shield to the 18-pin I/O interface on top of the
BlueWave®AX-550 controller, enabling interlock
functionality and power to the light shield fan.
(Figure 9)
B. AC Power Cord - Connects to the power input
on top of the BlueWave®AX-550 controller.
(Figure 10)
Figure 9.
Connecting the Interlock Cable
Figure 10.
Connecting the AC Power Cable
A
B
BlueWave AX-550
LED Curing System
Light Shield
Adapter Plate
Assembly

9|D YM AX .C O M
U SE R G U ID E |AX-550
6. Plug the AC power cord into an AC power
outlet.
7. When all connections are properly made, toggle
the power switch on the top of the BlueWave®
AX-550 controller. The system is now ready for
use. Verify that the fan on the back of the light
shield is operating.
8. Set the curing parameters according to
application requirements. Instructions for setting
these parameters and complete unit operation
can be found in the BlueWave®AX-550 LED
Curing System’s User Guide.
9. Open the light shield door, and verify “LED
INHIBIT OPEN” is displayed across the bottom
of the LCD screen (Figure 11). This indicates
that the light shield is connected and functioning
properly.
NOTE: Curing cycles cannot be started while
“LED INHIBIT OPEN” is displayed on the screen,
preventing accidental light exposure.
10. Estimate the height of the curing part in respect
to its base, or to the base of the part holder (if
the object to be cured is not free standing), and
then adjust the position of the tray to a proper
distance from the curing part. Use a ruler for
setting accuracy. You can set working distances
for each type of LED array assembly differently
to optimize your throughput with respect to
adhesive properties and irradiant energy
required to achieve the best curing quality in the
shortest time. Dymax Application Engineering is
ready to assist you if needed.
11. The system is ready for operation.
Figure 11.
“LED INHIBIT OPEN” Indicates the Light Shield is
Connected and Functioning Properly
NOTE: If your unit doesn’t display the “LED INHIBIT
OPEN” message on the screen when the Light
Shield door is opened, remove all power and do not
operate the unit. Contact Dymax for assistance
Door Open
Indication

10 |DY MAX .C OM
U SE R G U ID E |AX-550
Operation
For a detailed description of the BlueWave®AX-550 LED
curing system operation, maintenance, and
troubleshooting, see the BlueWave®AX-550 LED Curing
System User Guide. Below is a general, suggested
sequence of activities that can be altered to better match
your working conditions, process requirements, and work
habits.
1. To begin production curing, place the item to be
cured inside the Light Shield. Close the Door and a
click sound should be heard.
2. Initiate the cure cycle by pressing the Foot Switch or
Rotary Push Button on the front panel of the
BlueWave®AX-550 Controller. If using the Rotary
Push Button, make sure to first highlight the
Stop/Run Screen Icon (Figure 12)
3. Once the cure cycle is completed, open the Light
Shield and unload the cured parts.
4. If the Light Shield’s Door is opened at any time, the
“LED INHIBIT OPEN” message will be shown
on the screen and the curing cycle cannot be
started. If the Door is opened during a cycle, the
cycle will be terminated immediately and the “LED
INHIBIT OPEN” message will appear on
the screen.
NOTE: Once a cycle has been terminated due to
door opening, the door must be shut and cycle
restarted; it does not automatically restart upon
shutting the door.
Cleaning & Maintenance
General
For detailed technical assistance, please call the Dymax
Application Engineering.
Light Shield
The light shield is designed to be maintenance free.
Periodic cleaning will ensure long, trouble-free operation.
BlueWave®AX-550 LED Curing System
See the BlueWave®AX-550 LED Curing System User
Guide for maintenance recommendations.
Figure 12.
Stop/Run Screen Icon Selection
Stop/Run Icon
Rotary Push Button

12 |DY MAX .C OM
Troubleshooting
Problem
Possible Cause
Corrective Action
The LED array will not
turn on and the “LED
INHIBIT OPEN” message
is displayed
The light shield's door not fully
closed
Close the door until it clicks
Interlock cable is not fully
plugged in on both ends
Firmly secure the interlock cable on
both ends. Verify the connector
screws are engaged and fastened
The LED array will not
turn on and the “LED
INHIBIT OPEN” message
is not displayed
Reference the Dymax BlueWave®AX-550 User Guide for further
information.
The LED array will not
turn on and the error
screen is visible
NOTE: If your unit displays an error message on the LCD screen, refer to the troubleshooting section of the
BlueWave®AX-550 LED Curing System User Guide for more information.
Spare Parts and Accessories
Item
Part Number
Cables
Interlock Cable
60471
Radiometer
ACCU-CAL™ 160-LED
41585
Misc. Replacement Parts
Work Surface Tray Assembly
40806

12 |DY MAX .C OM
Specifications
Property
Specification
Part Numbers
60419 AX Light Shield Kit (Includes Light Shield & Interface Kit)
43251 Compatible BlueWave®AX-550 Controller
43249 Compatible BlueWave®AX-550 PrimeCure®Emitter –385 nm
43250 Compatible BlueWave®AX-550 VisiCure®Emitter –405 nm
43248 Compatible BlueWave®AX-550 RediCure®Emitter –365 nm
Work Area
10" x 10" [25.4 cm x 25.4 cm]
Work Surface Load Capacity
Up to 5 lbs. [2.27 kg]
Overall Dimensions
(Light Shield Only)
(W x D x H)
15.1" x 18.2" x 10.6" [38.42 cm x 46.25 cm x 26.83 cm]
Overall Dimensions
(with LED Flood Array)
(W x D x H)
15.1" x 18.2" x 21.4" [38.42 cm x 46.25 cm x 54.36 cm]
Need 2" [5.08 cm] clearance for cable on the top of BlueWave®Controller
Weight (Light Shield Only)
12.75 lbs. [5.78 kg]
Weight (Adapter
Plate w/L-Bracket Only)
1.05 lbs. [0.476 kg]
Unit Warranty
1 year from purchase date
U SE R G U ID E |AX L I G HT S H IE L D K IT

Figure 13.
Light Shield with BlueWave®AX-550 LED Curing System Dimensions
Warranty
From date of purchase, Dymax Corporation
offers a one-year warranty against defects in
material and workmanship on all system
components with proof of purchase and
purchase date. Unauthorized repair,
modification, or improper use of equipment may
void your warranty benefits. The use of
aftermarket replacement parts not supplied or
approved by Dymax Corporation will void any
effective warranties and may result in damage to
the equipment.
IMPORTANT NOTE: DYMAX CORPORATION
RESERVES THE RIGHT TO INVALIDATE ANY
WARRANTIES, EXPRESSED OR IMPLIED, DUE
TO ANY REPAIRS PERFORMED OR ATTEMPTED
ON DYMAX EQUIPMENT WITHOUT WRITTEN
AUTHORIZATION FROM DYMAX. THOSE
CORRECTIVE ACTIONS LISTED ABOVE ARE
LIMITED TO THIS AUTHORIZATION.
13 |DY MAX .C OM
U SE R G U ID E |AX L I G HT S H IE L D K IT

Index
Assembly ......................................................... 7
Cable Connections........................................... 8
Cleaning ........................................................ 10
Contact Informationt......................................... 3
Converting an ECE System over to LED ........... 8
Dimensions .................................................... 12
Features and Benefits ...................................... 5
Help ................................................................. 3
Maintenance .................................................. 10
Operation....................................................... 10
Optional Equipment........................................ 11
Parts ................................................................ 4
Parts Included .................................................. 5
Product Overview............................................. 4
Safety .............................................................. 3
General Safety Considerations ......................... 3
Safety Symbol Index........................................ 3
Specific Safety Considerations ......................... 3
Setup .............................................................. 6
Spare Parts and Accessories ......................... 11
Specifications................................................. 12
Support............................................................ 3
System Components........................................ 4
System Interconnect ....................................... 6
Troublshooting ............................................... 11
Unpacking ....................................................... 6
Warranty ........................................................ 13

www.dymax.com
Americas
Europe
Asia
© 2020 Dymax Corporation. All rights reserved. All trademarks in this guide, except where noted, are the property of, or used under license by Dymax Corporation, U.S.A.
Please note that most curing system applications are unique. Dymax does not warrant the fitness of the product for the intended application. Any warranty applicable to the product, its application and use is strictly limited
to that contained in Dymax’s standard Conditions of Sale. Dymax recommends that any intended application be evaluated and tested by the user to ensure that desired performance criteria are satisfied. Dymax is willing to
assist users in their performance testing and evaluation by offering equipment trial rental and leasing programs to assist in such testing and evaluations. MAN108DA 60482 5/11/2020
Other manuals for BlueWave AX-550
3
This manual suits for next models
8
Table of contents
Other dymax Medical Equipment manuals
Popular Medical Equipment manuals by other brands

Benchmark Scientific
Benchmark Scientific MyGel E1201-E operating manual

Bodypoint
Bodypoint HW100-150 Installation and user instructions

B. Braun
B. Braun microspeed uni Instructions for use

VIASYS
VIASYS Nicolet Endeavor user guide

Integra
Integra MAYFIELD A2101 instruction manual

Halyard
Halyard MIC Instructions for use