Dynex DX-E101 User manual

INSTALL GUIDE • GUIDE DE L’UTILISATEUR • GUÍA DEL USUARIO
Dynex Fast Ethernet Adapter
Carte réseau Ethernet rapide de Dynex
Adaptador de Ethernet rápido Dynex
DX-E101
Dynex5x7-multi.book Page 1 Wednesday, September 14, 2005 9:09 AM

2
Dynex Fast Ethernet Adapter
DX-E101
Contents
Package contents. . . . . . . . . . . . . . . . . . . . . . . . . . . . . . . . . . . . . . . 3
Installing the adapter . . . . . . . . . . . . . . . . . . . . . . . . . . . . . . . . . . . 3
Connecting the WOL cable. . . . . . . . . . . . . . . . . . . . . . . . . . . 4
Installing the drivers . . . . . . . . . . . . . . . . . . . . . . . . . . . . . . . . . 5
Troubleshooting . . . . . . . . . . . . . . . . . . . . . . . . . . . . . . . . . . . . . . 11
Specifications . . . . . . . . . . . . . . . . . . . . . . . . . . . . . . . . . . . . . . . . . 11
Legal notices . . . . . . . . . . . . . . . . . . . . . . . . . . . . . . . . . . . . . . . . . . 12
Français . . . . . . . . . . . . . . . . . . . . . . . . . . . . . . . . . .15
Español . . . . . . . . . . . . . . . . . . . . . . . . . . . . . . . . . . .31
Dynex5x7-multi.book Page 2 Wednesday, September 14, 2005 9:09 AM

Package contents 3
Package contents
Make sure that the package contains the following items:
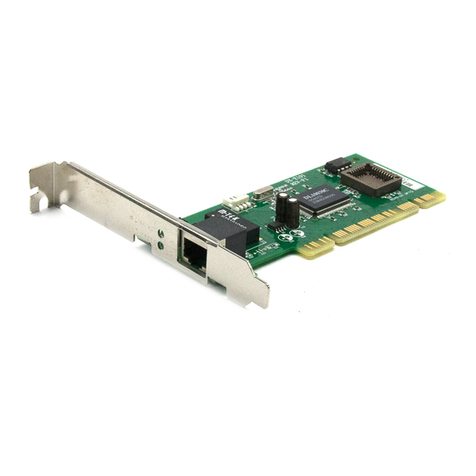
• DX-E101 Fast Ethernet Adapter
• Drivers CD
• Wake-On-Lan (WOL) cable (optional)
• User guide and this installation guide
Installing the adapter
Caution: Opening your computer’s case may void your computer’s warranty.
Contact your computer‘s manufacturer before opening the case to make sure that
you do not void the warranty.You may need to have the adapter installed by your
computer’s manufacturer or an authorized computer technician.
Caution: Before touching any electronic components, make sure that you first
touch an unpainted, grounded metal object to discharge any static electricity
stored on your clothing or body.
Dynex5x7-multi.book Page 3 Wednesday, September 14, 2005 9:09 AM

4Installing the adapter
To install the E101:
1Turn off your computer and unplug the power cord and all cables.
2Remove your computer’s case cover. See your computer’s user guide for
information about removing the cover.
3Locate an available PCI slot. PCI slots are usually white.
4Remove the screw that secures the backplate (the small piece of metal that
covers the opening for the PCI card on the back panel of your computer),
then remove the backplate.
5If you are installing the Wake On LAN cable, follow the instructions in
“Connecting the WOL cable” on page 4.
6Carefully insert the adapter into the PCI slot. Do not touch the metal
connector on the adapter.
7Secure the adapter to the case using the screw you removed from the
backplate.
8Reinstall your computer’s case cover.
9Plug in the power cord and other cables, then turn on your computer.
Connecting the WOL cable
The adapter features Wake On LAN (WOL). This feature lets a remote station
“wake” your computer when it is in Standby or Hibernate mode.
For more information about WOL, see your user guide.
Caution: The WOL cable is an interconnect cable with standard 3-pin connectors
on each end. If your computer’s system board WOL connector does not fit the WOL
cable or does not have 3 pins, do not try to force a connection or alter the
components to fit. Doing so could permanently damage your computer.
Note: The WOL function is system dependent. In addition to the following
instructions, you may need to download WOL software from Intel or another
manufacturer’s Web site.
See your computer’s user guide for specific BIOS settings.
To install the WOL cable:
1Connect one end of the cable to the NIC WOL connector on the adapter.
Both ends of the WOL cable are identical, so you can use either end.
2Examine the computer’s system board or see the system board guide to
locate the corresponding WOL connector on the system board. The actual
location varies, but the system board may have a label beside the WOL
connector.
Dynex5x7-multi.book Page 4 Wednesday, September 14, 2005 9:09 AM
Installing the adapter 5
3Connect the other end of the cable to the WOL connector on the system
board.
4Turn on your computer and press Delete or F1 when prompted to enter the
BIOS Setup utility. The keys you press to enter the BIOS Setup utility may
vary. See your computer’s user guide. Enable the WOL function or power-on
function of the computer. The name of this function is system dependent,
but it may be located in a category heading titled such as “Power
Management.” See your computer‘s user guide for more information
regarding the BIOS Setup utility and BIOS settings.
Installing the drivers
WINDOWS XP
To install the adapter drivers in Windows XP:
1Make sure that you have installed the adapter into your computer and have
connected the network cable.
2Turn on your computer. After Windows XP automatically installs the drivers,
a Found New Hardware message appears next to the clock on the Windows
taskbar.
3If Windows does not automatically install the drivers, follow the
instructions in “Manually installing the drivers in Windows XP” on page 5.
MANUALLY INSTALLING THE DRIVERS IN WINDOWS XP
To manually install the drivers in Windows XP:
1Click Start, right-click My Computer, then click Properties. The System
Properties box opens.
Dynex5x7-multi.book Page 5 Wednesday, September 14, 2005 9:09 AM
6Installing the adapter
2Click the Hardware tab, then click Device Manger. The Device Manager
window opens.
3Double-click Network Adapters or click the plus (+) sign next to
Network Adapters. The network adapters installed in your computer are
displayed.
4Double-click the Dynex DX-E101 PCI Adapter.
5Click the Driver tab.
6Click Update Driver. The Hardware Update Wizard opens.
7Insert the DX-E101 CD into your CD or DVD drive.
8If an Autorun box opens, close it.
Dynex5x7-multi.book Page 6 Wednesday, September 14, 2005 9:09 AM
Installing the adapter 7
9In the Hardware Update Wizard, click Install from list or specific
location (Advanced), then click Next. The Please select your search and
installation screen opens.
10 Click Search for the best driver in these locations.
11 Click to remove the check in the Search removable media (floppy,
CD-ROM) check box.
12 Click the Include this location in the search check box, type D:\WINXP
(where D: is the drive letter for your CD or DVD drive) in the Include this
location in the search box, then click Next. Windows searches for the
drivers on the DX-E101 CD and installs the drivers. When the installation is
complete, the Completing the Hardware Update Wizard screen opens.
13 Click Finish. The driver installation is complete.
WINDOWS 2000
To install the drivers in Windows 2000:
1Make sure that you have installed the adapter into your computer and have
connected the network cable.
2Turn on your computer. The Found New Hardware Wizard opens.
Dynex5x7-multi.book Page 7 Wednesday, September 14, 2005 9:09 AM
8Installing the adapter
3Click Next. The Install Hardware Device Drivers screen opens.
4Insert the DX-E101 drivers CD into your CD or DVD drive.
5On the Install Hardware Device Drivers screen, click Search for a suitable
driver for my device (recommended), then click Next. The Locate Driver
Files screen opens.
6Click Specify a location, click to clear any other checked options, then
click Next. The Found New Hardware box opens.
Dynex5x7-multi.book Page 8 Wednesday, September 14, 2005 9:09 AM
Installing the adapter 9
7Type D:\win2k (where D: is the drive letter for your CD or DVD drive) in the
Copy manufacturer’s files from box, then click OK. The Driver Files
Search Results screen opens.
8Click Next. The Completing the Found New Hardware Wizard screen opens.
9Click Finish. The driver installation is complete.
WINDOWS ME
To install the drivers in Windows ME:
1Make sure that you have installed the adapter into your computer and have
connected the network cable.
2Turn on your computer. The Add New Hardware Wizard opens.
Dynex5x7-multi.book Page 9 Wednesday, September 14, 2005 9:09 AM
10 Installing the adapter
3Click Specify the location of the driver (Advanced), then click Next.
The search locations screen opens.
4Insert the DX-E101 CD into your CD or DVD drive.
5If an Autorun box opens, close it.
6On the search locations screen, click Search for a suitable driver for my
device (recommended), then click to clear any other selected options.
7Click Specify a location, type D:\WINME (where D: is the drive letter for
your CD or DVD drive), then click Next. The Windows driver search for the
device screen opens.
8Click Next. Windows installs the drivers, then the Dynex DX-E101 PCI
adapter screen opens.
9Click Finish.
10 When you are prompted to restart your computer, click Yes. Your computer
restarts and the driver installation is complete.
Dynex5x7-multi.book Page 10 Wednesday, September 14, 2005 9:09 AM
Troubleshooting 11
Troubleshooting
For troubleshooting information, see your user guide.
Specifications
•NetworkType:
• Fast Ethernet 100 Base-TX–IEEE 802.3u standard for 100 Mbps
baseband CSMA/CD local area network
• Ethernet 10Base-T–IEEE 802.3 standard for 10 Mbps baseband CSMA/CD
local area network
•Jumperlesshardware
•Auto-negotiation
• ACPI PCI power management support
• Remote wake up of ACPI/APM system support
• With AMD magic packet:
•LinkChg.
• Microsoft wake-up frame
• Media interface: RJ-45
• EMI Compatibility:
•FCCClassB
•VCCIClassB
•CISPRB
• Canada ICES-003, Class B
• CE Certification, Class B
•C-Tick
• Host interface: PCI 2.1 and PCI 2.2 Bus (bus master)
• I/O & IRQ base address: assigned by Plug and Play system
• Physical dimensions: 5.5 in. × 2.9 in. (13.9 cm x 7.3 cm)
• Environment:
• Storage: 14° to 158°F (-10° to 70°C) 14
• Operating: 14° to 131°F (-10° to 55°C)
• Humidity: 10% to 90% RH, non-condensing
• Power consumption: 0.8W (240 mA @ 3.3V) max
• PCB Layer: 2 layers
Dynex5x7-multi.book Page 11 Wednesday, September 14, 2005 9:09 AM

12 Legal notices
• Software drivers for:
• Microsoft Windows 98
• Microsoft Windows NT 4.0
• Microsoft Windows Me/2000/XP
• Microsoft LAN Manager v2.1
• Novell Netware 3.x, 4.x, 5.0 ODI driver
•NDISdriver
•Packetdriver
•Linux
Legal notices
FCC STATEMENT
This equipment has been tested and found to comply with the limits for a Class A
digital device, pursuant to Part 15 of the FCC Rules. These limits are designed to
provide reasonable protection against harmful interference in a residential
installation. This equipment generates, uses, and can radiate radio frequency
energy and, if not installed and used according to the instructions, may cause
harmful interference to radio communications. However, there is no guarantee
that interference will not occur in a particular installation. If this equipment does
cause harmful interference to radio or television reception, which is found by
turning the equipment off and on, the user is encouraged to try to correct the
interference by one or more of the following measures:
• Reorient or relocate the receiving antenna
• Increase the separation between the equipment or device
• Connect the equipment to an outlet other than the receiver’s
• Consult a dealer or an experienced radio/TV technician for assistance
Copyright and disclaimer
© 2005 Dynex. DYNEX and the DYNEX logo are trademarks of Best Buy Enterprise
Services, Inc. Other brands and product names are trademarks or registered
trademarks of their respective holders. Specifications and features are subject to
change without notice or obligation.
Support number: (800) 305-2204
URL: www.dynexproducts.com
Dynex5x7-multi.book Page 12 Wednesday, September 14, 2005 9:09 AM

Legal notices 13
Warranty
Dynex warrants that for 1 year from date of purchase as stated on your receipt, it
will replace this product if found to be defective in materials or workmanship. If
defective, return the item to the store where it was purchased before the
expiration of the 1 year warranty period, with your original receipt, and we will
replace it with a then-current equivalent Dynex product (or a pro-rated refund at
Dynex’s option). This warranty is available only for the original purchaser of this
product. Dynex will not be responsible for any incidental or consequential
damages or for any loss arising in connection with the use or inability to use this
product. Some states do not allow the exclusion or limitation of incidental or
consequential damages, so the above limitation or exclusion may not apply to
you.
Dynex5x7-multi.book Page 13 Wednesday, September 14, 2005 9:09 AM

14 Legal notices
Dynex5x7-multi.book Page 14 Wednesday, September 14, 2005 9:09 AM
15
Carte réseau Ethernet rapide
DX-E101 de Dynex
Table des matières
Contenu de l’emballage . . . . . . . . . . . . . . . . . . . . . . . . . . . . . . . 17
Installation de la carte . . . . . . . . . . . . . . . . . . . . . . . . . . . . . . . . . 17
Connexion du câble pour l’éveil par appel réseau. . . . 18
Installation des pilotes . . . . . . . . . . . . . . . . . . . . . . . . . . . . . . 20
Problèmes et solutions . . . . . . . . . . . . . . . . . . . . . . . . . . . . . . . . 26
Caractéristiques . . . . . . . . . . . . . . . . . . . . . . . . . . . . . . . . . . . . . . . 27
Avis juridiques . . . . . . . . . . . . . . . . . . . . . . . . . . . . . . . . . . . . . . . . 28
Français
Dynex5x7-multi.book Page 15 Wednesday, September 14, 2005 9:09 AM

16
Dynex5x7-multi.book Page 16 Wednesday, September 14, 2005 9:09 AM
Contenu de l’emballage 17
Contenu de l’emballage
Vérifier que l’emballage contient les articles suivants :
• Carte réseau Ethernet rapide DX-E101 de Dynex
• CD avec les pilotes
• Câble pour éveil par appel réseau (optionnel)
• Guide de l’utilisateur et ce Guide d’installation
Installation de la carte
Attention : L’ouverture du boîtier de l’ordinateur peut annuler sa garantie.
Contactez le fabricant de votre ordinateur avant d’ouvrir le boîtier, pour vous
assurer que votre garantie ne sera pas annulée. Il se peut que la carte doive être
installée par le fabricant de votre ordinateur ou un spécialiste autorisé.
Dynex5x7-multi.book Page 17 Wednesday, September 14, 2005 9:09 AM

18 Installation de la carte
Attention : Avant de toucher un composant électronique, assurez-vous de
toucher d’abord un objet métallique non peint et mis à la masse, afin de
décharger toute électricité statique accumulée dans votre corps ou sur vos
vêtements.
Pour installer la carte E101 :
1Mettre l’ordinateur hors tension, puis débrancher le cordon d’alimentation
et tous les câbles.
2Enlevez le couvercle du boîtier de votre ordinateur. Reportez-vous au guide
de l’utilisateur de l’ordinateur pour toute information sur la façon d’enlever
le couvercle.
3Localisez un connecteur PCI disponible. Les connecteurs PCI sont en général
blancs.
4Enlevez la vis de fixation du cache (la petite pièce métallique qui masque
l’ouverture de l’emplacement de la carte PCI, sur la face arrière de
l’ordinateur), puis l’enlever.
5Si vous installez un câble pour éveil par appel réseau, reportez-vous aux
instructions de la section « Connexion du câble pour l’éveil par appel
réseau. » page 18.
6Insérez délicatement la carte dans le connecteur PCI. Ne touchez pas le
connecteur métallique sur la carte.
7Fixez la carte sur le boîtier en utilisant la vis qui tenait le cache.
8Replacez le couvercle du boîtier de l’ordinateur.
9Connectez le cordon d’alimentation et les autres câbles, puis mettez
l’ordinateur sous tension.
Connexion du câble pour l’éveil par appel réseau.
La carte est dotée de la fonction éveil par appel réseau. Cette fonction permet à
une station de travail à distance de « réveiller » l’ordinateur quand il est en mode
veille ou de mise en veille prolongée.
Pour plus ample information sur l’éveil par appel réseau, reportez-vous au guide
de l’utilisateur.
Dynex5x7-multi.book Page 18 Wednesday, September 14, 2005 9:09 AM

Installation de la carte 19
Attention : Le câble pour l’éveil par appel réseau est un câble d’interconnexion
avec des connecteurs standard à trois broches à chaque extrémité. Si le câble pour
l’éveil par appel réseau ne peut pas se brancher au connecteur de la carte système
de votre ordinateur ou n’a pas 3 broches, n’essayez pas de le brancher de force ou
de modifier le connecteur pour effectuer le branchement. Cela pourrait
endommager votre ordinateur de façon permanente.
Remarque : La fonction éveil par appel réseau varie en fonction du système. En
plus des instructions suivantes, vous pouvez avoir besoin de télécharger le logiciel
d’éveil par appel réseau sur le site Web d’Intel ou d’un autre fabricant.
Reportez-vous au guide de l’utilisateur de votre ordinateur pour la configuration
spécifique du BIOS.
Pour installer le câble pour l’éveil par appel réseau :
1Connectez une extrémité du câble au connecteur pour l’éveil par appel
réseau sur la carte. Les deux extrémités du câble pour l’éveil par appel
réseau sont identiques et peuvent être utilisées indifféremment du sens.
2Examinez la carte système de l’ordinateur ou reportez-vous au guide de la
carte système pour localiser l’emplacement du connecteur d’éveil par appel
réseau. L’emplacement varie d’une carte à l’autre, mais votre carte système
peut avoir une étiquette identifiant le connecteur d’éveil par appel réseau.
3Connectez l’autre extrémité du câble au connecteur d’éveil par appel réseau
de la carte système.
4Mettez l’ordinateur sous tension et appuyez sur la touche Delete (Suppr)
ou F1 à l’invite d’accéder à l’utilitaire de configuration du BIOS. Les touches
permettant l’accès à l’utilitaire de configuration du BIOS peuvent varier.
Reportez-vous au guide de l’utilisateur de votre ordinateur. Activez la
fonction éveil par appel réseau ou la fonction allumage automatique de
l’ordinateur. Le nom de cette fonction varie suivant les systèmes, mais elle
peut être située sous une catégorie telle que « Power Management »
(Gestion de l’alimentation). Reportez-vous au guide de l’utilisateur de
l’ordinateur pour plus ample information sur l’utilitaire de configuration du
BIOS et de ses paramètres.
Dynex5x7-multi.book Page 19 Wednesday, September 14, 2005 9:09 AM
20 Installation de la carte
Installation des pilotes
WINDOWS XP
Pour installer les pilotes de la carte sous Windows XP :
1Assurez-vous que vous avez installé la carte sur l’ordinateur et connecté le
câble réseau.
2Mettez l'ordinateur sous tension. Après l’installation automatique des
pilotes par Windows XP, le message Found New Hardware (Nouveau
matériel détecté) s’affiche à côté de l’horloge sur la barre d’état de
Windows.
3Si Windows n’installe pas automatiquement les pilotes, reportez-vous aux
instructions de la section « Installation manuelle des pilotes sous
Windows XP » page 20.
INSTALLATION MANUELLE DES PILOTES SOUS WINDOWS XP
Pour installer les pilotes sous Windows XP :
1Cliquez sur Start (Démarrer), puis à l’aide du bouton droit de la souris sur
My Computer (Poste de travail), puis sur Properties (Propriétés). La boîte
System Properties (Propriétés système) s’ouvre.
Dynex5x7-multi.book Page 20 Wednesday, September 14, 2005 9:09 AM
Other manuals for DX-E101
2
Table of contents
Languages:
Other Dynex Adapter manuals

Dynex
Dynex DX-VS201A User manual

Dynex
Dynex DX-TAPS5 User manual

Dynex
Dynex DX-WGUSB User manual

Dynex
Dynex DX-BUSB User manual

Dynex
Dynex DX-FC202 User manual

Dynex
Dynex DX-WGPUSB User manual

Dynex
Dynex DX-TADPCON Parts list manual

Dynex
Dynex DX-ECFW User manual

Dynex
Dynex DX-ECFW User manual

Dynex
Dynex DX-NUSB User manual

Dynex
Dynex DX-AC9013 User manual

Dynex
Dynex DX-ECFW User manual

Dynex
Dynex DX-TCADPT User manual

Dynex
Dynex DX-TADPCON User manual

Dynex
Dynex DX-AC1200 User manual

Dynex
Dynex DX-ECFW User manual

Dynex
Dynex DX-PCIGB User manual

Dynex
Dynex DX-TCADPT Parts list manual

Dynex
Dynex DX-UBDB9 User manual

Dynex
Dynex DX-NUSB User manual