10
MCKR-8700N
To make an espresso
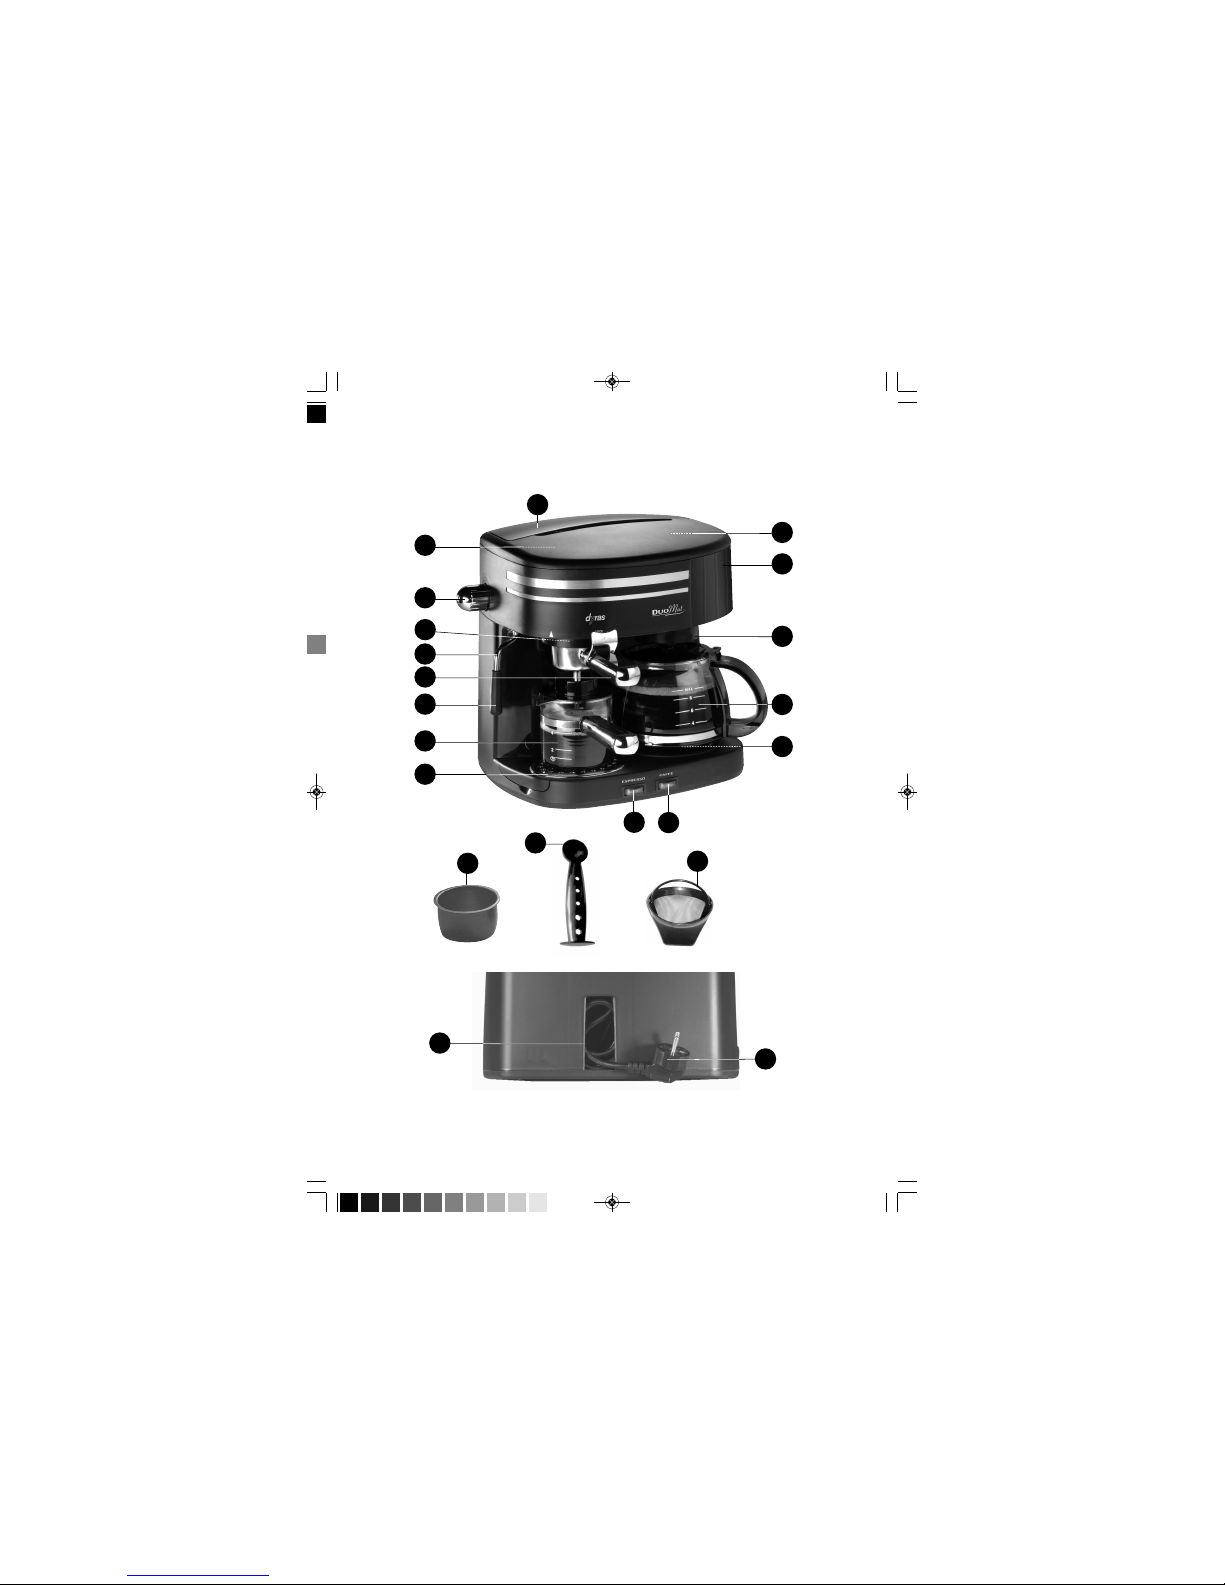
1. Lift the lid on top of the machine (1) to access the water tank of the espresso unit.
2. Unscrew the cap of the tank (2) counterclockwise and remove it from the machine.
3. Pour the required quantity of fresh, cold water into the tank. Always use the measuring markings on the side
of the glass jug.
• water level up to the "2" marking on the jug (2 cups of water) = 2 cups of espresso coee.
• water level up to the "4" marking on the jug (4 cups of water) = 4 cups of espresso coee.
• water level up to the lower edge of the metal strip securing the handle of the jug = 4 cups of
espresso coee + steam to froth the milk for making cappuccino coee.
• If you just want to use the machine to make steam, ll the jug up to the steam symbol.
Important! Never put more water in the water tank of the espresso maker then will t in the jug
up to the lower edge of the metal strip which secures the handle.
4. After pouring the required amount of water into the tank, close the lid by turning it clockwise. Make sure the
lid is closed tightly but do not over-tighten it. Never tilt the lid when tightening it because this may damage
the water tank or the screw threads.
5. Remove the lter holder (part no.7) by turning it a quarter turn to the left, and place the lter containing the
ground coee (part no.19) into it. The inside of the lter contains markings to help you select the correct
amount of ground coee to make 2 or 4 cups.
6. Put the necessary amount of suitably ground coee into the lter (according to the measuring signs inside
the lter). Clean the excess from the rim of the lter. Do not press down the ground coee in the lter basket,
and do not ll it with coee above the 4 cups sign.
• Notes
Please take care when choosing or grinding coee. The texture (size of the grounds) of the coee you use will
inuence the avour of your drink and can also aect the operation of your coee maker.
If you are buying coee that is already ground, always try to select coee that has been produced for an
espresso coee machine. (This is usually indicated on the packaging).
If you grind your own coee beans, make sure you produce ground coee with a medium texture. If the
ground coee is too coarse, the resulting drink will be weak. If the ground coee is too ne, the brewing head
and lter can become blocked. This will increase brewing time and may reduce the amount of coee
produced, resulting in a bitter taste. In addition, using coee that is too ne may cause excess pressure in the
coee maker. This would result in the safety valve opening.
7. Put the lter holder with the lter containing the ground coee back in the machine. Secure the lter holder
into the socket at the bottom of the brewing head, with the arrow on the lter holder's handle which marks
the middle of the lter holder aligned with the white triangle on the appliance casing. Align the three
shoulders of the bayonet-joint on the upper rim of the holder with the grooves in the cast metal brewing
11
MCKR-8700N
EN
head. Push the lter holder upwards while turning it to the right until tight, and until the arrow marking the
middle of the lter holder handle comes in line with the word "LOCK" on the front of the casing.
Notes
• An incorrectly-tted lter holder can drop or y from the appliance due to steam pressure. This may damage
the coee maker or cause an injury.To prevent this, please note the following points:
• When tting the lter holder, always take care to ensure that all three lugs are tted into the socket on the
brewing head before tightening the lter holder. The lter holder must be parallel to the brewing head, not
at an angle. If all three lugs are not tted in the socket when the lter holder is tightened, the lter holder
and/or the outlet may be damaged.
• Always apply appropriate force when tting the lter holder. Turn the lter holder with a rm, steady
movement while avoiding any sudden jolts or irregular movements.
• After tting the lter holder, always check it is rmly attached to the appliance before switching on. If you
notice that the lter holder requires less eort to t than usual or if it does not remain locked in place,
immediately stop using the appliance and take it to a specialist engineer.
8. Put the lid on the glass coee pot so that the opening on the edge of the cover is in line with the lip for
pouring. Now put the pot on the drip tray under the lter holder, making sure the hole in the lter holder is in
line with the hole in the middle of the lid.
9. Before turning on the appliance, check that the espresso maker's control button (part no.3) is set to coee
making, the last setting when turning clockwise; the appliance will only work if the button is turned to the
last setting.Then, connect the appliance to the mains and turn it on.The red indicator light of the power
switch will indicate that the espresso maker is in operation.
10. After two minutes, the water in the tank starts to boil and ows through the ground coee into the jug.
When you have nished making coee, always turn the espresso maker o using the switch (part no.10).
11. Before removing the lter holder from the appliance, either for cleaning or when making coee, always make
sure that the water tank of the espresso maker is not under pressure. To check this, carefully turn the control
button of the espresso maker counterclockwise to the steaming function to release any remaining pressure.
Be careful of any escaping steam, as it could cause scalding!To prevent this, trap any escaping steam in a
good sized jar. Always perform this check prior to opening the cap of the tank. When removing the lter
holder, leave the lter in the holder and wait until both the lter holder and the lter have cooled down
before discarding spent coee grounds.
Important notes:
After using the coee maker, always let it cool down for at least ten minutes before using it again.
Be very careful if you are using the coee maker before it has cooled down completely. In
particular, take care to avoid burning yourself when checking for steam in the water tank, when
removing the water tank lid and when removing the lter holder. You should also be careful when
removing hot coee residue and emptying the lter. (Empty the lter by pushing the latch on the