DYS X230 User manual

User Manual
X230
V1.0
Disclaimer and Warning
Thank you for purchasing X230.
Please read this instruction manual carefully before using this product. By using this product, you
hereby agree to this disclaimer and signify that you have read it in full.
Please strictly adhere to this manual as the manufacturer has no control over the use of the product or
it’s set up or final assembly once sold.
Modification of this craft, such as using other motors , escs , propellers, ect. will result in no liability on
our part. No liability will be assumed or accepted for any resulting damage or injury.
For personal safety and because electrical signal interference problems could occur, please do not fly
this craft inside as it may become unstable.
Any parts of this manual is subjected to change without prior notice.
Any problems with this frame please contact with us or authorized agents.
The X230 mutlicopter kit consists of a multicopter, remote control (TX) and other parts necessary for
flight are included .
The forward looking HD FPV camera located at the nose of the craft can transmit up to 1000 meters,
(within operating range of the TX ).
Frame:
Built-in 120° wide angle and 1920 x 1080P HD camera to get the high quality shooting;
Camera connect with TS832 wireless 5.8G transmitter directly to achieve wireless transmission in aerial
photography;
Equipped with 2200mAh smart flight battery. Choose the high energy density cell and industry-lead-
ing advanced BMG(battery management system);
Flip 360° steadily;
Real-time transmission for FPV action video.
Remote control:
Built-in video transmitter to improve the transmission quality and reliability of communication;
Equipped with camera and operation button to control easily.
Flight attentions
Introduction
Brief introduction
Character
1. Please do not fly in bad weather such as rain, snow, sleet etc. as the craft is not water proof and will
not tolerate getting wet .
2. Please make sure all the parts work properly without aging or damage before flight.
3. Please ensure the propeller and arm mounted properly and firmly before flight.
4. Please be safety minded and do not fly near people , pets, trees, objects, buildings, high voltage
wires ect..
5.Please us the included battery.
6. Please do not close to or touch the motor or propeller once operation.
7. Please us the included parts with this frame only.
8. Please do not fly in the no-fly zone with legal and regulation stated.
9. This product is recommended for use by experienced hobbyists recommended age for use by
beginner is 14 years of age or older.
1

Box listContent
Multicopter 230 1Set
Balance charger X1pcs Charger cable X1pcs
4 pins connection wire
Adapter X1pcs
ABS propeller 5030 X2set
Screw bag X1
Remote control 1Set
Disclaimer and warning 1
Box list 3
1Flight attentions
2Content
1Introduction
Please charge the multicopter battery and remote control battery before flight.
Battery preparation
3Battery preparation
Remote control 5
6Multicopter
7Propeller installation
7Battery installation
8Remote control preparation
Remote control usage
9
On & Off
8
Operation tips
9Camera control
9Multicopter control
Flight
10
Inspection before flight
11
Manual start/stop motor
11
Basic flight
12Appendix
5030R
5030
Please use the included charger to charge the included battery.
Multicopter battery charge
2 3
Multicopter battery X1pcs
1. Connect the charger with supply socket (Use the adapter if needed).
2. Keep the battery OFF while connect battery with specified charger.
3. The battery indicator light will keep blinking and show the power while charging (Refer to the indica-
tor light table).
4. Full charge once the charger indicator light turn red from green. Disconnect the battery from the
charger.

[1]
[3] [2]
[4]
[5]
[6]
Charger port
Battery usage
LED indicator light
Battery power key(with built-in power indicator light)
[1] [2] [3] [4]
[5]
[6]
Smart battery function
Battery
Balance charge protection
Power indicator
Overcharge protection
Battery comes with power indicator light to show the battery percentage.
Overcharge will damage the battery. It will stop charging when battery
voltage up to 12.6V.
Overdischarge protection
Short-circuit protection
Sleeping protection
Charging temperature protection
Overdischarge will damage the battery. It will switch off output when battery
voltage lower than 10.9V.
Balance the inner cell voltage automatically to protect the battery.
It will switch off output to protect battery when short-circuit detected.
When the battery is turned on, it will be sleeping within 10mins without power
need.
It will stop charging while the temperature under 0˚C or exceed 55˚C.
Socket
Capacity
Type
Charging temperature
Discharging temperature
Charing/Discharging relative humidity < 80%
-15˚C~50˚C
0˚C~45˚C
LiPo
3S~11.1V 2200mAh
Remote control
Suppose to control flying maneuver within 1000 meters communication distance with assorted remote
control. Equipped with function keys to control camera and multicopter to shoot freely.
The real-time shooting can be showed on the mobile device(monitor) by remote control with built-in
5.8G wireless transmitter and multicopter with built-in 5.8G transmitter.
[1] Antennas
Signal transmission for copter and
transmitter
[2] Joystick/Rod
Control flight direction
[3] Power switch
[4] Power indicator light
(1 bar means 25%)
[5] Remote control operation light
The light will be on once power on
[6] Transmitter frequency display
[7] Video key
Start/Stop video
[8] Photo key
Photo function
[9] Playback key
Playback mode
[10] Camera function key
Back to previous while playback
[11] 3 section switch for remote control
[12] AV output
[13]12V voltage output and
battery charge for remote control
[14] 4pin USB with 5V and AV output
[15] Adjustment slider for camera tilt angle
Control camera up and down
[16] Battery cover for remote control
[1]
[3]
[4]
[5]
[6]
[2]
[12][13][14]
[11]
[8]
[11]
[10]
[7]
[15]
[16]
4 5
Power status: While power is off, short press power key 1 time to check the curren battery.
Turn on: While power is off, short press power key 1 time, press 2 seconds again to turn on.
Turn off: While power is on, short press power key 1 time, press 2 seconds again to turn off.
[9]
Please read carefully and strictly abide by this manual, disclaimer and the sticker requests
before using the battery.
Please charge the battery with the assorted charger. Manufacturer assumes no liability for
damage(s) or injures incurred by using other chargers.

Multicopter
Multicopter comes with propeller 5030, Black CCW and silver CW for propeller nut.
Built-in 120° wide angle camera, connect the webcam with TS823 wireless 5.8G transmitter directly
for FPV wireless transmission.
Built-in high capacity rechargeable lipo battery to achieve 10mins high speed flight time.
[1] Battery
Power supply for copter
[2] Power indicator
Energy consumption, 1 bar for 25%
[3] USB port for flight control
Adjust the copter setting
[4] Propeller
Make it fly
[5] 5.8G Antennas
Real-time image transmission
[6] Copter operation light
Light will be on once power on the
copter
[7] Camera operation light
[8] 5.8G frequency selection key
[9] 5.8G transmission channel display
[10] Remote control match code
[11] Camera SD card slot
[12] Camera USB port
[13] Camera reset key
[14] 120° wide angle webcam
[15] Foot stand
[16] LED light
It will be green once power on
[17] LED light
It will be red once power on
[18] Battery clasp
Easy to mount/take apart the battery
[2]
[5]
[4]
[6]
[7]
[9]
[14]
[15]
[16]
[17]
[18]
[1]
[3]
[10]
[12]
[11]
[13] [8]
[16]
[17]
6 7
Battery installation
Plug the battery into the battery case as picture shows.
Propeller installation
1. Disassemble the prop nut as per arm symbol, black prop nut for propeller 5030, silver prop nut for propeller 5030R;
2. Tighten up the prop nut as the opposite direction of arm symbol.
Please ensure the copter can fly properly with proper propeller installation.
Please pay attention while mount the propeller to avoid scratch.
Please use the assorted propeller with the copter.
Please purchase the same type propeller if needed.
Hold the motor with hand, unscrew the prop nut with arm symbol direction to disassemble the propeller.
5030 5030R
Installation method:
Disassemble method
Propeller
Sketch
Mounting position Mount black prop nut on the motor Mount silver prop nut on the motor
Arm symbol CW to disassemble prop nut.
CCW to disassemble prop nut.
5030
5030 5030R
5030R

Remote control usage
The maximum communication distance in 2.4Ghz frequency band is 1000 meters. Integrated with 5.8G
transmitter to support output real-time image for mobile device(monitor) directly as well as combination
with camera function key. This remote control meets the CE and FCC standards.
The remote control rod divide into two control methods American and Japanese according to usage
habit. Suggest to use American control method for beginners.
American control method: Left rod to control the throttle.
Japanese control method: Right rod to control the throttle.
Built-in 3S 1800mAh rechargeable battery, check the current by battery indicator light.
Turn on remote control as followings,
1. Short press power button 1 time to check the current battery. Please charge the remote control
once low battery.
2. Short press power button 1 time, then long press more than 2s to turn on remote control.
3. Check the remote control status according to notification tone. Green indicator light keep on to
connect successfully.
4. Repeat the step 2 to turn off remote control.
Operation tips
ON & OFF
Users can real-time control the camera remotely to shoot by " adjustment slider for camera pitch
angle", "Photo key", Video key", "Playback key" and "Camera setting key". ( Detailed key position see
remote control on P6)
Camera control
American control method is defaulted mode before leaving the factory, take an example for American
control method in this manual.
Throttle rod to control copter up and down.
The copter will rise while push up the rod; Fall while pull down the rod.(Push or pull
the rod slowly to avoid rise or fall rapidly.
Yaw rod to control direction
The copter will rotate clockwise while slide to left; Rotate counterclockwise white slide
to right. The copter will stay there while the rod in the middle.
Move the rod to control the rotation speed, the more you move the rod, the faster
rotation speed will be.
Multcopter control
Remote control preparation
The best communication range
Strong signal Weak signal
98
Unfold the remote control antennas and set position. The best communication range for remote control
signal as below:
Make sure the copter is in best communication range whilte operation.
Adjust the direction or distance between polit and copter appropriately to ensure the copter in
the best communication range.

Start motor
Stop motor
Start motor as per below, loosen rod immediately once the motor start rotation.
Pleased do not use the rod while flying, otherwise, the copter will stop working in the air.
Two methods to stop motor after starting.
1. While the copter landing on the ground, push the throttle rod to the lowest position pic 1, then
operate the rob as pic 2, the motor will be stopped immediately and then loosen the rod.
2. While the copter landing on the ground, push the throttle rod to the lowest position and stay 3s to
stop the motor.
Basic flight steps:
1. Keep the copter on the flat and wide ground, pilot should stand behind the copter.
2. Turn on remote control and copter smart battery.
3. Connect mobile device(monitor) with copter X230.
4. The copter can be safe flight while the green indicator light keep blinking. Start the motor with
operation rod.
5. Push up the throttle rod slowly to fly the copter steadily.
6. Adjust the camera tilt angle by adjustable slider.
7. Shooting by photo key and video key.
8. Pull down the throttle rod slowly to land on the ground steadily.
9. Once landed, pull the throttle rod to the lowest position and stay over 3s to stop the motor.
10. Turn off copter and remote control while stop motor.
Manual start/stop motor
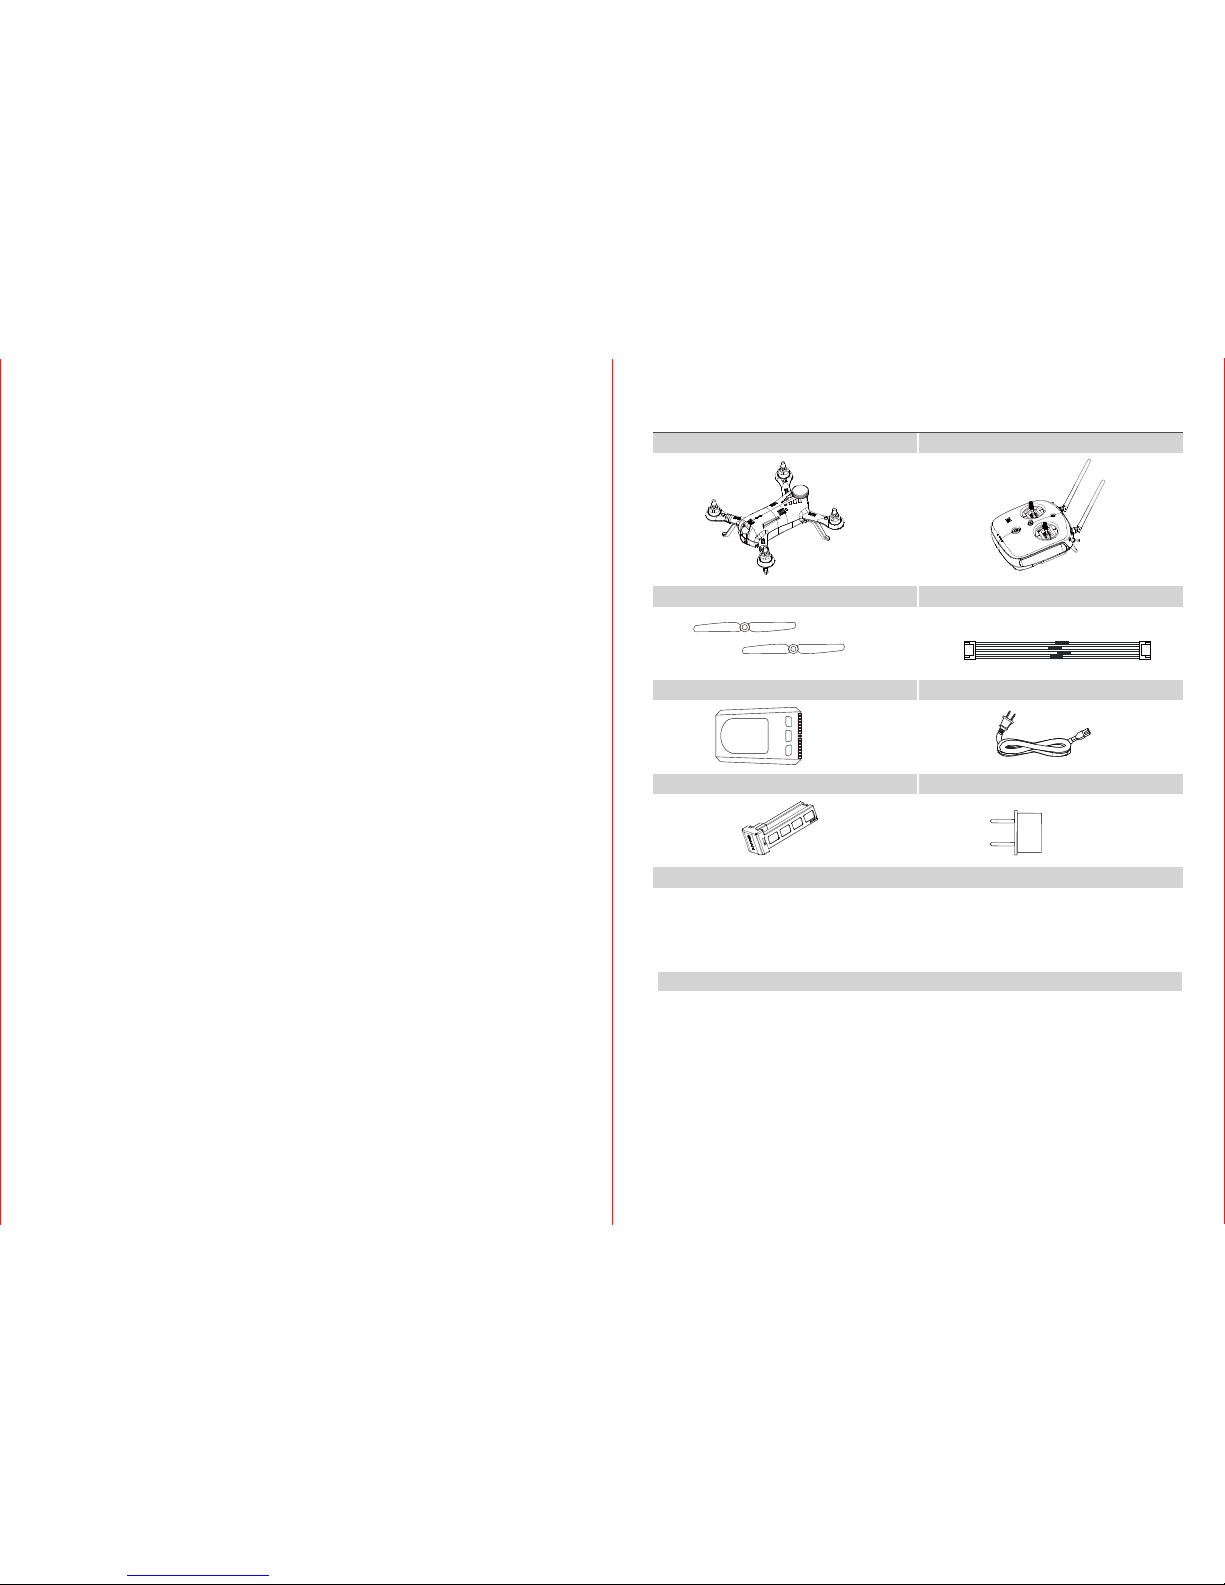
1. Whether enough power for remote control, smart battery and mobile device(Monitor).
2.
Whether all the propellers work properly, please change if any aging, damage or out of shape.
3. Whether the propellers mounted properly and firmly.
4. Make sure the camera with SD card.
5. Whether camera works properly once power on.
6. Whether the motors can work properly once starting up.
7. Whether the monitor can work properly.
Flight
Inspection before flight
Basic flight
Pitch rod to control the copter fly forward and backward
The copter will fly forward while push up the rod, Fly backward while pull down the rod.
The copter will stay there while the rod in the middle.
Move the rod to control tilt angle forward and backward, the more you move the rod,
the more tilt angle will be, and the faster the copter will be as well.
Roll rob to control fly to left and right
The copter will fly to left while push the rod to left; The copter will fly to right while push
the rod to right. The copter will stay level while the rob in the middle.
Slide this switch to control flight mode, detailed flight mode switch as below, different
modes for different switch position.
Mode 0 (Manual): All the flight lines and attitude are controlled by pilot with remote
control rod in manual mode. (Do not suggest to beginner)
Mode 1(Auto-stable): The flight attitude is auto-stable by flight control.
Mode 2(3D): The copter is in full manual mode. Pilot can control the copter to flip by
remote control rod.
Slide this switch to set 3 different flight data and sensitivity. (Custom settings)
10 11
1 0 2
1 0 2

Appendix
Specification
Multicopter
Model X230
Weight(include battery) 500g
Max. take-off weight 800g
Hovering(safe flight) Vertical: 0.5m; Horizon: 2.5m
Max. rotation angular speed Tilt axis: 300°/s, Yaw axis: 150°/s
Max. tile angle 360°
Max. rise rate 5m/s
Max. falling speed 4m/s
Max. level flight speed 30m/s
Max. flight altitude 500M
Max. speed for tolerable wind 6m/s
About 10minFlight time
Battery 3S 2200mAh 11.1V
Propeller 5030
Working temperature -10℃~40℃
2.400~2.483 GHz
10dBm@900M
AV
Remote control
Name
Working frequency
922.7~927.7MHz(Japanese version)
5.725~5.825GHz(Other version)
Signal effective range(outdoor non-interference)
FIRP
Video output port
Power supply
Charge mode
Coordination function
Working consumption
Working temperature
Storage temperature
Charge temperature
Battery
Built-in lithium battery
Assorted
Multi-interconnection supported
1KM
9 W
1800 mAh LiPo 3S
12 13
HD80 camera
Image Sensor
Lens
LCD Display
Viewfinder
Focusing
LED
Exposure
White Balance
Video Size
Audio
Storage
5.8G Transmitter
Interface
Dimensions (W*H*D)
Support
System Requirements
For Windows
*PC with processor better than Pentium 4 3.2GHz
*Windows XP(Service pack 2) or later
*Minimum 1 GB System RAM
*Minimum 256 MB RAM Video Card
*USB port, CD-ROM drive
*1024*768 pixels, 32-bit color display compatible monitor
Type
Effective Pixels
Output Pixels
Focal Length
F No.
F.O.V(D)
Optical Viewfinder
Type
Modes
1/3” CMOS 3.4 MP (Aptina AR0330CS)
3.4Mp (3:2) and 3.15Mp (4:3)still images
Lens f= 2.6mm
F= 2.5
125°
88 Digital Tube Display
No
Fixed
No
Auto
Auto
1920x1080P 30 fps
Mic Equipped
Internal memory: no internal memory
External memory: supporting SDHC Card up to 32GB
Photo : JPEG
Audio : PCM 8KHZ 16bit
Video : H.264 High Profile Level 4.2 MOV
5M(2592x1944)
Bulid-in 5.8G 200mW wireless AV Transmitter
USB 2.0 : Recharging/File Transfer
L: 60mm, W: 41mm, H:24.7mm (with lens part will be 30mm)
Mass Storage Driver
Windows XP(Service pack 2) or later
Mac OS X 10.4.11 or later
Media
File Format
Image Size 5Mp
2304(H) x 1536(V): (entire array):
5.07mm(H) x 3.38mm(V)
2048(H) x 1536(V) (4:3, still mode)
2304(H) x 1296(V) (16:9, sHD mode)
-10℃~40℃
0℃~40℃
Storage time within 3 months: -22℃~45℃
Storage time more than 3 months: 22℃~28℃
Table of contents
Other DYS Drone manuals
Popular Drone manuals by other brands

FORCE FLYERS
FORCE FLYERS 2.4G GYROSCOPE EXPLORER instruction manual

iVue Robotics
iVue Robotics Develop Air operating manual

dji
dji Phantom 2 Vision + user manual

Propel Trampolines
Propel Trampolines PROTON MICRO DRONE Instruction booklet

tbs electronics
tbs electronics XRACER user manual

Robolink
Robolink CoDrone Mini user manual