Dyson DC15 User manual

The Ball Guide d’utilisateur
Veuillez lire attentivement ce manuel avant d’utiliser votre DC15
The Ball Guía del usuario
Lea atentamente esta guía antes de utilizar su DC15
The Ball User Guide
Please read this guide carefully before using your DC15
12438_DC15_USA_OP_MAN_NE… p1-36 2/18/05 3:58 PM Page 1

IMPORTANT SAFETY INSTRUCTIONS
READ ALL INSTRUCTIONS BEFORE USING THIS VACUUM CLEANER
When using an electrical appliance, basic precautions should always be
followed, including the following:
WARNING
TO REDUCE THE RISK OF FIRE, ELECTRIC SHOCK OR INJURY:
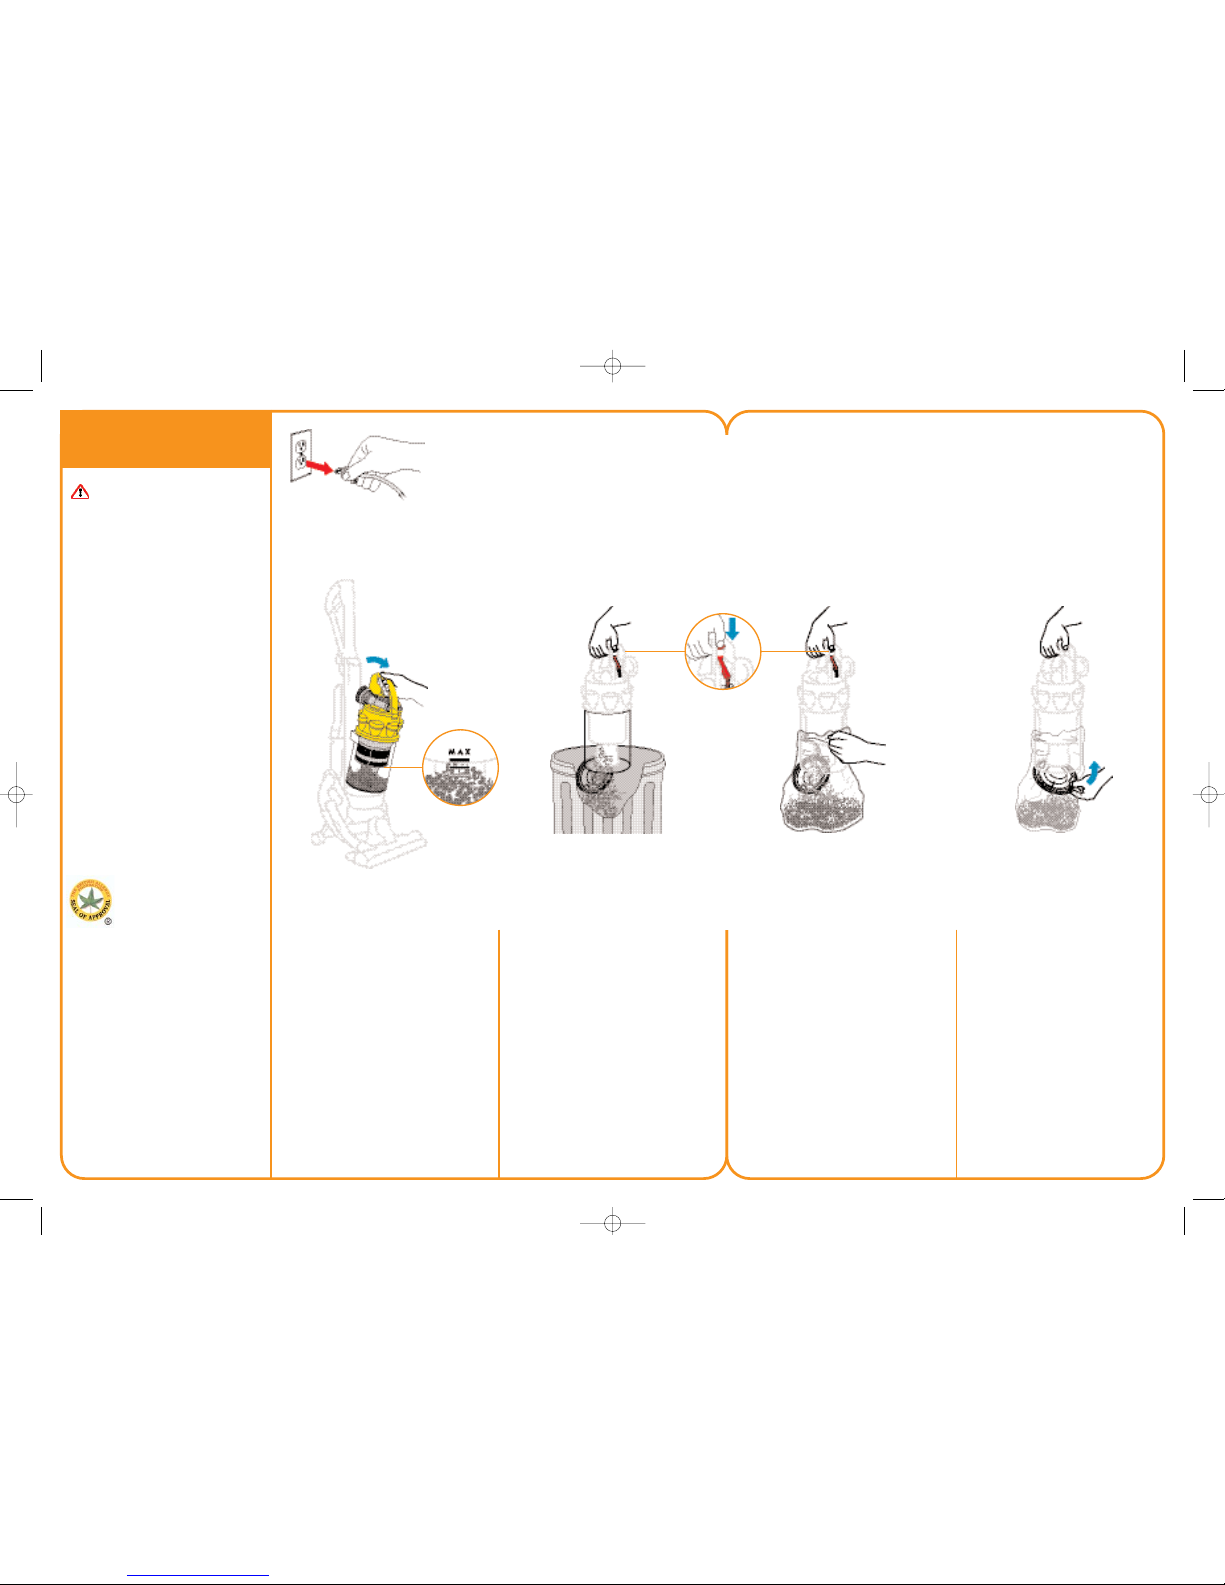
1 Do not leave plugged in. Unplug from electrical outlet when not in use and
before servicing.
2 Do not use outdoors or on wet surfaces or to vacuum water or other liquids –
electric shock could occur.
3 Do not allow to be used as a toy. Close attention is necessary when used by or
near children.
4 You are responsible for making sure that your vacuum cleaner is not used by
anyone unable to operate it properly.
5 Use only as described in this manual. Use only with Dyson recommended
attachments and accessories.
6 Check to ensure your electricity supply corresponds to that shown on the rating
plate, which is located behind the bin. The machine must only be used as rated.
7 Do not use with a damaged cord or plug. If the appliance is not working as it
should, has been dropped, damaged, left outdoors, or immersed in liquid,
contact the Dyson Helpline at 1-866-693-9766.
8 Do not pull or carry by the cord, do not use the cord as a handle, do not
close a door on the cord or pull the cord around sharp edges or corners. Do
not run the appliance over the cord. Keep the cord away from heated surfaces
and open flames.
9 Do not unplug by pulling on the cord. To unplug, grasp the plug, not the cord.
10 Do not handle the plug or appliance with wet hands.
11 Do not use the appliance without the clear binTM and filters in place.
12 Do not put any object into openings in the machine. Do not use with any
opening blocked; keep free of dust, lint, hair and anything that may reduce
air flow.
13 Keep hair, loose clothing, fingers, and all parts of body away from openings
and moving parts.
14 Do not use the machine to pick up sharp hard objects, small toys, pins, paper
clips etc. They may damage the machine.
15 The use of an extension cord is not recommended.
16 Store the machine indoors. Put the vacuum cleaner away after use with the
cord coiled safely, to prevent tripping accidents.
17 Turn off all controls before unplugging.
18 Use extra care when cleaning on stairs; always work with the machine at the
bottom of the stairs. Do not put the machine on chairs, tables etc. Keep on
floor.
19 Do not pick up anything that is burning or smoking, such as cigarettes,
matches or hot ashes.
20 Do not use to pick up flammable or combustible liquids, such as gasoline, or
use in areas where they may be present.
21 When vacuuming, certain carpets may generate small static charges in the
clear bin or wand. These are entirely harmless and are not associated with the
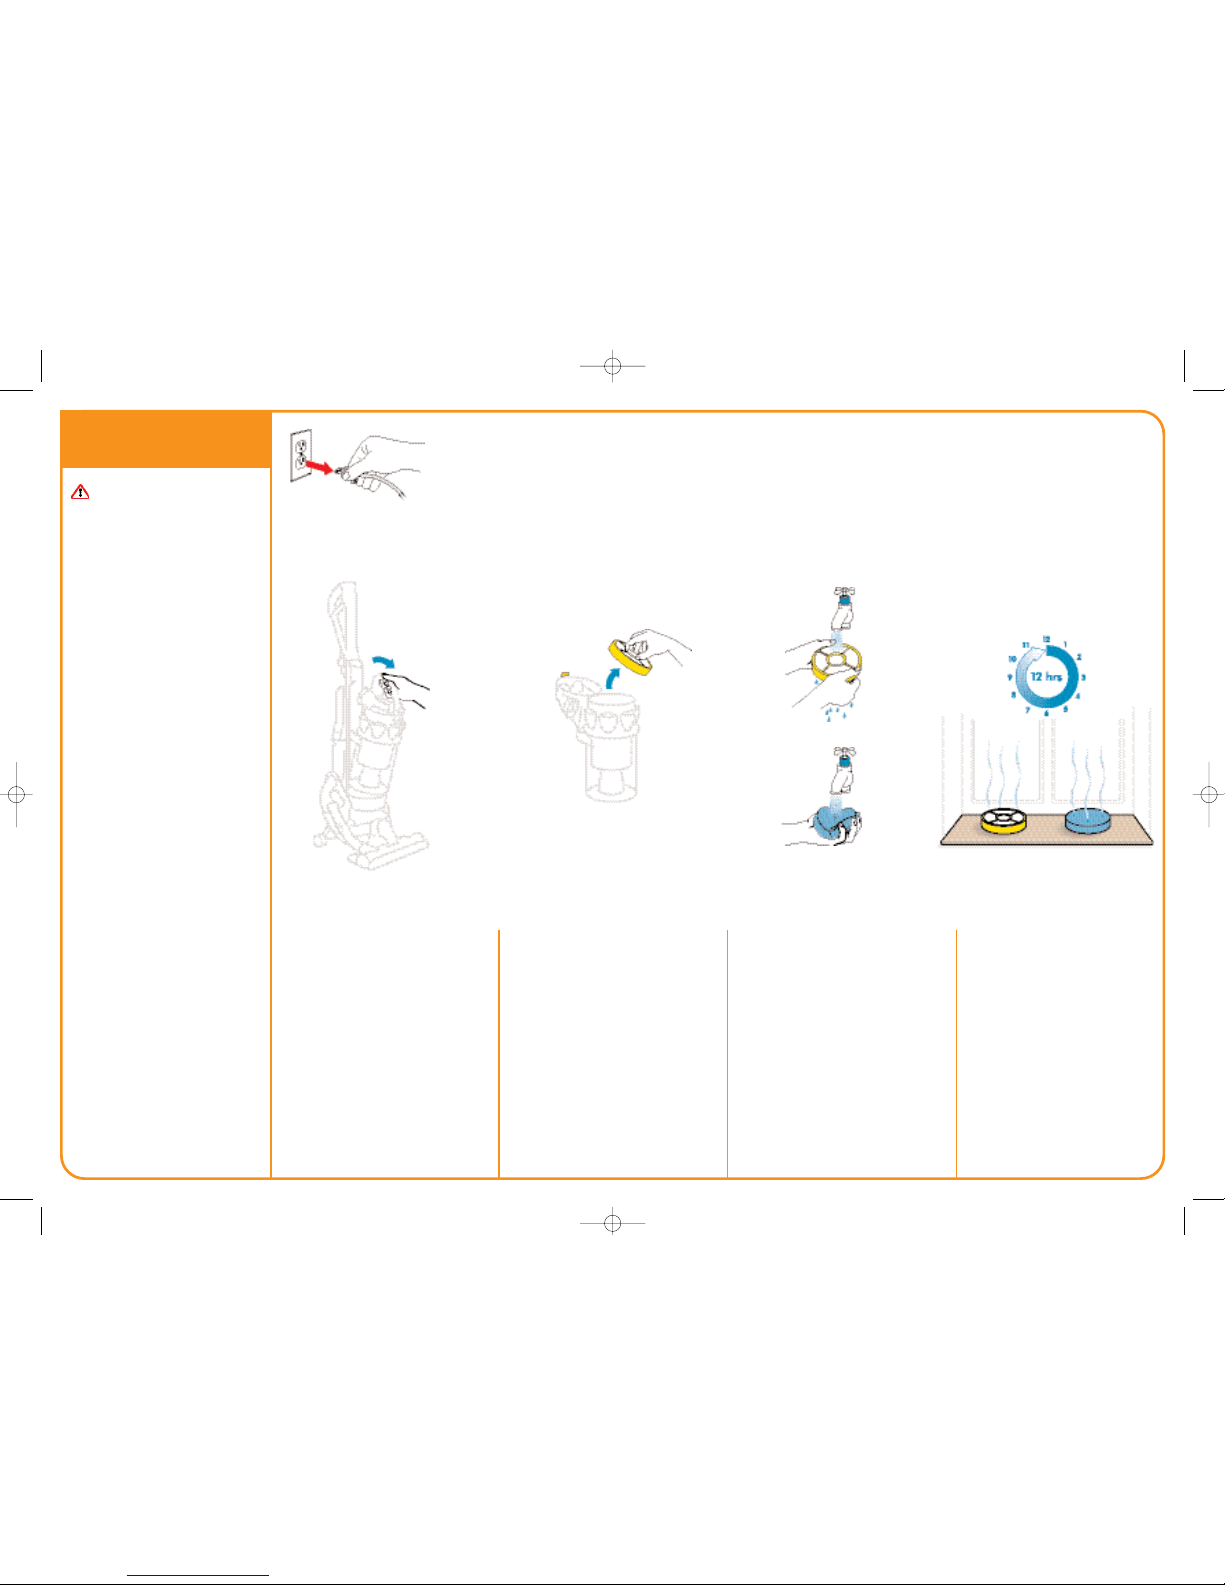
electricity supply. To minimize any effect from this, do not put your hand or
insert any object into the clear bin unless you have first emptied it and rinsed it
out with cold water.
22 Use only identical Dyson replacement parts.
23 Do not carry out any maintenance work other than that shown in this manual
or advised by the Helpline.
SAVE THESE INSTRUCTIONS
THIS APPLIANCE IS INTENDED FOR HOUSEHOLD USE ONLY
Polarization instructions
To reduce the risk of electric shock, this appliance has a polarized plug (one blade
is wider than the other). This plug will fit in a polarized outlet only one way. If the
plug does not fit fully in the outlet, reverse the plug. If it still does not fit, contact a
qualified electrician to install the proper outlet. Do not change the plug in any way.
12438_DC15_USA_OP_MAN_NE… p1-36 2/18/05 3:58 PM Page 2

User guide
Please read this guide
carefully before using
your DC15.
Important safety instructions
1Assembling
2Using your Dyson
3Using your Dyson
4Using the tools
5Washing your filter
6Emptying the clear binTM
7Cleaning the clear binTM
8Clearing blockages
Warranty and customer care
12438_DC15_USA_OP_MAN_NE… p1-36 2/18/05 3:58 PM Page 3

1Assembling
Slide wand down inside hose until
it clicks.
Slot wand into top of machine
and click into place.
Wind cord counter-clockwise and
secure with clip.
Click tools into place.
IMPORTANT
• Ensure hose is straight
when inserting wand.
• If you have any questions,
please call the Dyson
Helpline toll free at
1-866-693-9766 or log
onto www.dyson.com
Brush tool
Crevice tool
Stair tool
12438_DC15_USA_OP_MAN_NE… p1-36 2/18/05 3:58 PM Page 4

Carrying your Dyson
Ensure machine is upright before
carrying.
Use the carry handle at the top of
the cyclone to lift.
Using your Dyson
Plug in and press ON/OFF switch.
Press pedal firmly to release
cleaner head and pull handle
towards you.
Use pedal only – do not stand
directly on cleaner head.
Ensure stabilizing wheels are
fully retracted or brushbar will
not operate.
CAUTION
• Please note: this machine
is intended for domestic
use only. Fine dust such as
plaster dust or flour should
only be vacuumed in very
small amounts.
• The brushbar will
automatically stop if it
becomes obstructed.
•Do not press the cyclone
release button while
carrying the machine or it
could fall and cause injury.
• Ensure the cyclone is
secured to the machine.
•Do not shake the machine
while carrying or it could
fall and cause injury.
2Using your Dyson
12438_DC15_USA_OP_MAN_NE… p1-36 2/18/05 3:58 PM Page 5

3Using your Dyson
(continued)
Brush control
Press button to turn brushbar
OFF for delicate rugs, berbers
and bare floors; and again to
restart for carpets.
Using DC15
Small movements of the wrist will create a zigzag motion in the head, for
easier cleaning around furniture.
When finished, push the
handle firmly beyond the
upright position to drop the
stabilizing wheels.
Ensure stabilizing wheels
are fully locked in place
before releasing the
cleaner.
IMPORTANT
• When you first start to
vacuum, the brushbar is
“ON”.
• Press button to turn
brushbar off for delicate
rugs, berbers, and bare
floors.
• If the brushbar stops
during use, please refer
to the blockages section.
• Ensure stabilizing wheels
are fully locked in place
before releasing the
cleaner.
12438_DC15_USA_OP_MAN_NE… p1-36 2/18/05 3:58 PM Page 6

4Using the tools
IMPORTANT
• Ensure machine is in
upright position before
using tools.
• To protect your floors, the
brushbar will not rotate
when the machine is in
an upright position.
• Ensure hair and loose
clothing are kept clear of
wand cap when machine
is switched on.
• Ensure wand cap is closed,
unless using with tools.
• Powerful suction can
cause the hose to `pull
back’ – please take care
when cleaning stairs.
• To avoid personal injury
and to prevent the
machine from falling
when cleaning stairs,
always place it at the
bottom of the stairs. Wand mode
APull metal wand from inside handle until it clicks.
BPress button to release hose and wand handle from machine. To push
wand back inside hose, ensure hose is straight. Press wand release
button and push wand down into hose.
Hose mode
AFirst extend the wand, then
press side buttons to remove
wand handle from hose.
BTools can be fitted directly to
the end of hose or wand.
Stair cleaning
Always work with the
machine at the bottom of
the stairs.
A
BA
B
B
12438_DC15_USA_OP_MAN_NE… p1-36 2/18/05 3:58 PM Page 7

CAUTION
• Check your filter regularly
and wash at least every 6
months according to
instructions to maintain
performance.
• Turn power off and unplug
before washing the filter.
Failure to do so could
result in electric shock or
personal injury.
• The filter may require
more frequent washing if
vacuuming fine dust.
•Do not use detergent to
clean filter.
•Do not put the filter in the
dishwasher, washing
machine, tumble dryer,
microwave or near an
open flame.
Press catch to release cyclone
and bin from machine.
Lift filter release catch and
remove filter.
Separate blue filter and yellow case.
Wash filter and case in cold water
only. Repeat until water runs clear.
Air dry for at least 12 hours
or overnight. Ensure filter is
completely dry before refitting
onto the machine.
5Washing your filter
12438_DC15_USA_OP_MAN_NE… p1-36 2/18/05 3:58 PM Page 8

Empty bin as soon as the level of
the MAX mark is reached at any
point in the bin.
Press catch to release cyclone
and bin from the machine.
Option 1
Push the button as shown to
empty directly into trash.
Option 2
Emptying into a bag is
recommended for allergy sufferers.
Place bin in bag and push button.
Let the dust settle and close bin
base securely before removing
from bag and refitting bin on
machine.
CAUTION
• Turn power off and unplug
before emptying the bin.
Failure to do so could
result in electric shock or
personal injury.
• Do not use the machine
without the clear bin in
place.
The British Allergy Foundation
considers that this product may in
proper use reduce exposure to both
House Dust Mite (Der p 1) and Cat
Allergen (Fel d 1). It is strongly
recommended that a sensitive person
should take care when emptying the
clear bin. We recommend the
manufacturer's emptying instructions
should be strictly followed.
The British Allergy Foundation is a
UK national charity (Charity Re. No.
1003726) founded in 1991 with the
aim of improving awareness,
prevention and treatment of
allergies.
6Emptying the clear binTM
12438_DC15_USA_OP_MAN_NE… p1-36 2/18/05 3:58 PM Page 9

Cleaning the shroud (optional)
Ensure bin is empty (as detailed
in section 6) and bin base is
open.
Press catch Ato release the clear
bin from the cyclone.
Clean shroud with a cloth or dry
brush to remove lint. Re-assembling the
clear binTM
Holding carry handle, fit
cyclone assembly inside the
clear bin.
TM
Line up the front and rear
guides and push down to
secure.
7Cleaning the clear binTM
CAUTION
• Do not use detergents,
polishes or air fresheners
to clean the clear bin.
• Do not immerse the whole
cyclone in water.
• Ensure bin is completely
dry before replacing.
A
Cleaning the clear binTM (optional)
Ensure bin is empty and bin base
is open.
Rinse with cold water only.
Ensure bin is dry before replacing.
12438_DC15_USA_OP_MAN_NE… p1-36 2/18/05 3:58 PM Page 10

CAUTION
• Turn power off and unplug
before checking for
blockages. Failure to do
so could result in electric
shock or personal injury.
• If any part of your
machine becomes
blocked, it may overheat
and then automatically
shut off. Unplug machine
and leave to cool down.
• For safety, please lie the
machine on its side before
checking for blockages.
• Please note: clearing
blockages is not covered
by your machine’s limited
warranty.
• Beware of sharp objects
when clearing blockages.
• Refit all parts of the
machine securely before
using it. Check to see if tools, wand and hose are clear
of blockages.
ATo remove the hose, rotate base of hose
downwards until it clicks, then twist away
from the machine.
BSqueeze release catches to remove the airway
inspections and check inside.
CPull the top end of the tube away from machine
and check inside.
DUndo colored soleplate
fasteners with a coin.
ERotate endcaps and remove.
FPull out brushbar sections.
GCut out debris blocking
bristles.
8Clearing blockages
A
E
G
F
B
C
D
12438_DC15_USA_OP_MAN_NE… p1-36 2/18/05 3:58 PM Page 11

If you have a question about your Dyson vacuum cleaner, call the Dyson Helpline at 1-866-693-9766 with your serial number and details
of where/when you bought the cleaner. Your serial number can be found on the rating plate, which is located on the machine behind the bin.
Most questions can be solved over the phone by one of our Helpline staff. If your cleaner needs service, call the Dyson Helpline we will
discuss with you the options available for service. If your machine is under warranty and it is a covered repair, your machine will be
repaired at no cost. To reach the Dyson Helpline call at 1-866-693-9766, or visit Dyson online at www.dyson.com
Thank you for choosing to buy a Dyson.
To help us ensure you receive prompt and efficient service, please register your purchase with us. There are two ways to do this:
• You can register by completing and returning the enclosed form to us by mail.
• Alternatively, you can register on line at www.dyson.com
This will confirm your ownership of your Dyson in the event of an insurance loss, and enable us to contact you if necessary. If you have any questions about your
Dyson, please call our customer helpline at 1-866-693-9766, 7 days a week, or log on to our website at www.dyson.com
What is covered
Your Dyson vacuum cleaner is warranted against original defects in material and workmanship for a period of two years from the date of purchase, when used for
private household purposes in accordance with the Dyson Owner’s Manual. This warranty provides, at no extra cost to you, all labor and parts necessary to ensure
your vacuum cleaner is in proper operating condition during the warranty period. This warranty is subject to the following terms:
What is not covered
Dyson, Inc. shall not be liable for costs, damages or repairs incurred as a result of:
• Use of parts not assembled in accordance with the Owner’s Manual.
• Careless operation or handling, misuse and/or lack of maintenance or use not in accordance with the Owner’s Manual.
• External sources such as weather.
• Repairs or alterations carried out by unauthorized parties or agents.
• Use of the vacuum cleaner other than for normal domestic household purposes within the United States, e.g. for commercial or rental purposes.
• Normal wear and tear, including normal wearing parts such as belt, filter, brush bar, hose assembly and power cord (or where external damage or abuse is diagnosed).
• Use of parts and accessories other than those produced or recommended by Dyson, Inc.
Warranty Service
• Please fill out and return the Product Registration Form, or register on line at www.dyson.com.
• Before service can take place, the terms of the warranty require that you contact the Dyson Helpline with your model name/number, serial number, date and place
of purchase. Please keep your purchase receipt in a safe place to ensure you have this information. The serial number is found on the vacuum cleaner’s rating
plate, which is located on the machine behind the bin.
• All work will be carried out by Dyson, Inc. or its authorized agents.
• Any replaced defective parts will become the property of Dyson, Inc.
• The fitting of replacement parts will not extend the period of this warranty.
• If your machine is not functioning properly, please call the Dyson Helpline at 1-866-693-9766. Most issues can be rectified over the telephone by our trained customer
care staff. If this is not possible Dyson, Inc. will arrange for your vacuum cleaner to be repaired and returned in full working order at no extra cost to yourself.
Warranty Limitations and Exclusions
• Any implied warranties relating to your vacuum cleaner, including but not limited to warranty of merchantability or warranty of fitness for a particular purpose, are
limited to the duration of this warranty. This limitation is not allowed by some states and so this limitation may not apply to you.
• Your remedy for breach of this warranty is limited to the warranty service described above. Dyson, Inc. will not be liable for any consequential damages or
incidental damages you may incur in connection with your purchase and use of your vacuum cleaner. This limitation is not allowed by some states and so this
limitation may not apply to you.
• This warranty gives you specific legal rights. You may also have other rights which vary by state.
Dyson customer care
Limited 2 year
household warranty
Terms and Conditions of the
Dyson 2 year limited warranty
Your serial number can be
found on the rating plate,
which is located on the
machine behind the bin.
Note your serial number for
future reference:
WO 03/039317
GB0326102.1
PCT/GB04/004303
GB0416903.3
AU2002226556
CA2,439,250
EP1370172
JP2002-567120
US10/468,676
AU2002225209
CA2,438,073
EP1377197
JP2002-567130
US10/467,671
AU2002225232
CA2,438,079
EP1361815
JP2002-567134
US10/468,304
GB0318939.6
PCT/GB04/003414
AU2002225207
CA2,438,069
EP1361814
JP2002-567129
US10/468442
AU2001240894
EP1268076
JP2001-572220
US10/239,426
AU637 272
CA2,056,161
EP0636338
JP1948863
US5078761
PCT/GB03/03132
PCT/GB03/03135
PCT/GB03/03142
GB0416355.6
GB0416476.0
GB0416359.8
GB0410700.9
AU2002233553
CA2,439,247
EP1365676
JP2002-570878
US10/468,469
AU2003252873
CA2449304
EP1380247
JP2003-344965
US10/683390
X020:
GB0411236.3
GB0229873.5
PCT/GB03/005384
GB0321950.8
PCT/GB04/003995
GB0321951.6
PCT/GB04/004004
GB0402528.4
GB0402527.6
GB0322842.6
PCT/GB04/004002
DC15*
Major territories only=
*list of patents and patent applications
=rights may exist in other territories
12438_DC15_USA_OP_MAN_NE… p1-36 2/18/05 3:58 PM Page 12

The Ball Guía del usuario
Lea atentamente esta guía antes de utilizar su DC15
12438_DC15_USA_OP_MAN_NE… p1-36 2/18/05 3:58 PM Page 13

INSTRUCCIONES IMPORTANTES DE SEGURIDAD
LEA TODAS LAS INSTRUCCIONES ANTES DE UTILIZAR ESTA ASPIRADORA
Cuando se utiliza un aparato eléctrico, deben tomarse siempre precauciones
básicas, incluyendo las siguientes:
ADVERTENCIA
PARA REDUCIR EL RIESGO DE INCENDIO, DESCARGA ELÉCTRICA O ACCIDENTE:
1 No deje la aspiradora enchufada. Desenchúfela de la toma de corriente
cuando no la utilice y antes de cualquier revisión o reparación.
2 No la utilice al aire libre ni sobre superficies mojadas ni para aspirar agua u
otros líquidos, ya que podría recibir una descarga eléctrica.
3 No la trate como si fuera un juguete. Preste atención si es utilizada por menores
o cerca de ellos.
4 Usted es responsable de asegurarse de que su aspiradora no sea utilizada por
ninguna persona incapaz de operarla correctamente.
5 Utilice la aspiradora solamente de acuerdo con las instrucciones de este manual
y sólo con piezas y accesorios recomendados por Dyson.
6 Compruebe que la corriente eléctrica se corresponda con la que figura en la
placa de calificación, que se encuentra detrás del cubo. La máquina sólo
debe utilizarse conforme a las características técnicas.
7 No use la máquina si el cordón o el enchufe están dañados o si la máquina no
funciona correctamente, se ha caído, dañado, se ha dejado al aire libre o ha
estado en contacto con cualquier líquido, póngase en contacto con la Línea
Directa de Asistencia al Cliente de Dyson llamando al 1-866-397-9766.
8 No arrastre ni tire de la aspiradora por el cordón, no utilice el cordón a modo
de empuñadura, no atrape el cordón con las puertas ni tire del cordón
alrededor de bordes afilados o esquinas. No pise el cordón con la máquina.
Mantenga el cordón alejado de superficies caldeadas y llamas vivas.
9 No desenchufe la máquina tirando del cordón. Para desenchufarla, sujete el
enchufe, no el cordón.
10 No toque el enchufe ni la máquina con las manos mojadas.
11 No use la máquina sin el cubo transparente y los filtros en su sitio.
12 No coloque ningún objeto en las aberturas de la máquina. No la utilice si las
aberturas están bloqueadas; manténgala libre de polvo, hilos, cabellos y
objetos capaces de reducir el flujo de aire.
13 Mantenga el cabello, la ropa suelta, los dedos y el cuerpo alejados de las
aberturas y las piezas móviles.
14 No utilice la máquina para recoger objetos duros cortantes, juguetes pequeños,
alfileres, sujetapapeles, etc., ya que podrían dañar la máquina.
15 No se recomienda el uso de un cordón de extensión.
16 Guarde la máquina en interiores. Después de usar la aspiradora déjela con el
cordón enrollado de forma segura para evitar accidentes.
17 Apague todos los mandos antes de desenchufarla.
18 Preste especial atención al limpiar las escaleras y trabaje siempre con la
máquina colocada al pie de las escaleras. No la coloque sobre sillas, mesas,
etc.; colóquela siempre sobre el suelo.
19 No utilice la aspiradora para recoger cigarrillos o fósforos encendidos o
cenizas calientes.
20 No utilice la aspiradora para recoger líquidos inflamables o combustibles,
como la gasolina, ni la utilice en áreas donde dichos líquidos podrían
estar presentes.
21 Al aspirar, algunas alfombras pueden generar pequeñas descargas de estática
en el cubo transparente o en el tubo. Éstas son totalmente inofensivas y no
están asociadas al suministro de corriente eléctrica. Para minimizar sus efectos,
no coloque su mano ni introduzca ningún objeto en el cubo transparente, a
menos que primero lo haya vaciado y lavado con agua fría.
22 Utilice solamente piezas de Dyson de recambio idénticas.
23 No lleve a cabo trabajos de mantenimiento aparte de los mostrados en este
manual o los aconsejados por la Línea Directa de Asistencia al Cliente.
GUARDE ESTAS INSTRUCCIONES
ESTE APARATO ESTÁ DESTINADO PARA USO DOMÉSTICO SOLAMENTE
Instrucciones de polarización
Para reducir el riesgo de descarga eléctrica, este aparato lleva un enchufe polarizado
(una clavija es más ancha que la otra). Este enchufe se conecta a una toma de
corriente polarizada de una sola forma. Si el enchufe no entra totalmente en la toma
de corriente, dé la vuelta al enchufe. Si sigue sin entrar bien, póngase en contacto
con un electricista calificado para instalar una toma de corriente correcta. No cambie
el enchufe de ninguna manera.
12438_DC15_USA_OP_MAN_NE… p1-36 2/18/05 3:58 PM Page 14

Guía del usuario
Lea atentamente esta guía
antes de utilizar su DC15.
Instrucciones importantes de seguridad
1Ensamblaje
2Uso de su Dyson
3Uso de su Dyson
4Uso de los accesorios
5Lavado del filtro
6Vaciado del cubo transparenteTM
7Limpieza del cubo transparenteTM
8Limpieza de obstrucciones
Garantía y servicio de atención al cliente
12438_DC15_USA_OP_MAN_NE… p1-36 2/18/05 3:58 PM Page 15

Deslice el tubo hacia adentro de
la manguera hasta que encaje.
Coloque el tubo en la parte
superior de la máquina y
encájelo en su sitio.
Enrolle el cordón en sentido
antihorario y asegúrelo con la
presilla.
Coloque los accesorios en
su sitio.
1Ensamblaje
IMPORTANTE
• Asegúrese de que la
manguera esté recta al
introducir el tubo.
• Si tiene alguna pregunta,
por favor llame en forma
gratuita a la Línea
Directa de Asistencia
al Cliente de Dyson al
1-866-693-9766 o visite
www.dyson.com
Accesorio de cepillo
Accesorio para
huecos
Accesorio para
escaleras
12438_DC15_USA_OP_MAN_NE… p1-36 2/18/05 3:58 PM Page 16

Cómo transportar su Dyson
Asegúrese de que la máquina
esté en posición vertical antes de
transportarla.
Use el asa de transporte en la
parte superior del cyclone para
levantarla.
Uso de su Dyson
Enchúfela y presione el botón de
encendido/apagado.
Presione el pedal firmemente
para liberar el cabezal de la
aspiradora y tire de la
empuñadura hacia usted.
Sólo utilice el pedal – no se
pare encima del cabezal de la
aspiradora.
Asegúrese de que las ruedas
estabilizadoras estén
totalmente retraídas o de lo
contrario el cepillo rotatorio
no funcionará.
2Uso de su Dyson
PRECAUCIÓN
• Por favor tome nota: esta
máquina es solamente de
uso doméstico. Las
partículas pequeñas de
polvo, como el yeso o la
harina, sólo se deben
aspirar en cantidades
pequeñas.
• El cepillo rotatorio se
detendrá automáticamente
si se obstruye.
•No presione el botón de
liberación del cyclone
mientras transporta la
máquina o podría caer y
causar heridas.
• Asegúrese de que el
cyclone esté sujeto a la
máquina.
•No zarandee la máquina
mientras la transporta o
podría caer y causar
heridas.
12438_DC15_USA_OP_MAN_NE… p1-36 2/18/05 3:58 PM Page 17

Control del cepillo
Presione el botón para apagar el
cepillo rotatorio para alfombras
delicadas, bereberes y pisos al
descubierto y presiónelo otra vez
para limpiar alfombras.
Uso del DC15
Pequeños movimientos de la muñeca crearán un movimiento en zigzag
del cabezal para limpiar más fácilmente alrededor de los muebles.
Una vez terminado, empuje la
empuñadura con firmeza más
allá de la posición vertical para
bajar las ruedas estabilizadoras.
Asegúrese de que las
ruedas estabilizadoras
queden aseguradas en
su posición antes de soltar
la aspiradora.
3Uso de su Dyson
IMPORTANTE
• Cuando empieza a aspirar,
el cepillo está “encendido”.
• Presione el botón para
apagar el cepillo rotatorio
para alfombras delicadas,
bereberes y pisos al
descubierto.
• Si el cepillo rotatorio se
detiene durante el uso,
sírvase consultar la
sección de obstrucciones.
• Asegúrese de que las
ruedas estabilizadoras
queden aseguradas en su
posición antes de soltar la
aspiradora.
12438_DC15_USA_OP_MAN_NE… p1-36 2/18/05 3:58 PM Page 18

4Uso de los accesorios
Limpieza de escaleras
Trabaje siempre con la
máquina al pie de las
escaleras.
A
BA
B
B
PRECAUCIÓN
• Asegúrese de que la
máquina esté en posición
vertical antes de usar los
accesorios.
• Para proteger sus pisos,
el cepillo rotatorio no
rotará si la máquina está
en posición vertical.
• Asegúrese de mantener el
cabello y la ropa suelta
lejos de la tapa del tubo
cuando la máquina esté
encendida.
• Asegúrese de que la tapa
del tubo esté cerrada, a
menos que esté usando
los accesorios.
• La succión potente puede
causar que la manguera
se contraiga y tire – tenga
cuidado cuando limpie
escaleras.
• Para evitar los accidentes
personales e impedir que
la máquina se caiga
durante la limpieza de
escaleras, coloque
siempre la aspiradora al
pie de las escaleras.
Modalidad de tubo
AHale el tubo de metal del interior de la empuñadura del tubo hasta
que encaje.
BPresione el botón para liberar la manguera y la empuñadura del tubo
de la máquina. Para volver a colocar el tubo en la manguera,
asegúrese de que la manguera esté recta. Presione el botón de
liberación del tubo y coloque el tubo en la manguera.
Modalidad de manguera
APrimero extienda el tubo, luego
presione los botones laterales
para retirar la empuñadura del
tubo de la manguera.
BLos accesorios se pueden
conectar directamente en el
extremo de la manguera o
del tubo.
12438_DC15_USA_OP_MAN_NE… p1-36 2/18/05 3:58 PM Page 19

Presione el gatillo para liberar el
cyclone y el cubo de la máquina.
Levante el gatillo de liberación
del filtro y retire el filtro.
Separe el filtro azul y el
alojamiento amarillo.
Lave el filtro y el alojamiento
en agua fría solamente.
Repita hasta que el agua
corra transparente.
Deje secar al aire libre
durante al menos 12 horas
o de un día para el otro.
Asegúrese de que el filtro
esté completamente seco
antes de colocarlo de nuevo
en la máquina.
5Lavado del filtro
PRECAUCIÓN
• Controle el filtro
regularmente y lávelo al
menos cada 6 meses
según las instrucciones
para mantener el
rendimiento.
• Apague y desenchufe la
máquina antes de lavar
el filtro. De lo contrario
podría recibir una
descarga eléctrica o
sufrir un accidente
personal.
• Es posible que el filtro
deba lavarse con más
frecuencia si aspira
polvo fino.
•No utilice detergente
para limpiar el filtro.
•No ponga el filtro en el
lavavajillas, lavadora,
secadora, horno de
microondas ni cerca de
una llama.
12438_DC15_USA_OP_MAN_NE… p1-36 2/18/05 3:58 PM Page 20
Other manuals for DC15
5
Table of contents
Languages:
Other Dyson Vacuum Cleaner manuals

Dyson
Dyson DC20 User manual

Dyson
Dyson V8 Absolute User manual

Dyson
Dyson DC14 Telescope Reach User manual

Dyson
Dyson DCO3 Absolute User manual

Dyson
Dyson Big Ball CY23 User manual

Dyson
Dyson DC30 User manual

Dyson
Dyson 4236580 User manual

Dyson
Dyson V11 User manual

Dyson
Dyson DC35 MULTI FLOOR User manual

Dyson
Dyson DC26 User manual

Dyson
Dyson DCO3 User manual

Dyson
Dyson D23 stowaway User manual

Dyson
Dyson DC39 multi floor User manual

Dyson
Dyson DC26 User manual

Dyson
Dyson DC57 User manual

Dyson
Dyson DC 22 User manual

Dyson
Dyson DC02 User manual

Dyson
Dyson DC21 Motorhead User manual

Dyson
Dyson BIG BALL User manual

Dyson
Dyson SV04 User manual