Boost
Eco Auto Med
100%
5%
English
Ελληνικ
Espanol
Čeština
中文
한국어
English EnglishEnglish
Eco
Eco
Auto Med
100%
5%
English
Ελληνικ
Espanol
Čeština
中文
한국어
English EnglishEnglish
Eco
Auto
Med
100%
5%
English
Ελληνικ
Espanol
Čeština
中文
한국어
English EnglishEnglish
Eco
Med
100%
5%
English
Ελληνικ
Espanol
Čeština
中文
한국어
English EnglishEnglish
Eco
English
Espanol
English English
selected
4:50 Auto
Low
run time
Exit
Off
On
Boost
Eco Auto Med
100%
English
Espanol
English
English
selected
4:50 Auto
Low
run time
Exit
Off
On
100%
English
Espanol
English English
selected
4:50 Auto
Low
run time
Exit
Off
On
clik clik clik
User manual
Bedienungsanleitung
Manual de instrucciones
Manuel d’utilisation
Manuale d’uso
Gebruikershandleiding
Instrukcja obsługi
Руководство по эксплуатации
Priročnik za uporabo
Assembling your machine
Zusammensetzen Ihres Geräts
Montaje del dispositivo
Quick start
Kurzanleitung
Inicio rápido
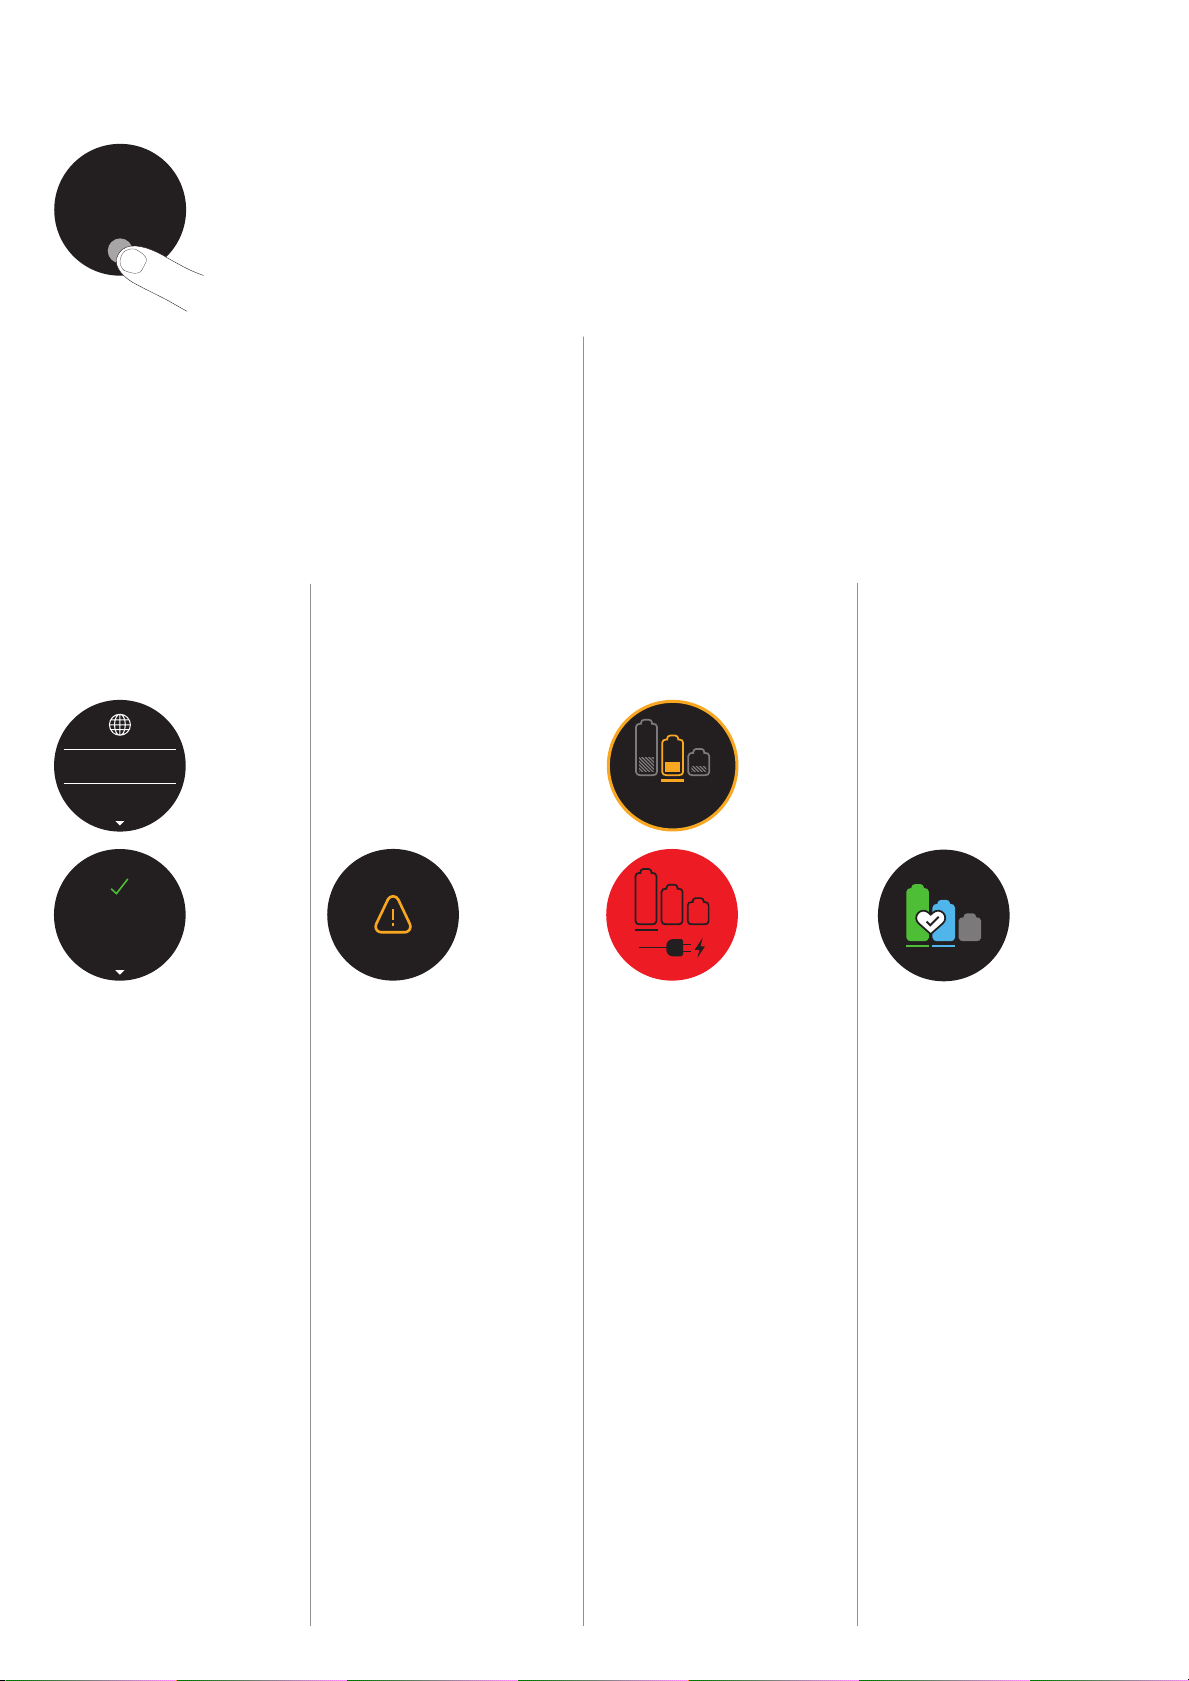
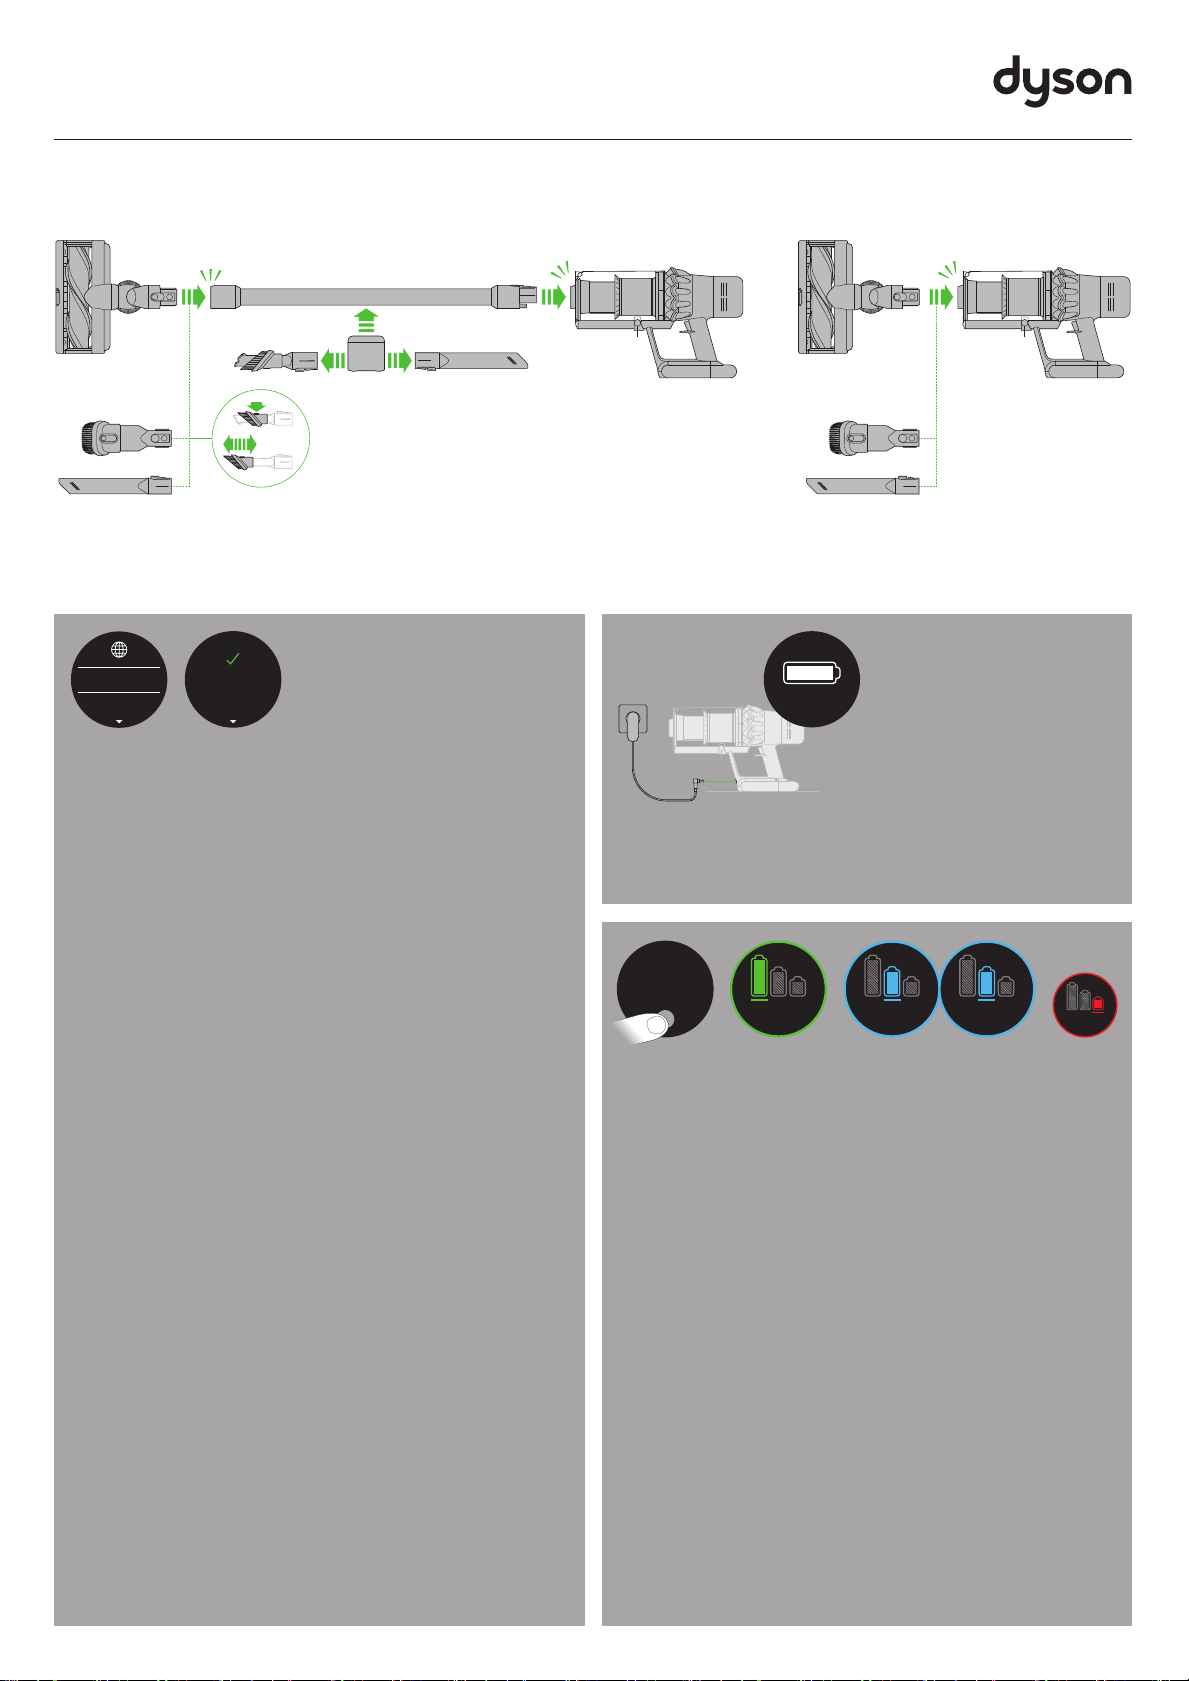
Setting up your language
Before using your machine, you will need to set up your
preferred language option.
You can continue to use your machine without setting up the
language but you will be prompted each time you release
the trigger.
To set up your language, tap the Selection button to activate
the screen.
Tap the button to scroll through the language list to your
preferred language. Press and hold the button until the
countdown ends to set your language.
A green tick will appear on the screen to show your
language selection is complete.
To cancel your selection, release the button during
the countdown.
You can access a full list of available languages by selecting
'More+' from the language list.
Einrichten Ihrer Sprache
Bevor Sie Ihr Gerät verwenden, müssen Sie Ihre bevorzugte
Sprache einrichten.
Sie können Ihr Gerät weiterhin verwenden, ohne die
Sprache einzurichten, aber Sie werden jedes Mal erneut
dazu aufgefordert, wenn Sie den Ein-/Ausschalter loslassen.
Um Ihre Sprache einzurichten, tippen Sie auf die
Auswahltaste, um den Bildschirm zu aktivieren.
Drücken Sie die Auswahltaste, um durch die Sprachen
zu blättern. Durch ein kurzes Drücken (zwischen 2 und
4 Sekunden) auf die Auswahltaste wählen Sie eine
Sprache aus.
Auf dem Bildschirm wird ein grünes Häkchen
angezeigt, um anzuzeigen, dass Ihre Sprachauswahl
abgeschlossen wurde.
Um Ihre Auswahl abzubrechen, lassen Sie die Taste
während des Countdowns los.
Sie können auf eine vollständige Liste der verfügbaren
Sprachen zugreifen, indem Sie in der Sprachliste „Mehr+“
auswählen.
Configuración de su idioma
Antes de usar su máquina, deberá configurar la opción de
idioma preferido.
Puede seguir utilizando la máquina sin configurar el
idioma, pero se le pedirá que lo haga cada vez que suelte
el activador.
Para configurar el idioma, toque el botón de selección para
activar la pantalla.
Toque el botón para desplazarse por la lista de idiomas
hasta el idioma que prefiera. Pulse sin soltar el botón hasta
que termine la cuenta regresiva para establecer su idioma.
Aparecerá una marca verde en la pantalla para mostrar
que la selección de idioma se ha completado.
Para cancelar la selección, suelte el botón durante la
cuenta regresiva.
Si desea acceder a una lista completa de idiomas
disponibles, seleccione “Más+” en la lista de idiomas.
Configuration de votre langue
Avant d'utiliser votre appareil, vous devez configurer votre
option de langue préférée.
Vous pouvez continuer à utiliser votre appareil sans
configurer la langue, mais vous serez invité à le faire chaque
fois que vous relâcherez la gâchette.
Pour configurer votre langue, appuyez sur le bouton
Sélection pour activer l'écran.
Appuyez sur le bouton de sélection pour faire défiler les
langues. Appuyez un court instant (entre 2 et 4 secondes)
sur le bouton de sélection pour sélectionner une langue.
Une coche verte apparaît à l'écran pour indiquer que votre
sélection de langue est terminée.
Pour annuler votre sélection, relâchez le bouton pendant le
compte à rebours.
Vous pouvez accéder à une liste complète des langues
disponibles en sélectionnant «Plus+» à partir de la liste
de langues.
Configurazione della lingua
Prima di utilizzare la macchina, è necessario impostare
l’opzione di lingua scelta.
È possibile continuare a utilizzare l’apparecchio senza
impostare la lingua, ma verrà richiesta ogni volta che si
rilascia il grilletto.
Per configurare la lingua, premere il pulsante di selezione
per attivare lo schermo.
Premere il tasto di selezione per scorrere tra le lingue.
Tenendo premuto da 2 a 4 secondi il tasto di selezione, si
seleziona una lingua.
Apparirà un segno di spunta verde sullo schermo per
indicare che la selezione della lingua è stata completata.
Per annullare la selezione, rilasciare il pulsante durante il
conto alla rovescia.
È possibile accedere a un elenco completo delle lingue
disponibili selezionando “More+” (Altro) dall’elenco
delle lingue.
Uw taal configureren
Voorafgaand aan het gebruik van uw apparaat, moert u uw
gewenste taaloptie configureren.
U kunt uw apparaat blijven gebruiken zonder het
configureren van de taal, maar u wordt hierom gevraagd bij
elke keer dat u de activering loslaat.
Voor het configureren van uw taal, tikt u op de selectieknop
om het scherm te activeren.
Druk op de selectieknop om door de talen te scrollen. Door
de selectieknop kort (tussen 2 en 4 seconden) ingedrukt te
houden, wordt een taal geselecteerd.
Een groen vinkje wordt weergegeven op het scherm om aan
te geven dat uw taalselectie gereed is.
Om uw selectie te annuleren, laat u de knop tijdens het
aftellen los.
U hebt toegang tot een volledige lijst met beschikbare talen
door het selecteren van 'Meer+' in de lijst met talen.
Ustawienie Twojego języka
Przed użyciem urządzeniem należy skonfigurować
preferowany język.
Można dalej korzystać z urządzenia bez skonfigurowania
języka, ale przy każdym zwolnieniu spustu będzie
wyświetlany monit o jego ustawienie.
Aby skonfigurować język, należy stuknąć przycisk wyboru,
aktywując ekran.
Przewijać listę języków, naciskając przycisk wyboru. Aby
wybrać język, nacisnąć i krótko przytrzymać przycisk
wyboru (od 2 do 4sekund).
Wybrany język zostanie oznaczony na ekranie zielonym
symbolem potwierdzenia.
Aby anulować wybór, należy zwolnić przycisk w
trakcie odliczania.
Dostęp do pełnej listy języków można uzyskać, stukając
pozycję „Więcej+”.
Настройка языка
Перед использованием устройства потребуется
настроить предпочитаемый язык.
Можно использовать устройство без настройки языка,
однако после каждого отпускания кнопки-курка будет
появляться запрос.
Чтобы настроить язык, нажмите кнопку выбора для
активации экрана.
Нажимайте кнопку выбора для прокрутки языков.
Нажмите и кратковременно удерживайте кнопку
выбора (от 2 до 4 секунд), чтобы выбрать язык.
На экране появится зеленая галочка, показывающая,
что выбор языка завершен.
Чтобы отменить выбор, отпустите кнопку во время
обратного отсчета.
Чтобы открыть полный список доступных языков,
выберите в списке языков пункт «More+» (Больше).
Nastavitev jezika
Pred uporabo naprave morate nastaviti želeno
jezikovno možnost.
Napravo lahko še naprej uporabljate, ne da bi nastavili
jezik, vendar bo prikazan poziv vsakič, ko sprostite sprožilec.
Če želite nastaviti jezik, tapnite gumb Selection (Izbor), da
aktivirate zaslon.
Pritiskajte gumb za izbiranje za pomikanje med jeziki. Če za
kratek čas (od 2 do 4 sekunde) pridržite gumb za izbiranje,
boste izbrali jezik.
Na zaslonu se prikaže zelena kljukica, ki kaže, da je izbira
jezika končana.
Če želite preklicati izbiro, spustite gumb med odštevanjem.
Do celotnega seznama razpoložljivih jezikov lahko
dostopate tako, da na seznamu jezikov izberete »More+
(Več +)«.
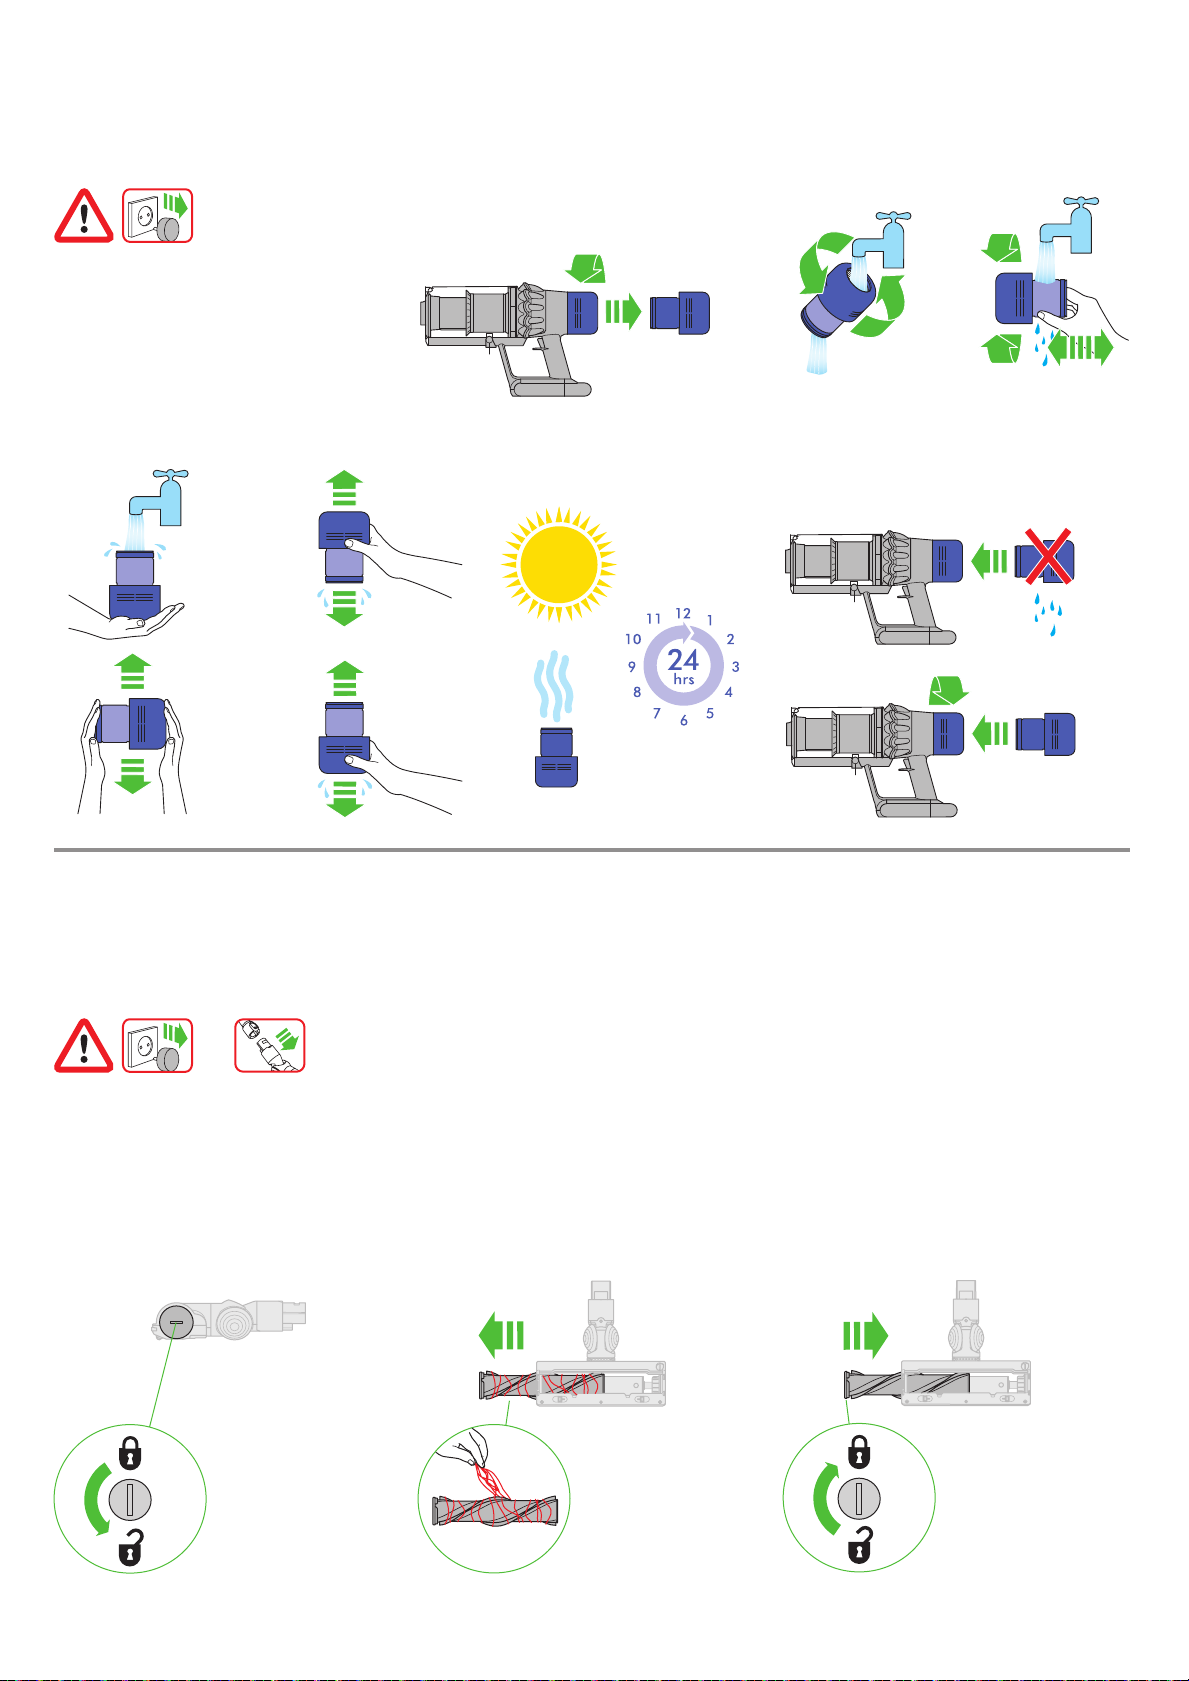
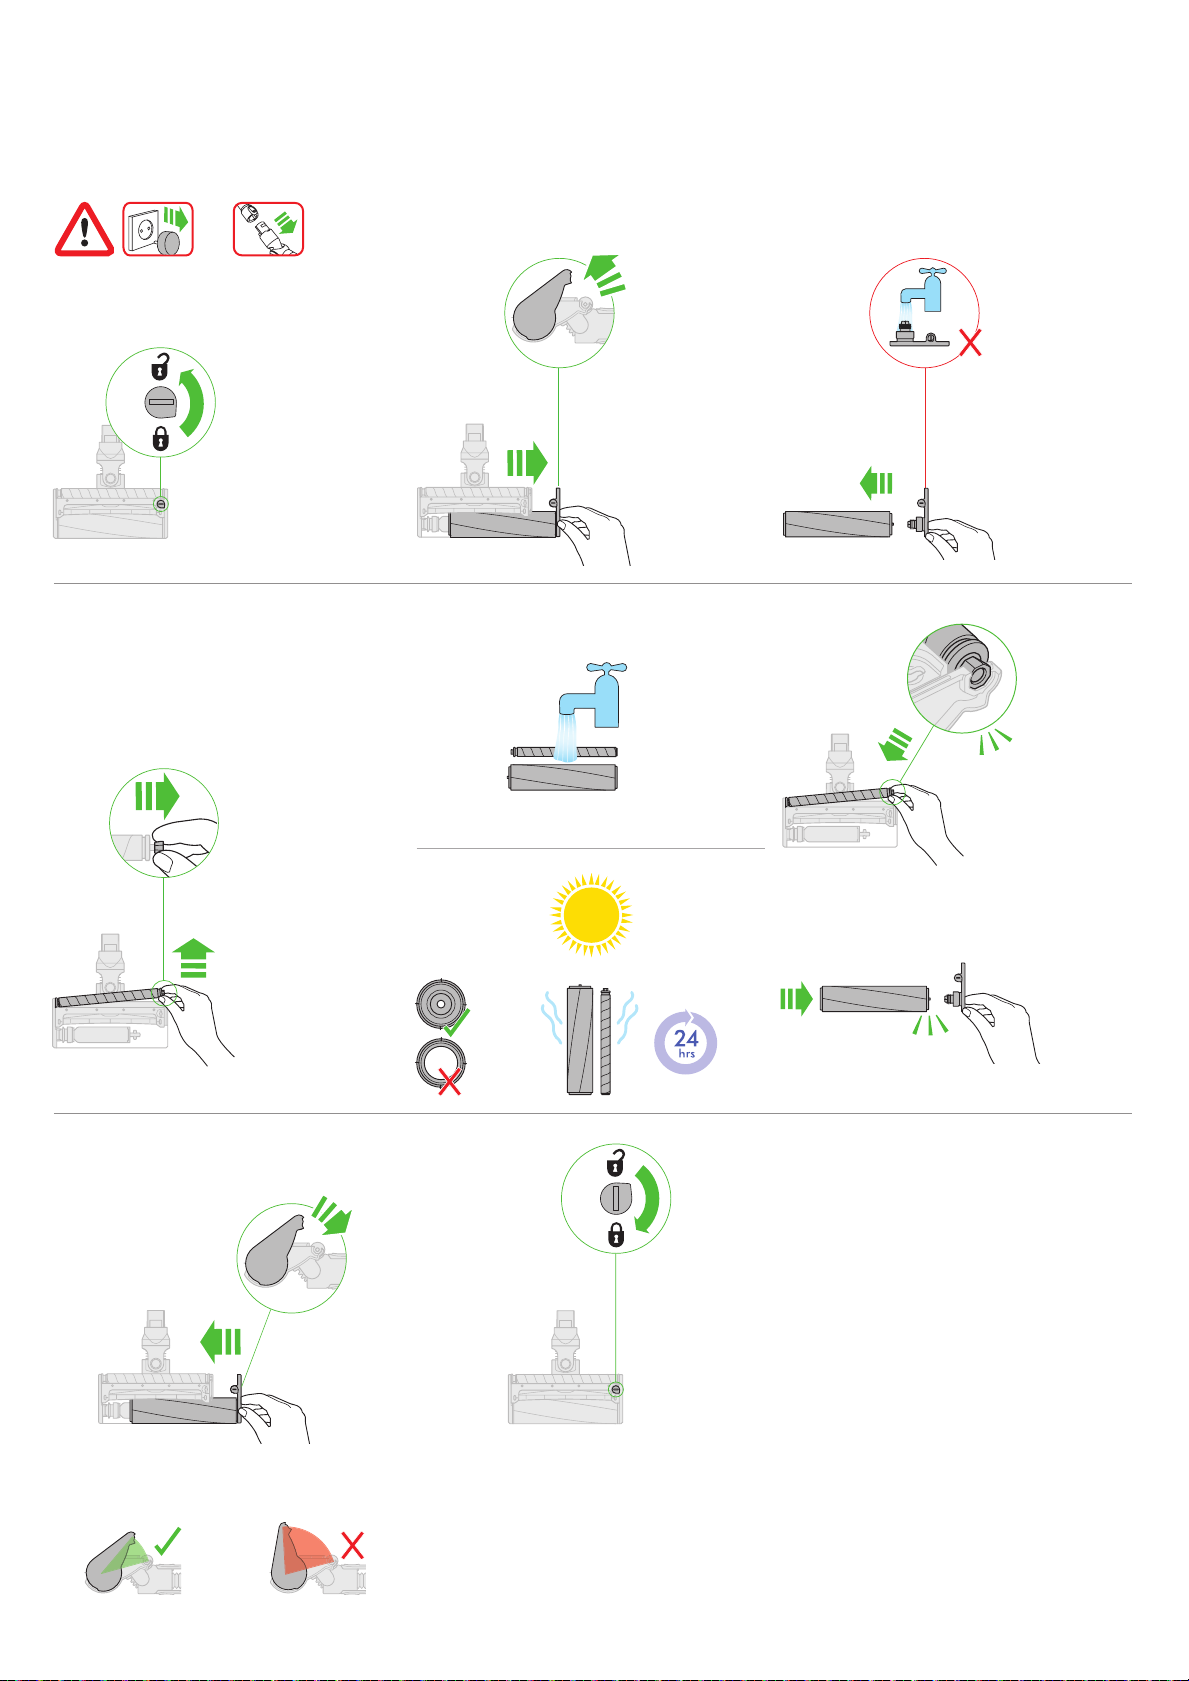
Fully charge before first use
It's important to fully charge your new machine before using
it for the first time, and after every use.
Vor dem ersten Gebrauch vollständig aufladen
Es ist wichtig, dass Sie Ihre Maschine vor dem ersten und
nach jedem weiteren Gebrauch vollständig aufladen.
Cárguelo por completo antes del primer uso
Es importante cargar completamente el dispositivo antes de
usarlo por primera vez y después de cada uso.
Charger complètement avant la première utilisation
Il est important de charger complètement votre appareil
avant la première utilisation et après chaque utilisation.
Caricare completamente prima del primo utilizzo
È importante caricare completamente la macchina prima di
utilizzarla per la prima volta e dopo ogni utilizzo.
Volledig opladen voorafgaand aan eerste gebruik
Het is belangrijk om uw apparaat volledig op te laden
voordat u het voor de eerste keer gebruikt en na elk gebruik.
Całkowicie naładować przed pierwszym użyciem
Urządzenie należy całkowicie naładować przed pierwszym
użyciem oraz po każdym użyciu.
Полная зарядка перед первым использованием
Перед каждым использованием и после него важно
полностью зарядить устройство.
Pred prvo uporabo popolnoma napolnite
Pomembno je, da popolnoma napolnite vaš stroj pred prvo
uporabo in po vsaki uporabi.
Power modes
Your machine has three power modes for different tasks.
Change cleaning modes quickly using a single button.
Eco: Maximum run time, for longer cleans.
Auto/Med: The optimum balance to clean all floors.
Attach your High torque cleaner head to activate Auto
mode, which automatically adapts power between carpets
and hard floors.
Boost: Intensive cleaning for ground-in dirt.
Leistungsstufen
Ihr Gerät verfügt über drei Leistungsstufen für
unterschiedliche Aufgaben. Über eine einzige Taste
wechseln Sie rasch zwischen den Reinigungsmodi.
Eco: Maximale Betriebsdauer für eine längere Reinigung.
Auto/Med: Das optimale Gleichgewicht für alle Böden.
Stecken Sie die Elektrobürste mit Direktantrieb auf, um
den Automatikmodus zu aktivieren, der die Leistung
automatisch an Teppiche und Hartböden anpasst.
Boost: Intensive Reinigung von tiefsitzendem Staub
und Schmutz.
Modos de alimentación
El aparato tiene tres modos de potencia para distintas
tareas. Cambie de modo de limpieza de forma rápida
pulsando un solo botón.
Eco: Tiempo de funcionamiento máximo para limpiezas
más largas.
Auto/Medio: El equilibrio perfecto para limpiar todo tipo
de suelos.
Ponga el cabezal de limpieza Direct Drive para
activar el modo Automático, que adapta la potencia
automáticamente para alfombras y suelos duros.
Boost: Limpieza en profundidad para la suciedad
más difícil.
Modes de puissance
Votre appareil possède trois modes de puissance pour
effectuer différentes tâches. Changez de mode de
nettoyage rapidement à l’aide d’un seul bouton.
Éco: durée de fonctionnement maximale, pour des
nettoyages plus longs.
Auto/Inter: le parfait équilibre pour nettoyer tous les sols.
Raccordez votre brosse motorisée pour activer le mode
automatique, qui adapte automatiquement la puissance
entre les tapis et les sols durs.
Boost: pour les nettoyages intensifs et la
poussière incrustée.
Modalità di aspirazione
L’apparecchio ha tre modalità di accensione per funzioni
diverse. Tramite un unico tasto è possibile cambiare
rapidamente la modalità di pulizia.
Eco: durata massima, per pulire più a lungo.
Auto/Med: adatta in modo intelligente potenza
e autonomia.
Collegare la spazzola High Torque per attivare la modalità
Auto che consente di adattare automaticamente la potenza
passando dai tappeti alle superfici.
Boost: pulizia intensa per sporco ostinato.
Vermogensmodi
Uw apparaat heeft drie vermogensmodi voor verschillende
taken. Wijzig snel de reinigingsmodus met gebruik van
een enkele knop.
Eco: Maximale looptijd, voor langere reinigingen.
Auto/Med: De optimale balans voor het reinigen van alle
typen vloeren.
Bevestig uw torque vloerzuigmond voor het activeren van
de Automatische modus, wat het vermogen automatisch
aanpast tussen tapijten en harde vloeren.
Boost: intensieve reiniging voor extra vuile plekken.
Tryby mocy
Urządzenie ma trzy tryby mocy dostosowane do różnych
zadań. Tryb czyszczenia można zmienić szybko za pomocą
jednego przycisku.
Eco: Maksymalny czas pracy, do dłuższego sprzątania.
Auto/Med: Optymalny balans do czyszczenia wszystkich
rodzajów podłóg.
Wystarczy zamocować elektroszczotkę Torque Drive, by
uruchomić tryb automatyczny, w którym poziom mocy
sam dostosuje się rodzaju powierzchni – dywanu lub
twardej podłogi.
Boost: Intensywne czyszczenie uporczywego brudu.
Режимы работы
Устройство может работать в трех режимах в
зависимости от выполняемой задачи. Режимы быстро
переключаются одной кнопкой.
Эко: максимальное время работы, дольше чистка.
Авто/средний: оптимальный баланс для уборки
всех покрытий.
Подключите насадку с высоким крутящим
моментом для активации режима "Авто", в котором
автоматически осуществляется адаптация
мощности между ковровыми и твердыми
напольными покрытиями.
Турбо: интенсивная очистка сложных загрязнений.
Načini porabe energije
Naprava ima tri načine porabe energije za različna
opravila. Način čiščenja lahko hitro spremenite s samo
enim gumbom.
Eko: Najdaljši čas delovanja, primeren za daljša čiščenja.
Auto/Sred: Optimalno ravnovesje za čiščenje vseh
talnih površin.
Namestite čistilno glavo z visokim navorom, da vklopite
samodejni način, ki samodejno prilagaja moč delovanja
med čiščenjem preprog oziroma gladkih površin.
Boost: Intenzivno čiščenje za trdovratno umazanijo.
SV17
Montage de votre appareil
Assemblaggio dell’apparecchio
Uw apparaat monteren
Démarrage rapide
Guida rapida
Snelle start
Montaż urządzenia
Сборка устройства
Montaža
Szybkie uruchomienie
Краткое руководство
Hitri začetek