E-Lins H700 Series User manual

E-Lins H700 Series Router User Manual
E‐LinsTechnologyCo.,Limited
Tel:+86‐755‐29230581E‐mail:sales@e‐lins.comsales@szelins.comwww.szelins.com
H700 Series Router
User Manual
E-Lins Technology Co., Limited
PHONE: +86-755-29230581 83700465
WEB: http://www.szelins.com http://www.e-lins.com
ADDRESS: #301,Unit 6, Building A,Minkang Garden, Minkang Rd.,
Minzhi, Longhua,Shenzhen,518109, China

E-Lins H700 Series Router User Manual
E‐LinsTechnologyCo.,Limited
Tel:+86‐755‐29230581E‐mail:sales@e‐lins.comsales@szelins.comwww.szelins.com
Content
PREPARATION JOB BEFORE CONFIGURATION ····················································· 5
0.1 LEARN YOUR ROUTER VERSION AND FEATURE ···························································· 5
0.2 PREPARE SIM CARD AND WORKING CONDITION·························································· 6
1 PROLOGUE ····································································································· 7
1.1 VERSION ······································································································ 7
1.2 REFERENCED DOCUMENTS·················································································· 7
1.3 NOTICE ········································································································ 7
2 INTRODUCTION ······························································································ 8
2.1 BRIEF ·········································································································· 8
2.2 SPECIFICATION································································································ 8
3 GETTING STARTED·························································································· 9
3.1 PANEL INTRODUCTION ······················································································· 9
3.2 THE PORT &LED STATE ···················································································· 9
3.3 CONNECT TO PRODUCTS···················································································· 11
3.4 INSERT SIM CARD ·························································································· 11
3.5 LOGIN WEB ·································································································· 11
3.6 CONNECTION CONFIGURATION ············································································ 12
3.7 LOGIN WEB CONFIGURATION ············································································· 13
3.8WEB CONFIGURATION······················································································ 13
4 MAIN CONFIGURATION ··················································································15
4.1 ROUTER FUNCTION CONFIGURATION······································································15
4.1.1 Select working mode (For some version only)·········································15
4.1.2 WAN configuration ············································································15
4.1.3 Two Cell Cold Backup········································································22
4.1.4 Two Cell Hot Backup ·········································································23
4.2 CONFIG VPN ································································································ 24
4.2.1 Configure Router as IPSec client··························································24
4.2.2 Configure Router as IPSec Server························································26
4.2.3 Configure Router as PPTP Server························································28
4.2.4 Configure Router as PPTP client··························································29
4.2.5 Change login address and password·····················································30
4.2.6 Change login address········································································30
4.2.7 Change login password······································································30
4.3 PRODUCTION WEB UPGRADE ·············································································31
4.4 FACTORY DEFAULT ··························································································32
4.4.1 Reset via WEB ·················································································32
4.4.2 Reset via “reset” button······································································32
5 WIFI SETTING (FOR VERSION WITH WIFI ONLY)··············································· 33
6 NETWORK SETTING ·······················································································35
6.1 DHCP ········································································································35
6.2 DNS &DDNS·······························································································36
6.3 STATIC ROUTING ····························································································37
6.4 MAC /IPBINDING ···························································································37
7 FIREWALLSETTING························································································38

E-Lins H700 Series Router User Manual
E‐LinsTechnologyCo.,Limited
Tel:+86‐755‐29230581E‐mail:sales@e‐lins.comsales@szelins.comwww.szelins.com
7.1 OPTIONS······································································································38
7.2 TIMESCHEDULE ·····························································································39
7.3 PORT MANAGE ······························································································40
7.4 PORT MAP (PORT FORWARDING) ·········································································· 40
8 DTU & GPS SETTING ·······················································································42
8.1 DTU SETTING (SERIAL TO CELLULAR FEATURE)·························································42
8.1.1 CONFIGURE DTUAS SERVER SIDE ······································································43
8.1.2 CONFIGURE DTUAS CLIENT SIDE ······································································44
8.2 GPS SETTING································································································44
9 OTHER SETTING·····························································································46
9.1 TIME SETTING ·······························································································46
9.2WEB PORT SETTING·························································································46
9.3 SYS LOG SETTING···························································································47
9.4 REBOOT TIME SETTING·····················································································48
9.5 FIRMWARE UPGRADE ·······················································································49
9.6 PARAMETERS BACKUP AND RESTORE·····································································50
9.7 LAN SETTING ·······························································································51
9.8 CUSTOMIZED DIALUP (DIALUP VIA REQUEST)···························································· 51
9.8 SERVICE –CENTRE “HEART-BEAT PACK” ·································································52
9.9 SERVICE –CLI······························································································· 53
9.10TRAFFIC –BANDWIDTH CONTROL (IP FLOW CONTROL)··············································53
10ADDENDA·····································································································54
10.1TERMINOLOGY ·····························································································54
10.2 FAQ·········································································································54
11 TYPICALSETTING & TEST ·············································································55
11.1 DMZ FEATURE ·····························································································55
11.2 STATIC ROUTING SETTING ················································································56
11.3 PPTPSETTING SAMPLE····················································································57
11.4 IPSEC SETTING SAMPLE ···················································································66
11.5 SIGNAL STRENGTH CHECK ···············································································68
11.6 KEEP ALIVE FEATURE······················································································ 69
11.7 MODEM IMEI CHECK ·····················································································71
11.8 PIN CODE ··································································································· 72
11.9 DTU FEATURE (SERIAL TO CELLULAR GATEWAY FEATURE)TEST SAMPLE ··························72
11.10 REMOTE/SYSLOG TOOL RECORDS THE SYS LOG ······················································78
11.11 PORT FORWARDING (NAT, NAPT) TEST ······························································· 79
12 FAQ··············································································································85
12.1WAN IPADDRESS SHOWS “DIALING”ALWAYS.························································85
12.2 CAN NOT POWER ON·······················································································86
12.3 LOG SHOWS “NO NETWORK PROTOCOLS RUNNING” ··················································86
12.4 DNS IS WRONG AFTER DIALUP ···········································································87
12.5 ROUTER IS DIALUP TO ONLINE,BUT CANNOT GET INTERNET. ·········································88
12.6 DDNS NOT WORKING ·····················································································89
12.7 PORT FORWARDING NOT WORKING······································································· 90
12.8 SERIAL DTU POINT-TO-POINT SOLUTION NOT WORKING ··············································90
12.9 DNS MANUAL INPUT NOT WORK ········································································· 90

E-Lins H700 Series Router User Manual
E‐LinsTechnologyCo.,Limited
Tel:+86‐755‐29230581E‐mail:sales@e‐lins.comsales@szelins.comwww.szelins.com

E-Lins H700 Series Router User Manual
E‐LinsTechnologyCo.,Limited
Tel:+86‐755‐29230581E‐mail:sales@e‐lins.comsales@szelins.comwww.szelins.com
Chapter 0
Preparation job before configuration
0.1 Learn your router version and feature
1) H700 series contains different version and option feature. Please learn it before using it.
H700 series defines the model as follows,

E-Lins H700 Series Router User Manual
E‐LinsTechnologyCo.,Limited
Tel:+86‐755‐29230581E‐mail:sales@e‐lins.comsales@szelins.comwww.szelins.com
2) Find the modem type info at the back cover of the router. This will be used while do configuration.
For example:
0.2 Prepare SIM Card and working condition
1) For GSM/GPRS/EDGE/HSDPA/HSUPA/HSPA/HSPA+/4G LTE networks or TD-SCDMA networks,
please get a SIM card with data business.
2) For CDMA2000 EVDO/CDMA1x networks, please get a UIM card with data business or inform us
before order if the network uses non-ruim (nam-flashing).
3) Make sure the sim card or uim card is with enough data business and balance.
4) Make sure the signal is good enough where you test or install the router. Weak signal will make the
router no work. If you find your signal strength is not good, please contact us for high gain antenna.

E-Lins H700 Series Router User Manual
E‐LinsTechnologyCo.,Limited
Tel:+86‐755‐29230581E‐mail:sales@e‐lins.comsales@szelins.comwww.szelins.com
Chapter 1
1 Prologue
This document is just suit for the following products; it helps you quickly to used cellular Router function and
resolves some common questions.
1.1 Version
V
ersion Date Description Author
1.1 2012-6-5 updated Jason.Zou
1.2 Referenced Documents
H700_Datasheet_Eng.pdf
1.3 Notice
The copyright of the document belongs to E-Lins Technology Co., Limited. Copying of this document and
modifying it and the use or communication of the contents thereof, is forbidden without express. Authority,
Offenders are liable to the legal sanction.

E-Lins H700 Series Router User Manual
E‐LinsTechnologyCo.,Limited
Tel:+86‐755‐29230581E‐mail:sales@e‐lins.comsales@szelins.comwww.szelins.com
Chapter 2
2 Introduction
2.1 Brief
H700 Series Router is easy to install, reducing the Reliance on the end customer and enables direct access to
your remote LAN devices for control and monitoring purposes, it enables companies to remotely access
equipment at mobile, remote networks and isolated sites.
H700 Series Router is a dedicated ideal data transmission channel for industrial applications. It can be
operated at GPRS or CDMA 1x or EDGE or HSDPAor HSUPA or 4G LTE or CDMA2000 EVDO network by
selecting a different radio module
2.2 Specification
Please follow the related specification datasheet

E-Lins H700 Series Router User Manual
E‐LinsTechnologyCo.,Limited
Tel:+86‐755‐29230581E‐mail:sales@e‐lins.comsales@szelins.comwww.szelins.com
Chapter 3
3 Getting Started
3.1 Panel introduction
Power supply interface: DC7V-27V power supply (9V or 12V suggested), Please the fixed necessary
power supply of connection product is ensured voltage and the current
parameter of power supply if customer exchanges with other power supply.
Special attention: If customer has changed the power supply, sometimes
can because of twinkling the current ability and leads to Router product
reboot inadequately
Ethernet interface: Can recognize voluntarily crosses or the straight networking winding thread,
and consult 100M voluntarily and 10M's network speed merit ability
Antenna interface: standard SMA antenna interface
Notes:pleaseinstallthesimcardandantennabeforeplugthepoweradapter.Wrongoperationwilldefeattherouter
orthesimcard.
3.2 The Port & LED State
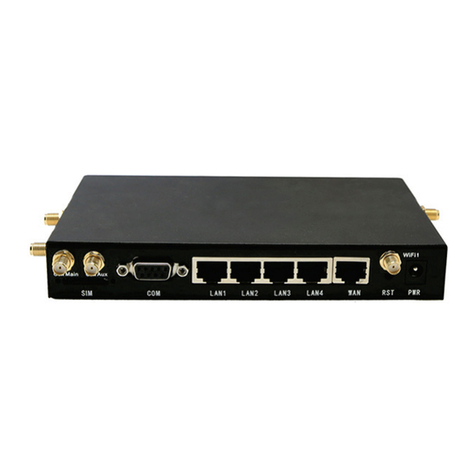
3.2.1 Port
WiFi: WiFi antenna socket
GPS: GPS antenna socket
ANT2: Cell2 antenna socket
ANT1: Cell1 antenna socket
SW: internal battery power on/off
PWR: power supplier socket, DV7~27V, 2.5mm
WAN: WAN RJ45 port
LAN1-LAN4: LAN RJ45 Ethernet port
UART: DB9 transparent transmission port. Support RS232/RS485/TTL (Please confirm which one you need

E-Lins H700 Series Router User Manual
E‐LinsTechnologyCo.,Limited
Tel:+86‐755‐29230581E‐mail:sales@e‐lins.comsales@szelins.comwww.szelins.com
before order).
USB: USB host (not ready, for future use)
V_RST: Video server reset to factory default
R_RST: Router reset to factory default. (Press 5~10 seconds)
SIM1: SIM Card Slot 1. Push the yellow button beside sim card slot to take out the sim card tray, put the sim
card well and insert it.
SIM2: SIM Card Slot 2. Push the yellow button beside sim card slot to take out the sim card tray, put the sim
card well and insert it.
Left WAN LED: indicates for WAN RJ45 port
LAN1 LED: indicates for LAN RJ45 Port 1
LAN2 LED: indicates for LAN RJ45 Port 2
LAN3 LED: indicates for LAN RJ45 Port 3
LAN4 LED: indicates for LAN RJ45 Port 4
Cell1 LED: indicates for cell1
Cell2 LED: indicates for cell2
WiFi LED: indicates for WiFi
VPN LED: indicates for VPN feature
SYS LED: indicates for router working
CHR LED: indicates for internal battery charging
GPS LED: indicates for GPS feature
Right WAN LED: indicates working status of WAN RJ45 port.
3.2.2 The system work LED state explanation
Instruction Marks
SYS System running Led Long light-on when booting, blink after booting
LAN LAN port Led Long light-on with connection;
Fast wink when LAN transfers data;
WAN WAN port Led A) Left WAN LED:
Long light-on with connection;
Fast wink when LAN transfers data;
B) Right WAN LED: once WAN connection is
online, it will light-on
VPN VPN Led Light-on when VPN is linked
CELL Network data Led LINK LED will light-on if dialup to network;

E-Lins H700 Series Router User Manual
E‐LinsTechnologyCo.,Limited
Tel:+86‐755‐29230581E‐mail:sales@e‐lins.comsales@szelins.comwww.szelins.com
Blink after booting or transfers data;
WIFI WiFi Led Fast wink when WiFi module is on
Link Link status led Light-on once the related feature/port is working
CHR Charging status led Light-on if internal better is charging
GPS GPS status led Light-on if GPS is working
3.3 Connect to products
Please connect antenna and RJ45 cable with our products,
3.4 Insert SIM Card
Insert SIM card to the SIM Card Slot of the router.
Import Notes: When the router is power on, never insert or take out the sim card, which will
cause router/sim card damaged.
3.5 Login Web
H700 Cellular Routers contains WEB SERVER, CONSOLE, TELNET and other configuration mode. It is
suitable for different users for configuration operation in local or remote. And the web server is easiest to be
used, so we advice your to used this configuration mode.

E-Lins H700 Series Router User Manual
E‐LinsTechnologyCo.,Limited
Tel:+86‐755‐29230581E‐mail:sales@e‐lins.comsales@szelins.comwww.szelins.com
3.6 Connection configuration
Step 1: Ensure that the computer is on the same network address range as the Router and make it as
your computer’s default gateway and DNS server.
ConsultyouroperatingsoftwareusermanualtodeterminehowtochangetheIPaddressontheEthernetportofthe
computerandthedefaultgatewayaddress.IntheexamplebelowtheIPaddressofthePChasbeensetto192.168.0.2
-192.168.0.253andthedefaultgatewayisthedefaultaddressofthecellularRouter(192.168.0.254)andPrimaryDNS
as192.168.0.254
For Windows XP the sequence is:
START >>Control Panel >> Network Connections >>Right-Click on Local Area Connection >> Properties
>> Internet Protocol
Change the computer’s IP address, default gateway and DNS server and then click OK.
ItmaytakeaminuteortwoforthecomputertobeallocatedthenewIPaddress.Insomecases,arebootmaybe
required
Step 2: To test that there is connectivity between the computer and the Axon, you can ping the Axon
using the ping command at the command prompt. To get to the command prompt in Windows XP, use:
START>>RUN>>cmd
Thepingcommandisenteredasfollows:
Ifsuccessfulyoushouldseesomepingstatisticslikethefollowingexample:
1) If having appeared with command: "Request timed out." That indicate PC and 3G cellular Router are not

E-Lins H700 Series Router User Manual
E‐LinsTechnologyCo.,Limited
Tel:+86‐755‐29230581E‐mail:sales@e‐lins.comsales@szelins.comwww.szelins.com
in the same net section. Please run “IPCONFIG/ALL” under the command model.
Please check the two IP are in the same set. If they are, but still ping successfully, it is possibly wrong in PC
ARP. Recommend run “ARP –D” first.Attention: If appears former error in setting more than one 3G cellular
Router, because the same default IP but different MAR, then it must run “PING” after “ARP –D”.
2) It indicates that no real connect between PC and H700 3G cellular Routers when come out “Destination
host unreachable”. Please check or change the cable after setting the 10M Half model of the Ethernet card.
3) If still PING blocks up, please whether or not can lead to by PING between your PC and other PC, and
checks up if PC has the software such as fire wall at the same time. If still PING blocks up, please whether or
not can lead to by PING between your PC and other PC, and checks up if PC has the software such as fire
wall at the same time.
3.7 Login WEB configuration
Open IE on your PC, type the default URL address http://192.168.0.254:10000
The H700 series cellular Router is configured using a web browser as the interface. To log-on to the web
server, enter the IP address of the 3G cellular Router in the browser address window. The default address is
192.168.0.254:10000. A log-on screen should display.
For H800 series cellular Router,
Username: admin Password: 888888
3.8 WEB configuration
If Login successful, the browser should display the following web page,

E-Lins H700 Series Router User Manual
E‐LinsTechnologyCo.,Limited
Tel:+86‐755‐29230581E‐mail:sales@e‐lins.comsales@szelins.comwww.szelins.com
FirmwareVersion:showstheversionofthesoftwarefirmware
Systemtime:router’sworkinglastingtime.Oncetherouterre‐powers,itwillcountfromzero
LANIPaddress:it’sthelocalLANIPaddressoftherouter
WANIPAddress:itshowstheIPaddressassignedfromtheISPoncetherouterisonline
DNS:itshowstheassignedDNSfromtheISPoncetherouterisonline
VPNSettingStatus:onceyouconfigtheVPNfeature,andthereisVPNconnection,hereindicatedtheinfo.

E-Lins H700 Series Router User Manual
E‐LinsTechnologyCo.,Limited
Tel:+86‐755‐29230581E‐mail:sales@e‐lins.comsales@szelins.comwww.szelins.com
Chapter 4
4 Main configuration
4.1 Router function configuration
If you need to dial-up an internet network, you can configure Router as following steps
4.1.1 Select working mode (For some version only)
Notes: Skip this step if your router has no such option.
It Includes Routing Mode, Transparent Bridge, and Gateway Mode. We advice to used Gateway mode,
default is Gateway mode.
(1) Gateway Mode: If you want H700 router to connect the internet directly. Select Gateway mode.
4.1.2 WAN configuration
Before this configuration, please get the APN info parameters from your network provider.
APN info ----
Username:
Password:
Dial number (service code):
APN code:
Example 1: for network provider “China Mobile”, the APN info is as follows.
Username: wap

E-Lins H700 Series Router User Manual
E‐LinsTechnologyCo.,Limited
Tel:+86‐755‐29230581E‐mail:sales@e‐lins.comsales@szelins.comwww.szelins.com
Password: wap
Dial number (service code): *99***1#
APN code: CMNET
Example 2: for network provider “China Telecom”, theAPN info is as follows.
Username: card
Password: card
Dial number (service code): #777
APN code: blank (means no APN code)
Example 3: for network provider “China Unicom”, the APN info is as follows.
Username: none (keep blank)
Password: none (keep blank)
Dial number (service code): *99#
APN code: UNINET
The following table is china common setting from different ISP. Please get your own parameters from your
network provider.
ISP Dial-up
Number Username password APN
China mobile *99***1# wap wap CMNET
China unicom *99# UNINET
China telecom #777 CARD CARD
At the router menu,
Click ”PORT -- WAN -- WAN Setting”
According to different ISP, WAN configuration include PPP(modem), PPPoE(DSL), Static IP, DHCP Mode,
PPP(modem) mode: config the router works as 2G/3G/4G working mode.
If you config the WAN port with sim card, please choose ”PPP(modem)” for this product.
Find the modem type info at the back cover of the router. This will be used while do
configuration.
For example:

E-Lins H700 Series Router User Manual
E‐LinsTechnologyCo.,Limited
Tel:+86‐755‐29230581E‐mail:sales@e‐lins.comsales@szelins.comwww.szelins.com
This will be used while do configuration.
Warmly reminding: the H700 router has three WAN ports, configure the right one, and please close
the other one, otherwise will make the router no work.
WAN Port definition:
WAN PORT - WAN: for WAN RJ45 (If your H700 version is without WAN RJ45 feature, please choose
“close” at WAN Setting, and save it)
WAN PORT - CELL 1: for cellular module 1 or SIM card 1
WAN PORT - CELL 2: for cellular module 2 or SIM card 2
Configuration example:
For example, with the label at the back cover of the H700 router,
Step 1) This router support WAN RJ45 port, and two CELL. We should configure it as follows,
WAN Port - WAN: This router support WAN RJ45 port. If want to use it, please connect the H700 WAN

E-Lins H700 Series Router User Manual
E‐LinsTechnologyCo.,Limited
Tel:+86‐755‐29230581E‐mail:sales@e‐lins.comsales@szelins.comwww.szelins.com
RJ45 port and xDSL modem with network cable. And configure it as follows,
WAN Port: select “WAN”
WAN Setting: select “PPPoE(ADSL)”
COM: no need select
Username: input the right xDSL username from your ISP
Password: input the right xDSL password from your ISP
Notes:
1) Do not forget to click “Save” button.
2) Please close the WAN port and Save it if your H700 doesn’t support WAN RJ45 feature.

E-Lins H700 Series Router User Manual
E‐LinsTechnologyCo.,Limited
Tel:+86‐755‐29230581E‐mail:sales@e‐lins.comsales@szelins.comwww.szelins.com
Step 2) Config CELL1 & CELL2.
Please configure CELL1 & CELL2 with right parameters as follows.
Notes: do not forget to click “Save” button after configuration.

E-Lins H700 Series Router User Manual
E‐LinsTechnologyCo.,Limited
Tel:+86‐755‐29230581E‐mail:sales@e‐lins.comsales@szelins.comwww.szelins.com
For normal use, please just set the following parameters, and keep others as default when we send the router.
1) WAN Port: first select CELL 1 to configure, save it. Then select CELL2 to configure and save it.
2) WAN Setting: select “PPP(modem)”
3) COM: select the right one as the back label indicates.
4) Username (some network provide has no this value, please keep it as blank)
5) Password (some network provide has no this value, please keep it as blank)
6) Pincode (If your sim card has pin code, please input here; if none, please keep it as blank)
7) Dial number (it’s service number or service code, please get this from network provider. Normally 2G is
*99***1#, and 3G is *99#)
8) APN (Please get this from ISP provider and fill in it)
9) Network select. (Select the right one with your router)
NULL: no select
GPRS: for GPRS or EDGE router
CDMA/EVDO: for CDMA or EVDO router
WCDMA: for WCDMA/UMTS/HSDPA/HSUPA/HSPA/HSPA+ router
TD: for TD-SCDMA router
Notes:
A. for 3G HSPA/4G LTE version, please select “WCDMA”
B. for 2G GPRS/EDGE, please select “GPRS”
C. for 3G EVDO/2G CDMA1x, please select “CDMA/EVDO”
D. for 3G TD-SCDMA, please select “TD”
Other manuals for H700 Series
4
Table of contents
Other E-Lins Wireless Router manuals
