E-Swin E-One clinic User manual

1
User Manual

2 3
TABLE OF CONTENTS
Dear client,
You have just purchased an and I thank you for your custom.
Habits change and is evidence of this. You can now safely
have access to a hair removal technology that uses professional
quality pulsed light in the comfort of your home.
I have personally ensured that the utmost attention be paid to the
implementation of each ; you will see, that is an
exceptional product.
I hope that you will be completely satisfied with your
and that you will share your experience on our company’s official
website at www.esw-beauty.com.
Yours Sincerely,
Yves Vincent
Creator of
PROHIBITED HANDLINGS
USING THE ACCESSORIES
MAINTENANCE
ASSISTANCE
TECHNICAL CHARACTERISTICS
STANDARDS
WARRANTY CONDITIONS
CONTACT
CHANGING THE OPTIC CARTRIDGE
SOFTWARE OPTIONS
HAIR REMOVAL WITH THE
PACKAGE CONTENTS
PRECAUTIONS FOR USE
GLOSSARY
INFORMATION PROVIDED BY TOUCH SCREEN
4
6
12
14
18
40
42
32
36
44
46
48
53
54
55

4 5
1stop
Guide plate.
1 Clean- optical spray 1 patches
self-adhesive patches.
1 hair removal follow-up.
User Manual
1 user manual.
WARNING: Using is exclusively restricted to use at home and must not be used for professional
purposes.
All manufacturer’s warranty will be voided if the device is used for professional purposes or if the optic
cartridges are used at an abnormally high rate. An device that has lost its warranty will not be able to
recover it afterwards.
1 base and applicator. 1optic with filter included -
consumable cartridge and its optical filter
(included in the applicator of your ).
1 pen - pencil of work and sharpener. 1gel -flashing intended gel. 1 mask - safety glasses.
PACKAGE CONTENTS
REMINDER: Only E-Swin is authorised to sell and its accessories: optic, clean, patches,
pen, gel, mask, fun, etc. on its own website store.esw-beauty.com
CAUTION: YOU MUST KEEP ALL THE ELEMENTS OF THE ORIGINAL PACKAGING (BOXES, PACKAGING ETC.).
The manufacturer’s 2 year warranty will cover parts and labour only if the device is returned with all its elements in its original
packaging. You must therefore carefully maintain the entire original packaging in which was delivered to you.
Hair removal follow-up
1 activation card
Hair removal follow-up
1 power cord.

6 7
USAGE PRECAUTIONS
• Voltage: 100 -240 V.
• Nominal frequency: 50-60 Hz.
• Maximum power consumption: 240 VA.
• Make sure that the voltage corresponds to that of your installation. Any improper connection may cause permanent
damage not covered by warranty.
• Make sure that the power outlet to which you are connecting your is undamaged, in perfect working
condition and that it does not interfere with the proper use of your (the power outlet must be easily
accessible).
• This device is intended for personal use at home only and not for professional purposes.
• Do not unplug by pulling the cable of .
• Never use with wet hands.
• must never be used in the shower, bath or in any place where water can splash the device (applicator or
base).
• Never immerse the base of , its applicator or the optic cartridge in water.
• Never use if damaged, never use in case of a functional anomaly appearing on the touch screen, or
following a fall (non-visible damage can be detrimental to your safety).
• This device can be repaired only with special tools. For any problems after delivery, please contact us on our
website www.esw-beauty.com.
• optic cartridges and, more generally all accessories, must be ordered only via our shop store.esw-beauty.com.
We disclaim any responsibility for the use of consumable cartridges and accessories from another manufacturer.
• When using the device, make sure to place it on a flat surface, in a place where the potential of a fall can be
avoided.
• E-Swin SAS disclaims any responsibility for any damage resulting from improper use of the device or use other
than described in this manual.
• One pair of safety glasses (mask) is provided with the device: these glasses shall be worn at all times
when using the device. If other people are close to you while using the they should also wear the
mask.
• When is being used, it must not come into contact with hair, the periocular region delimited by the
safety glasses mask (for example: eyebrows and eyelashes must never be flashed with ), clothes
or any other object, so as to prevent all risk of injury, blockage or impairment.
• The applicator tip must not touch the mask at the time of the flash.
• Never use near an aerosol, a heat source, or any other electronic devices.
• Do not stack on top of other electrical devices.
• Your is provided with a power cord (2 meters long) and an applicator cable (2 meters long). Do not
use any extension cables or any cable other than those provided by E-Swin SAS, as this could render the
equipment non-compliant from an electromagnetic point of view.
• The wireless communication equipment must be kept away (about 3 meters) because they may interfere with
the proper functioning of the device.
• The device must be installed in an environment unpolluted by electromagnetic disturbance (computer,
electrical appliances...).
Only people who can read and understand this user manual are authorised to use .Only people who meet the criteria for use as described in this manual are able to use on their body.
❙ FOR YOUR SECURITY
Before using , please read the following information carefully:

8 9
NEED HELP?
To contact our sales department or technical support, please visit our website www.esw-beauty.com
• If you are pregnant or have diabetes.
• To treat white, grey or red hair. Specifically, certain people are born as red phototype I (red hair type). As adults
these people may experience a reduction of this essentially orange colour. However, the melanin structure of
this hair retains characteristics that render light technologies ineffective for hair removal.
• On very dark skin or black skin.
• On an injured, burned, or infected skin.
• On skin that has been sunburnt and whose recovery time is less than one month.
• On skin lesions of unusual aspect, you must first have a medical consultation with your doctor.
• On high-risk areas (blemishes, birthmarks, warts, unhealed wounds...).
• On moles: if they are located on the zone to be treated, they must first be protected, specifically by covering
them with the self-adhesive patches provided with your .
• On tattooed areas: permanent makeup (e.g. lip tattoos) or cosmetic tattoos, whatever their colour. If this is the
case, use the delimitation plate stop that came with your .
• If you have a skin condition (eczema, inflammation, acne...).
• If you are taking medication that can lead to photosensitivity (please ask your doctor before use)
• If there is a history of skin diseases, you will need to obtain medical advice before using the .
• Do not use on animals.
You must only use the pencil of work pen, the gel gel, the self-adhesive patches patches, the guide
plate stop and the safety glasses mask provided with your . The use of any other products
may cause skin burns.
• Any use of by an under aged person must be performed under the supervision of an adult.
• Always store away the after each use, out of reach of children. Unplug the power cord and store it
in its original bag and wind back the applicator cable around the applicator support cables provided for this
purpose.
USAGE PRECAUTIONS
❙ DO NOT USE THE
❙ KEEP OUT OF REACH OF CHILDREN
SUNBEDS / SUNSHOWERS OR ARTIFICIAL UV IN A BEAUTY PARLOUR:
You should take care about the use of artificial UV radiation.
Regarding high pressure UV dispensed by high powered machines, it is advisable to wait a few days before or after such
a session before starting treatment with .
NATURAL UV:
When exposed to sunlight after a treatment session with , it is imperative to use a sunscreen of very high
protection on the treated areas for 2weeks following the session.
Do not use if you have applied a self-tanning product on the area to be treated; wait until the effects of the self-
tanning product have disappeared completely before using .
❙ CAUTIONS REGARDING UV
❙ SELF-TANNING PRODUCTS

10
USAGE PRECAUTIONS
When used properly, the risk of adverse eects, such skin rashes or burns, is extremely reduced but still exist. If these
eects occur, you must stop using the device immediately.
A simple solution is to test the device on a small area of the skin before the full session. The absence of skin reaction will
enable a perfectly safe use of the device.
When your hair removal device is used as directed, side eects and complications are rare. However, all cosmetic
treatments, even those designed for home use, involve certain risks. This is why it is important to understand and accept
these risks and possible complications when using a pulsed light hair removal system for home use.
❙ POSSIBLE SIDE EFFECTS WITH
❙ PERIMETER OF USE OF
, designed and manufactured by E-Swin is a device of health regulated of class IIa, with CE marking delivered by
CE 0197 organisation.
may be used for the following applications:
- Treatment for hair removal in relation to hormonal or idiopathic hirsutism,
- Depilatory treatment for purely cosmetic purposes, on all parts of the body outside the peri-ocular region.

12 13
GLOS SARY
❙ THE BASE ❙ THE APPLICATOR
Applicator
support cable
Colour
touch screen
Applicator
support area
Tip of optical
guide
Lower
casing
Air
vents
Mobile head
Mobile head locking
tab
Start
button
Flash
availability
LED
Upper
casing

14 15
6 7 4 5
2 3
128
14
13
119
10
22 121201918171615
INFORMATION PROVID ED BY TOUCH SCREEN__
THE BASE OF IS EQUIPPED WITH A TOUCH SCREEN
ON / OFF OF THE DEVICE
1On/off switch.
AREAS OF SAFETY ICONS
2Spillage of water on any part of the device is strictly
prohibited.
3must not be used in certain physiological or
medicated contexts (pregnant women, photosensitising
drugs...).
4Reading this instruction manual before using is
mandatory.
5 Wearing the safety glasses (mask) is recommended.
HOW TO PROGRAMME A HAIR REMOVAL SESSION
6 Silhouette of man / woman. This area allows you to choose
between "woman" and "man".
7Thickness of the hair. This area allows you to select the
thickness of the hair, from the thinnest (bottom) to the
thickest (top).
8The skin colour. This area allows you to select the colour of
the skin, from the lightest (bottom) to the darkest (top).
9The level of intensity. The gauge represents the 6 levels of
intensity of the issued flash. The arrows adjacent to this
gauge enable you to increase or decrease the level of
intensity.
10 Pause.Thisiconisdisplayedonthetouchscreenthroughout
the duration of the hair removal session. Pressing it allows
you to put the device in pause mode.
11 Play. Enables you to cancel the pause mode and to resume
the hair removal session.
BROWSING AREA
12 These buttons enable you to move from one character to
another (
22
), and to increase or decrease the digits of each
character.
13
Go back to the previous menu. This icon enables you to
modify any selection made previously. It is available only
when icons 16 and 20 have been selected.
14 Validation of input data (
22
).
INFORMATION IN REAL TIME
15 Volume activation/deactivation.
16 Lock / unlock. This icon enables you to secure your
with a PIN code.
17 Warning. A number is displayed on the touch screen when
this icon is active; it corresponds to an error message (see
page 50.).
18 Detection of the activation card.
19 Temperature of the applicator. This icon is not active during
normal functioning of the device. If it blinks, please refer to
the corresponding error message (See page 50).
20
Cartridge tube. When it is blinks, it means that you can flash
(this does not concern this version of ).
21
Numbers 1 and 2 correspond respectively to the first input,
then to the second input that confirms the secure PIN (this
does not concern this version of ).
22
All these characters enables you to enter the secure PIN
code of , and also to show the remaining number
of flashes at any moment.


18 19
❙ BEFORE EACH USE
REMOVING HAIR WITH
123
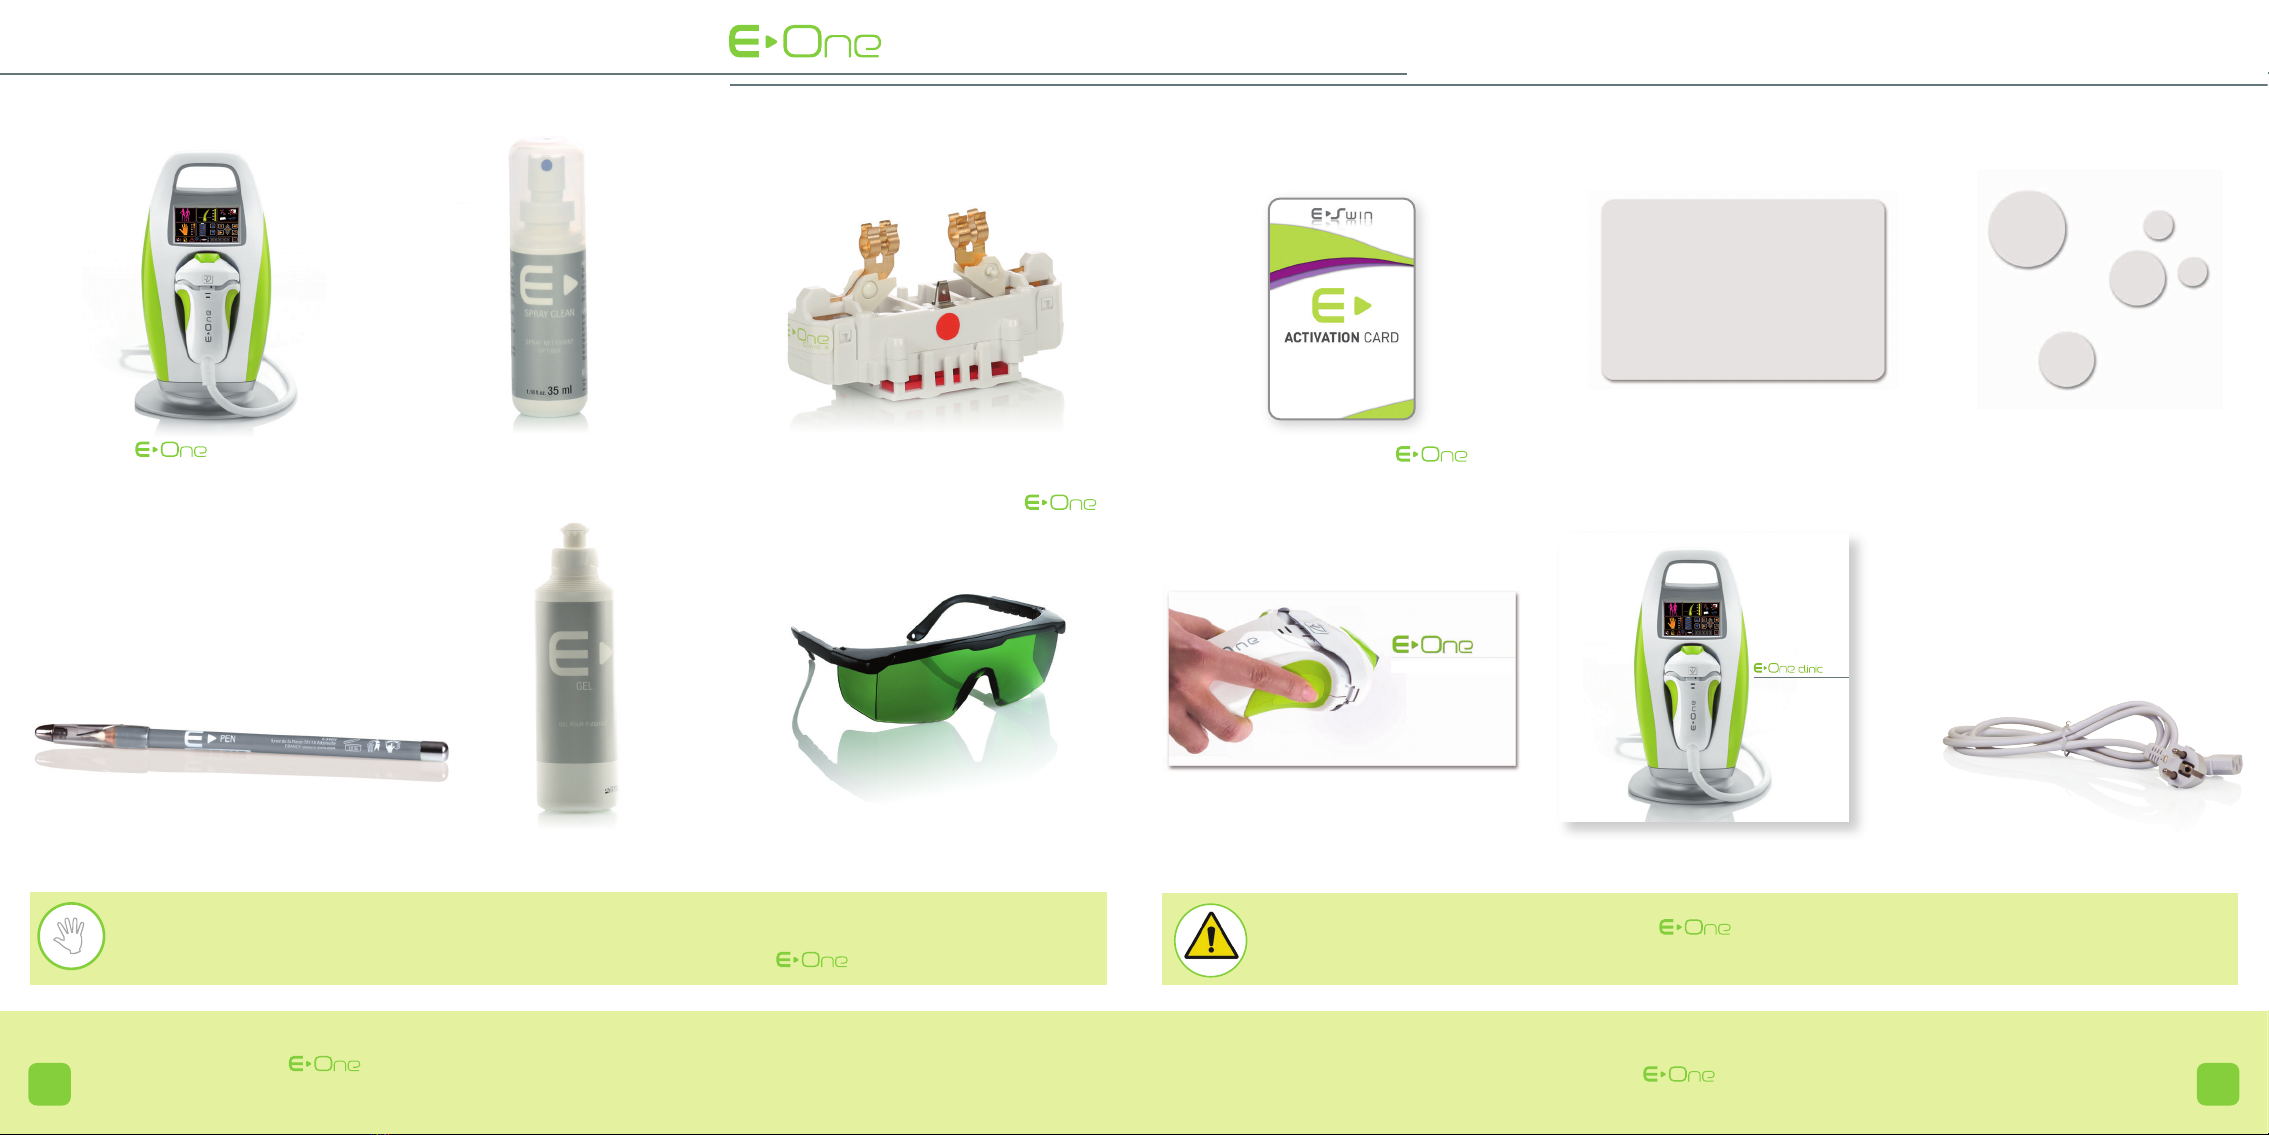
• Check the power cord (must not be pinched or crushed, wire must not be bare).
• Check the cable connecting the base to the applicator (no visible impairment).
• Check the external optical parts of .
Check that the glass tip of the applicator (optical guide) is intact, and if this is not the case (if the optical guide is cracked or
chipped), changing the whole mobile head is essential. Ordering this part is possible at store.esw-beauty.com.
• Verification of the internal optical parts.
- In all cases, the device must be unplugged before you start disassembling the mobile head.
- Before each use, and before plugging-in , you must check the integrity of the internal optical parts: tube, filter
(flat red piece of glass), and optical guide. The filter must be cleaned systematically before each hair removal session with
. It must be clean and free of dust.
To proceed to the verification code:
- Press simultaneously on the 2 locking tabs of the mobile head, and remove it (1).
- Delicately place the mobile head on a flat surface.
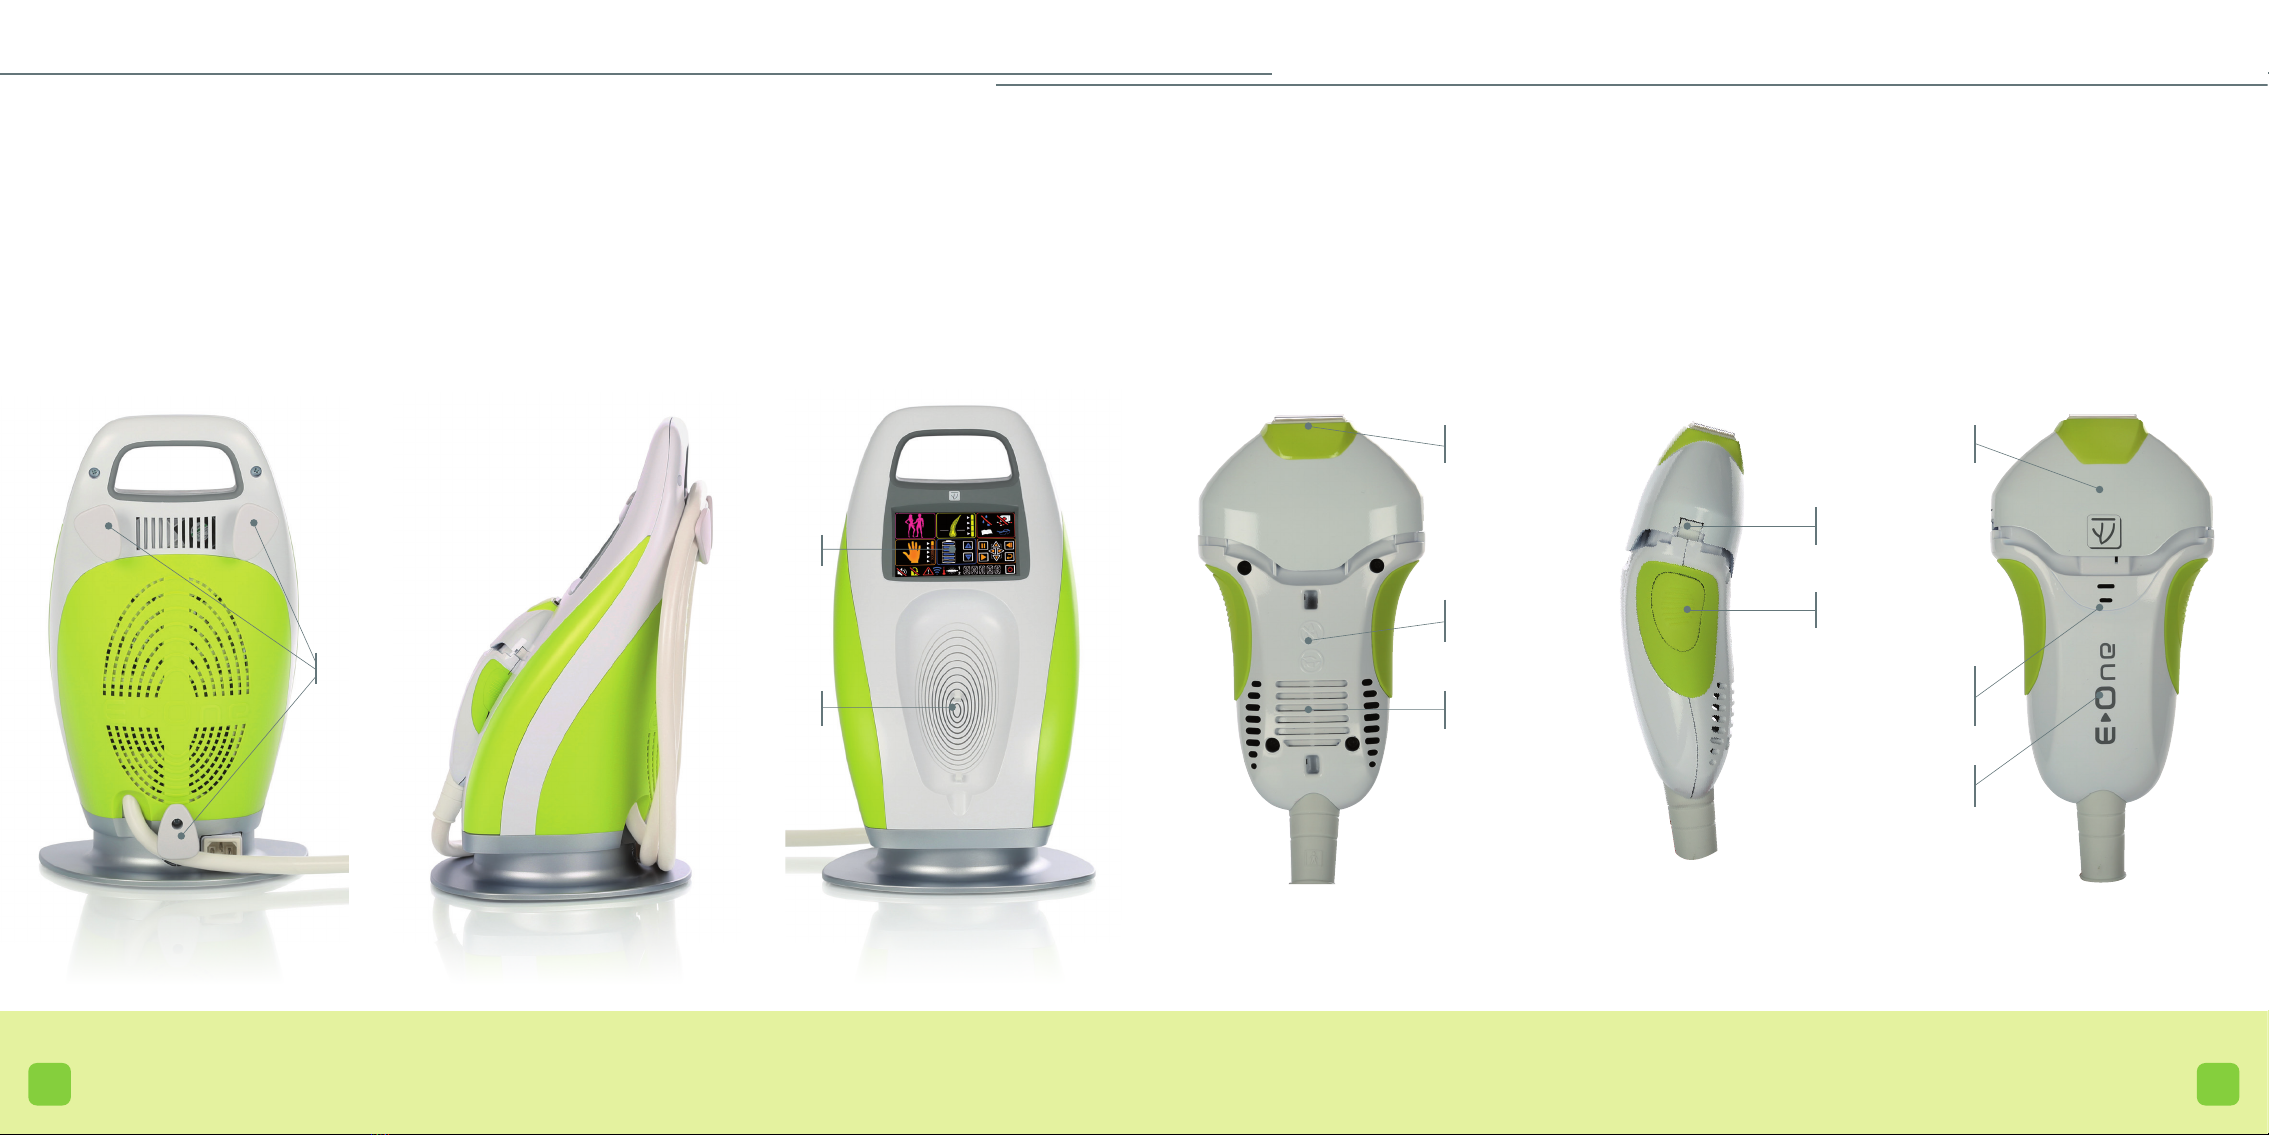
Once you have completed your treatment, you must wait for the fan to come to a complete stop (it may
take more than 10 minutes), before switching it off and unplugging it. This procedure enables the inter-
nal optical parts to cool down. The other fans, located in the base of , will only stop once the
device is unplugged.
4 5
6 7
8 9
10 11
12 13
VERIFICATION • Removing the optic cartridge with filter.
- Once the mobile head is removed, the optic cartridge
with filter is then visible in the applicator (2).
- Remove the cartridge from the applicator: press firmly on
the filter support (3) and pull (4). The optic cartridge
with filter now presents itself to you (5); it is imperative
to hold it only by the plastic parts.
• Cleaning of the internal optical parts.
- Once the filter cartridge is removed, the transparent
optical glass is also accessible (6).
- Using the spray clean: spray it on a lint-free cloth
beforehand (7).
NOTE: Never spray directly on the optical parts.
Afterwards clean only the accessible side of the filter with this
cloth (8). Repeat the same procedure for the accessible part
of optical glass (9).
NOTE: The filter must never be separated from its optic
cartridge.
- When cleaning is complete, take the optic cartridge and
align it with the applicator with the help of the red dots (10).
Push it into the slide way of the applicator by pressing on it
(11), so as to ensure that it is properly in position (12).
- Re-attach the mobile part of the applicator by pressing
simultaneously on the locking tabs of the mobile head (13),
making sure to align the internal red dot of the head with the
red dot of the applicator.
NOTE: For better efficiency of , t is recommended to clean the filter before each use with the spray clean
provided when you purchased . Any damaged filter due to non-compliance with the procedure for use is not
covered by the manufacturers warranty.

20 21
❙ STEP 1
CHOOSING THE BEST TIME TO USE THE
If your previous hair removal method was:
Razor:
You can use immediately.
Depilatory creams:
You should only use
1 week after your last depila-
tory cream treatment.
Waxing, electric epilator, tweezers:
You should only use 3 weeks after your last depila-
tion treatment.
Laser technology, flash lamp or other method:
You should only use after hair re-growth has
started.
❙ STEP 2
PREPARE YOUR SKIN
• Your skin should be clean, dry and free of any cosmetic
product.
• Do not apply any cream, moisturiser, oil or any other
substance on your skin.
• Shave the area to be flashed on the same day of the
session with .
NOTE: It is imperative that the areas of the skin to be
flashed are completely free of all hair by shaving (and
not by waxing, depilation cream, electric epilator or by
any other hair removal procedure). Shaving must be
done preferably on damp skin in order to reduce the
aggressive effect of the razor.
• Rinse your skin with water. After shaving, the skin should be
thoroughly rinsed to remove all the hairs that have been cut.
❙ STEP 3
USING OF THE ACTIVATION CARD
These devices operate with an activation card, credited with 3000 flashes.
This card is specific to the optic cartridge with which it has been ordered.
- Use the activation card of your optic cartridge.
- Insert the card on the upper support clip located in the base of the applicator.
- Leave the card in this slot throughout the entire hair removal session.
- At the end of the session, remove the activation card, take care not to damage it, and store it in its case.
- Follow the procedure to switch off the device.
REMOVING HAIR WITH

22 23
NOTE: Very dark skin and black skin are not represented here because they are not compatible with .
- IDENTIFY YOUR SILHOUETTE (screen D).
Select man / woman silhouette by clicking alternately on
the frame (6). The selected silhouette stays on the screen:
the other silhouette disappears.
-
IDENTIFY THE THICKNESS OF THE HAIRS TO BE
REMOVED (screen E).
Choose the thickness of the hair (7), among the 4 thic-
knesses of hair proposed, from the thinnest (bottom) to the
thickest (top).
- IDENTIFY THE COLOUR OF THE SKIN (screen F)
Choose the colour of the skin (8), from the lightest
(bottom) to the darkest (top).
D
E
F
❙ STEP 4
STARTING AND SETTING UP YOUR
• Connect to its power cord.
issues 3 beep sounds; the screen is black (screenA).
Just press anywhere on the screen to enable all icons to
appear (screen B). These icons are explained on pages
14 and 15. The menus are displayed temporarily. Only the
safety icons keep blinking.
• Unlock the safety features (screen C).
It is mandatory to validate each safety feature by pressing
one by one on each safety icon (the order of validation does
not matter).
Once all the safety icons are validated, all the other settings
icons for the flash will be available.
If an icon has not been validated, it will continue to blink.
You will not be able to set up or use your so long
as all the safety features have not been confirmed and
pressed.
• Setting up your hair removal session.
Simply give some information to each blinking icon to set up
your hair removal session. You do not need to press on the
validation icon to select each one of them (14). All the settings
must have been pressed to be able to use . If one of
them has not been selected, the icon will continue to blink.
A
B
C
REMOVING HAIR WITH

24 25
Screen H
“I’m a man, I have white skin, I wish to remove the hair from
my armpits”.
My selections will be as follows:
- Man.
- Fair skin (1st colour).
- The thickest hair (4th thickness).
- Intensity level gauge (level 1).
Screen I
“I am a woman, I have dark skin, I wish to remove the hair on
my arms”.
My selections will be as follows:
- Woman.
- The darkest skin (5th colour).
- Hair (2nd thickness).
- Intensity level gauge (level 1).
❙ CASE STUDIES
H
I
ADJUST THE DESIRED INTENSITY LEVEL: (screenG)
The arrows located next to the intensity level icon (9),
enable you to increase or to decrease the intensity of the
issued flash.
Click on one of the two blue arrows, until it gradually
reaches the desired intensity level.
When the last setting has been validated, the pause icon
(10) located in the browsing area becomes visible.
The icon representing the lamp (20) blinks; the device is
ready to flash.
At any time, you can change any of these settings; you just
need click on the corresponding icon and modify the set-
tings.
IN PRACTICE: Always start with a test using the basic setting (the default adjustment proposed by ) then
gradually move the intensity up 1 notch until you reach the desired intensity. Issue a flash, then wait 5 minutes after
this flash to appreciate the skin reaction. In the absence of skin reaction, you can continue to flash the entire desired
area or move the intensity up again by 1 notch and observe the reaction once again (and so on).
IMPORTANT: The darker the skin (whether by photo type or tanning ), the more important it is to
stay close to the minimum default power setting.
NOTE: By default, the proposed intensity level is adjusted to the minimum. This level enables most users to obtain
good quality results, with optimum safety in 100% of cases. Increasing the intensity level of will have the
following consequences:
- An increase in the results obtained.
- A reduction of the number of sessions needed to obtain lasting result.
- An increased sensation on the skin when the flash is issued.
- An increased risk of rashes and even burns on highly pigmented skin (olive) after a session.
G
REMOVING HAIR WITH

26 27
❙ STEP 5
MARK OUT THE AREA TO BE FLASHED
• Mark out the area to be flashed with the help of the pen,
by tracing parallel white lines on the large areas.
• If necessary, use the guide plate stop to cover a rather
large area that should not be flashed (tattoos...).
• Cover small areas that should not be flashed (moles...)
with the patches.
• After applying a thick layer of gel over the entire area to
be flashed, move the applicator along the marked out area
(refer to the next page to know how to issue a flash).
• The applicator’s positioning leaves a ‘foot print’ on the
skin, which enables you to see the area that has just been
treated. Thus, from one flash to another, it is very easy to
distinguish between an area that has already been flashed
and another area that has not yet been. An overlap of about
1 mm is possible.
• Apply a thick layer of gel over the entire area to be
flashed. It must, under no circumstance, enter inside the
mobile head.
REMINDER: The pencil of work pen, the gel, self-adhesive patches, the guide plate stop, the safety glasses
mask to be used must be those supplied with your . The use of any other product may cause skin burns and
void the warranty of your device.
PRECAUTIONS TO BE TAKEN DURING THE SESSION
• You shall wear your mask safety glasses at all times. If other people are around you while you are using , they
should also wear the mask safety glasses.
IMPORTANT: Do not flash the periocular area (located under the mask safety glasses protecting your eyes, eye-
brows, eyelashes...).
• If you are planning to flash a large area, do not apply the gel over the entire area from the beginning: as it will dry
out and lose its effectiveness in terms of optical transmission. Therefore apply the gel as you progress onto the area
concerned. Once the gel has been used on the skin and has been flashed, it should under no circumstance, be collected
and reused on another area: flashing the gel is likely to cause a change in its optical characteristics.
TIP! To easily remove the applicator from its base, you must grasp it next to the large white cable. The
applicator is then easily unhooked.
REMOVING HAIR WITH

28 29
20 21
❙ STEP 6
ENDING THE SESSION
• Press key 1.
• Once the fan located inside the applicator is off (after
10 minutes or so), the power cord can be unplugged. The
other fans, located inside the base of will only
stop once the device is unplugged.
• Clean the glass tip of the applicator (optical guide) with
a damp cloth.
• Finish cleaning the optical guide with the spray clean
(images 20 and 21).
Once you have completed your treatment with ,
you must wait for the fans located inside the applicator
to turn off completely. This enables, among other things,
the optical parts to cool down properly. The fans located
in the base, for their part, only stop when the device is
unplugged.
• Store your .
NOTE: After the hair removal session, small red spots may appear: this is a normal reaction and will disappear
quickly. In case of sensitive skin, and after a hair removal session with do not use any hair removing
cream, for a whole week, on the areas that have been flashed.
ISSUING A FLASH
- To be able to flash, the glass tip of the applicator (optical
guide) must be applied onto the skin. Then pressure should
be exerted so as to “push down” the head of the applicator,
creating a pressure on the skin.
- The flash can then be triggered, by pressing the button
located on the side of the applicator.
- The pressure must be released and the applicator must be
moved away from the skin.
- The applicator is then moved onto the next area just beside
the one that has just been flashed. It can only be triggered
again after the indicator light has turned green (if the appli-
cator is triggered again before the indicator light has turned
green, you will not be able to issue the flash).
- Make sure that you stretch the skin where it is the thinnest,
so that the glass tip (optical guide) of the applicator is in
contact with the skin and that you have properly removed all
hairs from the area to be flashed.
14 15
16 17
18
19
NOTE: For each flash, the treated area corresponds to the
range covered by the tip of the optical guide, i.e. 3x 2 =
6 cm2. The glass surface (optical guide) at the tip of the
applicator must be placed well flat on the skin.
NOTE: If the device remains idle for 10 minutes or so, it will automatically activate the energy saving mode.
The fans located inside the applicator will stop running, unlike those located inside the base: these will only
stop once the device has been unplugged. For the fans to be reactivated, you simply need to issue a flash.
Once the hair removal programme has started, the device charges itself: vertical bars scroll at the bottom of the
touch screen, from right to left (where icon (22)is located). It also charges after each flash and precedes the display
of the number of remaining flashes on the optic cartridge. If the device is idle for 15 minutes, it will automatically
go into “pause” mode.
REMOVING HAIR WITH


32 33
This step must be performed with utmost caution. Any improper handling can result in permanent
damage to the applicator and to in a more general way. The warranty does not cover improper han-
dling. We therefore recommend you to be very attentive to the procedure to follow.
The filter must never be separated from its
optic cartridge.
❙ STEP 1
The cartridge must be changed when the number of flashes
displayed is equal to 0. When this happens, the lamp icon
(20) appears, but does not blink (screen J).
You can monitor your usage on the touch screen at any time.
J
__CHANGING THE OPTIC CARTRIDGE
❙ STEP 3
• Turn off the device.
• Unplug the power cord from the device.
❙ STEP 4
EXTRACTING THE CARTRIDGE
• Take the applicator and press simultaneously on the
2locking tabs of the mobile head (23), and remove it.
• Once the mobile head is removed, the optic cartridge
with filter presents itself in the applicator (24).
• Remove the cartridge from the applicator: strongly pinch
the filter support (25) and pull (26). The optic cartridge
with filter now appears (27); it is imperative to only hold
the plastic parts.
23 24
25 26
27
❙ STEP 2
Before turning off and unplugging your device, you must wait for the fan located inside the applicator to stop operating
completely (this may take several minutes). This procedure enables the optical parts of the applicator to cool down; the
other fans located inside the base of , will only stop once the device is unplugged.
NOTE: The explanation of the different parts of the applicator can be found on page 13.

34 35
❙ STEP 5
RECEPTION OF THE NEW OPTIC CARTRIDGE AND
UNPACKING
Remove the new optic cartridge from the plastic box (28&
29).
❙ STEP 6
INSERTING A NEW CARTRIDGE
• Take the new optic cartridge and check the direction for
inserting this new cartridge.
• Align the optic cartridge with the applicator with the help
of the red dots (30).
30
If this is not the case (if it overtakes by more than 2mm),
it means that the cartridge was inserted incorrectly: you
must take it out and check that:
- The red dots are aligned (33).
- You have not twisted the electrodes (34).
If you have twisted the electrodes, do not insert your
optic cartridge in your as it may cause serious
damage to your device. You will need to send us back the
damaged cartridge and order another one.
❙ STEP 7
Before repositioning the mobile head of the applicator,
you must always clean the filter (located directly on the
optic cartridge) with the spray clean, but use it only
on its accessible surface. It is strictly forbidden to spray
clean directly on the filter. It must be sprayed before-
hand on a clean, dry cloth, and it is this cloth, which must
be used to clean the accessible surface of the filter (35).
31
32
34
35 36
22
29
28 33
PRECAUTIONS: During the entire procedure of changing the cartridge, you must under no circumstance touch
the electrodes of the tube (34). If you accidentally touch the tube or its reflector, we urge you to send us back your
cartridge to proceed to an exchange.
❙ STEP 8
Re-attach the mobile part of the applicator by pressing simultaneously on the locking tabs of the mobile head (36) making
sure to align the internal red dot on the head with the red dot on the applicator.
❙ STEP 9
When the number of flashes expires, you must order an optic cartridge (delivered with its activation card).
The warranty does not cover improper handling. We therefore recommend you to be very attentive to the procedure to
follow.
WARNING: It is strictly prohibited to make any modification of any kind to your .
__CHANGING THE OPTIC CARTRIDGE
NOTE: The cartridges are not symmetrical, so they must
be inserted in a specific way, and certainly not any other
way. To help find your way, a red dot indicates the part
underneath the cartridge. This dot must be oriented to
match the side of the applicator that contains a ventilation
grid, which is also marked by a red dot. You must there-
fore align the 2 red dots.
• Push it into the slide way of the applicator by pressing on
both sides, so as to ensure that it is properly maintained
(31).
• After attaching the cartridge, you must make sure that it is
positioned correctly: it must be aligned to the fix part of the
applicator (32).

36 37
• Modify an existing PIN code
Modifying an existing PIN code, while a former code already exists, is possible but only when is already running,
i.e. the PIN you want to change has already been entered at start-up. You must therefore click once on the lock icon (16)
and enter the current code once, then validate it (validation icon14). The device is unlocked; the oblique red line appears
the lock icon (16). It is then possible to enter a new PIN code by following the same steps as those described previously.
NOTE: If you have mistakenly selected the lock icon (16), and that you do not wish to enter a personalised PIN code,
click on the go back icon (13).
IMPORTANT: If you cannot remember the PIN code you have entered, you must send us back your so that our
technical department can unlock your device. This service is not included in the warranty; you will therefore be billed for it.
BEEP KEYS
By default, the “Beep keys” are activated but it is possible to disable it. This is why we recommend that you choose a simple
PIN code that you can remember, but you will also need to write it down somewhere else.
❙ SOFTWARE OPTIONS
PIN CODE
It is possible to secure your by entering a PIN code. As long as a specific PIN code has not been entered, a red bar
will appear on the lock icon (16). This means that the device is not locked; there is no code to enter.
By default, the PIN code is 0000. If you do not act on the PIN code, you will not be asked for one each time you turn on the
device. If, on the other hand, you change the default PIN code (0000), you will need to enter the new PIN code each time you
restart .
• Change the PIN code
To change the PIN code, you must:
- Click the on lock icon (16). The number 1, located next to the lamp icon (20) will blink: you must therefore enter the 1st
code.
- Enter the PIN code (4 digits) with the help of the browsing icons (12). They enable you to change the digit of each
segment (vertical arrows) and to move from one segment to another (horizontal arrows). Once the 4 digits of the code
are entered, validate them by clicking on icon (14). The number 2, located next to icon (20) will blink: you must enter
the second code.
- Enter your code a second time (confirmation entry) and revalidate (validation icon 14).
When the input is completed, you will automatically go back to the previous menu.
However, if the second code entered is different from the first code, the warning icon (17) will blink and the error message
no.13 will be displayed. You must therefore press the validation icon (14), and redo the entire procedure (enter the PIN code,
then re-enter the same PIN code for confirmation).
Following this procedure, each time you start up your device, you will be asked to enter the PIN code. The unlock icon
(16) blinks (it is no longer crossed out by a red line). You must enter the PIN code (only once). If the code is correct, the
safety icons will be displayed. If the code is erroneous, the warning icon (17) will blink and the error message no.14 will be
displayed.
• Disabling the PIN code
Disabling the PIN code is possible only when is already running, i.e. the PIN code you want to change has already
been entered at start-up. You must then click once on the unlock icon (16), and enter the PIN code 1 only once.
SOFTWARE OPTIONS

Table of contents
Popular Personal Care Product manuals by other brands

Viconte
Viconte VC-1924 instruction manual

Philips
Philips Lumea IPL 8000 Series manual

Orliman
Orliman Lumbitron LT-320 Use and maintenance instructions

Gordon Ellis & CO
Gordon Ellis & CO Prima manual

Air Liquide
Air Liquide Soffio Cube instruction manual

HoMedics
HoMedics FAC310AU Instruction manual and warranty information