TRADITIONAL BELL DNT-206
Main features:
• A steel bell bowl (76 mm diameter) is a source of sound.
• The doorbell loudness volume control is possible.
• Volume: ~79 dB.
MOUNTING INSTRUCTION
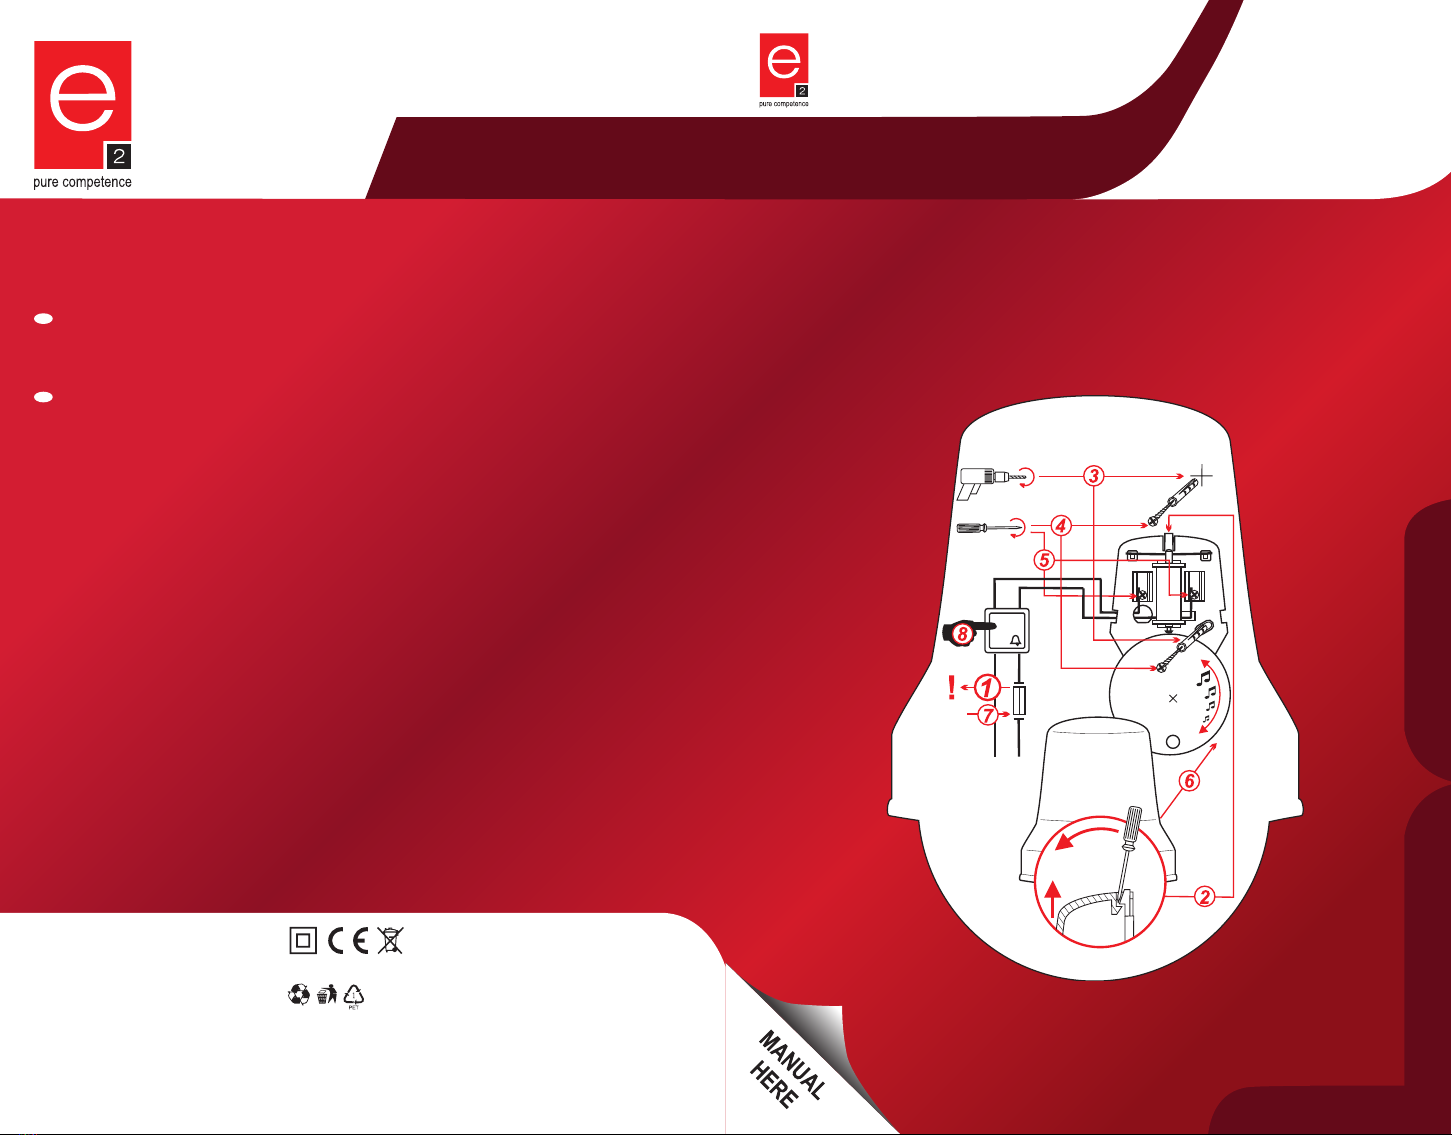
1. A qualied electrician should mount the doorbell.
2. It is reco mmended to use 0.5 mm² and 2.5 mm², 300/500 V insulation voltage wires for the doorbell electrical
system. The wire type should be appropriate for local circumstances.
3. The doorbell may be powered by 8 V AC voltage only. An external 230/8 V AC transformer is needed (e.g.
TRM-8 of ZAMEL). It is necessary to buy a transformer independently; it is not included in the doorbell kit.
4. It is necessary to prevent a phase wire against shortcuts and overloads by means of an overcurrent switch or
a safety fuse with an appropriate rated current and electrical characteristic.
5. It is necessary to disconnect 230 V AC mains before you connect the doorbell. Check if there is no voltage
between power leads by means of an appropriate gauge.
6. Remove the doorbell cover by means of a screwdriver. It is necessary to release the cover catch.
7. Drill the mounting holes in the wall and insert studs into the holes. The hole spacing should be the same as in
the doorbell base.
8. Lead the doorbell wires through the hole in the doorbell base and screw the base on to the wall by means of
the appropriate screws. Mount the doorbell base carefully; in particular, check if it is mounted vertically in a
proper way.
9. Strip the doorbell electrical system wire ends insulation (approximately 10 mm in length) and connect the
wires to appropriate terminals.
10. Place the doorbell cover again and switch 230 V AC mains on.
11. Press the doorbell push button to check if the device operates properly.
12. If necessary, adjust the doorbell loudness volume by means of turning the bell bowl.
NOTE! Check if there is no voltage between power leads before you remove the doorbell cover!
The Declaration of Conformity is on our Website www.zamelcet.com
GUARANTEE
1. ZAMEL Sp. z o.o. provides a two - year warranty for its products. 2. The ZAMEL Sp. z o.o. warranty does not
cover: a) mechanical defects resulting from transport, loading / unloading or other circumstances, b) defects
resulting from incorrect installation or operation of ZAMEL products, c) defects resulting from any changes
made by CUSTOMERS or third parties, to products sold or equipment necessary for the correct operation of
products sold, d) defects resulting from force majeure or other aleatory events for which ZAMEL Sp. z o.o. is
not liable, e) power supply (batteries) to be equipped with a device in the moment of sale (if they appear). 3. All
complaints in relation to the warranty must be provided by the CUSTOMER in writing to the retailer after dis-
covering a defect. 4. ZAMEL Sp. z o.o. will review complaints in accordance with existing regulations. 5. The
way a complaint is settled, e.g. replacement of the product, repair or refund, is left to the discretion of ZAMEL
Sp. z o.o. 6. Guarantee does not exclude, does not limit, nor does it suspend the rights of the PURCHASER
resulting from the discrepancy between the goods and the contract.
TRADITIONAL KLINGEL DNT-206
Sondermerkmale:
• Tonquelle ist eine Stahlschüssel (mit dem Durchmesser von 76 mm).
• Möglichkeit der Lautstärkeregelung.
• Lautstärke: ~79 dB.
MONTAGEANWEISUNG
1. Es empehlt sich, dass die Montage von einer Person mit entsprechenden Qualikationen und
Berechtigungen durchgeführt wird.
2. Die Anlage sollte mit einer Leitung mit einem Durchmesser von 0,5 mm² bis 2,5 mm² und einer
Nennspannung von min. 300/500V, als auch mit einem zu den Einsatzbedingungen passenden
Leitungstyp ausgeführt werden.
3. Die Klingel darf ausschließlich mit einer verringerten Spannung von 8 V AC eingespeist werden, mit
Einsatz eines 230/8 V AC Außentrafos, z.B. vom Typ TRM-8 der Firma Zamel. Der Trafo sollte separat
angeschafft werden – er gehört nicht zur Klingelausstattung.
4. Die Phasenleitung der Klingelanlage sollte vor Kurzschluss- und Überlastungsfolgen mit Hilfe eines
Überschussstromschalters, einer Schmelzsicherung mit entsprechend gewählter Charakteristik und
Nennstromwert abgesichert werden.
5. Vor Beginn der Anschlusstätigkeiten, die die Klingelanlage versorgende 230 V AC Spannung abschalten.
Man soll sich mit Hilfe eines geeigneten Messgerätes vergewissern, dass die Anlage spannungslos ist.
6. Den Deckel der Klingel mit Hilfe eines achen Schraubendrehers durch Anheben des Deckel-Federhakens
abnehmen.
7. Die Montagestelle der Klingel an der Wand markieren und zwei Löcher bohren, die den Montageöffnungen
in der Klingelunterlage entsprechen. In die Löcher Spanndübel einsetzen.
8. Durch die Öffnung in der Klingelunterlage die Leitungen der Klingelanlage durchführen und die Unterlage
befestigen, indem man Montageschrauben in die Spanndübel einschraubt. Man sollte die korrekte
Montageart der Klingelunterlage beachten, insbesondere deren vertikale Lage.
9. Die Enden der Anlageleitungen auf einer Länge von 10 mm abisolieren und an die entsprechenden
Kle mmen anschließen.
10. Klingeldeckel anlegen und die die Klingelanlage versorgende 230 V AC Spannung einschalten.
11. Den Klingelbetrieb durch Drücken der Klingeltaste prüfen.
12. Bei Bedarf eine Lautstärkenregelung durch Drehen der Klingelschüssel durchführen.
ACHTUNG! Vor dem Abnehmen des Klingeldeckels muss man sich i mmer versichern, dass die
Klingelanlage spannungslos ist.
Konformitätserklärung auf der Internetseite www.zamelcet.com
GARANTIE
1. Die Firma ZAMEL Sp. z o.o. gewährt 24 - Monate lange Garantie für die von ihr verkauften Waren. 2. Aus
der Garantie der Firma ZAMEL Sp. z o.o. sind folgende Schäden ausgeschlossen: a) mechanische Schäden
infolge von Transport, Ver - /Entladung oder anderer Umstände, b) Schäden infolge fehlerhafter Montage
oder Gebrauchsweise der Produkte von ZAMEL Sp. z o.o., c) Schäden infolge jeglicher Änderungen am Ver-
kaufsgegenstandes oder an den zum korrekten Betrieb des Verkaufsgegenstandes nötigen Geräte, die vom
KÄUFER oder Drittpersonen durchgeführt wurden, d) Schäden infolge höherer Gewalt oder anderer zufälligen
Ereignisse, für die ZAMEL Sp. z o.o. keine Verantwortung trägt., e) Versorgungsquellen (Batterien) die zum
Zubehör der Geräts im Moment des Verkaufs gehören (falls vorhanden). 3. Jegliche Garantieansprüche stellt
der KÄUFER, nach deren Feststellung an der Verkaufsstelle oder in der Firma ZAMEL Sp. z o.o. schriftlich
vor. 4. ZAMEL Sp. z o.o. verpichtet sich, Reklamationen gemäß geltender polnischer Rechtsvorschriften zu
behandeln. 5. Die Wahl der Behandlungsart der Reklamation, z.B. Warenaustausch, Reparatur oder Geldrü-
ckerstattung hängt von ZAMEL Sp. z o.o. ab. 6. Die Garantie bewirkt weder Ausschließen, Beschränkung,
noch Einstellung der KÄUFERrechte infolge von Nichtübereinsti mmung der Ware mit dem Vertrag.
GB D