manuals.online logo
Brands
  1. Home
  2. •
  3. Brands
  4. •
  5. EasyPro
  6. •
  7. Pond Pump
  8. •
  9. EasyPro EX8800 Manual

EasyPro EX8800 Manual

EX8800 • EX11200 • EX13200
Reliability You Can Count On! © 2010 EasyPro, Inc
Pg. 1
TYPE: STRAIGHT CENTRIFUGAL
MOTOR: NEMA C FACE, 56J
HORSEPOWER: 1/2 (1750 RPM), 3 (3450 RPM)
INLET: 2" FNPT AND BUTTRESS THREAD PORTS
DISCHARGE: 2" FNPT AND BUTTRESS THREAD PORTS
MATERIAL: 40% GLASS-FILLED POLYPROPYLENE
HARDWARE: STAINLESS STEEL
OPTIONS: SALTWATER SERVICE
ACCESORIES: 90 CUBIC INCH STRAINER BASKETS (1.5" & 2")
SWING CHECK VALVES (1.5", 2", 3")
500 CUBIC INCH STRAINER BASKETS
(1.5", 2", 3")
WARNING: Please read completely before you install or operate your new pump! This is an external “out-of-pond” pump!
It is NOT submersible! Do NOT allow this pump to become submerged! Never run dry! Max. case pressure.- 65 PSI!
Please fill in for future reference:
MODEL:________________________________________
SERIAL NUMBER:_______________________________
DATE PURCHASED: _____________________________
* Please fill out the warranty registration card in this manual
EasyPro
EX8800
S/N: XXXX-XXXXXX
Model EX8800 EX11200 EX13200
Inlet 2" 2" 2"
Discharge 2" 2" 2"
Max Flow (gph) 8220 11160 13200
Max Head (feet) 22.3' 80.8' 81.7'
Max Power (watts) 450 2162 2595
Max Current (amps) 4.0 @ 115v 9.6@230v 11.5@230v
Volts 115/230 230 230
Motor HP 1/2 3 3
Motor Enclosure TEFC TEFC TEFC
Impeller 8 6 7
Installation and Service Manual
Jolie Products Inc
EX8800 • EX11200 • EX13200
Reliability You Can Count On! © 2010 EasyPro, Inc
Pg. 2
ELECTRICAL HOOK-UP
1. Check that supply voltages match the motor’s requirements.
2. Check motor wiring and connect, according to instructions on motor, to match supply voltage.
3. Power cord should be protected by conduit or by cable and be of proper gauge. It should be no longer than necessary.
4. Power should be drawn directly from a box with circuit breaker protection or with a fused disconnect switch.
Wecongratulateyou onyour choiceof theEX8800/EX11200/EX13200 CentrifugalPump! Ithas beencarefullydesigned using the advan-
tages of today’s technology and carefully constructed to give you the dependability of yesterday. To insure proper performance, we urge
you to carefully follow the instructions in this manual. If you have any questions, call your nearest distributor or EasyPro for assistance.
INSTALLATION
Please read carefully! When properly installed the EX8800/EX11200/EX13200 will provide dependable trouble-free service.
1. Locate the pump as near the water source as possible.A flooded suction situation is preferred. The pump is not self-priming, therefore,
if the fluid level is below the pump, a swing check valve must be installed and the pump primed prior to start-up. (Figure 2)
2. Mount motor base to a secure, immobile foundation.
3. Use only plastic fittings on both the intake and discharge ports. Seal pipe connections with Teflon™ paste. These fittings should be self-
supported and in neutral alignment with each port. (i.e. Fittings must not be forced into alignment which may cause premature line failure
or damage to the pump volute.) For non-flooded installations, a strainer basket and check valve are recommended.
4. Never restrict the intake. Keep both input and discharge lines as free of elbows and valves as possible. Always use pipe of adequate
diameter. This will reduce friction losses and maximize output.
5. TheEX8800isnot self-priming! It must not be run dry! Werecommendaflooded suctioninstallation. Pleasereadcarefully!When properly
installed, the EX8800 will provide dependable, trouble-free service.
6. For additional plumbing tips, review EasyPro’s website: www.EasyProPondProducts.com for pond plumbing and pump installation
hints.
PUMP
SWING
CHECK VALVE
FLOODED SUCTION
WARNING: DO NOT RUN DRY!
WARNING: ALWAYS SHUT OFF ELECTRICAL POWER BEFORE INSTALLATION AND / OR SERVICING THIS PUMP! ALL ELECTRICAL WIRING
SHOULD MEET STATE AND LOCAL ORDINANCES. IMPROPER WIRING MAY NOT ONLY BE A SAFETY HAZARD BUT MAY PERMANENTLY
DAMAGE THE MOTOR AND/OR PUMP! 230V 50 HZ MOTORS AVAILABLE - CONTACT YOUR SUPPLIER FOR INFORMATION.
BALL
VALVE
(FIGURE 2)
SUCTION LIFT
Jolie Products Inc
EX8800 • EX11200 • EX13200
Reliability You Can Count On! © 2010 EasyPro, Inc
Pg. 3
PUMP END ASSEMBLY
1. Clean and inspect all pump parts (O-ring, seal seats, motor shaft, etc.).
2. Apply sealant to the bracket bore ID wall and around the seal case - follow sealant manufacturer instructions. We recommend using
Gasgacinch®. Silicone sealant can also be used.
3. Press carbon graphite seal into bracket while taking care not to damage carbon graphite face.
4. Place slinger (rubber washer) over motor shaft and mount bracket to motor.
5. Carefully, lubricatethe seal seatelastomerOD andimpeller hub IDwithwater. Press thesealseat intothe impeller hubmakingcertain
that the ceramic is in evenly - the sealing surface should be parallel with the impeller hub.
6. Carefully lubricate carbon-graphite and ceramic sealing surfaces with CLEAN water. Do not use silicon lubricants or grease!
7. Assemble bracket to motor with four m-bolts
8. Thread impeller onto shaft and tighten! If required, remove motor end-cap and use a screwdriver on the back of motor shaft to pre-
vent shaft rotation while tightening. Replace motor end cap.
9. Seat large O-ringinvolute slotand assemblevolute to bracketwith seven1/4-20x 23/4" hexcapscrews,washers andnuts.Tighten
in a cross pattern (30 in-lbf).
10. Install drain plug with its O-ring in volute drain hole.
11. Before operating pump, allow a proper cure time for the sealant used in step 2.
DISASSEMBLY
1. Shut off power to motor before disconnecting any electrical wiring from the back of the motor.
2. Disassemble volute from bracket by removing the seven 1/4" - 20 threads per inch x 2 3/4" hex cap screws.
3. Remove cap covering shaft at back of motor and with a large screwdriver, prevent shaft rotation while unscrewing impeller.
4. Remove ceramic piece from impeller. (If you are replacing the seal)
5. Detach bracket from motor.
6. Remove carbon-graphite seal from bracket by pressing out from the back. Do not dig out from the front! (If you are replacing the
seal)
DESCRIPTION EASYPRO®
P/N
DRAIN PLUG 1000.110
O-RING, DRAIN
PLUG
E014B70
VOLUTE 4000.070
LARGE O-RING 1000.061
IMPELLER 4000.05__*
SEAL - BRASS 1000.0415
SEAL - SS316 1000.0414
BRACKET 1000.030P
SLINGER 1000.010V
HARDWARE KIT 1000.502
Note: These part numbers are only for the
standard model of EX8800. Reference page one
for impeller number.
*Motor illustration is for reference only.
2.75
3.50
4.22
14.75
IMPELLER
SEAL
VOLUTE
LARGE
O-RING
P-BOLT
& WASHER
DRAIN PLUG
& O-RING
WASHER &
LOCK NUT
BRACKET
SLINGER
M-BOLT
Jolie Products Inc
EX8800 • EX11200 • EX13200
Reliability You Can Count On! © 2010 EasyPro, Inc
Pg. 4
EasyPro Pond Products
4385 East 110th, Grant, MI 49327
800-448-3873 • 231-834-5537 fax
www.EasyProPondProducts.com
Name:________________________________________
Address:______________________________________
City: _______________State: _____ Zip: __________
Model: _______ Serial Number:__________________
Date purchased:______Where purchased: ________
Gasgacinch®is a registered trademark of Porter Manufacturing. Noryl®is a registered trademark of the
General Electric Company. Teflon®is a registered trademark of DuPont Company.
Activate your warranty by filling out this form and mailing to EasyPro Pond Products
EASYPRO LIMITED WARRANTY
This product is warranted to the initial purchaser to be free of defects in materials and workmanship at the time of initial purchase and for a period of three years. In
the event this product malfunctions within three years from the date of purchase, the sole obligation of EasyPro, Incorporated (hereinafter referred to as EP) will be
to repair the unit or replace with an equivalent new or factory refurbished unit at EP’s discretion, subject to the following conditions:
1. You MUST call EP for a return authorization (RA#) number prior to returning, pumps returned without an RA# will be refused.
2. The malfunction is proved attributable to a defect in materials or workmanship, including repairs performed under this warranty. Malfunction for any other
reason — including but not limited to misuse, negligence, accident, tampering with parts, incorrect wiring, improper installation — will not be remedied
under this warranty.
3. EP specifically does not guarantee chemical compatibility, and expressly does not warrant units from any problems caused by chemical attack or failure due
to incompatibility of fluid being pumped with pump materials of construction.
4. All warranty repairs must be performed by EP or an EP authorized company. Purchaser must retain the purchase receipt and present it with this certificate
as proof of ownership and entitlement to warranty repairs. Unauthorized repairs will not be compensated by EP, are not the responsibility of EP, and if such
repairs damage the product, such damages are not remedied under this warranty.
5. Purchaser shall bear all shipping, packing and insurance costs and all other costs, excluding labor and parts necessary to effectuate repairs under
this warranty.
6. Periodic check-ups are not covered by this warranty.
7. This warranty is in lieu of all other express warranties which now or hereafter might otherwise arise with respect to this product. Any and all limited warranties,
including the warranties of merchantability and fitness for particular purpose, shall have no greater duration than the duration period of the express written
warranty applicable to this product, and shall terminate automatically the expiration of such duration period. Some states do not allow limitations on how
long an implied warranty lasts, so the above limitation may not apply to you. No action shall be brought for breach of any implied or express warranty after
one year subsequent to the expiration of the duration period of the express written warranty.
8. Incidental and consequential damages caused by malfunction, defect, or otherwise, and with respect to breach of any express or implied warranty, are
not the responsibility of EP, and, to the extent permitted by law, are hereby excluded both for property damage and, to the extent not unconscionable, for
personal injury damage. Some states do not allow the exclusion or limitation of incidental or consequential damages, so the above limitation or exclusion
may not apply to you.
9. This warranty does not apply to any malfunction arising out of any application of this product other than normal use, unless such application is upon request
specifically approved in writing by EP.
10. The provisions of this warranty are severable and if any provision shall be deemed invalid, the remaining provisions shall remain in full force and effect.
11. Rights under this warranty are not assignable without the express prior consent in writing by EP and, regardless of the terms of such consent in writing, such
assignee shall have no greater rights than his assignor had against EP.
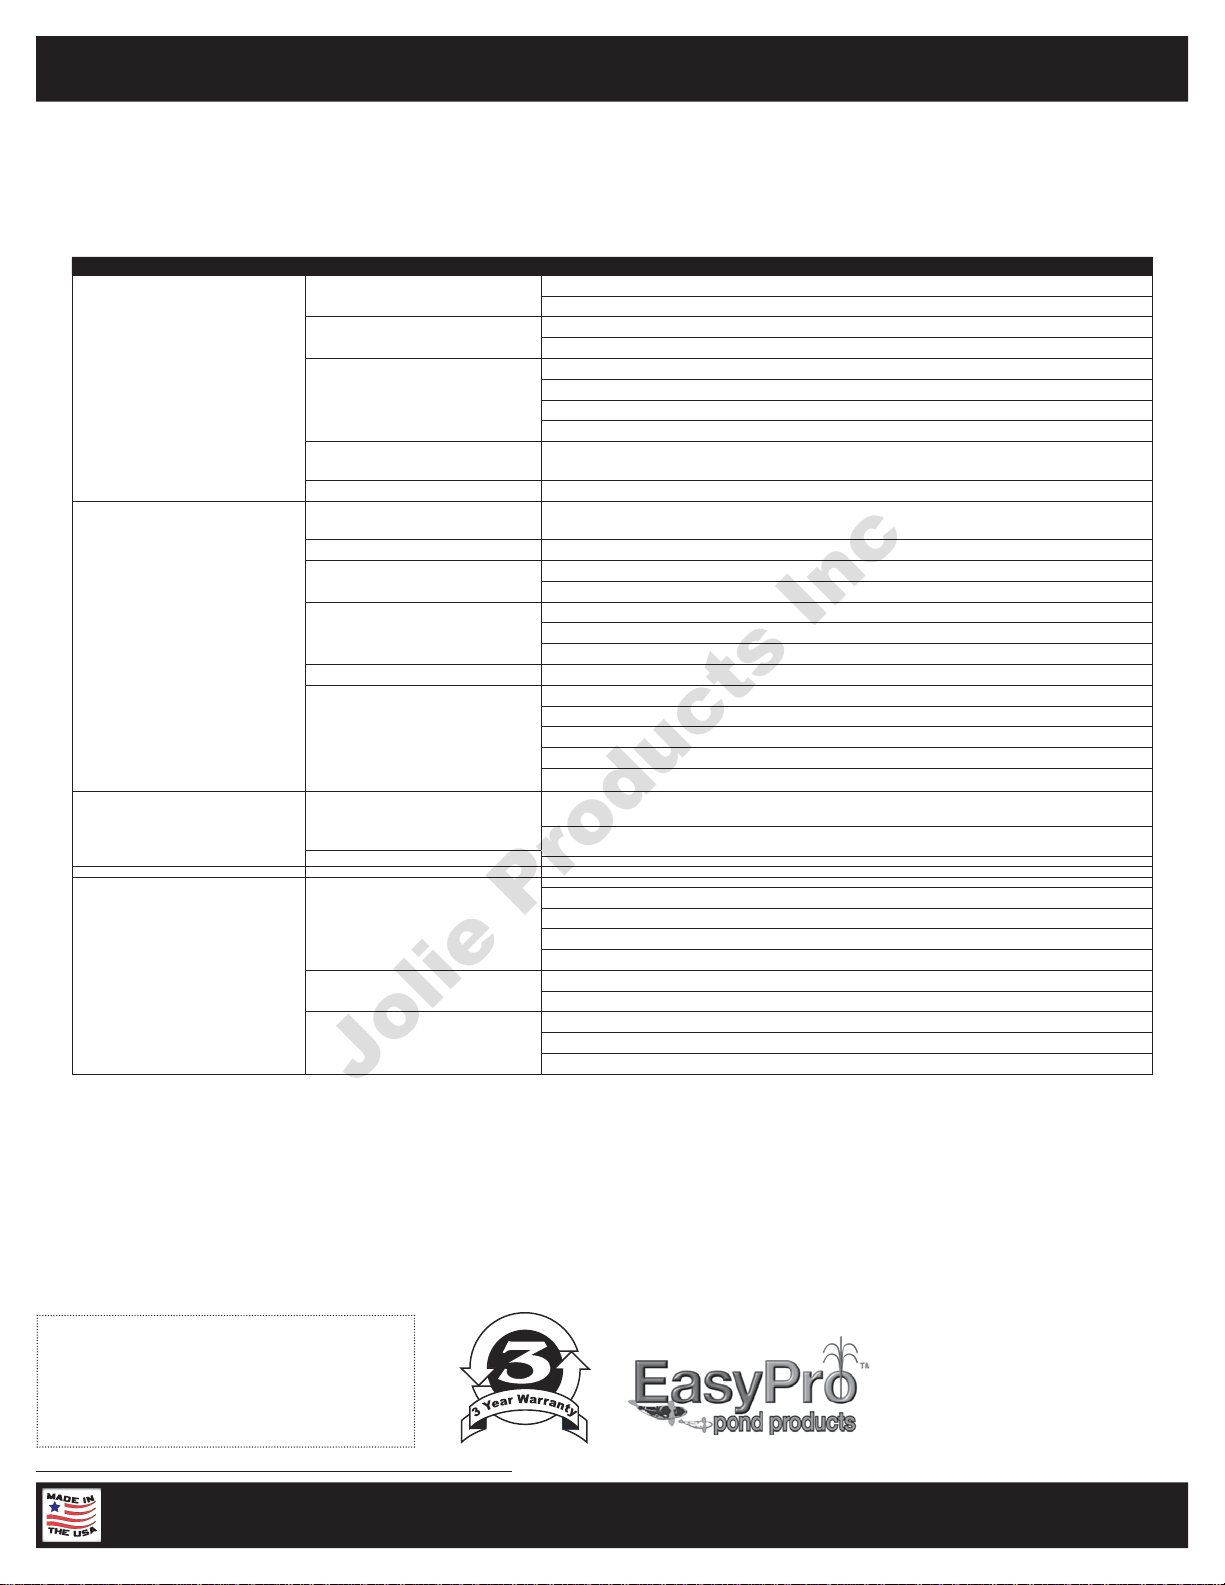
MAINTENANCE
Lubrication
Motor - permanently lubricated ball bearings - no service required.
Rotary Seal - requires no lubrication after assembly.
Symptom Problem Resolution
No Flow
Insufficient Prime Prime system with water and purge all air from suction piping.
Install check valve.
Insufficient Power Verify power supply and connection from panel to pump.
Verify proper voltage. Some models are dual voltage (115/230).
Flow Restriction
Ensure valves are open.
Ensure plumbing is clear, including suction strainers, check valves, etc.
Verify check valve orientation and direction of permitted flow.
Clean out leaves or other debris from basket strainer (if applicable).
Air leak Fix air leaks at fittings, connections, strainer basket etc. This typically occurs on the
intake side.
System Incompatibility Verify hydraulic compatibility: i.e. pump & pipe are sized for the system.
Low Flow
Air leak Fix air leaks at fittings, connections, strainer basket etc. This typically occurs on the
intake side.
System Incompatibility Verify hydraulic compatibility: i.e. pump & pipe are sized for the system.
Insufficient Power Verify power supply and connection from panel to pump.
Verify proper voltage. Some models are dual voltage (115/230).
Flow Restriction
Ensure valves are open.
Ensure plumbing is clear, including suction strainers, check valves, etc.
Clean out leaves or other debris from basket strainer (if applicable).
Insufficient Prime Prime system with water and purge all air from suction piping.
Cavitation
Verify airtight plumbing on the suction plumbing especially fittings!
Clean out leaves or other debris from basket strainer (if applicable).
Increase pipe size where possible.
Decrease suction pipe length, reduce the number of elbows, etc.
Verify hydraulic compatibility: i.e. pump and pipe are sized for the system.
Sporadic Operation Insufficient Power Verify power supply and connection from panel to pump.
Verify proper voltage. Some models are dual voltage (115/230).
Poor Ventilation Ensure adequate aiflow over motor to prevent overheating.
*The pump must be drained before servicing or if stored
below freezing temperatures. Periodic replacement of
seals may be required due to normal carbon wear.
Excessive Noise
Cavitation
Verify airtight plumbing on the suction plumbing especially fit
Clean out leaves or other debris from basket strainer (if applicable).
Increase pipe size where possible.
Decrease suction pipe length, reduce the number of elbows, etc.
Verify hydraulic compatibility: i.e. pump and pipe are sized for the system.
Insufficient Power Verify power supply and connection from panel to pump.
Verify proper voltage. Some models are dual voltage (115/230).
Flow Restriction
Ensure valves are open.
Ensure plumbing is clear, including suction strainers, check valves, etc.
Verify check valve orientation and direction of permitted flow.
11-10
Jolie Products Inc

This manual suits for next models

2

Other EasyPro Pond Pump manuals

EasyPro PA34 Owner's manual

EasyPro

EasyPro PA34 Owner's manual

EasyPro UWD16C Assembly instructions

EasyPro

EasyPro UWD16C Assembly instructions

EasyPro Eco-Clear EPS1300 Use and care manual

EasyPro

EasyPro Eco-Clear EPS1300 Use and care manual

EasyPro LA5N Use and care manual

EasyPro

EasyPro LA5N Use and care manual

EasyPro Spirit TLS1850 Operation and maintenance manual

EasyPro

EasyPro Spirit TLS1850 Operation and maintenance manual

EasyPro PA90AD Owner's manual

EasyPro

EasyPro PA90AD Owner's manual

EasyPro EX6750-2 Manual

EasyPro

EasyPro EX6750-2 Manual

EasyPro TH Series Use and care manual

EasyPro

EasyPro TH Series Use and care manual

EasyPro Rocking Piston PA86A Owner's manual

EasyPro

EasyPro Rocking Piston PA86A Owner's manual

EasyPro Mag Drive Use and care manual

EasyPro

EasyPro Mag Drive Use and care manual

EasyPro ETP05 Use and care manual

EasyPro

EasyPro ETP05 Use and care manual

EasyPro EX8500 Manual

EasyPro

EasyPro EX8500 Manual

EasyPro EX11000 Manual

EasyPro

EasyPro EX11000 Manual

Popular Pond Pump manuals by other brands

fish mate 2000 instructions

fish mate

fish mate 2000 instructions

Oase Numa Aquarius 1000 operating instructions

Oase

Oase Numa Aquarius 1000 operating instructions

Oase AquaMax Eco Premium 4000 Commisioning Guide

Oase

Oase AquaMax Eco Premium 4000 Commisioning Guide

AQUA FORTE Dosatech manual

AQUA FORTE

AQUA FORTE Dosatech manual

AQUA FORTE PRIME E-SILENCE VS Instruction for installation and maintenance

AQUA FORTE

AQUA FORTE PRIME E-SILENCE VS Instruction for installation and maintenance

AQUA FORTE DM-Vario 10000S manual

AQUA FORTE

AQUA FORTE DM-Vario 10000S manual

Oase AquaOxy 450 operating instructions

Oase

Oase AquaOxy 450 operating instructions

PondMAX ALL-IN-ONE SF650 instruction manual

PondMAX

PondMAX ALL-IN-ONE SF650 instruction manual

Meßner eco-X operating instructions

Meßner

Meßner eco-X operating instructions

Messner system-N 850 operating instructions

Messner

Messner system-N 850 operating instructions

HEISSNER Smartline HSP 5000-00 Instructions for use

HEISSNER

HEISSNER Smartline HSP 5000-00 Instructions for use

Aquagarden inpond 2000 manual

Aquagarden

Aquagarden inpond 2000 manual

Pond Technics VIVIOPRO manual

Pond Technics

Pond Technics VIVIOPRO manual

AquaScape SLD 2000-5000 Instructions & maintenance

AquaScape

AquaScape SLD 2000-5000 Instructions & maintenance

HEISSNER Smartline HFP2500-00-He Instructions for use

HEISSNER

HEISSNER Smartline HFP2500-00-He Instructions for use

TIP WP 500-10 R operating instructions

TIP

TIP WP 500-10 R operating instructions

HIBLOW HP Series manual

HIBLOW

HIBLOW HP Series manual

Profi-pumpe OASIS 200-3 LI+LED operating instructions

Profi-pumpe

Profi-pumpe OASIS 200-3 LI+LED operating instructions

manuals.online logo
manuals.online logoBrands
  • About & Mission
  • Contact us
  • Privacy Policy
  • Terms and Conditions

Copyright 2025 Manuals.Online. All Rights Reserved.