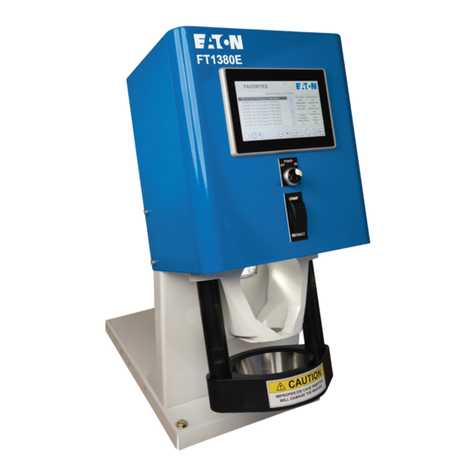
Eaton FT1380e User manual

Eaton Electronic FT1380e Crimp Machine Operator’s Manual
CRIMP MACHINE OPERATOR’S MANUAL
FT1380E Crimp Machine Operators Manual: E-HOAS-TT005-E

• Safety Instructions
• Specications
• Accessories
• Setup and Installation
• Operating Instructions
• Crimping Procedures
• Calibration
• Maintenance
• Maintenance Intervals
• Machine Maintenance Procedures
• Die Cage Maintenance Procedures
• TroubleshootingTips
• Crimp Machine Components
• Die Cage Components
• Hydraulic Schematic
Table of Contents

WARNING
Failure to follow Eaton process and product instructions and limitations could
lead to premature hose assembly failures, resulting in property damage,
serious injury or death.
Eaton tting tolerances are engineered to match Eaton hose tolerances.
The use of Eaton ttings on hose supplied by other manufacturers and/or
the use of Eaton hose ttings supplied by other manufacturers, may result
in the production of unreliable and unsafe hose assemblies and is neither
recommended nor authorized by Eaton.
Read and understand the operator’s manual before attempting to operate
any equipment.
Eaton hereby disclaims any obligation or liability (including incidental and
consequential damages) arising from breach of contract, warranty, or tort
(under negligence or strict liability theories) should Eaton Aeroquip or Eaton
Weatherhead hose, ttings or assembly equipment be used with the hose,
ttings or assembly equipment supplied by another manufacturer, or in the
event that product instructions for each specied hose assembly are not
followed.
SAFETY INSTRUCTIONS
1. Prevent Unauthorized operation. Do not permit anyone to operate this
equipment unless they have read and thoroughly understand this manual.
2. Wear safety glasses. Do not wear loose clothing while operating the
machine.
3. Avoid pinch points. Do not rest your hand on the crimp ring. Keep your
hands clear of all moving parts. Do not allow anyone, other than the operator,
close to the equipment while it is in operation.
4. Maintain dies with care. Dies used in the FT1380e crimp machine are
sintered powdered metal, offering the best combination of strength and wear
resistance for long life. Sintered powdered metal dies are generally brittle
and care should be taken to avoid any sharp impact. Never strike a die with a
hardened instrument.
5. Use only specied Eaton products. Make hose assemblies using only Eaton
hose assemblies specied for this assembly equipment.
6. Verify correct crimp diameters. Check and verify correct crimp diameters of
all ttings after crimping. Do not put any hose assemblies into service if the
crimp diameters do not meet Eaton crimp specications.
7. Make sure all dies are completely in place and the cage is positioned
properly on the pressure plate.
8. Do not over pressurize. Do not exceed the 10,000 psi hydraulic pressure
supplied to the machine.This setting is preset at the factory and should not
require adjustment.
Note: All components used to connect the pump and crimp cylinder must meet
the criteria set forth in the Material Handling Institute Specication #IJ100 for
hydraulic jacking applications.
9. Die change. Do not insert/remove dies while the power is on.
10. Secure the equipment to a stable work surface. Prior to operation, secure
the crimp machine to a stable work surface to prevent the equipment from
tipping.
11. Unplug the power supply when not in use.
12. Keep work area clean. Cluttered areas and benches invite accidents.
Safety Instructions

ELECTRICAL REQUIREMENTS
FT1380e-115 & FT1380e-115CSA:
115-Volt AC single phase (50/60) Hz circuit with a minimum of 20 amps
FT1380e-230 & FT1380e-230CSA:
208 to 230-Volt AC single phase (50/60) Hz circuit with a minimum of 15 amps
CRIMP MACHINE DIMENSIONS
Width 16.062 inches
Depth 25.75 inches
Height 29.875 inches
Weight 258 pounds
PRODUCTION CAPACITY
Eaton braided and spiral hydraulic hoses which useTTC/Z or
4S/6S series hose ends through -20 size.
SETUP AND INSTALLATION
1. Mount your Eaton FT1380e crimp machine onto a workbench that will
support at least 300 pounds. Secure the unit using the holes provided
in the corners of the crimp machine base.
2. Remove the plug from the hydraulic reservoir vent port and replace it
with the vent cap that is supplied with the unit.
CAUTION: Failure to do so will cause cavitation and damage to the
pumping mechanism. Hand tighten the vent cap.
3. Never use an extension cord, always plug directly into the power outlet.
CAUTION: Provide electrical service with a dedicated circuit
(per the crimp machine electrical requirements) to eliminate the
possibility of a low-voltage situation.
CRIMP MACHINE PART NUMBERS:
FT1380e-115 Base machine with 115v pump
FT1380e-115CSA Base machine with 115v pump, UL/CSA approved
FT1380e-230 Base machine with 230v pump
FT1380e-230CSA Base machine with 230v pump, UL/CSA approved
CRIMP MACHINE AND TOOLING PACKAGE PART NUMBERS:
FT1380e-115-9 Contains FT1380e crimper, 115v pump,
and ET4020TP-0003 tooling package
FT1380e-115-9CSA Contains FT1380e crimper, 115v pump,
and ET4020TP-0003 tooling package, UL/CSA approved
UPGRADE PACKAGE PART NUMBERS:
FT1380e-115-UP 11 5 v Electronic Upgrade Package
(requires shipment of current machine to manufacturer)
FT1380e-230-UP 230v Electronic Upgrade Package
(requires shipment of current machine to manufacturer)
FT1380e-115-UPCSA 11 5 v Electronic Upgrade Package, UL/CSA approved
(requires shipment of current machine to manufacturer)
FT1380e-230-UPCSA 230v Electronic Upgrade Package, UL/CSA approved
(requires shipment of current machine to manufacturer)
Specications

DIE CAGE REPAIR KITS
Die cage repair kits for FT1380-200-size, FT1380-275-size.
Part number........................................................... FT1380-2-9
OPTIONAL FITTING BACKSTOP
Part number........................................................... FT1380-4
TTC/Z SERIES FITTING LOCATORS
Part number........................................................... FT1330-XL
4S SERIES FITTING LOCATORS
(cannot be used in combination with FT1330-XL locators)
Part number........................................................... FT1380-XL
USB DRIVE
Part number........................................................... FT1380e-1-7
STYLUS
Part number........................................................... FT1380e-1-8
WIPING CLOTH
Part number........................................................... FT1380e-1-9
DIE CAGES
Part numbers:
FT1380-275-M070 FT1380-275-M090
FT1380-275-M120 FT1380-200-M150
FT1380-200-M180 FT1380-200-M210
FT1380-200-M240 FT1381-200-M280
FT1380-200-M320 FT1380-200-M370
FT1380-200-M420 FT1382-200-M465
FT1382-275-M520
Accessories

ICON QUICK REFERENCE
Below is a quick reference guide for the icons that are shown when using
the FT1380e touch screen.
FT1380e CONTROL PANEL TUTORIAL
The electronic FT1380e machine comes with an integrated
touch screen to control the machine functions.This section provides
instruction for how to use the touch screen controller.
Operating instructions
Help including owner’s manual, icon
quick reference and tutorial
Product Library
Favorites Menu
Rename
Favorited Spec
Delete
Favorited Spec
Save Favorite
Load
Selected Spec
Production Screen
Search
Maintenance
Admin Login
Calculator
Page Up
Page Down
Scroll Up
Scroll Down
Move Spec Up
Move Spec Down
−

The screen displays available Crimp Spec options.To nd your spec,
select the search icon . Once the keyboard appears, type in the
hose series name on the keyboard, then hit ENT. It will scroll to the
rst entry for the searched value. Scroll up or down using the arrow
icons to locate the desired crimp spec.
To nd your spec, select the search icon . Once the keyboard appears,
type in the hose series name on the keyboard, then hit ENT. It will scroll to
the rst entry for the searched value. Scroll up or down using the arrow
icons to locate the desired crimp spec.
Commonly crimped hoses should be saved as Favorites. If an offset
has been entered for the crimp spec, it will be stored with the Favorites
record.
On the Product Library Screen, you can see the complete list
of FT1380e crimp specs.
Favorites Menu
Product Library

The Production Screen displays all the information required for
crimping and includes color assembly photos for core hose products
allowing for easy assembly verication. If the CALIBRATION spec is loaded, a calculator icon will appear.
Select the calculator to enter calibration measurements following
the calibration procedure steps outlined in this manual.
Revision level for the HMI and PLC can be found under “Revision.”
The Maintenance Screen displays crimp machine calibration
information, revision level, and a crimp counter. Access to user privilege
settings can also be found on this screen.This screen is only accessible
when logged in as Admin.
The crimping procedure is performed from the Production Screen.
Production Screen Maintenance

Note: It will scroll to the rst entry for the searched value. Scroll up or
down using the arrow icons to locate the desired crimp spec.
• Navigate to the Product Library Screen by selecting the
Product Library icon .
• Click the Search icon on the bottom of the screen.
Once the keyboard appears, type in the hose series name on the
keyboard, then hit ENT.
To search for a crimp spec
A. Click Search icon
B. Type in hose name, hit ENT

To load a crimp spec into the machine, go to the Product Library
screen and select the relevant spec by either searching or scrolling.
Hit the Load icon . Once the Load icon is selected, you are able
to crimp with this spec via the production screen or navigate to the
favorites screen to save the crimp spec as a favorite.
Loading a hose assembly crimp spec into the machine
A. Select required spec
B. Hit Load icon
-Spec is now able to be
crimped or saved as a favorite

To save a hose as a favorite:
• Select the required spec and then load into machine by selecting
the Load icon .
• Navigate to favorites menu .
• Highlight a blank row and hit the Save Icon to save as a favorite.
The spec is now saved as a favorite.
Note: If a location is not selected when the save icon is selected,
the spec will save in the rst available blank favorite row.
Note: If privileges are enabled, you can move a spec up and down by
selecting the move spec up and move spec down arrows.
A. Highlight a blank row B. Hit Save icon
Saving a hose as a favorite

If privileges are enabled, you can select a favorite row and then
move the selected spec up or down in the favorites list by selecting
the move spec up and move spec down arrows.
Load a hose into the machine by selecting the Load icon and navigate
to production screen. Crimp spec details are shown. Verify the proper hose,
tting, and tooling selections and begin the crimping process by pressing the
crimp switch on the machine. After crimping, measure the achieved crimp
diameter to ensure a safe and reliable hose assembly.
*Warning – Follow all instructions in this operator’s manual and do not permit
anyone to operate this equipment unless they are properly trained
and have read and thoroughly understand this manual.
* Offsets can be entered, but will not be saved for future use. An offset cannot
be saved back to “Product Library.” Offsets can only be saved to “favorites.”
Moving a favorite record Crimping from product library menu

Navigate to the Favorites menu . Highlight desired crimp spec and
hit the Load icon to load the favorited spec into the machine.
Navigate to the production screen . Crimp Spec details are
shown. Verify the proper hose, tting, and tooling selections and
begin the crimping process by pressing the crimp switch on the
machine.
*Warning – Follow all instructions in this operator’s manual and do
not permit anyone to operate this equipment unless
they are properly trained and have read and thoroughly
understand this manual.
After crimping, measure the achieved crimp diameter to ensure a
safe and reliable hose assembly. Enter the measured crimp diameter
using the calculator .The offset will automatically be calculated
and saved with the favorites record.
Navigate to favorites menu
A. Highlight desired spec
B. Hit Load icon to load favorited spec into machine
Crimping from Favorites Menu

The current name is populated. Use the keyboard to change the
name as desired. Use the back button to erase the characters in
the current name.To save the new name, hit ENT.
To rename a favorite, select a spec to rename.
Then press the Rename Favorite icon .
A. Select spec to be renamed
B. Press Rename Favorite icon
Renaming Favorites
C. To save name
hit ENT

A favorite record may be removed by highlighting
it and selecting the remove favorite icon −.
You will be prompted to conrm that you do wish to
remove the Favorite.
Removing a Favorite
A. Select crimp spec to be removed
B. Select the remove favorite icon −

After crimping, measure the crimp diameter across each of the ats
of the crimped tting. Press the Calculator Icon .
The calculator window will open. Enter the four measurements and
select the Calculate button. One or more values must be entered for the
calculation to be performed.The offset value is automatically calculated
based on the average of the measurements entered and stored with the
Favorites record, if the spec was accessed from Favorites.
Note: The calculated offset may be adjusted and overwritten by
selecting the Offset button and entering a new value.
Changing crimp offsets via calculator
A. Enter the 4 Measured Diameters in
Measured “A”, “B”, “C”, and “D”
B. Press “Calculate”
A. Press Calculator
C
C

If further adjustment is needed after another crimp, select
the Calculator Icon and enter the four measurements
and select Calculate.
Note: The additional offset is calculated and added
to original offset value.
Changing crimp offsets via calculator (continued)

To change the crimp spec offset manually, press the “offset”
eld. Enter the desired offset using the keypad. Hit the ENT
button to save and close window.
Offset Verication
Once the offset has been veried, select the box next to Offset
and a green checkmark will appear.This indicates that the offset
has been veried.
Note - If unable to select the checkbox, the Administrator
has not enabled this Offset Verication privilege for
the Non-Admin user.
Changing crimp offset manually
A. Press “Offset” eld
Type in desired offset
B. Hit ENT to save and close the window
Note: This function overwrites the offsets
determined via the calculator

To set the Variable Retract Position, jog the crimper to
desired retract position.Then, note value in “Position” eld,
which is shown for reference.
Jog the crimper to the desired retract position
A. Note value in “Position” eld
B. Press “Retract” eld
C. Type desired value, hit ENT
The crimper will now retract to the desired position.
Note: The retract position can be safely entered as values 0 - 1000.
The retract position value is “global” and all crimps will
retract to this position until the value is changed.
Note: Entering a retract value that is smaller than the target setting
will cause the machine not to retract.The retract must then be
performed manually by using the switch.
Setting variable retract position

To log in as Admin, press on Admin Login icon . Enter the admin password provided and then press “ENTER” to
log in as admin.
A. Press Admin Login icon
• Keyboard pops up
Logging in as Admin
Other manuals for FT1380e
1
Table of contents
Other Eaton Crimping Tools manuals
Popular Crimping Tools manuals by other brands

TE Connectivity
TE Connectivity ERGOCRIMP 4-1579001-1 instruction sheet

TOOLCRAFT
TOOLCRAFT 43 04 61 operating instructions

Staubli
Staubli PV-CZM operating instructions

TE Connectivity
TE Connectivity SDE-SA instruction sheet

molex
molex 207129 Series specification

Hasco
Hasco Z 865 Series operating instructions