Eaton xComfort User manual

xComfort Roo
m Controller Touch User Manual 1
v
00
_EN
xComfort Room Controller Touch
User Manual

xComfort Roo
m Controller Touch User Manual 1
v
00
_EN
ii | P a g e
•
For other languages an information about xComfort, visit
www.eaton.eu/xcomfort or www.xcomfort.com or use the QR-co e.
•Für weitere Sprachen un Informationen zum xComfort System
besuchen Sie ww.eaton.eu/xcomfort o er www.xcomfort. e o er
verwen en Sie en QR-co e
•Besok www.xcomfort.no eller www.eato.eu/xcomfort for an re språk
og mer informasjon om xComfort eller bruk QR-ko en.
•Pro alší jazyky informace o xComfort návštěvy
www.eaton.eu/xcomfort nebo www.xcomfort.cz nebo použijte QR
kó .
•Voor an ere talen en meer informatie over xComfort ga naar
www.eaton.nl/xcomfort of www.xcomfort.nl of maak gebruik van e
QR-co e

xComfort Roo
m Controller Touch User Manual 1
v
00
_EN
iii | P a g e
Table of Contents
1. Intro uction ......................................................................................................................................... 1
1.1 Safety instructions .......................................................................................................................... 1
1.2 Inten e use .................................................................................................................................. 1
1.3 Instructions for isposal ................................................................................................................. 1
1.4 About this ocument ...................................................................................................................... 1
2 The Room Controller Touch .................................................................................................................. 2
2.1 Operation ....................................................................................................................................... 2
2.2 Cleaning mo e ............................................................................................................................... 3
2.3 Replacing the batteries ................................................................................................................... 3
2.4 Operation mo e ............................................................................................................................. 4
2.4.1 Basic operations ...................................................................................................................... 4
2.4.2 Enhance operations ............................................................................................................... 4
2.4.3 Settings e it operations ........................................................................................................... 4
2.5 Basic Operating Instructions ........................................................................................................... 5
2.5.1 Show Current Room Temperature ........................................................................................... 5
2.5.2 Show Current/Active Set-Point Temperature ........................................................................... 5
2.5.3 Temporarily a just the current set-point temperature............................................................. 6
2.5.4 Switch active set-point temperature (operation mo e) ........................................................... 6
2.5.5 Show Room Humi ity .............................................................................................................. 7
2.5.6 (Optional) Show out oor temperature. ................................................................................... 7
2.5.7 Show Time an Day of Week ................................................................................................... 8
2.5.8 (Optional) Touch-button(s) ...................................................................................................... 8
2.6 Enhance Operating Instructions ................................................................................................... 9
2.6.1 (Optional) Activate/Deactivate Week Program ........................................................................ 9
2.6.2 (Optional) Selecting Heating an /or Cooling mo e ................................................................ 10
2.7 E it Operating Instructions ........................................................................................................... 11
2.7.1 Change Pre-Define Set-Point Temperature .......................................................................... 11
2.7.2 (Optional) E it Week Program Timer ..................................................................................... 13
2.7.3 (Optional) E it humi ity Set-point ......................................................................................... 15
2.7.4 (Optional) E it/Set Current Time an Date ............................................................................ 16
2.7.5 (Optional) E it/Set Monthly clock correction factor ............................................................... 17

xComfort Roo
m Controller Touch User Manual 1
v
00
_EN
iv | P a g e

xComfort Roo
m Controller Touch User Manual 1
v
00
_EN
1 | P a g e
1. Introduction
1.1 Safety instructions
This ocument contains important warnings an safety instructions which must be observe an
followe by the users. Failure to follow these warnings an safety instructions will put the fault-free
operation of the Room Controller Touch at risk.
1.2 Intended use
The Room Controller Touch has been esigne solely for resi ential use in private homes an small
offices. It is not suitable for in ustrial use.
The Room Controller Touch is esigne to facilitate the climate control in a room an provi e the user
access to this through an intuitive LCD Touch screen menu.
The Room controller can operate in two application mo es:
•Control mode; in which the Room Controller Touch controls the regulation of the climate in a room
•Sensor mode; in which the Room Controller Touch registers the room climate con itions an the
user settings an sen s them to an intelligent evice, e.g. xComfort Smart Home Controller (SHC),
which actually controls the climate in the room.
Since the transmission of ra io signals is b
ase on a
non
-
exclusive
communication channel,
interference to the transmission are possible. Because of this, the Room Controller Touch
must not be use to control components with safety-relate functions, such as
overheating protection, emergency stop or emergency call.
The use of the unit for any purpose other than escribe in this ocument or the failure to observe the
warnings an safety instructions it contains will imme iately invali ate any claims in respect to the
warranty an /or liability.
1.3 Instructions for disposal
Do not dispose of this device with regular domestic waste.
Electronic equipment must be ispose of at local collection points for waste electronic
equipment an in compliance with the local regulations governing waste electrical an electronic
equipment.
1. About this document
These operating instructions are inten e for en users an escribe the operation an menu structure
of the Room Controller Touch.
Certain functions an their availability epen on the configuration of the Room Controller Touch uring
the installation. These functions are marke with (Optional).
Please contact a suitable qualifie electrical engineer for all assembly, installation an
basic configuration requirements or if you nee to remove or ispose of the evice.
Faulty installation or configuration can otherwise cause amage to property an persons.

xComfort Roo
m Controller Touch User Manual 1
v
00
_EN
2 | P a g e
2 The Room Controller Touch
2.1 Operation
The Room Controller Touch is equippe with a Display with Backlight an Touch function. The isplay is
use to isplay the information through which, by touching the isplay, the Room Controller Touch can
be operate .
Note:
The
isplay
is esigne to
respon to
on
-
screen
pressing only
. Compare to the common
ly
use touch isplays for smartphones an tablets it may be the case that touching the
isplay a little more firmly is necessary.
In the Idle-state the isplay shows the temperature an status with the backlight switche off. On
touching the isplay it enters the Active-state. In this state, the backlight is switche on, an when
connecte to the xComfort SHC, the information is refreshe to get the latest status.
Note:
To
maximize
the battery life,
a elay
between the
information on the isplay
in
the
idle
-
state an the actual status in the xComfort SHC is possible. The maximum possible elay
can be re uce by the installer, but this will lea to a re uction in the battery life. In other
configurations the isplay always contains the latest information.
Pre
-
defined temperature set
-
points
Frost protection
Night / Stan by
Economy
Day / Comfort
Request status
Heating request
Cooling request
Ventilation request
Shown information selection
Temperature
Humi ity
Clock
Out oor temperature
Various
Units of the shown information
Setting
Touch-button
Floor temperature regulation active
Low battery in ication
Week program timer
Week program timer activity status
Day of Week
Program timer switch time-point

xComfort Roo
m Controller Touch User Manual 1
v
00
_EN
3 | P a g e
2.2 Cleaning mode
To prevent unwante changes uring the cleaning of the Room Controller Touch, the isplay can be put
into the cleaning mo e.
The Room Controller Touch
must
only cleane with glass cleaner or win ow cleaner
,
an
never with abrasive pro ucts
During the cleaning mo e, the Room Controller Touch will ignore any touching on the isplay. The
isplay shows the remaining time in secon s until the Room Controller Touch switches back to normal
operation mo e.
2.3 Replacing the batteries
The Room Controller Touch operates with 2x LR03 (AAA) batteries which are locate in the rear section
of the Room Controller.
Replace the batteries when the low battery in icator is shown on the isplay.
Note:
Optional
ly,
the Room Controller can
also
be
use with
an
external
mains power a apter. In
this case batteries are not require . Contact your installer for more information.
Do NOT
press
the center of the isplay to mount
!! For
the
correct mounting
,
with two
han s, simply press the outer frame of the Room Controller Touch.
Use batteries shoul not be ispose of with regular omestic waste. They shoul be
taken to a battery isposal point.
Never recharge stan ar batteries!!
This
entails
a risk of explosion.
Do not throw the batteries into fires
Do not short-circuit batteries
>
7
Sec.

xComfort Roo
m Controller Touch User Manual 1
v
00
_EN
4 | P a g e
2. Operation mode
The operation functions of the Room Controller Touch are groupe into the following:
•Frequently use operation functions, asic operation functions.
•Occasionally use operation functions, Enhanced operation functions
•Changes to the settings, Edit operation functions
Note:
To start operat
ing
the Room Controller Touch
,
touching
the screen
o
nce
is necessary to
activate the isplay.
To maximize the battery life, the Room Controller Touch isplay will enter the Idle-state. In this state,
the isplay shows the temperature an status with the backlight switche off. On touching the isplay
again it enters the Active-state. In this state, the backlight is switche on, an when connecte to the
xComfort SHC, the information is refreshe to get the latest status.
2. .1 Basic operations
•Show the current temperature
•Temporary a just the current set-point temperature
•Show the current set-point temperature
•Select (another) per- efine set-point temperature (operation mo e)
•Show the current humi ity
•(Optional) Show out oor temperature
•(Optional) Show time an Day of Week
•(Optional) Touch-button(s)
2. .2 Enhanced operations
•Select regulation mo e; Heating, Cooling, (Optional) Heating&Cooling or OFF mo e
•(Optional) Switch Week Program Timer ON or OFF
2. .3 Settings edit operations
•E it pre- efine Set-point temperatures
•(Optional) E it Week Program
•(Optional) E it Humi ity Set-point
•(Optional) E it Time an Date
•(Optional) E it clock correction factor

xComfort Roo
m Controller Touch User Manual 1
v
00
_EN
5 | P a g e
2.5 Basic Operating Instructions
2.5.1 Show Current Room Temperature
The efault screen on the isplay shows the current temperature. After a timeout, the Room Controller
will always return to this efault screen. It is also possible to manually select the efault ‘current
temperature screen’.
2.5.2 Show Current/Active Set-Point Temperature
The set-point temperature which currently is use for the regulation of the temperature in the room can
be shown.
Note:
The active set
-
point temperature is the sum
total
of the active pre
-
efine operation mo e
set-point temperature an the temporary a justment (increase or ecrease) that is ma e.
Initial
Step 1
(
Optional
)
Select the Heating or
Cooling set-point
Idle
Timeout

xComfort Roo
m Controller Touch User Manual 1
v
00
_EN
6 | P a g e
2.5.3 Temporarily adjust the current set-point temperature
It is possible to temporarily increase or ecrease the current set-point temperature. The temporary
increase or ecrease in the set-point temperature will be reset to zero when the operation mo e (pre-
efine set-point temperature) is change , either manually or via the Week Program Timer.
Note:
To change the set
-
point
temperature permanent
ly,
see
the following section:
‘Edit
Operating Instructions - Change Pre-Defined Temperature Set-point .
Initial
Step 1
Optional Select
ion of
Heating or Cooling set-
point
Step 2
Idle
Timeout
2.5. Switch active set-point temperature (operation mode)
The Room Controller Touch supports four ifferent pre- efine an reprogrammable set-point
temperatures (operation mo es) for an easy change in the esire (set-point) temperature uring the
ay. It is possible to manually switch between these pre- efine set-point temperatures.
The pre- efine set-points can also be use in the Week Program (when enable ) to switch
automatically between the ifferent set-point temperatures on a time basis,
Note:
The Week Program will be switch
e
OFF
when the active set
-
point temperature (operation
mo e) is change manually.

xComfort Roo
m Controller Touch User Manual 1
v
00
_EN
7 | P a g e
Initial
Step 1
Step
2
Idle
Timeout
2.5.5 Show Room Humidity
The Room Controller Touch also measures the humi ity in the room, an the humi ity can be isplaye
by selecting the isplay humi ity screen.
2.5.6 (Optional) Show outdoor temperature.
Sensor mode
This option is available when the Room Controller is connecte to an intelligent evice which provi es
the out oor temperature.
Control mode
The option is available in control mo e if, uring installation, the external temperature sensor input is
configure for use as an out oor temperature sensor.

xComfort Roo
m Controller Touch User Manual 1
v
00
_EN
8 | P a g e
2.5.7 Show Time and Day of Week
The current time an ay of week can be isplaye .
2.5.8 (Optional) Touch-button(s)
The Touch-buttons of the Room Controller Touch can be use as push buttons to control the lights,
shutters/blin s in the room, for example, or to trigger Scenes in the xComfort SHC.
Note:
To get the Touch
-
buttons
,
an actuator or intelligent evice
must
be connecte to the
Touch-button of the Room Controller uring the installation. Contact your installer for
more information.
The Room Controller Touch has up to two Touch-buttons . Their behavior epen s on the
configuration uring the installation:
•2x Single Pushbuttons: Each Touch-button is connecte in ivi ually to an actuator(s) or to an
intelligent evice (e.g. the xComfort SHC). The Touch-button acts as single pole pushbutton.
The Touch-button supports short pressing (e.g. switch on/off) an long pressing (e.g. imming
up/ own).
•2x Single Rocker with arrow keys: Each Touch-button is in ivi ually connecte to an actuator(s)
or to an intelligent evice (e.g. xComfort SHC).
When the Touch-button is presse it will start flashing, an the arrow keys are shown, which can
be use ‘up ‘ or ‘ own’. In this respect on the ‘up’ key, apply a short press to switch on an a
long press to im up. Press briefly on the ‘ own’ key to switch off or to im own.
•1 Single Rocker: Both Touch-buttons are connecte to the same actuator(s). The pair of Touch-
buttons behave as one 2 pole pushbutton. The Touch-button on the left is the ON/UP
(short/long press) part an on the right the OFF/DOWN part.

xComfort Roo
m Controller Touch User Manual 1
v
00
_EN
9 | P a g e
2.6 Enhanced Operating Instructions
2.6.1 (Optional) Activate/Deactivate Week Program
The Week Program can be optionally eactivate (OFF) or activate (ON). When it is OFF, it is only
possible to manually switch between the pre- efine set-point temperatures (operation mo e), an
when it is ON, the operation mo e is base on the programme week program.
Control mode
If the Week Program Timer function is enable uring the installation (MRF), the option to activate or
eactivate the Week Program is available in the control mo e only.
Sensor mode
In the Sensor mo e the option is available when connecte with the xComfort SHC (e.g. Room Manager),
otherwise the Week Program is not available.
Note:
If
the Week Program is activate (ON)
, then
the operation mo e will switch to
the
correct
operation mo e accor ing to the week program for the current time.
Optional
Step 1
Step 2
Step 3 Timeout
D
eactivated (O )
A
ctivated (ON)
xComfort Roo
m Controller Touch User Manual 1
v
00
_EN
10 | P a g e
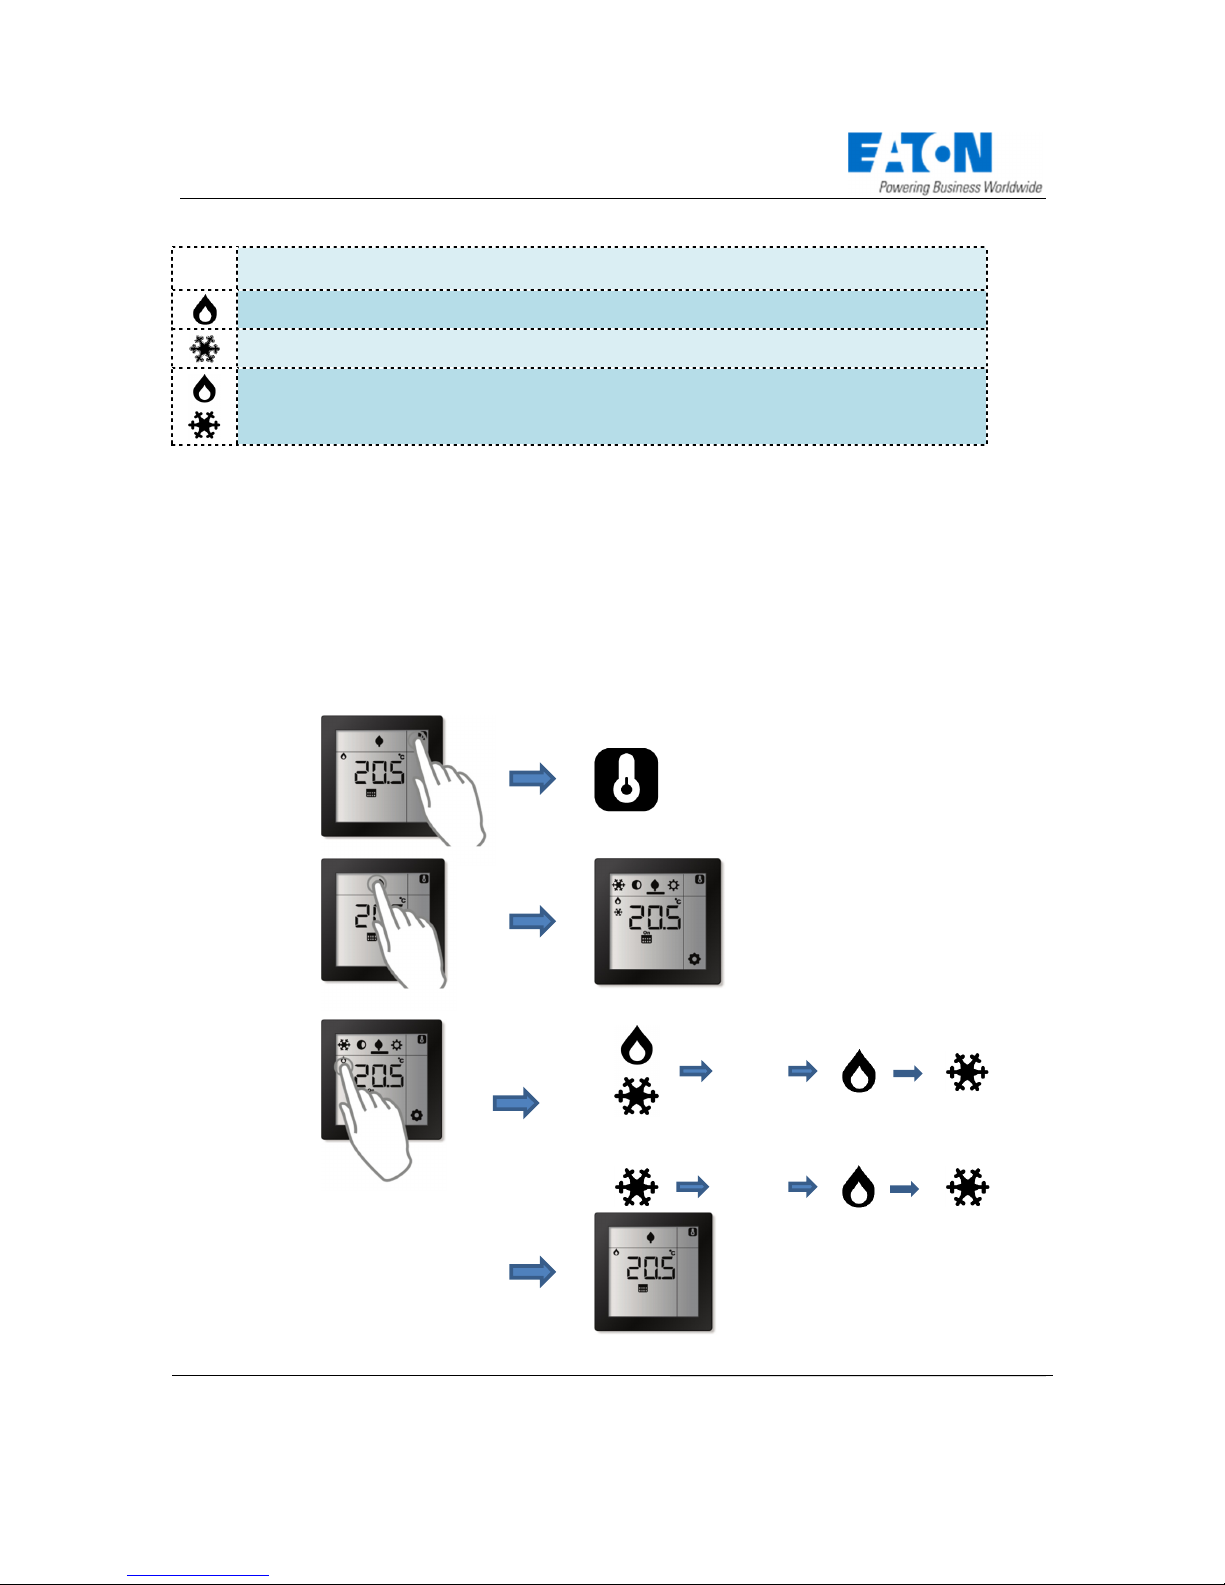
2.6.2 (Optional) Selecting Heating and/or Cooling mode
It is possible to select which temperature regulation mo e shoul be active manually.
(OFF)
No icons isplaye . No heating or cooling, e.g. regulation switch off.
Heating mo e. Regulation base on heating set-point(s) temperature only.
Cooling mo e. Regulation base on cooling set-point(s) temperature only.
Heating&Cooling mo e. Regulation base on both heating an cooling set-points
temperature.
Sensor Mode
If the Room Controller is connecte to an xComfort SHC, it is possible to change manually between
‘heating’, ‘cooling’ an ‘OFF’. In this case, the ‘Heating&Cooling’ mo e is not available. When connecte
to a Room Manager the temperature regulation mo e cannot be change .
Control Mode
* The available regulation mo es epen on the configuration. If a heating or a cooling actuator is
connecte only, then it is only possible to switch between ‘heating an OFF’ / ‘cooling an OFF’
manually. If both actuators are connecte , then all mo es are available.
Optional
Step 1
(Show mode)
Current a
ctive mode is shown
Step 2
(Select mode)
Control Mode*
(OFF)
Sensor Mode
(OFF)
Optional
Timeout

xComfort Roo
m Controller Touch User Manual 1
v
00
_EN
11 | P a g e
2.7 Edit Operating Instructions
2.7.1 Change Pre-Defined Set-Point Temperature
The Room Controller Touch supports up to 2 x 4 (4 for heating an 4 for cooling) ifferent pre- efine
set-point temperatures (operation mo es) which can be manually (re-)programme via the screen.
Frost protection mo e. Factory efault values 10°C/32°C (or -5K with Room Manager)
Stan by or Night mo e. Factory efault values 18°C/28°C (or -0,5K with Room Manager)
Economy mo e. Factory efault values 19°C/26°C (or -1K with Room Manager)
Comfort or Day mo e. Factory efault value 21°C/24°C (or 0K with Room Manager)
Sensor mode
When connecte to the xComfort SHC, the values of the pre- efine temperature are the same as the
set-point temperatures in the SHC. Making a manual change on the Room Controller Touch will also
change the set-point in the SHC (an v.v.).
When connecte to a Room Manager, the pre efine temperatures are use as offset in the Room
Manager for the Room Manager’s current set-point temperature.
Control mode
The initial values use in controller mo e are programme uring the installation (MRF). The set-point
values are use by the Room Controller Touch for the climate control.
Note:
If
the ‘
H
eating&
C
ooling
’
mo e
is
active
,
the Room Controller will
maintain
a minimum
temperature ifference between the heating set-point an cooling set-point temperature
( ea zone) to prevent the continuous switching between heating an cooling. This ea
zone value can be configure uring installation. The factory efault is 3K.
Optional
Step 1

xComfort Roo
m Controller Touch User Manual 1
v
00
_EN
12 | P a g e
Enter Edit mode
Step 2
(Select E it)
Edit icon flashing
Enter Edit Set
-
point
temperature
Repeat this for other set-points when required
Optional
Select the Set-point
Optional
Select the Heating or
Cooling Set-point
Step 3
(Change)
Changed value is flashing
Leave Edit mode
Step 4
Timeout
or
Idle Timeout

xComfort Roo
m Controller Touch User Manual 1
v
00
_EN
13 | P a g e
2.7.2 (Optional) Edit Week Program Timer
Sensor mode
When connecte to an intelligent evice, the climate control is carrie out by the intelligent evice an
base on the Week Program programme in the intelligent evice. Changes to the Week Program shoul
therefore be ma e in the intelligent evice.
Control mode
In the control mo e, the Week Program Timer is available if it is enable uring the installation (MRF).
The Room Controller Touch supports up to 6 manually (re-)programmable points for each Day of Week
at which time the Room Controller Touch shoul switch the active set-point temperature (operation
mo e), an to which of pre- efine set-point temperatures (operation mo e) it shoul switch.
Step 1
Step 2
Enter Edit mode
Step 3
(Select E it)
Edit icon flashing
Step 4
(Enter Program e it)
The Day of week and Trigger point
are flashing
Enter Edit Program
Repeat this
Select Day of Week
S
elected
Day of the Week
is
flashing

xComfort Roo
m Controller Touch User Manual 1
v
00
_EN
14 | P a g e
Select
Switch
point
Selected Switch point is flashing
To change the pre
-
defined set
-
point
Change Pre defined
Set-point
Selected Set-point has an underscore
To Change the Time minutes
Change Time
minutes
Step 1
(Select)
Minutes
are
flashing
Step 2 (Change)
To Change
the Time hours
Change Time Hour
Step 1 (Select)
Hours are flashing
Step 2 (Change)

xComfort Roo
m Controller Touch User Manual 1
v
00
_EN
15 | P a g e
Leave Edit mode
Step 6
(Leave Edit mode)
Timeout
or
Idle
Timeout
2.7.3 (Optional) Edit humidity Set-point
Sensor mode
The Humi ity set-point is not available if the Room Controller is connecte to an intelligent evice, e.g.
SHC or Room Manager.
Control mode
This option is available in control mo e if a humi ity actuator is connecte to the Room Controller Touch
uring the installation. The Room Controller Touch will sen an OFF comman to the actuator if the
humi ity is above the set-point value, an it will sen an ON comman if the actual humi ity is below
the set-point value. The set-point value can be change manually.
Initial
select Humidity
Edit mode
Enter
Change

xComfort Roo
m Controller Touch User Manual 1
v
00
_EN
16 | P a g e
Leave
Timeout
or
2.7. (Optional) Edit/Set Current Time and Date
Sensor Mode
The option to set the Time an Date manually with the Room Controller is not available if the Room
Controller is connecte to an xComfort SHC. In this case, the time an ate are synchronize with the
xComfort SHC ate an time.
Control Mode
The Time (Hours, Minutes) an Date (Day of Month, Month an Year) can be set manually if the Week
Program is enable uring installation.
Attention:
The time an ate are use for the execution of the Week Program. The Time an Date
nee to be set correctly for the correct operation of the Week Program
Initial select Clock
Enter Edit Mode
Other manuals for xComfort
1
Table of contents
Other Eaton Thermostat manuals


Popular Thermostat manuals by other brands

HITESCA
HITESCA SMT-770 Installer manual

Mars
Mars 70813 Installation and operating instructions

KMC Controls
KMC Controls CTE–5101 installation guide

EPH Controls
EPH Controls RFRB operating instructions

Carrier
Carrier Programmable Thermostats Installation, start-up, and operating instructions

Elsner
Elsner 71190 Installation and adjustment


