Eberg VISIV User manual

VISIV
Oczyszczacz powietrza
Instrukcja Obsługi
www.eberg.eu
Climateo.eu Sp. z o.o.
Ciepłownicza 54, 31-574 Krakow | Poland
ID/VAT: PL5272438859 | Phone: +48 12 262 97 05
email: [email protected]
www.eberg.eu

2 3
Spis treści
www.eberg.eu
PL Dane techniczne PL
Nazwa Produktu VISIV
Napięcie zasilania 220~240V 50HZ
Moc znamionowa 85 W
Moc akustyczna 40-66 dB(A)
Poziom hałasu 33-59 dB(A)
Generator jonów ujemnych 10 million/cm3
CADR - Pył zawieszony 800 m3/h
CADR - Formaldehyd 300 m3/h
Sugerowany czas wymiany ltrów #1 Filtr wstępny - co 2 lata
#2 Kaseta ltracyjna - co 6 miesięcy
Wagga netto 14 kg
Wymiary 400 x 400 x 669 mm
Procesy oczyszczania powietrza
1. Filtr wstępny
2. Filtr HEPA z warstwą węgla aktywnego
3. Generator jonów ujemnych
1. Dane techniczne ...................................................................................................
2. Proces oczyszczania.............................................................................................
3. Budowa urządzenia .............................................................................................
4. Sterowanie ..............................................................................................................
5. Montaż ltrów .......................................................................................................
6. Sposób użycia ........................................................................................................
7. Czyszczenie i konserwacja.................................................................................
8. Rozwiązywanie problemów .............................................................................
9. Uwagi i ostrzeżenia...............................................................................................
10. Zawartość zestawu ............................................................................................
03
04
05
06
08
09
12
14
17
18

4 5
Budowa urządzeniaProces oczyszczania
Dodatkowe funkcje
PLPL
Filtr wstępny
Filtr wstępny zatrzymuje kurz oraz inne większe zanieczyszczenia takie jak włosy czy sierść zwierząt
domowych. Filtr może być czyszczony oraz używany wielokrotnie.
Filtr HEPA
Filtr HEPA (H13) ltruje powietrze z większości zanieczyszczeń: cząstki ultra drobne (UFPs < 0.1 μm), pył
zawieszony PM2.5 oraz PM10 oraz wirusy i bakterie.
• Wskaźnik LED do jakości powietrza.
• Podwójny ltr, umożliwiając wysoką wydajność oczyszczania.
• Wbudowany czujnik cząstek stałych o wysokiej dokładności, realizuje pomiar w czasie rzeczywistym
jakości powietrza.
• Funkcja sterowania poprzez WiFi, manualny oraz automatyczny tryb pracy.
Filtr HEPA Filtr HEPA
Filtr wstępny
Filtr wstępny
Panel
Panel
Obudowa

6 7
Sterowanie PL Sterowanie PL
Na panelu wyświetlacza znajduje się klawisz włączania / wyłączania, przycisk funkcyjny, wskaźnik jakości
powietrza i wyświetlacz stanu pracy.
1. Klawisz włączania / wyłączania i wyświetlacz klawisza funkcyjnego
2. Funkcja wymiany ltra
Urządzenie posiada funkcję przypomnienia wymiany ltra. Czas wymiany został ustawiony na 3000
godzin. Ikona wymiany ltra zaświeci się po upłynięciu ustawionego czasu pracy oczyszczacza. W celu
zresetowania czasu do wymiany ltra należy można ponownie nacisnąć przycisk wymiany ltra. (Naciśnij
i przytrzymaj ten klawisz przez 3 sekundy, aby zresetować czas i ponownie uruchomić zegar.)
3. Wskaźnik jakości powietrza
Wskaźnik jakości
powietrza
Oznaczenia wskaźnika jakości powietrza
Stan gotowości Włączony
On/O
Funkcje przycisków
Mode Wind speed Child lock
Timer Filter screen Automatic
Speed Sleep WiFi (Niebieski)
Bardzo dobry
(Zielony)
Dobry
(Pomarańczowy)
Umiarkowany
(Czerwony)
Zły
Czerwony Zielony
Czerwona
ikonka
Normalna praca Wymiana ltra
Filtr HEPA brak podświetlenia

8 9
Umiejscowienie oczyszczacza
Montaż ltrów
Montaż ltrów
Sposób użytkownia
PL PL
30 cm od ściany 30 cm od ściany
20 cm od ściany tyłem
W trakcie pracy urządzenia, należy zachować przestrzeń pomiędzy urzadzeniem (z tyłu na 20 cm i ponad
30 cm z bocznych stron).
Przed użyciem, upewnij się że ltr został
wyciągnięty z folii ochronnej.
1. Wyciągnij ltr z plastikowej torby
1. Podłącz do prądu
Przed pierwszym użyciu wyjmij produkt z opakowania, usuń opaskę i włóż wtyczkę do gniazdka
zasilającego. Po podłączeniu zasilania ikona na panelu zmieni kolor na czerwony.
Po naciśnięciu przycisku zasilania urządzenie załączy się z sygnałem dźwiękowym. Przycisk
zasilania zmieni kolor na zielony. Urządzenie zacznie pracować w trybie automatycznym, ikona
trybu automatycznego zmieni kolor podświetlenia na biały.
2. Monta ltrów i paneli
a. Zdemontuj przednią i tylną pokrywę
a. Uwaga: strona z uchwytem powinna być
umieszczona na zewnątrz.
Urządzenie nie uruchomi się, jeśli panele nie
zostaną założone.
b. Zamontuj przednią i tylną pokrywę.
c. Wyjmij ltr z folii ochronnej
b. Wyciągnij ltry z oczyszczacza
Auto
Przycisk
zasilania

10 11
Sposób użytkowania PL Sposób użytkowania PL
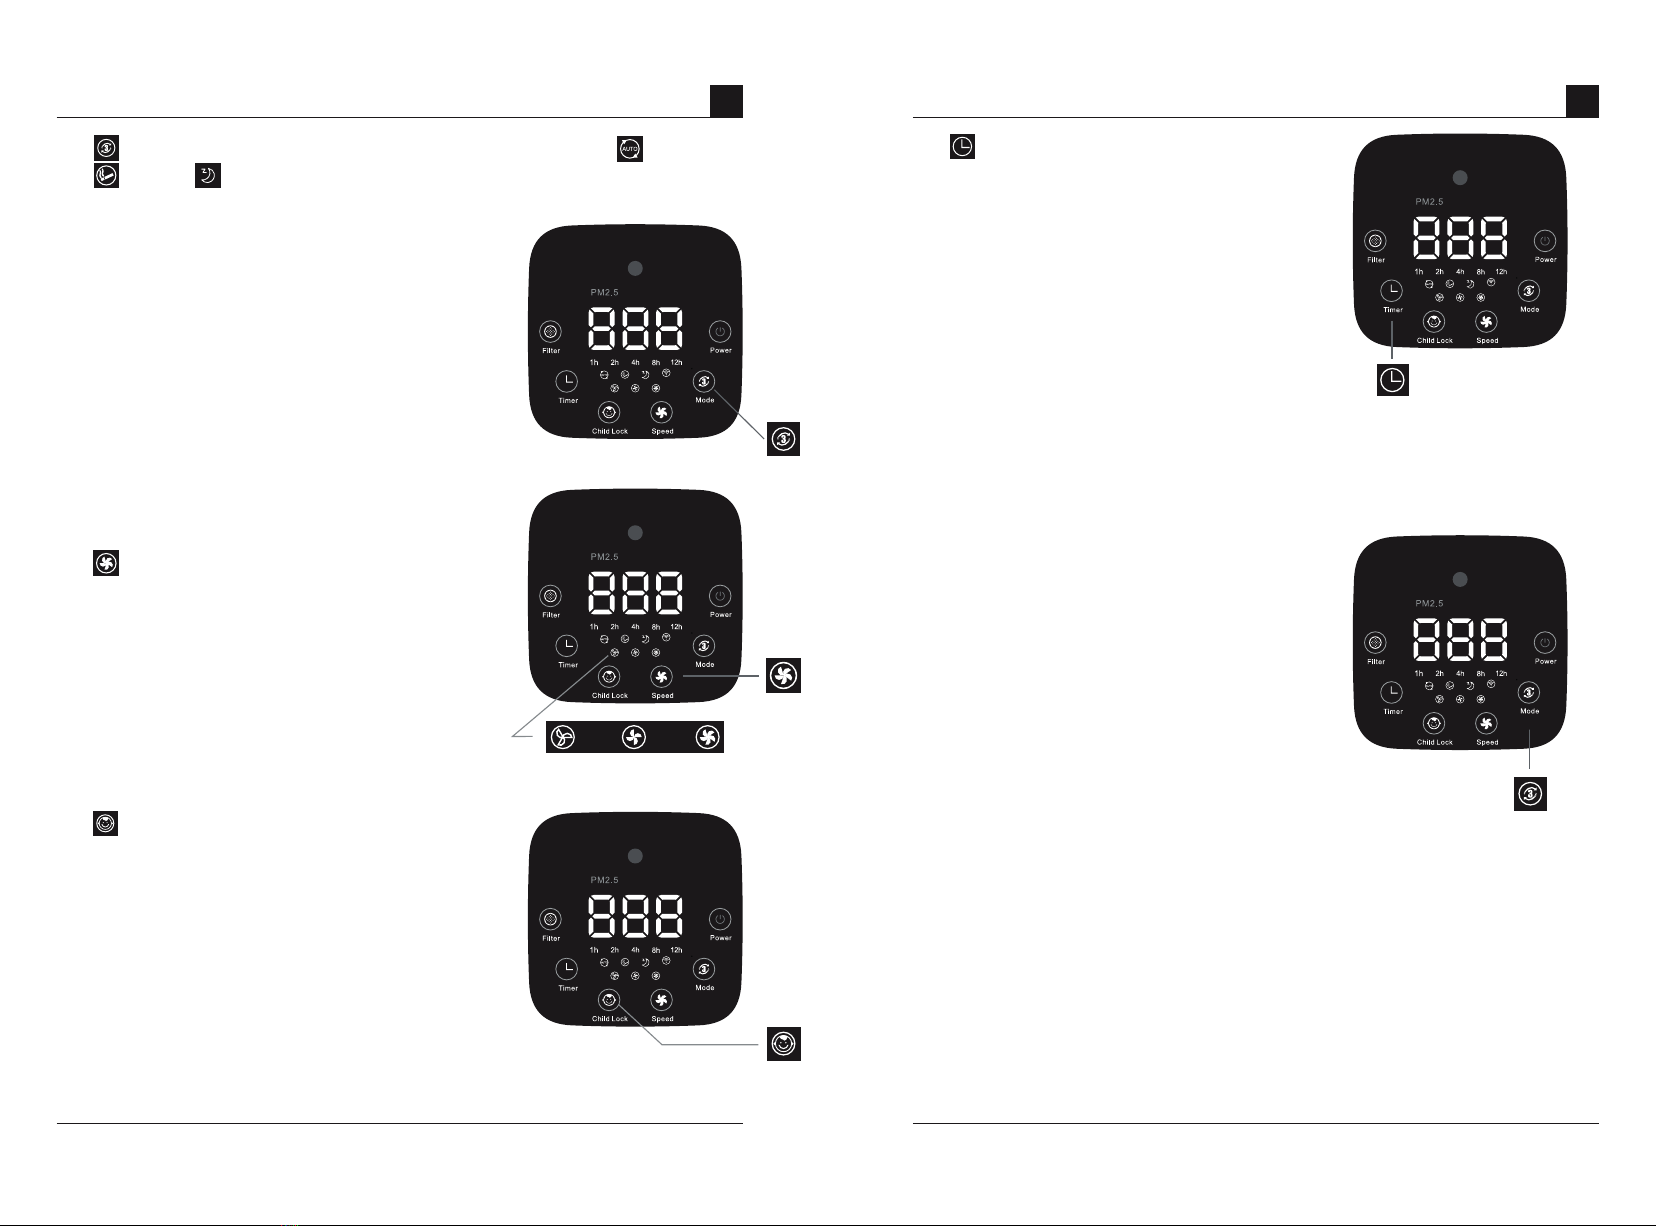
2. Wybór trybu. Gdy urządzenie jest włączone, mogą zostać wybrane 3 tryby: automatyczny,
tryb turbo oraz tryb uśpienia. W trybie automatycznym, funkcja generatora jonów
ujemnych jest aktywna, natomiast wentylator dostosowuje prędkość do aktualnie zmierzonego
poziomu zanieczyszczeń. (Wskaźnik zaświeci się, gdy
włączona jest funkcja automatyczna, i zgaśnie, gdy funkcja
automatyczna jest wyłączona). Po zapaleniu się ikony trybo
turbo, urządzenie przejdzie w tryb oczyszczania wysokiej
wydajności. Kiedy zaświeci się lampka uśpienia, jasność
wyświetlacza zmniejszy się o połowę. Urządzenie pracuje tylko
w jednym trybie jednocześnie.
• Timer działa w tle po uruchomieniu funkcji pomiaru
czasu,urządzenie przejdzie w tryb gotowości po upływie czasu. 6. Wi-Fi. Naciśnij i przytrzymaj klawisz zmiany trybu przez 5 sekund bez włączania urządzenia.
W tej chwili aplikacja telefonu komórkowego i urządzenie zostaną sparowane. Zapoznaj się
z instrukcjami WiFi dotyczącymi metody działania aplikacji telefonu komórkowego. Po
pomyślnym zakończeniu parowania, WiFi zostanie
włączone. Gdy urządzenie znajduje się poza sygnałem
WiFi, ikona zgaśnie. Wi-Fi może służyć do sterowania
wszystkimi funkcjami, takimi jak włączanie i wyłączanie.
3. Tryb ręczny. Gdy maszyna jest włączona, naciśnij
przycisk prędkości wiatru, aby zmienić bieg silnika, aby
dostosować prędkość. Po ręcznej zmianie biegów, silnik nie
będzie sterowany przez czujnik i może pracować tylko na
bieżącej nastawionej prędkości.
4. Blokada rodzicielska. Gdy urządzenie jest włączone,
urządzenie wejdzie w stan blokady klawiatury przez długie
naciśnięcie przycisku blokady przez 5 sekund, a następnie
wszystkie klawisze pozostaną zablokowane. Podczas gdy
urządzenie pozostanie w poprzednio ustawionym trybie
pracy. Status blokady zostanie zwolniony przez naciśnięcie
klawisza blokady przez 5 sekund. (Ikona zapala się, gdy
funkcja blokady przed dziećmi jest włączona i ściemnia się
po wyłączeniu funkcji).
5. Timer. Gdy urządzenie jest włączone, naciśnij
ten przycisk, aby ustawić wyłączenie czasowe. Gdy
urządzenie jest wyłączone, naciśnij ten przycisk, aby
ustawić czasowe włączenie. Każdorazowe naciśnięcie
przycisku spowoduje dodanie 1 godziny, po naciśnięciu
do 12 godzin, funkcja pomiaru czasu zostanie zamknięta
w następnym naciśnięciu. Czas włączenia/wyłączenia
można ustawić w zakresie 1-12 godzin (Ikona zaświeci się,
gdy funkcja pomiaru czasu jest włączona, i zgaśnie gdy
czas jest wyłączony).
1 Shift 2 Shift 3 Shift
5 sekund

12 13
Czyszczenie i konserwacja PL Czyszczenie i konserwacja PL
1. Filtr wstępny: Częstotliwość czyszczenia zależy od prędkości stosowanej prędkości oczyszczania oraz
stopnia zanieczyszczenia powietrza, zwykle należy wyczyścić ltr co 2 ~ 3 miesiące. Proszę posprzątać
Zabrudzony ltr wpłynie to na skuteczność oczyszczania.
2. Filtr HEPA: składa się z ltru HEPA oraz warstwy absorbującej (węgiel aktywny) może skutecznie
oczyszczać powietrze z pyłów zawieszonych, wirusów, bakterii oraz usuwać zapachy oraz szkodliwe
gazy.
3. Czyszczenie ltr wstępnego:
1) Wyłącz zasilanie i wyjmij wtyczkę z gniazdka.
2) Połóż dłoń na uchwycie i pociągnij na zewnątrz pod pewnym kątem, a następnie podnieś tylną
pokrywę na określoną odległość, zdejmij ją z oczyszczacza.
3) Delikatnie wyciągnij ltr wstępny, łapiąc za dwa zaciski, a następnie podnosząc go.
4) Filtr wstępny może zostać odkurzony lub umyty wodą lub detergentem. Jeśli ltr po czyszczeniu
jest czysty może zostać ponownie zamontowany w oczyszczaczu. (Nie zginaj podczas czyszczenia, aby
uniknąć uszkodzenia.)
5) Sposób ponownego montażu, włóż zatrzaski do odpowiedniego miejsca (Zwróć uwagę na kierunek
ltra, dwa zatrzaski powinny być na zewnątrz), a następnie zapnij górną podstawkę przycisku.
6) Włóż wszystkie elementy z powrotem do obudowy, najpierw ltry HEPA, następnie ltry wstępne
oraz pokrywę przednią i tylną w odpowiednim położeniu.
Uchwyt
odkurzanie mycie
Dwa elementy mocujące należy umieścić
w odpowiednich otworach obudowy.

14 15
Rozwiązywanie problemów PL Rozwiązywanie problemów PL
Problem Rozwiązanie
Urządzenie nie włącza się
Czy wtyczka jest prawidłowa podłączona?
- włóż prawidłowo wtyczkę zasilającą.
Czy panele wlotu powietrza są prawidłowo zamontowane?
- zamontuj panele w prawidłowy sposób.
Urządzenie nie włącza się
(Przycisk zasilania święci się
ale nie reaguje)
Czy kratka wylotu jest prawidłowo zamontowana?
- zamontuj kratkę wylotu w prawidłowy sposób
Ciągła praca oczyszczacza
nie powoduje zmiany jakości
powietrza (wskaźnik - kolor
czerwony)
Czy sensor pyły zawieszonego został wyczyszczony?
- wyczyść czujnik pyłu zawieszonego według instrukcji.
Głośna praca generatora
jonów ujemnych
Czy generator jonów jest zanieczyszczony kurzem?
- wyczyść generator jonów.
Nieprzyjemny zapach
z oczyszczacza
Czy ltr wstępny jest zabrudzony?
- wyczyść ltr
Czy ltr HEPA nie był wymieniany przez dłuższy czas?
- regularnie wymieniaj ltr HEPA.
Oczyszczacz nie przechodzi
automatycznie w tryb uśpie-
nia w nocy
Czy oczyszczacz działa w trybie ręcznym?
- naciśnij przycisk„auto” na panelusterowania , aby upewnić się,
że oczyszczacz pracuje w trybie automatycznym.
4. Funkcja przypomnienia o wymianie ltrów:
- wyłącz zasilanie i wyjmij wtyczkę z gniazda
- otwórz pokrywę i wyjmij ltr wstępny
- wyjmij ltr HEPA z urządzenia i umieść nowy ltr. Następnie zamontuj pozostałe elementy
z powrotem w oczyszczaczu.
Filtr HEPA
Przetrzyj delikatnie soczewkę czujnika
bawełnianym wacikiem po zdjęciu osłony.
Oczyść pokrywę czujnika powietrza
odkurzaczem lub suszarką do włosów.
Ikona sygnalizująca
wymianę ltrów
Filtr wstępny Panel (pokrywa)

16 17
Rozwiązywanie problemów PL Uwagi i ostrzeżenia PL
5. Czyszczenie
Zetrzyj plamy a obudowie za pomocą lekko wilgotnej ściereczki.
6. Czujnik pyłu zawieszonego PM 2.5 (czyścić mniej więcej raz na
dwa miesiące)
Przetrzyj soczewkę suchym bawełnianym wacikiem, aby
usunąć brud. (Wilgoć lub dym tytoniowy może spowodować
uszkodzenie czujnika). Najpierw zdejmij osłonę czujnika,
następnie użyj suchego bawełnianego wacika, aby wytrzeć
soczewkę.
Czyszczenie wylotu powietrza
Wyłącz zasilanie i wyciągnij wtyczkę z gniazda. Połóż dłoń po stronie kratki wentylacyjnej symbolem Δ
i pociągnij, aby ją wyjąć. Zdemontowanie kratki w trakcie pracy urządzenie spowoduje jeso wyłączenie.
Odłoży kratkę wylotową powietrza i wyczyść obudowę lekko wilgotną ściereczką.
Wskazówki bezpieczeństwa
W przypadku gdy wilgotność w pomieszczeniu jest zbyt wysoka, wskaźnik jakości powietrza może
wskazywać poziom wysokiego stężenia PM 2.5, pomimo czystego powietrza w pomieszczeniu.
Nie dotykaj urządzenia mokrą ręką.
Upewnij się, że zasilanie jest
wyłączone przed czyszczeniem
oczyszczacza.
Nie używaj zasilania innego niż
AC 220V 50Hz. Nie należy otwierać
urządzenia i naprawiać go samo-
dzielnie. Naprawa powinna być
wykonywana przez wykwalikowa-
nych serwisantów. Do produktu
nie należy wlewać wody, cieczy ani
łatwopalnych detergentów, aby
uniknąć uszkodzenia produktu lub
pożaru spowodowanego poraże-
niem prądem.
Kiedy oczyszczacz jest włączony,
proszę zachować odległość od
ściań: 20 cm z tyłu i powyżej 30 cm
po obu bokach. Oczyszczacz należy
umieścić na suchej i stabilnej
powierzchni.
Nie wolno myć oczyszczacza roz-
puszczalnikiem i cieczą chemiczną.
Nie wkładaj rąk ani żadnych
przedmiotów do wylotu powietrza.
Nie ciągnij za przewód zasilający,
aby go wyłączyć; należy wyłączyć
zasilanie, łapiąc za wtyczkę i wyjąć.
Jeśli urządzenie nie będzie używa-
ne przez dłuższy czas, należy wyjąć
wtyczkę zasilającą. Nadzoruj dzieci,
aby nie dotykały i nie używały tego
oczyszczacza. Należy uważać, aby
nie dopuścić do zablokowania
wlotu powietrza przez kurz, włosy
lub inne.

18 19
Zawartość opakowania PL
Oczyszczacz powietrza 1 szt.
Filtr wstępny 2 szt.
Filtr HEPA 2 szt.
Instrukcja Obsługi 1 szt.
VISIV
Air Purier
User manual
www.eberg.eu

20 21
Contents
1. Performance idex..................................................................................................
2. Product functions..................................................................................................
3. Product features.....................................................................................................
4. Filter screen characters........................................................................................
5. Product Structure..................................................................................................
6. Primary eect lter screen ................................................................................
7. Requirements for product placement...........................................................
8. Installing the Filter..................................................................................................
9. How to use...............................................................................................................
10. Maintenance ........................................................................................................
11. Troubleshooting..................................................................................................
12. Do’s and don’ts......................................................................................................
13. Packing list.............................................................................................................
21
22
22
22
23
24
26
26
27
30
32
35
36
www.eberg.eu
GB Performance Index GB
Product Name VISIV
Voltage/Frequency AC 110~120V or 220~240V50/60Hz
Please refer to the nameplate on the back of machine.
Rated Power 85 W
Sound Power 40-66 dB(A)
Noise level 33-59 dB(A)
Anion Concentration 10 million/cm3
Amount of Particulate-Cleaned Air (CADR) 800 m3/h
Amount of Formaldehyde-Cleaned Air (CADR) 300 m3/h
Applicable Area 56~96 m2
Suggested Period to Replace Filters #1 Filter 2 years
#2 Filter 6 months
Net Weight 14 kg
Product Measurements 400 x 400 x 669 mm
Method of Cleaning
1. Pre-lter
2. Composite carbon cloth lter
(HEPA+activated carbon)
3. Anion Purier

22 23
Product functions
Product features
Filter screen characters
GB
• Purication of gaseous pollutants such as smoke, dust particles and formaldehyde, etc.
• Motivation amounts of anions which can improve the air quality and optimize the living environment.
• Realization of sterilization and air purication for family, oce, restaurant, bar and entertainment
venues with areas up to 96 m2.
• Four-color LED lamp can indicate the air quality.
• Dual lter screen can lter and output double-time fresh air.
• Built-in high accuracy particulate matter sensor can realize the real-time detection of air quality.
• With WIFI function, manual operation control and automatic control during night sleep.
• It has four purication modes - manual, automatic, speed and sleep.
1. Primary eect lter screen: Can lter out the big particle such as human hair, pet fur, cotton ber etc.
2. HEPA composite lter screen: It can lter out the smoke, dust, pollen, allergens, pollutants and ne
particles larger than 0.3 microns, also it can lter out harmful gas such as benzene, formaldehyde,
stink etc.
Product Structure GB
Composite carbon cloth lter screen
Primary eect lter screenPrimary eect lter screen
Rear cover
Front cover
Mainframe

24 25
Primary eect lter screen GB
On display panel, there’s on/o key, function key, consumable status display and working status display.
1. On/o key and function key display
Standby On
On/o key
Function key display
Mode Wind speed Child lock
Timer Filter screen Automatic
Speed Sleep WiFi
Red Green
Primary eect lter screen GB
2. Replacement reminder for lter screen
This machine has a lter screen regular replacement reminding function, the replacement time is set
as 3000h, when the machine running up to given time, the indication lamp on the panel will light and
prompt the user to replace the lter screen. Meanwhile, the reset function get eective, the timing can
be restarted again by pressing this key. (Long press this key for 3 seconds to reset the time and restart
timing.)
3. Air quality status indication
Air quality indication lamp
Display status of Air quality indication lamp
Normal Expire
HEPA composite
lter No display
(Blue)Good (Green)Normal (Orange) Under-normal (Red) Dirty
Red lamp

26 27
Requirements for product placement
Installing the Filter
GB
30cm to wall 30cm to wall
20cm to wall on its back
When purier is working, please keep back space for 20cm, and over 30cm on both sides.
Make sure to remove plastic bag o
the lter before use.
1. Removing the lter from the plastic bag
a. Remove the front & rear covers
c. Take the lter out of the packaging
b. Remove the lters
Requirements for product placement
How to use
GB
1. Connect the power.
For the rst time use, please take out the product from the package box, remove the power cable tie, and
insert the plug into the socket. After power connection, the key icon on the panel will turn red.
Light touch on the machine will start with chord ringtone, power key will turn green the
machine will enter an automatic mode. Meanwhile, the machine front panel will display in white lamp
simultaneously: (Automatic mode) AUTO.
2. Installing the lter and covers
a. There are dierences between the inside and the
outside of the dust lter. Attention: The side with
a handle should be placed outwards.
c. Install the front & rear covers The machine will not run if the covers is uncovered.
b. There are dierences between the
inside and the outside of the front lter.
Attention: The side with a handle should
be placed outwards.
Auto
Power key

28 29
How to use GB
2. Mode selection: In on status, the mode key can select 3modes: Automatic Turbo for
smoke and Sleep . When the automatic lamp lighted, the anion function will be started,
the motor will change shift when receive the data from the sensor. (the indicator will on light
up when the auto function is on, and will light o when the
auto function is o. ). When the speed smoke purication lamp
lighted, the machine will enter speed purication mode after
speed indication lamp lighted. When the sleep lamp lighted,
the lamp brightness will reduce by half to indicate after sleep
function is on. The machine can only work on 1st shift and is
not controlled by the sensor.
• The timer will work as usual on background when start the
timing function, the machine will enter standby status after
time is up.
3. Manual mode: When the machine is on, press the wind
speed key to shift the motor’s gear to adjust the machine
running speed. The motor will be not controlled by sensor
after manual modication of the motor gear and can only
work on current set shift. (Where’s the smart key for wind
speed relief function after pressing the smart key.)
4. Child lock: When the machine is on, the machine will
enter key lock status by long pressing the child lock for
5 seconds, and then all keys will be in a status that can’t
be controlled, while the machine can work in previous
set status before lock. The lock status will be relieved by
repressing the child lock key for 5 seconds. (The key icon will
light when the child lock function is on and get dark when
the function closed.)
1 Shift 2 Shift 3 Shift
How to use GB
6. WiFi: Press and hold the mode key for 5 seconds without turning on the machine. The WiFi
pattern enters the ash status. At this time, the mobile phone APP and the machine are paired.
Refer to the WiFi instructions for the mobile phone APP operation method. After the pairing
is successful, the WiFi pattern is always on. When
the machine is in an environment where there is no
WiFi signal, the WiFi pattern does not shine. After the
machine is turned on, the WiFi pattern ashes slowly
when the WiFi signal is received, and the WiFi pattern
is always on when the WiFi signal is connected. When
the machine has been paired with this WiFi account,
there is a memory function; when the machine is in the
standby state, WiFi can be used to control all functions
such as turning on and turning o.
5. Timer: When machine is on, press this key to set
timed switch o. And when machine is o, press this key
to set timed switch on, 1 hour will be added by every
press, when press till 12 hours, the timing function will
be closed in next press. The appointment time can be
set in a range of 1-12 hours (The key icon will light when
timing function is on, and doesn’t light when timing is
o.)
5 seconds

30 31
Maintenance GB
1. Primary eect lter screen: The cleaning frequency is decided by the wind speed, air pollution degree
and accumulative time, normally it’s cleaned every 2~3months. Please clean timely, otherwise the
purication eciency will be aected.
2. HEPA composite lter screen: It’s consisted by HEPA, absorption& purifying material, functionality
ltering material, can eectively purify the suspended particles, viruses, bacteria in the air and remove
odors and harmful gases.
3. The cleaning of primary eect lter screen
1) Turn o the power, and remove the plug from the socket.
2) Put the hand on handle and pull outward in a certain angle, and lift up the rear cover for a certain
distance, then it can be taken o from the purier.
3) Pull out the primary eect lter screen lightly by catching the two slides, and then pull up it, be
careful not to make dust y.
Handle position
Pull out
Maintenance GB
4) The dust and ocs can be removed by vacuum cleaner or brush, also it can be washed by water or
detergent if it’s too dirty, install it back on purier after dry. (Don’t bend during cleaning process to
avoid damage).
5) Installation method, insert the inserted piece which is under lter screen into the corresponding card
slot (Please note the lter screen’s direction, two slides should be outward), then buckle up the upper
button stand.
6) Install the lter components back on the product, rstly put the HEPA composite lter screen,
primary eect lter screen, front cover on corresponding position and insert the inserted pieces into
corresponding card slots, then combine the front cover and machine card slot by suction.
suction wash
The two inserted piece into the card slot of the
machine frame.

32 33
Troubleshooting GB
Normal failure phenomenon Check/Solution
Can’t switch on
(Power lamp not lighted)
1. Whether the power plug is inserted well?
- Insert the power plug well.
Whether the left and right air inlet panel of purier is covered well?
- Cover left and right air inlet panel of purier.
Can’t switch on
(Power lamp twinkle),
button no response
Whether the roof air outlet grid network is installed To ensure the
air outlet grid network be straight.
- Install the roof air outlet grid network in place
There’s pollution in air while
the indication lamp still
not turn„blue”.
Whether the purier is put in a place where it’s easy to bring the
polluted air.
- Change the position of purier.
Even running consequently,
the air pollution indication
lamp is kept„red”.
Whether the particle sensor is dirty?
- Clean the particle sensor.
„Papa” ,”Lang” sound exist
during running.
Whether there’s too many dust in anion generator?
- Clean the anion generator.
The smell of the outlet makes
people uncomfortable.
Whether the lter screen is dirty?
- Clean the lter screen i Whether the lter screen is not replaced
for long time?
- Replace the lter screen regularly.
The purier not enter the
sleep mode automatically in
night.
Whether the purier is running under manual mode?
- Press the„Automatic” button on operation panel to ensure purier
running under automatic mode.
Troubleshooting GB
4. Smart replacement reminder for lter screen
- Turn o the power and remove the plug from socket
- Open the rear cover and take o the primary eect lter screen in the same way as„Cleaning of
primary eect lter screen”.
- According to the panel replacement indication, take out the HEPA composite lter screen from the
machine frame and put a new lter screen into lter screen frame in sequence, then install the lter
components back on the purier.
- Smart replacement reminder for lter screen
- Finally, switch o the power and install the rear cover on product frame.
HEPA high-eciency
composite lter
Wipe the sensor lens lightly with cotton
swab after taking o the anti-dust cover.
Clean the air sensor door cover
by vacuum cleaner or hair dryer.
lter screen key
Primary eect
lter screen
Front cover

34 35
Troubleshooting GB
5. Cleaning
Cleaning of air outlet
Wipe o the stains by cleaning cloth, water is not allowed to wash this
machine.
6. Particulate sensor (approximately once every two months)
Wipe the lens with a dry cotton swab periodically to remove
any dirt. (Moisture or tobacco smoke residue may cause it to no
longer work properly). First remove the particulate sensor cover,
use a dry cotton swab to wipe the lens.
Cleaning of air outlet
Switch o the power and pull out the plug from socket. Put the hand on air grid side with Δ symbol and
pull up to remove. Take out the air grid during running, the machine will stop automatically, put back
the air outlet grid and continue performing the function before power o.
Do’s and don’ts GB
Safety notes
When the indoor humidity is too high, condensed water will be generated on air quality sensor, at this
time and under automatic mode, though the air quality is very good, the status lamp on the panel will
indicate the air quality is bad and will suggest you to select the wind volume manually.
Don’t touch the power
plug with wet hand.
Ensure the power is switched o
before cleaning the purier.
Don’t use power in any other form;
AC 220V 50Hz is the only type
of power can be utilized for this
product. Don’t open the frame and
repair this product by yourself, the
repair should be done by professio-
nal repair people. Don’t pour water,
liquid or ammable detergent
into the product to avoid product
damage or re caused by electric
shock.
When the purier is working, ple-
ase keep the back with 20cm space
and above 30cm space on both
sides. Please place this product on
a dry and stable plane for use and
get away from the heat resource
and over humid position.
Don’t wash the mainframe by
solvent and chemical liquid to
avoid corrosion on frame. Don’t
put hand or any objects in wind
outlet. Don’t pull the power cable
to switch o; the power should be
switched o safely by catching the
plug and remove.
When it’s not used for a long time,
please remove the plug. Supervise
the children not to touch and use
this purier. The air ow should be
kept clear, don’t let dust, cotton
ber, hair or other material block
the wind inlet.

36
Packing list GB
Machine frame 1PC
Primary eect lter 2PCS
HEPA High-eciency lter 2PCS
User manual 1PC
Table of contents
Languages:
Other Eberg Air Cleaner manuals