ECdesigns PowerDAC-S User manual


© 1990-2021 - All Rights Reserved - ECdesigns!
https://www.ecdesigns.nl
/!2 17
Introduction
The PowerDAC-S is a digital audio set without -any- amplifiers or buffer circuits !
in the signal path.!
The PowerDAC-S is based on discrete multi-bit Power DA converters.!
Balanced power-supply and resistor attenuator are used to generate the output signal.!
The PowerDAC-S is intended for driving speakers, headphones and amplifiers.!
The PowerDAC-S has low efficiency but has very low distortion.!
Sensitive speakers are recommended.!
Highlights
•Custom DAPI receiver offers high source immunity!
•Directly drives speakers!
•Toslink input!
•Bit-perfect tester built-in!
•IR remote control included
•Local volume control using the 2 push buttons!
•Connect speakers on speaker output terminals!
•Connect to amplifier using supplied RCA adapters on the speaker output terminals!
•Connect headphones using supplied RCA adapters on the speaker output terminals +
RCA to 3.5mm HP cable!
•Firmware upgradable!
•Recommended speaker SPL: >= 90dB 1Watt at 1 meter distance!
•Max output with 2 Ohm = 2 x 4 Watt!
•Max output with 4 Ohm = 2 x 3.5 Watt!
•Max output with 8 Ohm = 2 x 2.6 Watt!
•Distortion: < 0.0005% (0dB) at the speaker terminals!
© 1990-2021 - All Rights Reserved - ECdesigns!
https://www.ecdesigns.nl
/!3 17
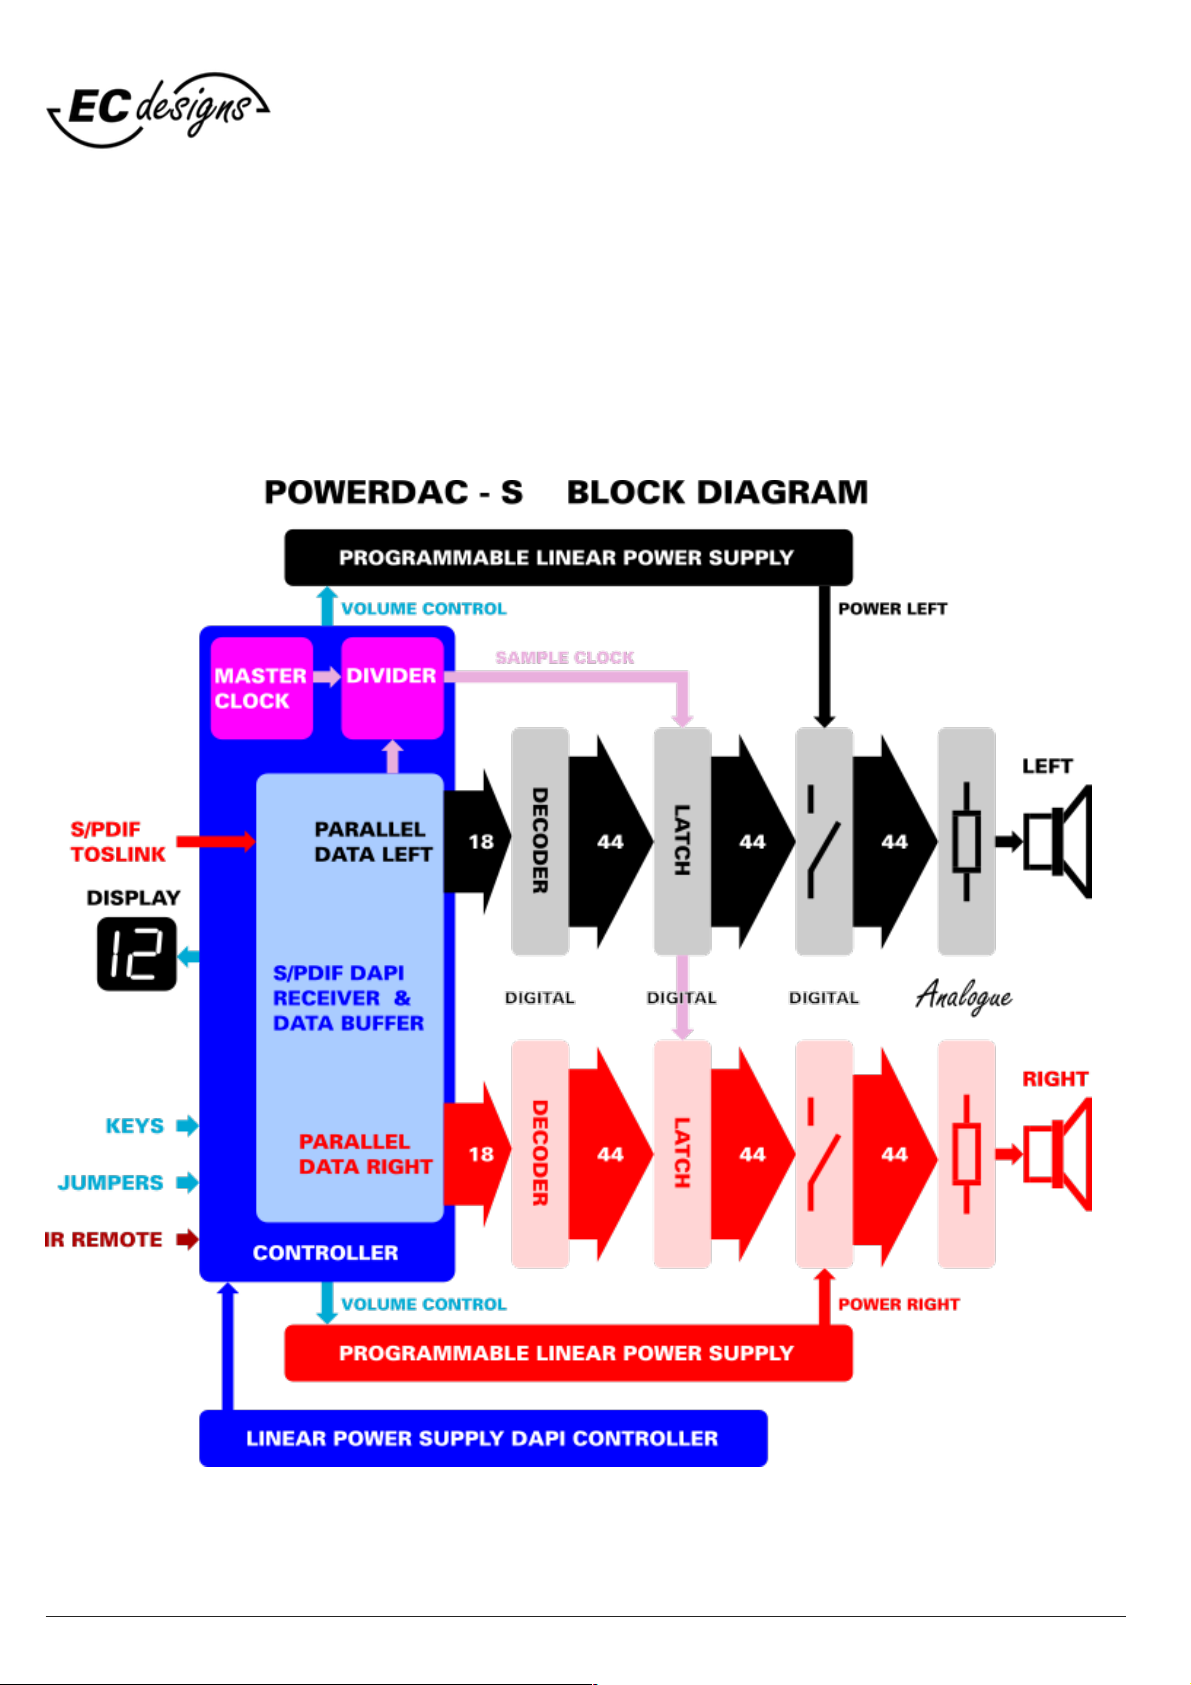
Theory of operation - Block diagram

© 1990-2021 - All Rights Reserved - ECdesigns!
https://www.ecdesigns.nl
/!4 17
Theory of operation - Speaker output
Batteries are used in the examples below to simplify the theory of operation, in reality these are the
programmable linear power supplies shown in block diagram above.
We have: two batteries (yellow), a speaker (grey), two equal resistors R (orange), and two electronic
switches. Batteries are a short circuit for AC signals (audio signals). Resistors limit the current through
the speaker.!
A) Switches in opposite position (+ & -) currents cancel, zero volts on the speaker. Membrane does not
move.
B) Switches are both positive (+ & +) positive currents add, maximum positive current flowing through
the speaker. Membrane moves outwards.
C) Switches are both negative (- & -) negative currents add, maximum negative current flowing through
the speaker. Membrane moves inwards.
In all 3 cases we have two resistors with value R in parallel and batteries are short circuit for AC. So
output impedance in all 3 cases remains the same, 0.5 R.
By changing the electronic switch settings we can have no voltage, positive voltage or negative voltage
on the speaker without requiring any amplifier.
But we need to program the current much more precisely for generating audio signals. Therefore we
use 44 electronic switches and resistors with different values (resistor array). Now we can program
262,144 different current / voltage levels and achieve 18 bit accuracy.
For 18 bits we would only require 18 switches, but because of the high currents (we have to drive a
speaker) and component limitations this is not going to work in a practical circuit.
That's why we had to add more switches that represent the 5 highest and most critical bits. We
required total of 31 switches for this. The remaining less critical lower bits require 13 extra switches so
we end up with 31 + 13 = 44 switches in total.
This way we can generate highly accurate and consistent audio signals on the speaker without
requiring any amplifier or lossy analogue signal path at all.

© 1990-2021 - All Rights Reserved - ECdesigns!
https://www.ecdesigns.nl
/!5 17
Max output power
With an efficiency of just 6,77% and a fixed output impedance of 2 Ohm we get about !
2x4 Watt from our four transformers (120 Watt).!
With maximum volume setting (12) the heatsinks have to dissipate 120 Watt.!
This is the max practical power output we can achieve. For higher power we would need
unpractical massive heatsinks.!
SPL considerations
Speaker sensitivity in dB can be a little confusing.!
Speaker manufacturers tend to use different dB notations.!
•dB 1W measured at 1 meter distance, this is independent of speaker impedance !
•dB 2.83 V at 1 meter distance, this is speaker impedance dependant!
•SPL in dB (max dB the speaker can produce without break-up, measured at 1 meter)%!
8 ohm speaker: 2.83 volts = 1 watt!
4 ohms speaker: 2.83 volts = 2 watt!
2 ohms speaker: 2.83 volts = 4 watt!
Example for Teufel Ultima:
Sensitivity (2.83 V / 1 m) %87 dB!
SPL %%%%%108 dB!
Impedance%%%%4-8 Ohm%(measured 4 Ohm)!
current i = 2.83 / 4 = 0.707A!
Power applied to speaker for 87 dB @ 1 meter equals p = v * i = 2,83 * 0,707 = 2 Watts !!
So the actual sensitivity at 1W / 1m will be 6 dB less: 87dB - 6dB = 81 dB.!
But the Teufel Ultima (4 Ohm) is still very usable i.c.w. PowerDAC-S with most albums, but albums that have
lower recording output level might not play loud enough.!
Stated SPL specification by manufacturers have to be read carefully !
%!
%%!
© 1990-2021 - All Rights Reserved - ECdesigns!
https://www.ecdesigns.nl
/!6 17
PowerDAC-S
PAGE 1
DAC type
2 x 44 bit Fractal-31 discrete, switch & resistor-based multibit power converters
Digital input
1 x Toslink 16/24 bit: 44.1 kHz / 48 kHz / 88.2 kHz / 96 kHz / 176.4 kHz / 192 kHz
Power Supply
Built-in 120 Watt 16V linear power-supply, 230VAC (default) or 115VAC (option)
Power
Temperature rise 0.263 ºC / Watt dissipated
Efficiency
6.77%
Output impedance
Remains 2.12 Ohms regardless of volume setting
Recommended
Speaker SPL
>= 90dB 1Watt at 1 meter distance
Load impedance
The PowerDAC-S can drive -any- load from dead short to infinity and speaker dips &
peaks are no problem either.
Steering method
The steering method is different from conventional audio systems, the PowerDAC-S offers
quasi constant power steering and it combines the best properties of constant voltage
steering (semiconductor amps) and quasi constant current steering (tube amps). The
steering method is based on power division. Constant amount of power is divided between
PowerDAC and speaker, the louder the signal, the more idle power is diverted to the
speaker, at digital silence the PowerDAC gets all power and the speaker gets no power.
The amount of power drawn from the mains remains constant, regardless of the output
signal. One -could- compare this with a pure class-A amplifier where the entire output
signal is generated from the bias current.
Speaker drive
arrangement
Wheatstone Bridge (power supply noise cancelling circuit). One branch is provided by the!
D/A converter, the other is provided by a split impedance for balancing the bridge.
Because of this supply noise cancelling method, the PowerDAC-S offers a ghostly silent
background, this is essential for hearing the smallest details.
Bandwidth
Theoretically 100 MHz (based on switching speed), but practically limited by wiring and
other factors. Unlike amplifiers there is no band limiting present as there are no feedback
loops & phase margin issues. This unique property translates to zero phase errors within
the audio and ultrasonic spectrum and zero degrading related to feedback loops, thermal
memory and other typical degrading related to analogue circuits.
Distortion
< 0.0005% (0dB) at the speaker terminals. Noise floor typically below -140dB at the
speaker terminals (degraded by speaker wiring and speaker internal wiring and crossover
parts picking up noise).
Technical specifications

© 1990-2021 - All Rights Reserved - ECdesigns!
https://www.ecdesigns.nl
/!7 17
PowerDAC-S
PAGE 2
Resolution
Better than 50uV at the speaker terminals
Clipping
Unlike amplifiers, the PowerDAC-S does not amplify any noise and it cannot clip. At
maximum volume, distortion remains 0.0005% at the speaker terminals and the
output signal does not clip (not even 1 LSB). So you have the unusual situation that
there is no distortion increase from the PowerDAC-S at full volume setting. This also
means there is no compression regardless of volume setting. The speakers are also
unlikely to distort much at these low power levels of 4W max. The membrane
movement of the speakers is very low (sometimes no movement is visible at all).
This translates to low distortion (the larger the cone movement, the higher te
speaker related distortion). This is why it makes sense to use lowest practical
output power and use sensitive speakers.
Integrated bit-
perfect tester
With muting on (display:"-") and using supplied bit-perfect test wav files, the display
will show "P" when test wav file is received by the PowerDAC-S without
modification.
Auto-mute
When no Toslink data is received the PowerDAC-S will switch to muting after about
15 minutes. When Toslink data is received again the previous volume setting will be
restored.
DAPI firmware
update!
The DAPI firmware can be updated using the USB socket and jumper setting
positions for firmware update.
Dimensions
Width: 40cm, Height: 32.5cm, Depth: 8cm, foot: 25.5cm (round)
Weight
8 kg
Technical specifications

© 1990-2021 - All Rights Reserved - ECdesigns!
https://www.ecdesigns.nl
/!8 17
PowerDAC-S
PAGE 3
POWER &
TEMPERATURE
Output
Voltage
shifts
attenuation
in dB
dissipated
power
output power
in mW for
2 4 8 Ω
heatsink
temp rise
heat sink temp
@20 ºC
Volume
-
6W
1 ºC
21 ºC
0
4.8Vpp
4
-36dB
36W
0.97 - 0.86 - 0.62
9 ºC
29 ºC
1
6.5Vpp
4
-33dB
50W
1.95 - 1.72 - 1.25
13 ºC
33 ºC
2
4.8Vpp
3
-30dB
36W
3.90 - 3.43 - 2.50
9 ºC
29 ºC
3
6.5Vpp
3
-27dB
50W
7.81 - 6.78 - 5.00
13 ºC
33 ºC
4
4.8Vpp
2
-24dB
36W
15.62 - 13.75 - 10.0
9 ºC
29 ºC
5
6.5Vpp
2
-21dB
50W
31.25 - 27.5 - 20.0
13 ºC
33ºC
6
4.8Vpp
1
-18dB
36W
62.5 - 55.0 - 40.0
9 ºC
29 ºC
7
6.5Vpp
1
-15dB
50W
125 - 110 - 80
13 ºC
33 ºC
8
4.8Vpp
0
-12dB
36W
250 - 220 - 160
9 ºC
29 ºC
9
6.5Vpp
0
-9dB
50W
500 - 440 - 320
13 ºC
33 ºC
10
8Vpp
0
-6dB
65W
1000 - 890 - 640
17 ºC
37 ºC
11
12Vpp
0
-3dB
90W
2200 - 2000 - 1400
23 ºC
43 ºC
12
16Vpp
0
0dB
114W
4000 - 3500 - 2600
30 ºC
50 ºC
Technical specifications

© 1990-2021 - All Rights Reserved - ECdesigns!
https://www.ecdesigns.nl
/!9 17
Bit-perfect test
It is essential to test if the Toslink source that is connected to the PowerDAC-S is setup to pass music without any
alterations. Alterations of original music data could cause serious SQ degradation !!
Alteration to original (CD) recordings could have numerous causes e.g.!
•Software volume control in streamer/player/pc music application!
•Equalisation in streamer/player/pc music application!
•Sample-rate conversion in streamer/player/pc music application!
•Compression in streamer/player/pc music application!
•DSP alterations in streamer/player/pc music application!
•Re-clocker devices in digital signal path to PowerDAC-S!
•Isolators in digital signal path to PowerDAC-S!
•Other devices in digital signal path to PowerDAC-S!
•Use of MQA (test) files converted to MQA!
•Streaming services you can’t test but they might do any of the above!
•Other ?!
To make sure that music data is received by the PowerDAC-S without alterations you can use the built-in !
bit-perfect tester in the PowerDAC-S.!
For this we have 4 wav test files (44.1kHz / 48kHz / 88.2kHz / 96kHz*) that can be played on your !
source (streamer/player/pc music application) to check if the music data arrives in the PowerDAC-S !
without alteration.!
This can only be tested with the PowerDAC-S in the muting volume setting (“-“ on display).
You have to wait until the streaming on PowerDAC-S stops (the decimal point “.” is off)
before (re)trying (next) track !!
Make sure that sample rate is correctly set before playback (in streamer/player/pc music application)!
Now play the track, when track play is finished a “P” should be displayed, if not then playback is NOT bit-perfect.!
The “P” will become “-“ after stream stops (“.” is off).!
You will have to re-run bit-perfect test if anything (any setting) is changed in your steamer/player/pc music
application.!
Download and unzip the bitperfect test wav files using this link: pd-bitperfect-wav-files.zip!
* There is not enough CPU power left to check sample-rates > 96kHz!
© 1990-2021 - All Rights Reserved - ECdesigns!
https://www.ecdesigns.nl
/!10 17
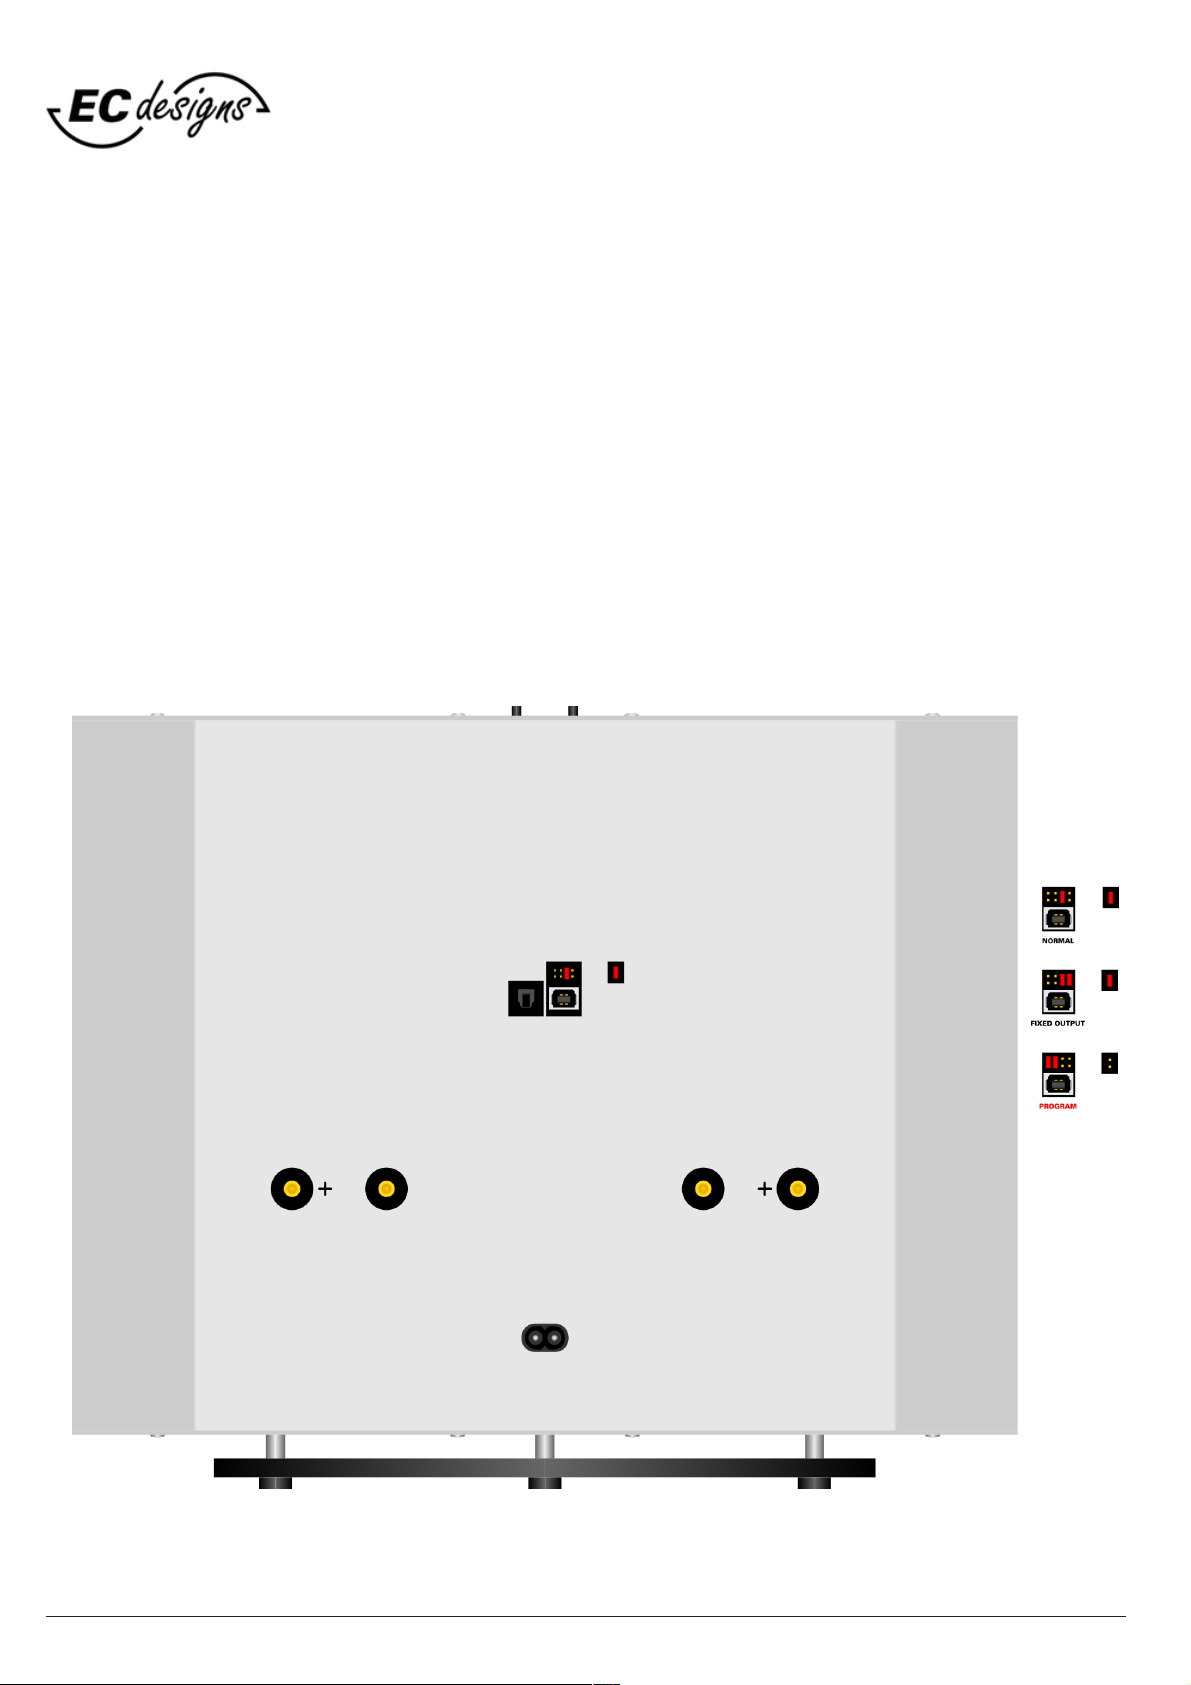
Jumper settings
Below are the jumper settings for PowerDAC-S.!
The FIXED OUTPUT jumper setting fixes PowerDAC-S output to volume level 9.!
Carefully remove or place jumpers using tweezers.!
Note that when updating firmware that single right most jumper must be removed.!

© 1990-2021 - All Rights Reserved - ECdesigns!
https://www.ecdesigns.nl
/!11 17
Firmware update
To update the PowerDAC-S firmware you need to download the STM32CubeProgrammer.!
You need to ACCEPT Licence Agreement (click button) and on the next screen you need to fill-in your E-mail
address to be able to download STM32CubeProgrammer (you need to use confirm via email sent to you before
you can download the STM32CubeProgrammer).!
The email sent to you contains the Download now button to start the download.!
Goto link below to download the STM32Cube programmer (Win/Lin/Mac):!
https://www.st.com/en/development-tools/stm32cubeprog.html#get-software!
Download and install STM32CubeProgrammer.!
Remove mains from PowerDAC-S.!
Use tweezers to set the red jumpers on rear of PowerDAC-S !
to PROGRAM configuration (see Jumper settings on previous page).!
Download and unzip latest pdrs-firmware.zip!
Now connect a USB cable from the PowerDAC-S to your computer and start the STM32CubeProgrammer.!

© 1990-2021 - All Rights Reserved - ECdesigns!
https://www.ecdesigns.nl
/!12 17
On the right hand side of the screen you should see:!
Port: USB1, if not then try the refresh button on the right
side of the Port dropdown button.!
If not working check jumper settings and USB cable
connection.!
Now press the Connect button.!
Then use the Open file button to load the firmware file.!
Click the Download button to load firmware file in the
PowerDAC-S.!
After message: File download complete!
Press the OK button on message window.!
Finally click on the Disconnect button to finish session.!
You can then close the STM32CubeProgrammer.!
Remove the USB cable between PowerDAC-S and PC.!
Set jumpers to the normal positions.!
After power-up PowerDAC-S the new firmware is used.

© 1990-2021 - All Rights Reserved - ECdesigns!
https://www.ecdesigns.nl
/!13 17
Alternate firmware update
If you don't want to register and download STM32CubeProgrammer then you can also use the dfu-util
command-line utility to download new firmware into the PowerDAC-S.!
For this you will have to use the command-line to update firmware.!
Download dfu-util here: http://dfu-util.sourceforge.net/releases/dfu-util-0.11-binaries.tar.xz!
After unpacking open shell/command window and change directory to “dfu-util-0.11-binaries“!
Depending on your operating system change directory to the directory containing the dfu-util executable for
your operating system.!
Disconnect power cable from the PowerDAC-S.!
Use tweezers to set the red jumpers on rear of PowerDAC-S !
to PROGRAM configuration (see Jumper settings on page 10).!
Now connect a USB cable from the PowerDAC-S to your computer.!
Now copy the firmware file (see page 11) e.g. PDRS140.bin into the same directory containing the dfu-util
executable.!
From this directory execute:%dfu-util -a 0 --dfuse-address 0x08000000 -D PDRS140.bin!
If this completes without errors (File downloaded successfully) your firmware should be updated.!
Disconnect the USB cable from PowerDAC-S and reset jumpers back to normal or fixed.!
Then connect PowerDAC-S power cable.!
After power-up PowerDAC-S the new firmware is used.!

© 1990-2021 - All Rights Reserved - ECdesigns!
https://www.ecdesigns.nl
/!14 17
IR Remote Control
The IR Remote Control is included with the PowerDAC-S.!
The IR Remote Control can be used to:!
•Increase volume!
•Decrease volume!
•Mute/Un-mute!
The IR Remote Control can be recharged with the !
included USB mini cable.!
Connect to a 5V source like PC or 5V USB charger to charge.!

© 1990-2021 - All Rights Reserved - ECdesigns!
https://www.ecdesigns.nl
/!15 17
UT96
The UT96 is an optional USB to Toslink converter that!
can be used with the PowerDAC-S.!
It supports USB full-speed 44.1kHz / 48kHz / 88.2kHz / 96kHz!
Use standard USB cable to connect to PC/Host.!

© 1990-2021 - All Rights Reserved - ECdesigns!
https://www.ecdesigns.nl
/!16 17
Volume control and Inputs
The DAPI controller has 4 S/PDIF inputs, so why not use all of them ?!
The whole point of the PowerDAC is to achieve Digital to Analog conversion with minimal noise input and
the lowest possible distortion without -any- amplifiers or buffer circuits in the signal path.!
We initially wanted to use all of the 4 S/PDIF inputs but by doing so we would let up-to 4 S/PDIF sources
into the DAPI controller simultaneously. Now the not used inputs that contain a live S/PDIF stream will
inject noise into the DAPI board even if this input is not selected.!
The only solution to use multiple S/PDIF inputs without causing noise injection into the PowerDAC is to
move them outside the PowerDAC.!
One possible solution is using an external input switch like the one below.!
It has 4 S/PDIF inputs and includes a remote control for selecting the active input.!
Digital Audio-Switch!
The PowerDAC Volume control consists of data bit-shifts combined with fixed voltage levels.!
The smallest volume change we can hear is about 3 dB, when the received audio data is shifted by one
bit, this corresponds to a 6 dB attenuation per shift.!
We use a combination of fixed voltages + bit shifts (max 4) to change the volume.!
Bit shifts only drop bits from the 4 least significant bits.!
We use 2 voltages in the PowerDAC-R giving a total of 10 volume steps of 3 dB.!
We use 5 voltages in the PowerDAC-S giving a total of 13 volume steps of 3 dB.!
When using the PowerDAC i.c.w. an external (pre)amplifier performance is degraded as any active device
in the audio path will degrade performance !!
By setting a jumper on the PowerDAC you can set fixed output without using any bit shifts.!
!

© 1990-2021 - All Rights Reserved - ECdesigns!
https://www.ecdesigns.nl
/!17 17
piCorePlayer
If you are looking for simple music player for stand-alone or even multi-room to use with the PowerDAC-S
checkout piCorePlayer.!
When run from an RPI4 you could connect your music to the RPI4 directly by USB or to NAS via network.!
By using the JustBoom Digi HAT or the HifiBerry Digi(+) HAT you can connect the PowerDAC-S !
using a Toslink cable.!
It supports 44.1kHz / 48kHz / 88.2kHz / 96kHz / 176.4kHz / 192kHz.!
Be sure to set Audio Volume Control to fixed at 100%, set Audio Crossfade to No, Volume gain to None.!
Then install “Material Skin” in LMS and choose in LMS pages under “Web Interface” and you will have a very
nice user interface using any browser on any PC in your network.!
Using plugins you can also use Spotify, Qobuz and Tidal.!
For more info see:!
https://www.picoreplayer.org/landingzone_option3.html!
Table of contents
Other ECdesigns Media Converter manuals


Popular Media Converter manuals by other brands


H&B
H&B TX-100 Installation and instruction manual

Bolin Technology
Bolin Technology D Series user manual

IFM Electronic
IFM Electronic Efector 400 RN30 Series Device manual

GRASS VALLEY
GRASS VALLEY KUDOSPRO ULC2000 user manual

Linear Technology
Linear Technology DC1523A Demo Manual

Lika
Lika ROTAPULS I28 Series quick start guide

Weidmuller
Weidmuller IE-MC-VL Series Hardware installation guide

Optical Systems Design
Optical Systems Design OSD2139 Series Operator's manual

Tema Telecomunicazioni
Tema Telecomunicazioni AD615/S product manual

KTI Networks
KTI Networks KGC-352 Series installation guide

Gira
Gira 0588 Series operating instructions

Lika
Lika SFA-5000-FD user guide