EchoMaster Pro 19366656 Operation manual

Installation/USER Guide
19366656
FC-GMOEFF-CC
Integrated Front Camera Assistance
Package
IntelliHaul

For installation assistance visit http://echomaster.com/Intellihaul/
email - gmsupport@echomaster.com (US) - tel - 866-766-2267
2
Illustrations are typical and may not match exact vehicle details
For installation assistance visit http://echomaster.com/Intellihaul/
email - gmsupport@echomaster.com (US) - tel - 866-766-2267
Cover all surfaces with tape or plastic protection lm to protect against
scratching and damage. EchoMaster is in no way responsible for any damage
that may incur during installation.
This product has been validated in the vehicles listed on the application guide only.
Care must be taken when installing this accessory to ensure damage does not occur
to the vehicle. The installation of this accessory should follow approved guidelines to
ensure proper installation. Read entire instructions thoroughly before starting.
This document covers such items as:
- Vehicle Protection (use of covers and blankets, cleaning chemicals, etc).
- Vehicle Disassembly / Reassembly (panel removal, part storage, etc).
- Electrical Component Disassembly / Reassembly (battery disconnection,
connector removal, etc).
NOTES:
Removed Parts: Inspect the vehicle and parts for any damage.
Place all removed parts on a protected surface in an area where they will not get
damaged.
Connectors: When disconnecting connectors, do not pull on the wires; pull by
holding the connectors.
Retains the factory reverse camera if equipped.
Prior to Installation
19366656
Integrated Front Camera Assistance Package

3
Illustrations are typical and may not match exact vehicle details
For installation assistance visit http://echomaster.com/Intellihaul/
email - gmsupport@echomaster.com (US) - tel - 866-766-2267
For installation assistance visit http://echomaster.com/Intellihaul/
email - gmsupport@echomaster.com (US) - tel - 866-766-2267
CAUTION
Consult your vehicle owner’s manual to disconnect the battery. Do not disconnect
ANY airbag connectors or indicators. Doing so may result in activating a diagnostic
code. These codes will require the dealer to perform the reset procedure which may
incur a reset fee. If you are unsure of any vehicle trim removal process consult the
OEM service manual.
Removing vehicle trim panels in extreme hot and/or cold climate could result in
damage. Use care when removing all vehicle trims.
Using painter’s blue tape on the vehicle trim panels can help limit any scratches
and/or marring. Use a nylon trim panel removal tool whenever possible.
Vehicle Preparation & Protection
Recommended Tools
19366656
Integrated Front Camera Assistance Package
Painters tape

For installation assistance visit http://echomaster.com/Intellihaul/
email - gmsupport@echomaster.com (US) - tel - 866-766-2267
4
Illustrations are typical and may not match exact vehicle details
For installation assistance visit http://echomaster.com/Intellihaul/
email - gmsupport@echomaster.com (US) - tel - 866-766-2267
Removing the Radio
Using a plastic dash removal tool, remove
the trim from around the LCD display.
Remove the 4 x 7mm bolts from around
the LCD display. Once screws have been
removed, pull the unit from the dash.
Disconnect the connectors from the back
of the LCD display assembly and set aside.
19366656
Integrated Front Camera Assistance Package
5
Illustrations are typical and may not match exact vehicle details
For installation assistance visit http://echomaster.com/Intellihaul/
email - gmsupport@echomaster.com (US) - tel - 866-766-2267
For installation assistance visit http://echomaster.com/Intellihaul/
email - gmsupport@echomaster.com (US) - tel - 866-766-2267
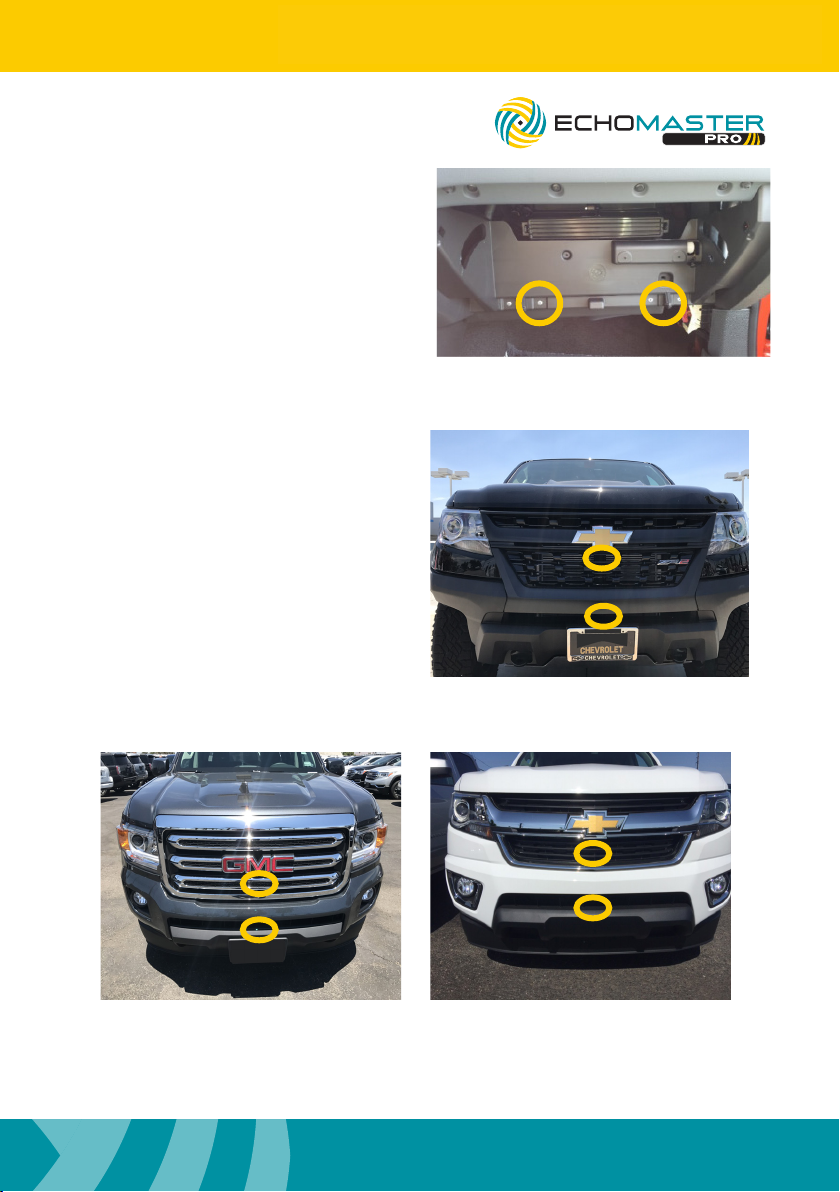
Recommended Mounting Locations
Mount directly under front em-
blem (for parking)
Mount lower for off road use on
the underside of the grille for
better viewing when rock crawling
or off roading.
Remove the glovebox for easier access
for running cables.
Remove the PINS from the hinges.
19366656
Integrated Front Camera Assistance Package
For installation assistance visit http://echomaster.com/Intellihaul/
email - gmsupport@echomaster.com (US) - tel - 866-766-2267
6
Illustrations are typical and may not match exact vehicle details
For installation assistance visit http://echomaster.com/Intellihaul/
email - gmsupport@echomaster.com (US) - tel - 866-766-2267
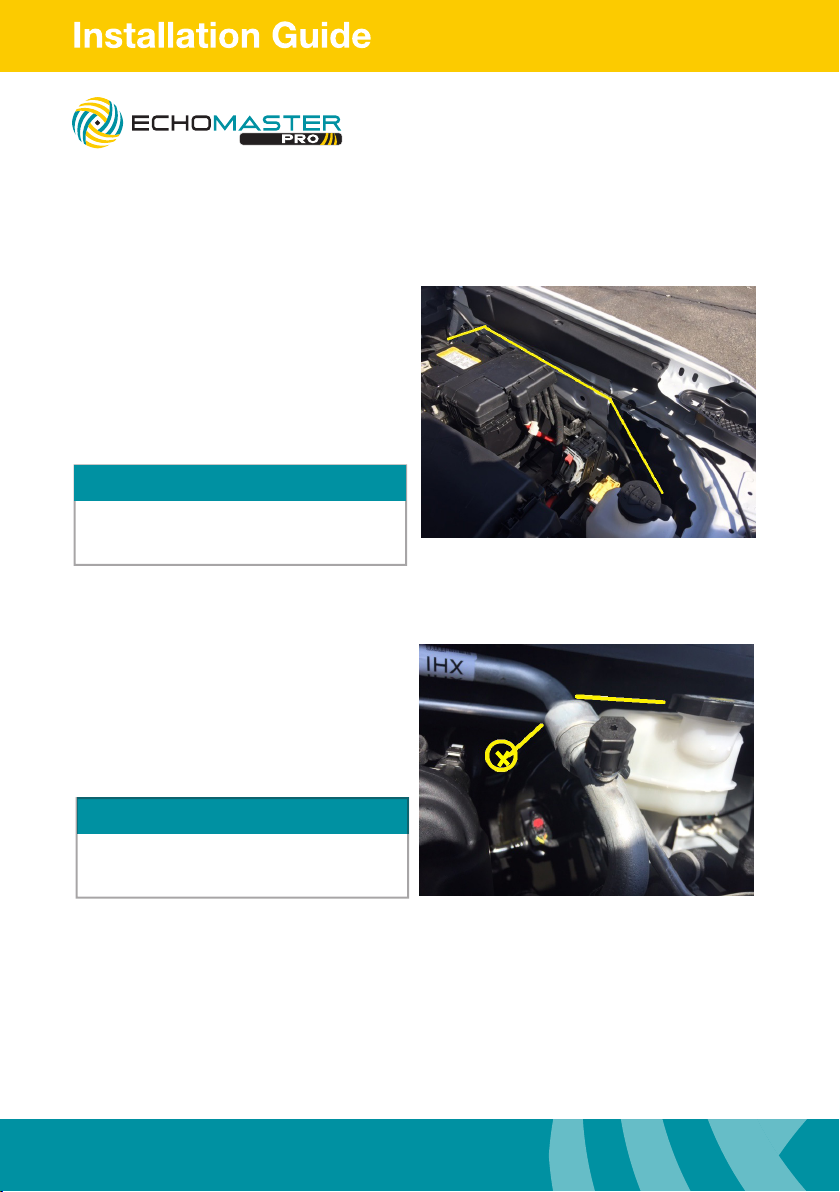
Route the camera cable along the
inside of the grille.
Route the camera cable along the
hood release cable using the hood
release holders to hold the camera
cable in place.
Use caution to avoid the vents that open
and close behind some of the grilles of
some vehicles.
Cut a small X in the large grommet
going in to the cab of the vehicle to
pass the cable into the vehicle.
19366656
Integrated Front Camera Assistance Package
PLEASE NOTE
Use caution when cutting into the large
grommet to not cut any wires inside the
grommet
Routing the Camera Extension Harness
PLEASE NOTE
7
Illustrations are typical and may not match exact vehicle details
For installation assistance visit http://echomaster.com/Intellihaul/
email - gmsupport@echomaster.com (US) - tel - 866-766-2267
For installation assistance visit http://echomaster.com/Intellihaul/
email - gmsupport@echomaster.com (US) - tel - 866-766-2267
19366656
Integrated Front Camera Assistance Package
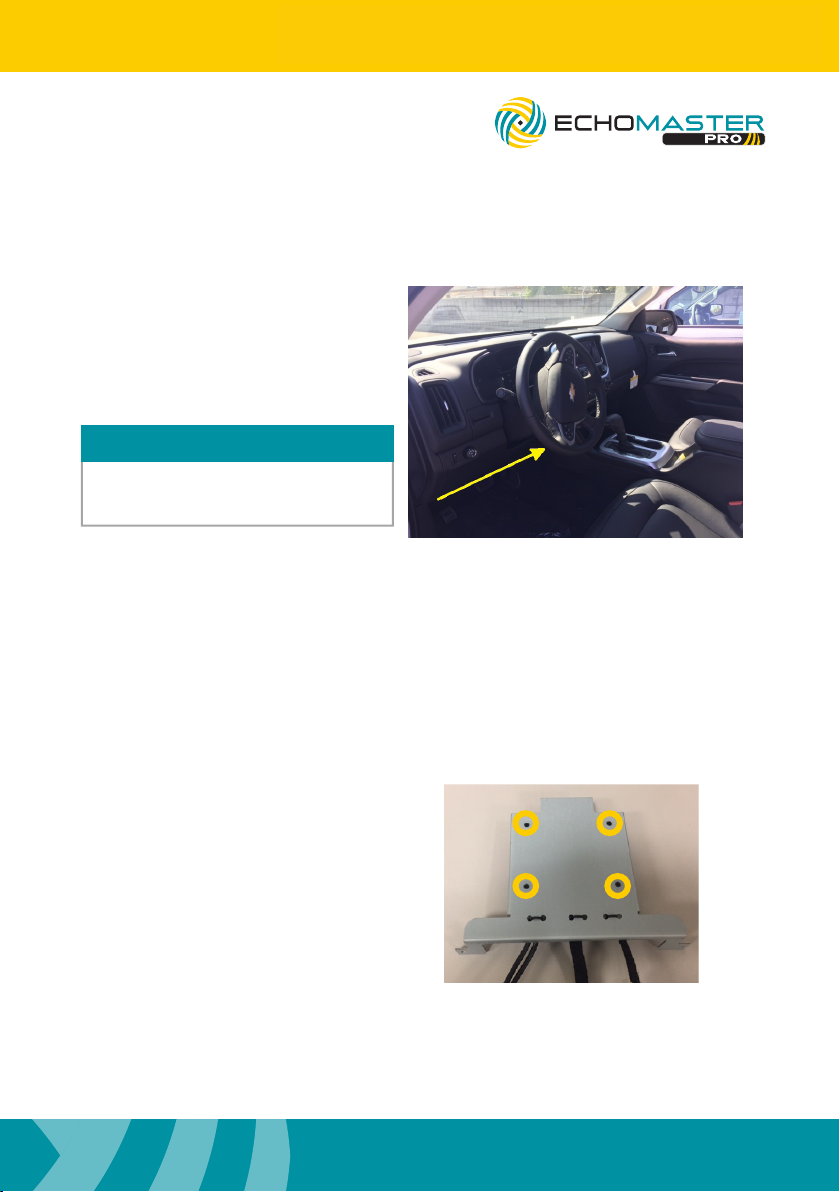
Inside the vehicle, route the cable
under the dash to the appropriate
connector on the main camera harness
extension in the glove box area.
Routing the Camera Extension Harness
Avoid all moving parts inside the dash as
well as under the hood.
PLEASE NOTE
Mounting the Module to the Bracket
Mount module to bracket using the four
provided M3 screws.
For installation assistance visit http://echomaster.com/Intellihaul/
email - gmsupport@echomaster.com (US) - tel - 866-766-2267
8
Illustrations are typical and may not match exact vehicle details
For installation assistance visit http://echomaster.com/Intellihaul/
email - gmsupport@echomaster.com (US) - tel - 866-766-2267
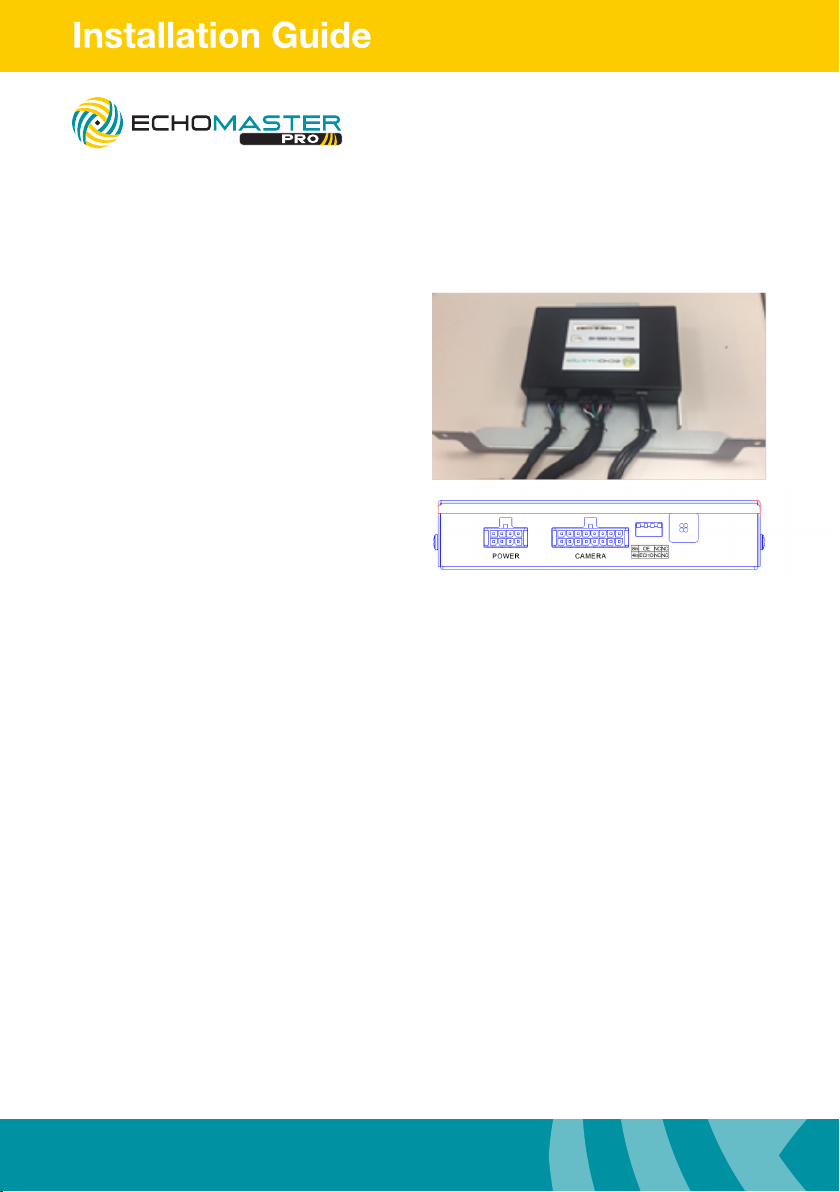
Module Connections
Connect 8-pin power T-harness to
module. Next, connect 16-pin main
camera extension cable to module.
Then, fasten harnesses to the bracket
using zip ties through the holes provided.
Please select the size of the monitor using
dip switch 1
u Up for 8”
u Down for 4”
Please select the reverse camera input
option using dip switch 2
u Up for OEM reverse camera
u Down for EchoMaster/aftermarket
camera.
Camera input 4 is automatically
activated when vehicle is in reverse gear
if dip switch 2 is set to ECHO
Please select vehicle year using dip switch
3
u UP for 2015-2016 models
u Down for 2017-
Keep dip switch 4 set to the UP position
19366656
Integrated Front Camera Assistance Package
9
Illustrations are typical and may not match exact vehicle details
For installation assistance visit http://echomaster.com/Intellihaul/
email - gmsupport@echomaster.com (US) - tel - 866-766-2267
For installation assistance visit http://echomaster.com/Intellihaul/
email - gmsupport@echomaster.com (US) - tel - 866-766-2267
19366656
Integrated Front Camera Assistance Package
Camera 1 = Not used
Camera 2 = Not used
Camera 3 = Front Camera
Camera 4 = Optional Camera
Camera 4 input is automatically activated
when vehicle is in reverse gear if dip switch 2
is set to ECHO.
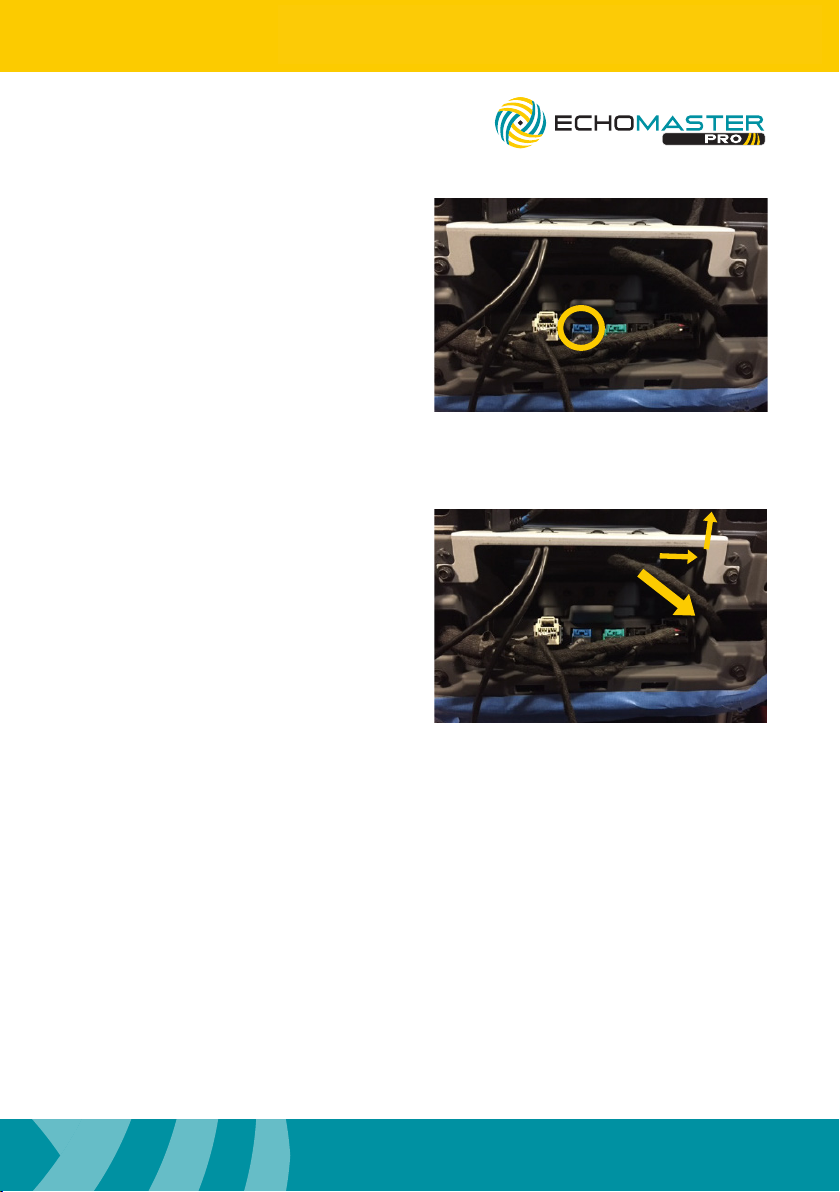
LVDS Connection
Locate HMI module in lower portion of
radio cavity Disconnect BLUE LVDS
connector. Connect loose male LVDS
connector into female EchoMaster
connector. Connect the male EchoMaster
LVDS connector into HMI module.
Secure loose wiring with zip ties.
Connections
Route the 8-pin power T-harness from the
module up to the radio display, making
sure it is behind the leg of the mounting
bracket. Connect T-harness to the vehicle
side harness, then the other side connects
to the display.
Route 16-pin main camera extension
cable down the right side through the
opening on the right side of the radio
cavity.
The main camera extension
should pass through hole located in the
lower right portion of the radio cavity and
exit from bottom of dash.
Route the cable under the dash to the
appropriate connector on the main harness
extension.
Use zip ties to secure wiring.
For installation assistance visit http://echomaster.com/Intellihaul/
email - gmsupport@echomaster.com (US) - tel - 866-766-2267
10
Illustrations are typical and may not match exact vehicle details
For installation assistance visit http://echomaster.com/Intellihaul/
email - gmsupport@echomaster.com (US) - tel - 866-766-2267
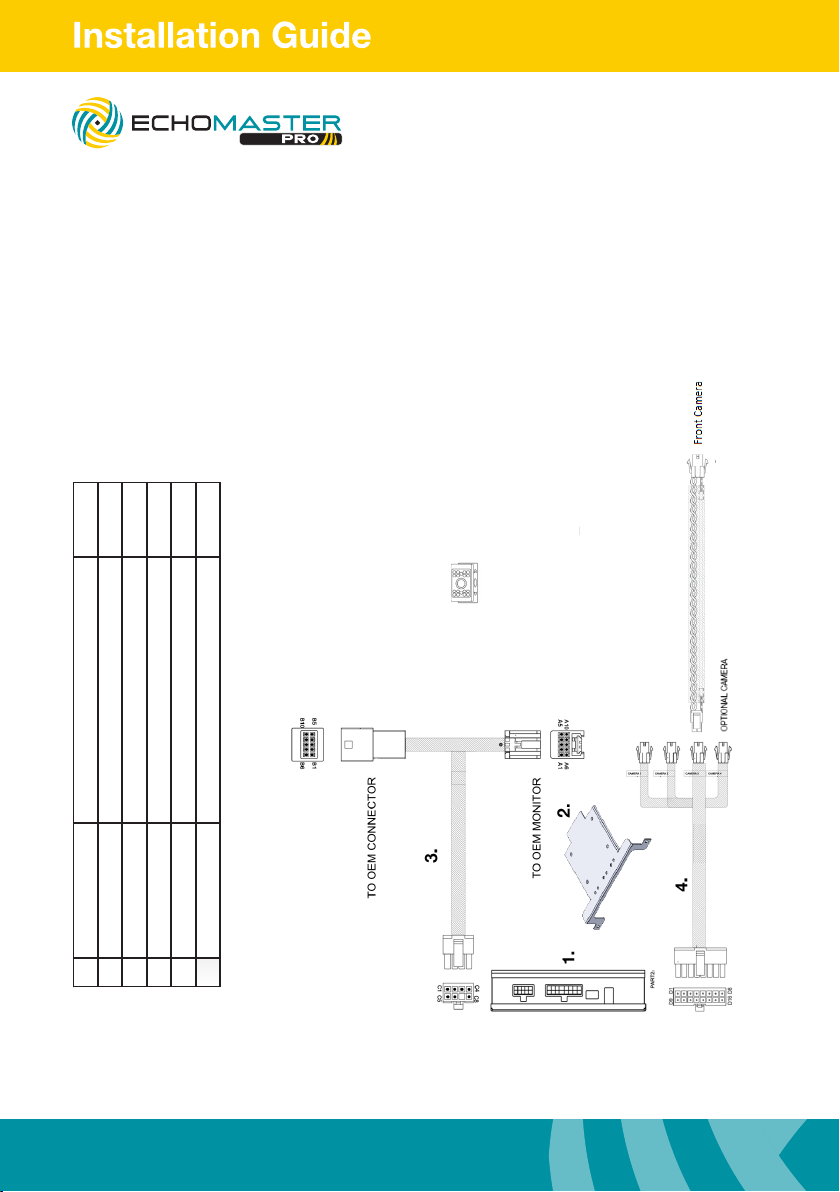
Wiring Diagram
GMCC
19366656
Integrated Front Camera Assistance Package
Included with camera.
5.
Part Number Description Qty
1 GMS-TC Main Interface module 1
2 GMSWRBRKT-3 Main Interface bracket 1
3 BSM4-PTH Power T-Harness 1
4 BSM1-CEH Camera Extension Harness 1
5 PCAM-10FF-GM Front Camera 1

11
Illustrations are typical and may not match exact vehicle details
For installation assistance visit http://echomaster.com/Intellihaul/
email - gmsupport@echomaster.com (US) - tel - 866-766-2267
For installation assistance visit http://echomaster.com/Intellihaul/
email - gmsupport@echomaster.com (US) - tel - 866-766-2267
19366656
Integrated Front Camera Assistance Package
Included with camera.
USER Guide
8” Radio
Press and hold the “BACK” button for three seconds to display the IntelliHaul
camera view.
Press the “BACK” button to return to the factory screen.
4” Radio
Press and hold the “HOME” button for three seconds to enter the IntelliHaul
camera view.
Press the “BACK” button to return to the factory screen.
PLEASE NOTE
The IntelliHaul camera is accessible after 7 seconds while in reverse. Press and
hold the “BACK” button on the 8” and the “HOME” button on the 4” to access.

AGREEMENT: End user agrees to use this product in compliance with the instructions and terms
of use above and with all State and Federal laws. EchoMaster provides instructions and safety
warnings with respect to this product and disclaims all liability for any use not in conformity with
those instructions or other misuse of its product. If you do not agree, please discontinue use
immediately and contact EchoMaster. This product is intended for off-road use and passenger
use only.
IUG-FC-GMOEFF-CC
REV. 112217
Clearwater, Florida 33760
EchoMaster is a Power Brand of AAMP Global.
EchoMaster.com
email - gmsupport@echomaster.com - tel - 1-866-766-2267 (US)
This manual suits for next models
1
Table of contents
Other EchoMaster Pro Automobile Electronic manuals

Popular Automobile Electronic manuals by other brands

HIK VISION
HIK VISION DS-TCP345-K user manual

ProRacing
ProRacing VP Assembly instructions and an operating manual

KLAUS
KLAUS trendvario6X00 E-parking XS Assembly instructions

Opel
Opel Edwin Audi A3 Avant brochure

Dakota Digital
Dakota Digital LED Tail Lights LAT-NR140 installation instructions

Skoda
Skoda 5JA 054 630 Fitting instructions

Cadillac
Cadillac Escalade 2016 Convenience/personalization guide

GROM Audio
GROM Audio Vline LEX5LSVL2 installation manual

Voyager
Voyager VCMS36I installation guide

Fortin
Fortin EVO-ONE Regular Installation

Dometic
Dometic MAGICWATCH MWE890K Installation and operating manual

Skoda
Skoda 5E0 054 630 Fitting instructions


