EcLine EC-PM-80320D User manual

User's Manual
EC-PM-80320 Series
Thermal Receipt Printer

EC-PM-80320 User's Manual
- i -
Declare
About Trademark
Corporation names and product names are the registered trademarks or commodity
names of the corporation.
*EPSON is a registered trademark of Seiko Epson Corporation.
*ESC/POS is a registered trademark of Seiko Epson Corporation.
*Windows is a registered trademark of Microsoft Corporation.

EC-PM-80320 User's Manual
- ii -
Important Safety Instructions
Read all of these instructions carefully and thoroughly and save them for later reference. The
unauthorized operation may lead to error or accident. Manufacturer will not answer any problems which
lead by unauthorized operations.
1. Follow all warnings and instructions in the manual as well as marked on the product.
2. Don’t touch the thermal print head with your hand and other solid object at any moment to avoid
your body burned or the thermal head damaged.
3. Be careful the dentate cutter when you are installing the paper.
4. Unplug this product from the power outlet before cleaning. Do not use liquid or aerosol cleaners.
Use a damp cloth for cleaning.
5. Please don’t use the printer near the water.
6. Do not place this product on an unstable cart, stand or table. The product may fall, causing serious
damage to you or the product.
7. Slots and openings on the cabinet and the back or bottom are provided for air ventilation. To ensure
reliable operation of the product and to protect it from overheating, do not block or cover these
openings. The openings should never be blocked by placing the product on a bed, sofa, rug or other
similar surface. This product should never be placed near or over a radiator or heater. This product
should not be placed in a built-in installation or kiosk stand unless proper ventilation is provided.
8. This product should never be placed near or over a radiator or heat origin, and should avoid of direct
sunshine.
9. Do not locate this product where the cord will be walked on. When the cord or the plug is mangled,
please stop using and get a new one replaced. Make sure the old one is far away from the printer,
so it can avoid someone who does not know the inside story getting damage.
10. Do not use in locations subject to high humidity or dust levels. Excessive humidity and dust may
cause equipment damage or fire.
11. Never push objects of any kind into this product through cabinet slots as they may touch dangerous
voltage dots or short out parts.
12. Don’t remove the printer’s out-cover and repair the printer. When needed, call or take it to the
professional.
13. To ensure safety, please unplug this product prior to leaving it unused for an extended period. The
wall outlet you plan to connect to should be nearby and unobstructed.
14. This device complies with Part 15 of the FCC Rules.
Operation is subject to the following two conditions:
(1) This device may not cause harmful interference.
(2) This device must accept any interference received, including interference that may cause
undesired operation.
The manufacturer is not responsible for any radio or TV interference caused by unauthorized
modifications to this equipment. Such modifications could void the user's authority to operate the
equipment.
15. Unplug this product from the power outlet and leave servicing to qualified service personnel under
the following conditions:
When the power cord or plug is damaged or frayed.
a) If liquid has been spilled into the product.
b) If the product has been exposed to rain or water.

EC-PM-80320 User's Manual
- iii -
c) If the product does not operate normally when the operating instructions are followed. Adjust
only those controls that are covered by the operating instructions since importer adjustment of
other controls may result in damage and will often require extensive work by a qualified
technician to restore the product to normal operation.
d) If the product has been dropped or the cabinet has been damaged.
e) If the product exhibits a distinct change in performance, indicating a need for service.
Warning: In order to ensure the printer life, strictly prohibit printing full line full black
exceeding 2 CM.
Notice: The contents of this manual are subject to change without notice.
*All the parts of the printer can be recycled. When it is abandoned, we can call it back
freely. Please contact us when you abandon it.

EC-PM-80320 User's Manual
- iv -
Table of Contents
Declare .....................................................................................................................................................i
Important Safety Instructions................................................................................................................ii
Chapter 1 Overview................................................................................................................................1
1.1 Features..........................................................................................................................................1
1.2 Product Model Description..............................................................................................................1
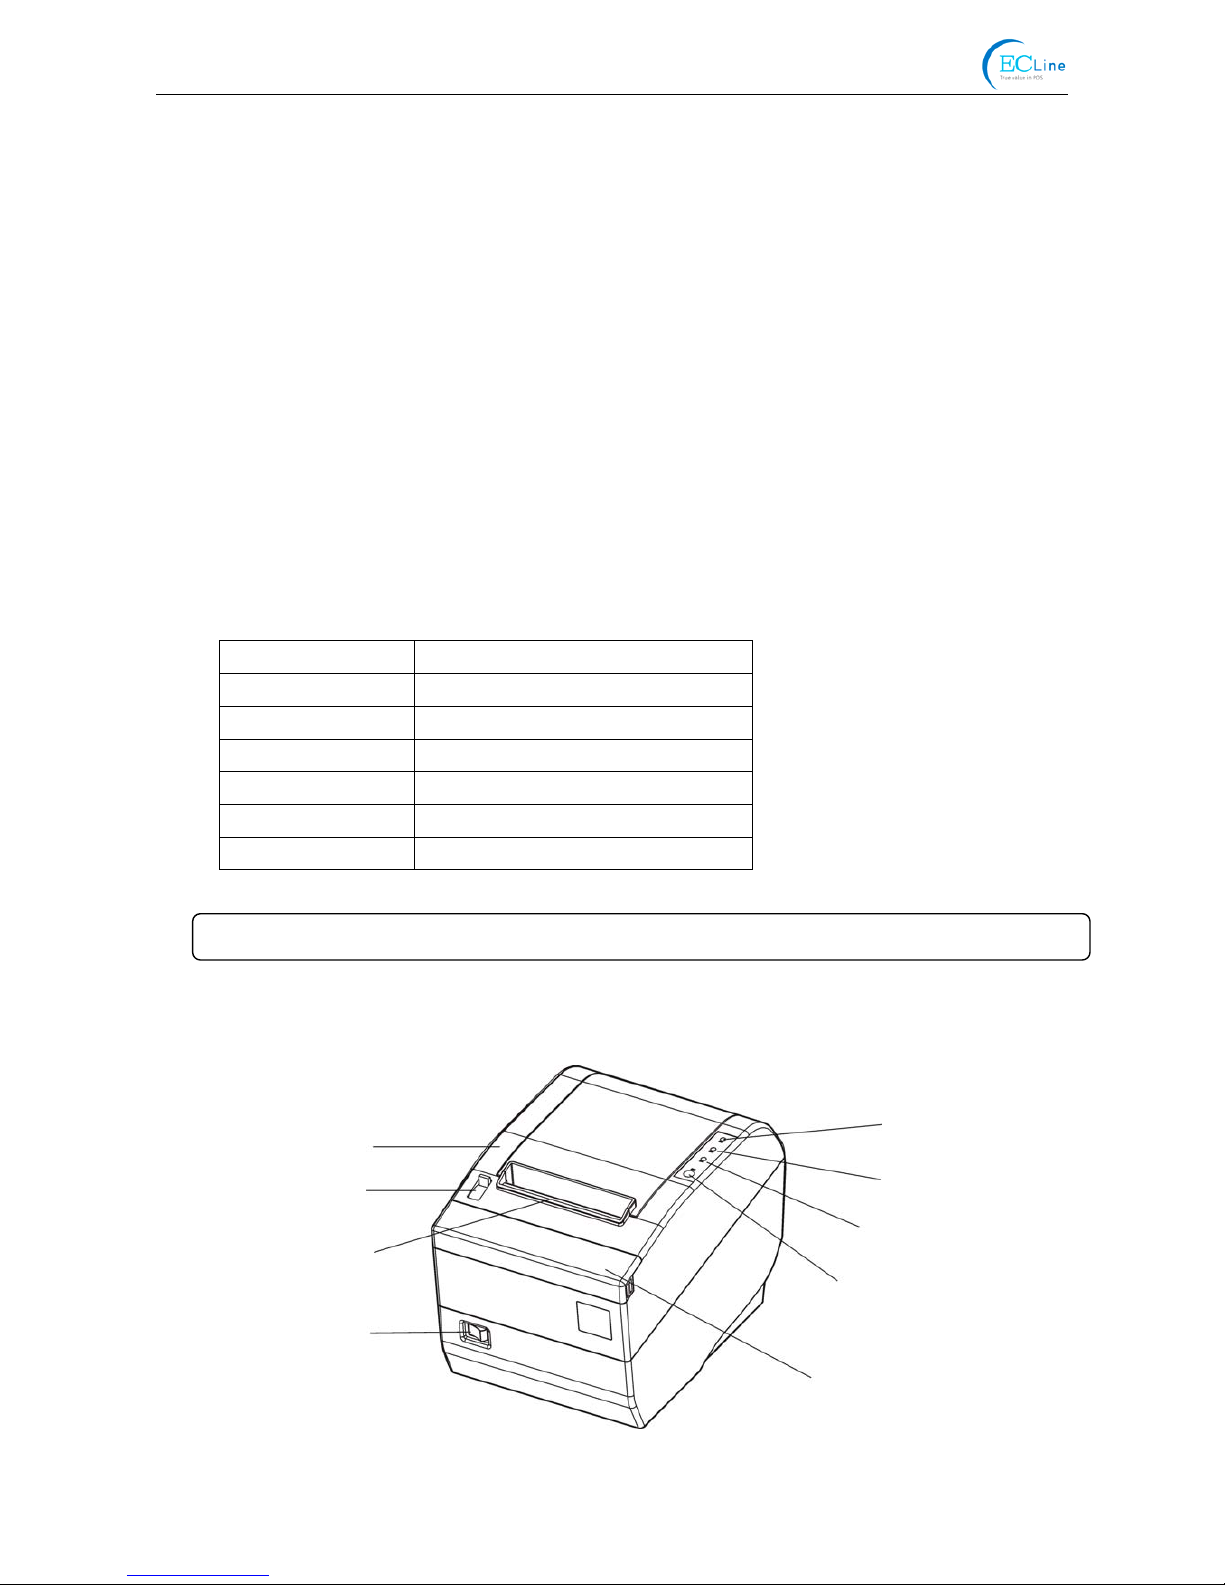
1.3 Main Parts of the Printer .................................................................................................................1
Chapter 2 Installing the Printer .............................................................................................................3
2.1 Unpacking & Checking....................................................................................................................3
2.2 Unpacking the Protective Materials.................................................................................................3
2.3 Connecting to Your Computer or Other Equipment.........................................................................3
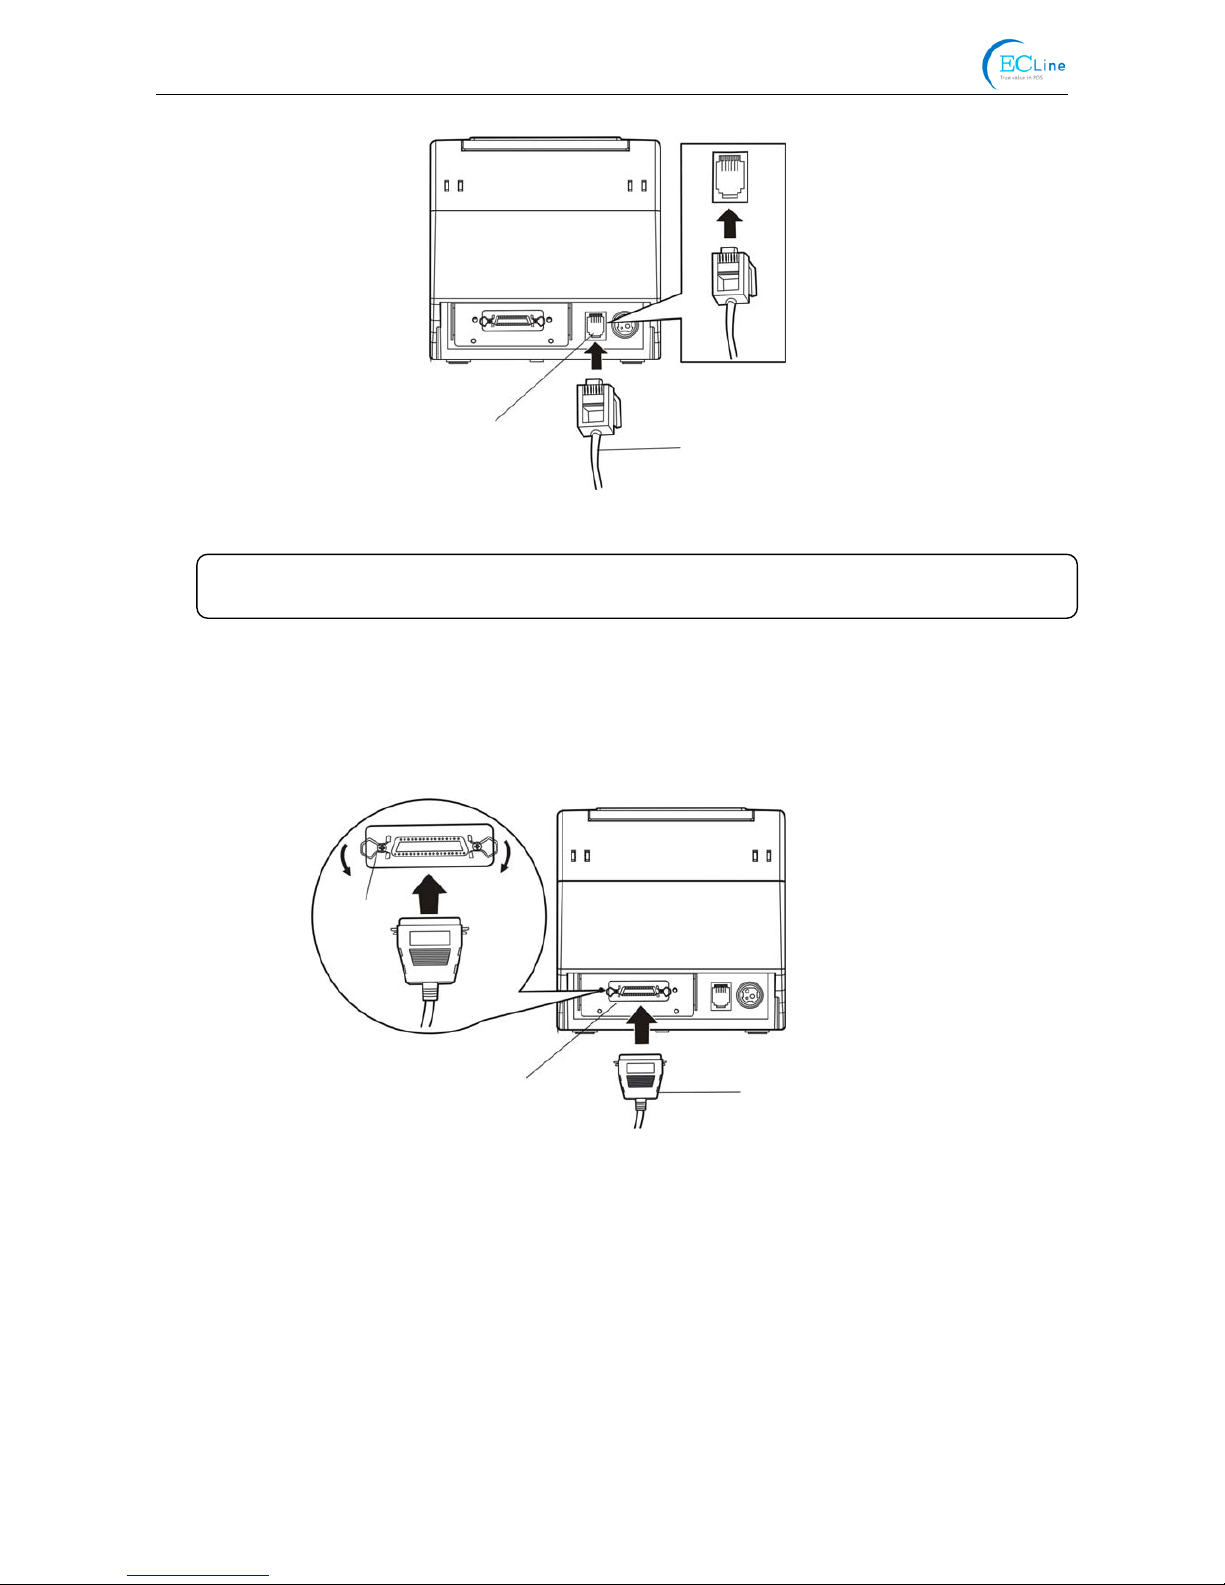
2.3.1 Connecting the Cash Drawer Cable.........................................................................................3
2.3.2 Connecting the Parallel Interface Cable...................................................................................4
2.3.3 Connecting the USB Interface Cable........................................................................................4
2.3.4 Connecting the Serial Interface Cable......................................................................................5
2.3.5 Connecting the Ethernet Interface Cable .................................................................................5
2.4 Connecting the Power Cord............................................................................................................6
2.5 Installing the Driver .........................................................................................................................7
2.5.1 Auto-installing Way (Recommended).......................................................................................7
2.5.2 Hand-operated Installing Way..................................................................................................7
2.6 Selecting the Cutter ........................................................................................................................9
2.7 Installing Bluetooth Interface Driver ..............................................................................................10
2.8 Ethernet Settings ..........................................................................................................................13
2.8.1 Connecting Printer..................................................................................................................13
2.8.2 Setting IPAddress..................................................................................................................13
2.9 Wi-Fi Setting of EC Printer............................................................................................................16
2.9.1 Connecting the Printer............................................................................................................16
2.9.2 Wi-Fi Parameters Description.................................................................................................19
2.9.3 Wi-Fi Interface Status Display and Parameters Reset............................................................30
2.10 Installing Printer Network Driver..................................................................................................30
Chapter 3 Control Panel.......................................................................................................................37
3.1 Control Panel ................................................................................................................................37
3.1.1 LED........................................................................................................................................37
3.1.2 Key.........................................................................................................................................37
3.2 Self-testPrinting............................................................................................................................37
3.3 Hex Dump Printing........................................................................................................................38
3.4 Restoring FactoryPrinter Settings ................................................................................................38
3.5 Setting Slip Stitch..........................................................................................................................38
3.6 Online-aptitude Parameter Settings..............................................................................................38
Chapter 4 Installing and Replacing the Roll Paper............................................................................41
4.1 Paper Installation Steps ................................................................................................................41

EC-PM-80320 User's Manual
- v -
Chapter 5 Specification........................................................................................................................43
5.1 General Specification ....................................................................................................................43
5.2 Interface Specifications .................................................................................................................45
5.2.1 Cash Drawer Interface ...........................................................................................................45
5.2.2 Parallel Interface ....................................................................................................................45
5.2.3 USB Interface.........................................................................................................................46
5.2.4 Serial Interface.......................................................................................................................47
5.2.5 Ethernet Interface...................................................................................................................48
5.2.6 Power Supply Inlet .................................................................................................................48
Chapter 6 Troubleshooting and Maintenance....................................................................................49
6.1 Maintenance .................................................................................................................................49
6.2 Error Message on the Control Panel.............................................................................................49
6.3 Auto-Cutter Jammed or Error........................................................................................................49
Chapter 7 Control Commands.............................................................................................................51
7.1 General .........................................................................................................................................51
7.2 Explanation of Terms ....................................................................................................................51
Appendix Commands List ...................................................................................................................64

EC-PM-80320 User's Manual
- 1 -
Chapter 1 Overview
1.1 Features
EC-PM-80320 printer is a high-speed mini thermal printer. It is a high-quality, high-reliability and
low-noise POS printer without ribbon. It’s small, easily-operated and can be widely used in ECR,
PC-POS and BANK POS for printing a variety of receipts.
1.2 Product Model Description
In order to fulfill different requirements and operating circumstance, manufacturer develops
EC-PM-80320 series products which are high-speed thermal mini-printers.
According to different data ports (interfaces), EC-PM-80320 series can be classified into different
models: EC-PM-80320D, EC-PM-80320U, EC-PM-80320US, EC-PM-80320UE, EC-PM-80320UB
and EC-PM-80320UW.
EC-PM-80320 series printer is equipped with an auto cutter which has two options for the consumer
to select: partial cutter can only cut the paper with one point left while full cutter cuts the paper fully.
Interface:
EC-PM-80320 series products are configured with a cash drawer interface, you can choose one of
the following data interfaces when purchasing this product:
Model Interface
EC-PM-80320D Parallel interface
EC-PM-80320U USB interface
EC-PM-80320US USB interface + Serial interface
EC-PM-80320UE USB interface + Ethernet interface
EC-PM-80320 UB USB interface + Bluetooth
EC-PM-80320UW USB interface + Wi-Fi
1.3 Main Parts of the Printer
Figure 1-1 Main parts of the printer
Cover-opening Button
Power Switch
Power LED
Error LED
Paper out LED
FEED Key
Manual Cutter
Fr
o
n
t
Co
v
er
Upper Cover
Note: Please contact the local dealer to change the interface with added expense if needed.

EC-PM-80320 User's Manual
- 2 -
Data Interface Cash Drawer Interface Power Supply Inlet
Figure 1-2 Interfaces on the back of the printer
Note: Please take the specific interface as standard.

EC-PM-80320 User's Manual
- 3 -
Chapter 2 Installing the Printer
2.1 Unpacking & Checking
Check the following items in the package, if any of these items is missing, please contact your dealer.
2.2 Unpacking the Protective Materials
1. Open the packing box, take out the printer.
2. Save all the original packing materials so that they can be used when transporting the printer.
2.3 Connecting to Your Computer or Other Equipment
The printer is configured with a cash drawer interface and one data interface (Parallel interface, USB
interface, Serial + USB interface, Ethernet + USB interface, USB interface + Bluetooth or USB
interface + Wi-Fi). (Please take the specific interface as standard). Connect the printer to your
computer with the correct cable.
2.3.1 Connecting the Cash Drawer Cable
Turn off the printer and plug the cash drawer cable into the cash drawer interface on the back of the
printer and the other end to the cash drawer, as shown in Figure 2-2.
Figure 2-1 Packing items
Note: Models with Bluetooth and Wi-Fi are not equipped with interface cable.
Driver CD
(Including User's Manual and Driver)
Printer
A
C Adapte
r
Power Cord Interface Cable (Optional)
Note: Before connecting or disconnecting the cash drawer cable, parallel interface cable or
serial interface cable, make sure that the power of the printer is turned off. Also make
sure the power cable plug is disconnected from the AC outlet. Or else it may damage
the printer.

EC-PM-80320 User's Manual
- 4 -
2.3.2 Connecting the Parallel Interface Cable
1. Make sure the computer and the printer are both turned off, connect the parallel interface cable to
the connector of the printer. Squeeze the wire clips on both sides and make the cable fixed. As
shown in Figure 2-3.
2. Connect the other end of the cable to the computer. Tighten the screws on both sides and make
the cable fixed.
2.3.3 Connecting the USB Interface Cable
1. Plug the USB cable A end (flat shape) into the computer's USB interface.
2. Plug the USB cable B end (square shape) into the printer's USB interface as shown in Figure 2-4.
Figure 2-3 Connecting the parallel interface cable
Parallel Interface Parallel Interface Cable
Wire Clips
Figure 2-2 Connecting the cash drawer cable
Cash Drawer Cable
Cash Drawer Interface
Caution: Please use the appropriate cash drawer. Manufacturer will not honor warranty
when usin
g
unauthorized cash drawer.

EC-PM-80320 User's Manual
- 5 -
2.3.4 Connecting the Serial Interface Cable
1. Make sure the computer and the printer are both turned off, connect the serial interface cable to
the connector of the printer. Tighten the screws and make the cable fixed. As shown in Figure 2-5.
2. Connect the other end of the cable to the computer’s serial interface. Tighten the screws on both
sides and make the cable fixed.
2.3.5 Connecting the Ethernet Interface Cable
1. Plug the crystal end of the Ethernet interface cable (RJ-45) into the printer's Ethernet interface as
shown in Figure 2-6.
2. Plug the other end of the Ethernet interface cable into the LAN’s entrance.
Figure 2-5 Connecting the serial interface cable
Figure 2-4 Connecting the USB interface cable
Serial Interface Serial Interface Cable
Screws
USB Interface
USB Interface Cable
Note: Please don’t impact the plug after connecting USB interface cable.

EC-PM-80320 User's Manual
- 6 -
Power Supply Inlet
AC Adapter
Power Cord
2.4 Connecting the Power Cord
1. Make sure the printer’s power is turned off. (The pressed down side on the switch with “O”
mark denotes the printer is off)
2. Make sure the voltage of the electrical outlet matches that of the printer.
3. Plug the AC adapter into printer’s power supply inlet.
4. Plug one end of power cord into the AC adapter, and then plug the other of power cord into the
grounded electrical outlet.
Figure 2-7 Connecting the AC adapter
Figure 2-6 Connecting the Ethernet interface cable
Ethernet Interface Cable Ethernet Interface
Note: Please refer to the user’s manual for the detailed instructions of network settings.
Caution: 1. If the rated voltage doesn’t match the outlet voltage, contact your dealer for
assistance. Do not plug in the power cord.
2. Please use the electrical outlet connecting the ground properly.
3. Please use original AC adapter only. Manufacturer will not honor warranty
when using unauthorized AC adapter.

EC-PM-80320 User's Manual
- 7 -
2.5 Installing the Driver
Please use the cable to connect computer with printer, then turn on the computer and the printer, put
the driver CD into the CD-ROM. Install driver by the following ways:
2.5.1 Auto-installing Way (Recommended)
Double click the file "Setup.exe" in the driver disc, install driver by the guide.
2.5.2 Hand-operated Installing Way
2.5.2.1 The Operating Systems of Windows 2000/XP/Vista/Win7
(1) The hand-operated installing steps of parallel interface or serial interface:
The following steps are used Windows XP as an example. There are slight differences among
different operating systems. The installing way with other operating systems depends on the
practical installing process.
1 Click “Start” →“Settings” →“Select Printers”.
2. Click “Add Printer”, then it pops up a window of “Add Printer Wizard”, click “Next”, then please
read the select guide carefully, such as, select “Local printer” in the “Local or Network Printer”
window, then click “Next”.
3. A window of “Select a Printer Port” pops up, according to your requirement, select “LPT1:
(Recommended Printer Port)” or serial interface, click “Next”.
4. A window of “Install Printer Software" pops up, click “Have Disk...”.
5. A window of “Install From Disk” pops up. Please according to the operating system environment,
you should select the path as follows: CD-ROM →“Drivers” →“WIN2000 (XP-Vista-Win7)”, click
“Open”, then click “OK” to return to the window of “Install Printer Software”, click “Next”.
6. Follow the guide and click “Next” gradually till the installation is finished.
(2) The hand-operated installing steps of USB interface:
The following steps are used Windows XP as an example. There are slight differences among
different operating systems. The installing way with other operating systems depends on the
practical installing process.
1. Connect with the USB cable and turn on both the computer and the printer. After the computer
finds out new hardware, and a window of “Found New Hardware” pops up — “Welcome to the
new hardware wizard”.
2. Select the “Set from the list or specific position”, then click “Next”
3. A window of “Please choose your search and installation options” pops up, choose “Don't search,
I will choose the driver to install”, click “Next”.
4. A window of “Add Printer Wizard” pops up, click “Have Disk...”.
5. A window of “Install From Disk” pops up. Please according to the operating system environment,
you should select the path as follows: CD-ROM →“Drivers” →“WIN2000 (XP-Vista-Win7)”, click
“Open”, then click “OK” to return to the window of “Add Printer Wizard", click “Next”.
6. Follow the guide and click “Next” gradually till the installation is finished.
Note: Auto-installing way needs the operating systems of Windows2000 and above and
the operating systems of Window 98/ME and below are not supported.
Note: This installing way is used for the people who have some knowledge on
hand-operated installing and equipment application.

EC-PM-80320 User's Manual
- 8 -
2.5.2.2 The Operating System of Windows 8
The hand-operated installing steps of parallel interface, serial interface or USB interface:
1. Enter “Control Panel” →“Device and Printers”.
2. Click “Add Printer”, then a window of “Add Printer Wizard” pops up, then click “Next”, select “Add
Local printer Manually” in the “Local or Network Printer” window.
3. A window of “Select a Printer Port” pops up, according to your requirement, click “Use the
Current Port”, select “LPT1: (Printer Port)”, serial interface or USB interface, click “Next”.
4. A window of “Install Printer Driver” pops up, click “Have Disk...”.
5. A window of “Install From Disk” pops up. Please according to the operating system environment,
you should select the path as follows: CD-ROM →“Drivers” →“Windows 8”, click “Open”, then
click “OK” to return to the window of “Install Printer Driver”, click “Next”.
6. Follow the guide and click “Next” gradually till the installation is finished.
2.5.2.3 The Operating System of Windows 98
(1) The installing steps of a serial interface cable:
1. Click “Start” →“Settings” →“Printers”.
2. Double click “Add Printer”, then a window of “Add Printer Wizard” pops up, select “Local Printer”
in the “Local or Network Printer” window, then click “Next”.
3. A window of “Click the manufacturer and model of your printer” pops up, click “Have Disk...”,
please click “Browse”, select the path as follows: CD-ROM →“Drivers” →“WIN98 (WINME)”,
then click “OK”.
4. A window of “Install From Disk” pops up, click "OK, return to a window of “Add Printer Wizard”,
then click "Next".
5. A window of “Printer Port” pops up, select “Available ports”, according to your requirement,
select “serial interface”, click “Next”, and then the printer’s name will be shown. If the system has
not installed other printer driver process, the printer is treated as default printer by the application
process of Window98 environment, click “Next”. Otherwise, according to prompt, choose the
printer as default printer: “Yes”, click “Next”, choose “Yes-(recommended)”, click “Finish”. A
window of “Printer test page completed” pops up, click “Yes”.
6. The printer driver process is installed successfully.
(2) The installing steps with the USB interface cable:
USB driver installing steps:
1. Connect with the USB interface cable and turn on the printer.
2. After the computer finds out new hardware and finishes searching, a window of “Add New
Hardware Wizard” pops up, click “Next”.
3. A window of “Add New Hardware Wizard” — “Windows Operation” pops up, choose “Search
the best driver for the device (recommended)”, and click “Next”.
4. A window of “Add New Hardware Wizard” pops up, check “Specify a location (L)”, click
“Browse”, select the path as follows: CD-ROM →“Drivers”→“WIN98 (WINME)” →”USB driver”,
then click “OK”.
5. Return to the window of “Add New Hardware Wizard”, click “Next”; a window of “Windows
Note: 1. As the system of Windows 98/ME doesn’t integrate USB driver control, please
install USB driver before using USB interface printing. Then install USB printer
driver.
2. If it has installed the USB driver, please install the USB printer driver directly by
the following steps.

EC-PM-80320 User's Manual
- 9 -
driver search for the device” pops up, click “Next”.
6. After the system finishing installing the file automatically, a window of “USB Printer Supported”
pops up, click "Finish".
7. The printer USB driver process is installed successfully.
USB printer driver installing steps:
1. Click “Start” →“Settings” →“Printers”.
2. Double click “Add Printer”, then a window of “Add Printer Wizard” pops up, click “Next”.
3. A window of “Click the manufacturer and model of your printer” pops up, click “Have Disk...”,
please click “Browse”, select the path as follows: CD-ROM →“Drivers” →“WIN98 (WINME)”,
and then click “OK”.
4. A window of “Install From Disk” pops up, click “OK”, return to the window of “Add Printer
Wizard”, then click "Next".
5. A window of “Printer Port” pops up, select “Available ports”, select “JMUSB”, click "Next", and
then the printer’s name will be shown. If the system has not installed other printer driver
process, the printer is treated as default printer by the application process of Window98
environment, click “Next”. Otherwise, according to prompt, choose the printer is default: "Yes";
click "Next", choose “Yes-(recommended)”, click “Finish”. A window of “Printer test page
completed” pops up, click “Yes”.
6. The printer driver process is installed successfully.
2.6 Selecting the Cutter
Please setup the driver following the setup description in the CD going along with the printer. What’s
more, you can use the TM-T88II, TM-T88III series driver from EPSON.
If you want to cut the paper after printing, please select the “Full cut” or “Partial cut” in the
Paper/Quality page after clicking the “Printing Preferences” button, which lies in the “General” page
of the driver properties. Referring figure is shown below.
Note: if paper cut effect is the same whichever you select “full cut” or “partial cut” in the driver
properties, it means that the cutter (the printer equipped with) can only carry out one
kind of cut-methods.

EC-PM-80320 User's Manual
- 10 -
2.7 Installing Bluetooth Interface Driver
1. Choose the appropriate Bluetooth adapter, the operation system is Window XP or above which is
with Bluetooth adapter driver.
2. Turn on the printer, search Bluetooth device in Window XP system, and click “Add”.
Note: Select to install this driver according to the chosen model.

EC-PM-80320 User's Manual
- 11 -
3. Tick off the option of “My device is set up and ready to be found.” Click “Next” to continue.

EC-PM-80320 User's Manual
- 12 -
4. Select the “EC-PM-80320”, and then click “Next”.
5. Tick off the option of “Let me choose my own passkey” and enter “1234” as shown, then click
“Next”.
6. Record the Outgoing COM port and click “Finish”, then reboot the computer.
EC-PM-80320

EC-PM-80320 User's Manual
- 13 -
7. Set the printer driver print port as the outgoing port and the installation is finished.
2.8 Ethernet Settings
Please use EC network setting software NetFinder to set the IP address for EC printers, which can
be found in the CD or downloaded from www.ecline.com.mx.
2.8.1 Connecting Printer
Power on the printer, connect with the Ethernet interface cable which has been connected to LAN,
and look into the information of Ethernet LED to ensure the printer has entered the normal
connection.
2.8.2 Setting IP Address
1. Run NetFinder Software
Double click NetFinder.exe in the PC which connects the printer in the same LAN. The figure of
the software is shown as follows:
Yellow LED Green LED Description
ON Blink Online
OFF OFF Offline
Note: Every Bluetooth device has its own address. Please reinstall it when replacing the
Bluetooth device.
Caution: The network printing function needs the operating systems of Windows2000 and
above and the operating systems of Window 98/ME and below are not supported.

EC-PM-80320 User's Manual
- 14 -
Button description:
Exit — Exit from the software
Search — Search printers in the same LAN
Assign IP — Modify the IP address and other settings for the specified printer.
2. Search Printer
Click “Search” button in the main interface, the dialogue box appearing will begin searching
automatically and displays the status, listing a printer in the main interface if found. The time is
counting down in the progress bar (10s in total) and the search will finish as soon as the time is
over. If you need to go on searching, press “Search” button again.
If the printer still can not be found out when the network connection is correct in the same network,
Please check whether the network fire wall on the PC is open or not. If there is fire wall, please
close it temporarily, open it again after finishing searching and setting a printer completely.
This manual suits for next models
5
Table of contents
Other EcLine Printer manuals

EcLine
EcLine EC-PM-80250 User manual

EcLine
EcLine EC-3150 User manual

EcLine
EcLine EC-3150 Owner's manual

EcLine
EcLine EC-PM-80320 User manual

EcLine
EcLine EC-PM-530B Series User manual

EcLine
EcLine EC-80340 User manual

EcLine
EcLine EC-PM-58110 User manual

EcLine
EcLine EC-80 Series Owner's manual

EcLine
EcLine EC-3150D User manual

EcLine
EcLine GP-5850 Series User manual