EcLine EC-PM-530D Series User manual

User's Manual
EC-PM-530D Series
Printer

EC-PM-530D User's Manual
- i -
Declare
About Trademark
Corporation names and product names are the registered trademarks or
commodity names of the corporation.
*EPSON and ESC/POS are the registered trademarks of Seiko Epson Corporation.
*Windows is a registered trademark of Microsoft Corporation.

EC-PM-530D User's Manual
- ii -
Warnings, Cautions, and Notes
Pay attention to the following promises when using this manual:
Warning:
Warnings must be followed carefully to avoid bodily injury.
Caution:
Cautions must be observed to avoid damage to your equipment.
Note:
Notes contain important information and useful tips on the operation of your printer.

EC-PM-530D User's Manual
- iii -
Important Safety Instructions
Read all of these instructions carefully and thoroughly and save them for later reference. The
unauthorized operation would lead to malfunction or accident. Manufacturers have no
responsibilities for the problems which are led by unauthorized operations.
1. Follow all warnings and instructions in the manual as well as marked on the product.
2. Unplug this product from the power outlet before cleaning. Do not use the chemicals like alcohol to
clean the printer. Use a damp cloth for cleaning.
3. Do not use this product where is easy to get wet.
4. Do not place this product on an unstable cart, stand or table. The product may fall, causing serious
damage to you or to the product.
5. Slots and openings on the cabinet and the back or bottom are provided for air ventilation. To ensure
reliable operation of the product and to protect it from overheating, do not block or cover these
openings. And do not place the printer on a bed, sofa, rug or other similar surface in case of blocking
the openings. This product should not be placed in crowded environment unless proper ventilation is
provided.
6. This product should never be placed near or over a radiator or heat origin, and should avoid of direct
sunshine.
7. Do not locate this product where the cord will be stepped on. When the cord or the plug is mangled,
please stop using and get a new one replaced. Make sure the old one is far away from the printer, so
it can avoid someone who does not know the inside story getting damaged.
8. Only the AC adapter supplied by our company can be used, or else, manufacturer will not answer for
any problems which are led by using unauthorized AC adapter.
9. Do not use in locations subject to high humidity or dust levels.
10. Never push objects of any kind into this product through cabinet slots as they may touch dangerous
voltage dots or short out parts.
11. Don’t remove the printer’s out-cover and repair the printer yourself. When needed, call or take it to
the professional.
12. If there are any liquid accidentally splashed into the product, or printer is exposed to rain or water,
please remove the plug immediately, and send it to a professional for repair.
13. To ensure safety, please unplug this product prior to leave it unused for an extended period. The wall
outlet you plan to connect to should be nearby and unobstructed.
14. This device complies with Part 15 of the FCC Rules.
Operation is subject to the following two conditions:
(1) This device may not cause harmful interference.
(2) This device must accept any interference received, including interference that may cause
undesired operation.
The manufacturer is not responsible for any radio or TV interference caused by unauthorized
modifications to this equipment. Such modifications could void the user's authority to operate the
equipment.
15. Unplug this product from the power outlet and leave servicing to qualified service personnel under
the following conditions:
A. When the power cord or plug is damaged or frayed.
B. If liquid has been spilled into the product.
C. If the product has been exposed to rain or water.
D. If the product does not operate normally when the operating instructions are followed.
E. If the product has been dropped or the cabinet has been damaged.
F. If the product exhibits a distinct change in performance, it indicates a need for service.

EC-PM-530D User's Manual
- iv -
Notice: The contents of this manual are subject to change without notice.
*All the parts of the printer can be recycled. When it is abandoned, we can call it back freely.
Please contact us when you abandon it.

EC-PM-530D User's Manual
- v -
Table of Content
Declare..........................................................................................................................................................i
Important Safety Instructions ...................................................................................................................iii
Chapter 1 Overview ....................................................................................................................................1
1.1 Model Information ...............................................................................................................................1
1.2 Application...........................................................................................................................................1
1.3 Main Parts of the Printer......................................................................................................................1
Chapter 2 Printer Installation.....................................................................................................................3
2.1 Unpacking and Checking ....................................................................................................................3
2.2 Removing the Protective Materials......................................................................................................3
2.3 Connecting to Computer or Other Equipment .....................................................................................3
2.3.1 Connecting the Cash Drawer Cable .............................................................................................3
2.3.2 Connecting the Parallel Cable......................................................................................................4
2.3.3 Connecting the USB Cable...........................................................................................................4
2.3.4 Connecting the Serial Cable.........................................................................................................5
2.3.5 Connecting the Ethernet Cable.....................................................................................................5
2.4 Connecting the Power Cord ................................................................................................................6
2.5 Installing the Ribbon Cartridge ............................................................................................................6
2.6 Installing the Driver .............................................................................................................................7
2.6.1 Auto-installing Way (Recommended)............................................................................................7
2.6.2 Hand-operated Installing Way ......................................................................................................8
2.7 Installing Bluetooth Interface Driver ..................................................................................................10
2.8 Network Settings ...............................................................................................................................13
2.8.1 Connecting Printer......................................................................................................................13
2.8.2 Setting IPAddress......................................................................................................................13
2.9 Wi-Fi Setting of EC Printer ................................................................................................................15
2.9.1 Connecting the Printer................................................................................................................15
2.9.2 Wi-Fi Parameters Description.....................................................................................................18
2.9.3 Wi-Fi Interface Status Display and Parameters Reset................................................................28
2.10 Mobile Equipment Wi-Fi Printing Function Application ....................................................................29
2.10.1 The System Print Service Application of Android Equipment....................................................29
2.10.2 AirPrint Printing Application of iPhone iOS Equipment .............................................................34
2.11 Installing Printer Network Driver ......................................................................................................37
Chapter 3 Control Panel...........................................................................................................................44
3.1 Control Panel ....................................................................................................................................44
3.1.1 Indicator LED..............................................................................................................................44
3.1.2 Function Keys.............................................................................................................................44
3.2 Self Test and Parameter Settings......................................................................................................44
3.2.1 Function Mode Setting................................................................................................................44
3.2.2 Parameter Settings.....................................................................................................................45
3.2.3 Menu Terms Descriptions...........................................................................................................48

EC-PM-530D User's Manual
- vi -
Chapter 4 Paper Loading .........................................................................................................................49
Chapter 5 Specifications..........................................................................................................................50
5.1 General Specifications ......................................................................................................................50
5.2 Interface ............................................................................................................................................52
5.2.1 Cash Drawer Interface................................................................................................................52
5.2.2 Parallel Interface.........................................................................................................................52
5.2.3 USB Interface.............................................................................................................................54
5.2.4 Serial Interface ...........................................................................................................................55
5.2.5 Ethernet Interface.......................................................................................................................56
5.2.6 Power Supply Inlet......................................................................................................................56
Chapter 6 Maintenance and Technical Service ......................................................................................57
6.1 Cleaning the Printer ..........................................................................................................................57
6.2 Problems and Solutions ....................................................................................................................57
6.3 Contact the Technical Service Centre ...............................................................................................58
Chapter 7 Command Code Summary .....................................................................................................59
7.1 General .............................................................................................................................................59
7.2 Explanation of Command..................................................................................................................59
Appendix Commands List .......................................................................................................................73

EC-PM-530D User's Manual
- 1 -
Chapter 1 Overview
1.1 Model Information
EC-PM-530D (Mini Receipt Printer) is developed by our corporation in order to fulfill different
requirements and using environments. TP stands for Mini printer, 230 stands for printer model.
EC-PM-530D series printers can be configured with parallel interface, USB interface, USB interface
+serial interface, USB interface + Ethernet interface, USB interface + serial interface + Ethernet
interface, USB interface + Bluetooth, Wi-Fi interface, or USB interface + Wi-Fi.
Interface:
EC-PM-530D series products are configured with cash drawer interface, you can choose one of the
following data interfaces when purchasing this product:
●Parallel interface (EC-PM-530D)
●USB interface (EC-PM-530DU)
●USB interface + Serial interface (EC-PM-530DUS)
●USB interface + Ethernet interface (EC-PM-530DUE)
●USB interface + Serial interface + Ethernet interface (EC-PM-530DUSE)
●USB interface + Bluetooth (EC-PM-530DB)
●Wi-Fi interface (EC-PM-530DW)
1.2 Application
yEmbedded installation and preprinting common bill printing market
yEmbedded installation and two-sheet common bill printing market
yCan be applied to tax-controlled cash register for invoice printing
yCan be applied to electronic billing machine for invoice printing
yCan be applied to self-service terminal for invoice printing or applied to other preprinting bill
printing
1.3 Main Parts of the Printer
Figure 1-1 Main parts of printer (Front view)
Note: Please contact the local dealer to change the interface with added expense if needed.
Rear Cover
Roll Paper Guide (Optional)
Ribbon Cartridge
Front
Cover
Power Switch
Cover-open Button
Carriage Shaft

EC-PM-530D User's Manual
- 2 -
Figure 1-2 Main parts of printer (Rear view)
Note: Please take the specific interface as standard.
Power Supply Inlet
Data Interface
Cash Drawer Interface
EC-PM-530D User's Manual
- 3 -
Chapter 2 Printer Installation
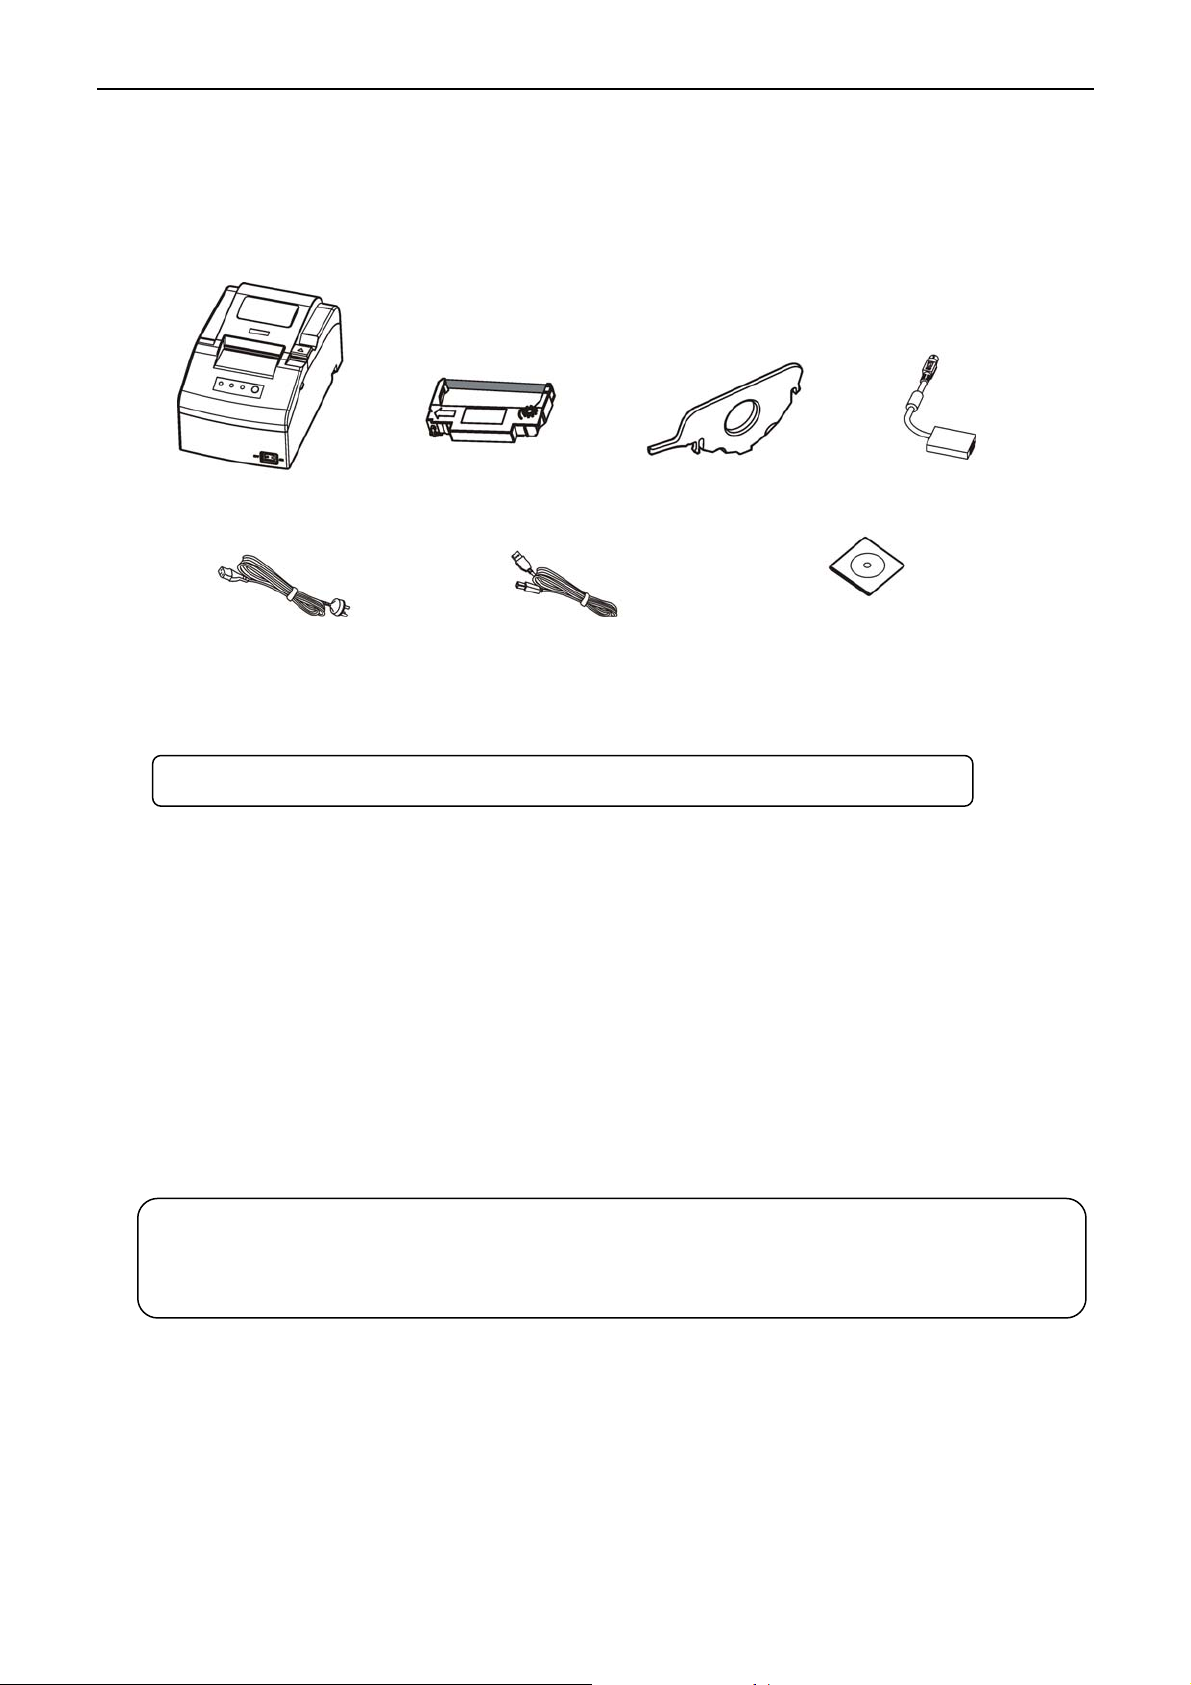
2.1 Unpacking and Checking
Check the following items in the package, if any of these items is missing, please contact your dealer.
(As shown in Figure 2-1)
2.2 Removing the Protective Materials
1. Open the packing box, take out the printer.
2. Save all the packing materials so that they can be used when transporting the printer in the future.
2.3 Connecting to Computer or Other Equipment
This printer can be equipped with one cash drawer interface and a data interface (you can select
parallel interface, USB interface, USB interface +serial interface, USB interface + Ethernet interface,
USB interface + serial interface + Ethernet interface, USB interface + Bluetooth or Wi-Fi interface).
(Please take the specific interface as standard.) Connect the printer to the computer with correct cable.
2.3.1 Connecting the Cash Drawer Cable
Make sure the printer is turned off. Plug one end of the cable into the cash drawer interface of the
printer and the other end to cash drawer. (Shown as Figure 2-2)
Figure 2-1 Printer packing list
Caution: Before connecting or disconnecting the cash drawer interface, parallel interface or
serial interface, you should make sure that the power of the printer is turned off.
Only after tightening the cable could you turn on the printer, or else, it may
damage the printer.
Note: Models with Bluetooth and Wi-Fi are not equipped with interface cable.
Power Cord Interface Cable (Optional)
Printer AC Adapter
Roll Paper Guide (Optional)
Ribbon Cartridge
Driver CD
(Including User's Manual and Drivers)

EC-PM-530D User's Manual
- 4 -
2.3.2 Connecting the Parallel Cable
1. Make sure that the computer and the printer are both turned off, connect the parallel cable to the
parallel interface of the printer, and squeeze the wire clips on both sides of the connector to make
the cable fixed. (As shown in Figure 2-3)
2. Connect the other end of the cable to the computer’s parallel interface, and tighten the screws on
both sides to make the cable fixed.
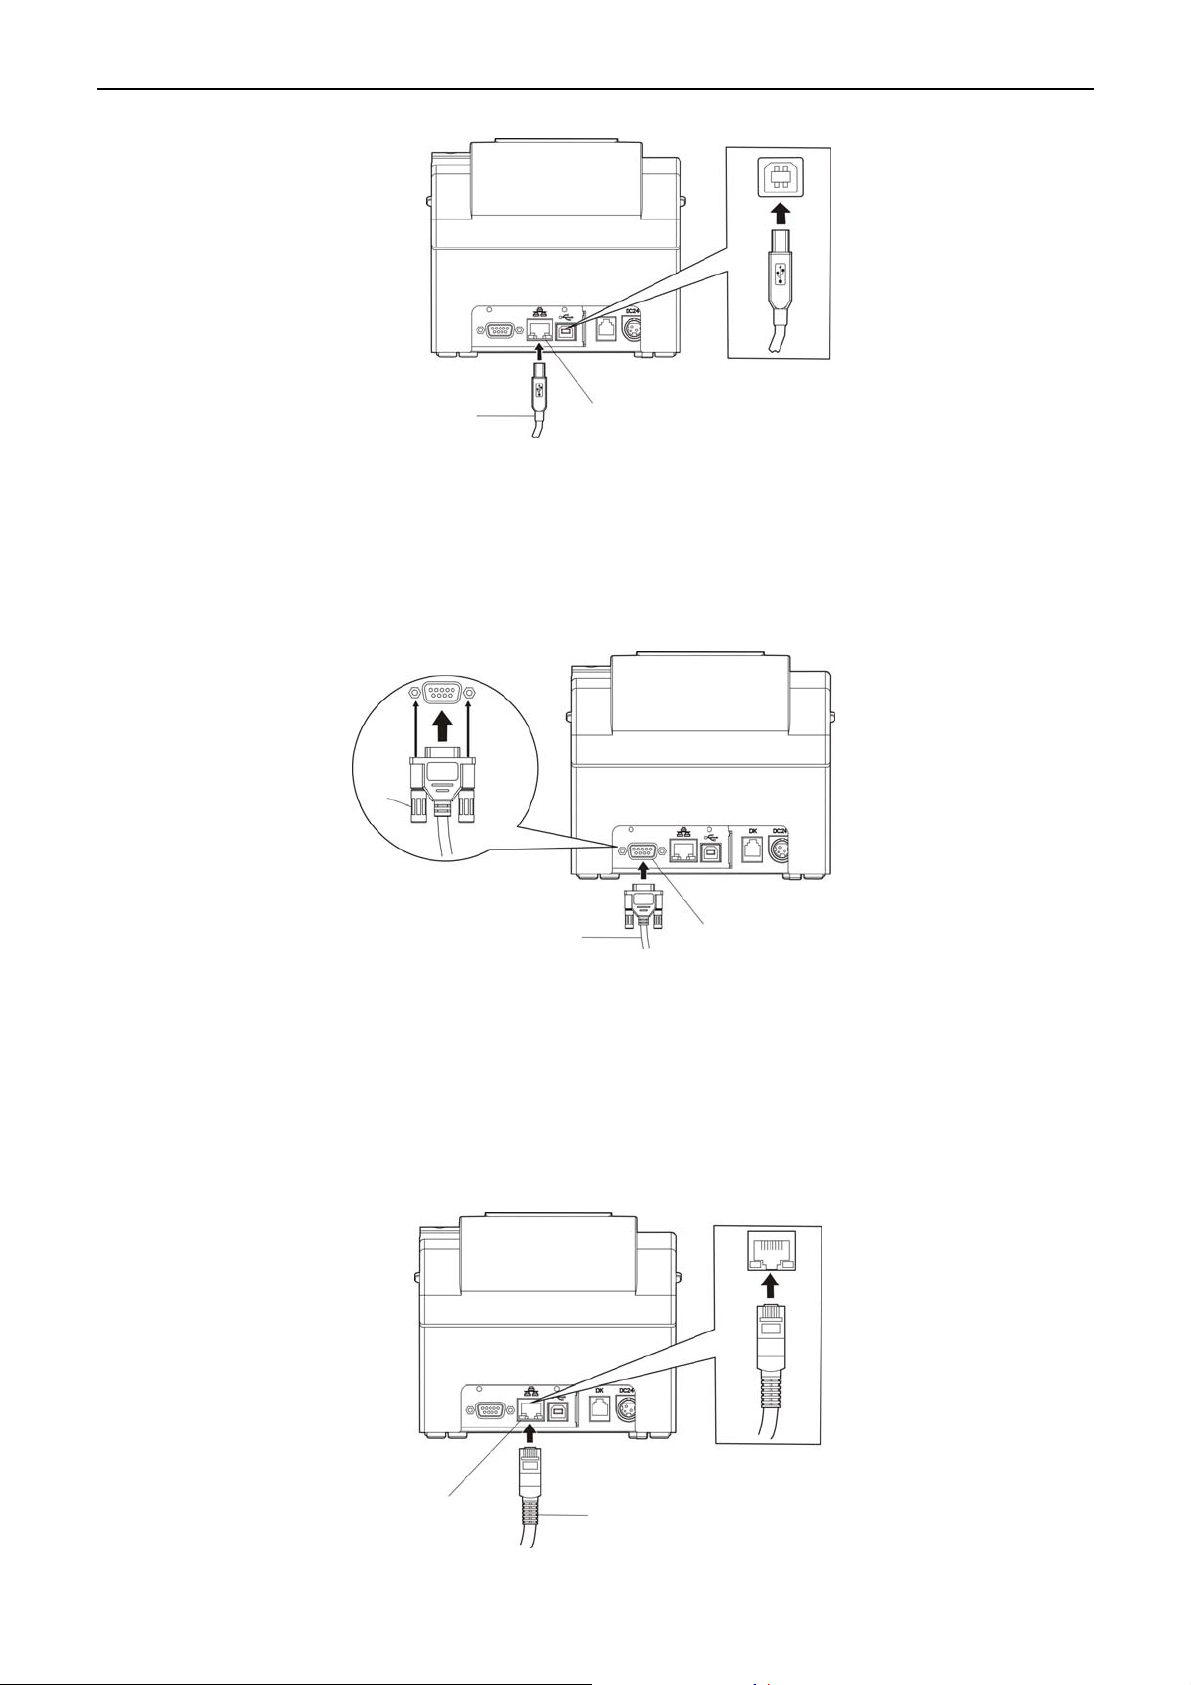
2.3.3 Connecting the USB Cable
1. Plug the A end of USB cable (flat shape) into the computer’s USB interface connector.
2. Plug the B end of USB cable (square shape) into the printer’s USB interface connector. (As shown
in Figure 2-4)
Figure 2-3 Connecting the parallel cable
Figure 2-2 Connecting the cash drawer cable
Note: Do not impact the plug after connecting the USB cable.
Note: You must use the proper cash drawer. Manufacturer will not honor warranty when
using improper cash drawer.
Cash Drawer Interface Cash Drawer Cable
Parallel Cable
Wire clips
Parallel Interface
EC-PM-530D User's Manual
- 5 -
2.3.4 Connecting the Serial Cable
1. Make sure that the computer and the printer are both turned off, connect the serial cable to the
serial interface of the printer and tighten the screws on both sides to make the cable fixed. (As
shown in Figure 2-5)
2. Connect the other end of the cable to the computer’s serial interface and tighten the screws on
both sides to make the cable fixed.
2.3.5 Connecting the Ethernet Cable
Plug the crystal end of the Ethernet cable (RJ-45) into the printer’s Ethernet interface, and then, plug
the other end into the LAN’s entrance. (Shown as Figure 2-6)
Figure 2-4 Connecting the USB cable
Figure 2-5 Connecting the serial cable
Figure 2-6 Connecting the Ethernet Cable
Ethernet Cable
Ethernet Interface
USB cable USB Interface
Serial Cable Serial Interface
Screw

EC-PM-530D User's Manual
- 6 -
2.4 Connecting the Power Cord
1. Make sure the printer is turned off. (The pressed down side on the power switch with O mark
denotes the printer is off).
2. Make sure the voltage of the electrical outlet matches that of the AC adapter.
3. Plug the AC adapter to printer's power supply inlet.
4. Plug one end of the power cord into the AC adapter, and then plug the other end of the power cord
into a properly grounded electrical outlet.
2.5 Installing the Ribbon Cartridge
1. Make sure the printer is turned off.
2. Open the rear cover firstly, and then pull the projections on both sides of the front cover upwards
to open the front cover forcibly.
3. Take out the ribbon cartridge, and then turn the ribbon knob in the direction shown by the arrow to
tighten the ribbon.
4. Insert one side of the ribbon cartridge with the ribbon knob on the right, and then press down
another side until the ribbon is locked in place.
5. Turn the ribbon knob in the direction shown by the arrow again to tighten the ribbon.
6. Close the rear cover and front cover and the installation is finished.
Figure 2-7 Connecting the power cord
Note: Don’t replace the ribbon cartridge when the power is on, or else, the printer may
start to work suddenly and you may get hurt.
Note: The detailed information of the network settings, please refer to the User’s Manual.
Warning: 1. If the rated voltage and your outlet voltage do not match, do not plug the power
cord to electrical outlet, and contact your dealer for assistance.
2. Please use the electrical outlet connecting the ground properly.
3. Please use the original AC adapter only. Manufacturers have no responsibilities
for the problems which are led by using unauthorized AC adapter.
Power Supply Inlet
AC Adapter
Power Cord
Power Switch

EC-PM-530D User's Manual
- 7 -
2.6 Installing the Driver
Please use the cable to connect computer with printer, then turn on the computer and the printer, put
the driver CD into the CD-ROM. Install driver by the following ways:
2.6.1 Auto-installing Way (Recommended)
Double click the file "Setup.exe" in the driver disc, install driver by the prompt.
Figure 2-8 Installing the ribbon cartridge
Note: 1. When your print becomes faint, you need to replace the ribbon cartridge.
Otherwise, the print quality will be affected and the print head may be damaged.
2. To remove the old ribbon cartridge, firstly, make sure the power is turned off, then
as the above figure shown, hold the ribbon cartridge with your thumb and middle
finger, and then lift up the left side of the ribbon cartridge, and then take out the
ribbon cartridge. Install a new one as the above steps.
3. Please use the original ribbon cartridge only. Manufacturer will not honor
warranty when using unauthorized ribbon cartridge.
4. Please turn the ribbon knob in the direction as the arrow shown.
Caution: Don’t move the print head when the printer is powered on, or else, it may damage
the printer. Moreover, don’t touch the print head if the printer has just been used as
the print head may be hot.
Note: Auto-install way needs the operating systems of Windows 2000 and above and the
operating systems of Window 98/ME and below are not supported.
Ribbon Cartridge
Ribbon Knob
Rear Cover
Front Cover
Power Switch
Cover-open Button
Ribbon Core

EC-PM-530D User's Manual
- 8 -
2.6.2 Hand-operated Installing Way
2.6.2.1 The Operating Systems of Windows 2000/XP/Vista/Win7
(1) The hand-operated installing steps of parallel interface cable or serial interface cable:
In the following, Windows XP is taken as an example to show the installing steps. There are slight
differences among different operating systems. The installing way with other operating systems
depends on the practical installing process.
1 Click “Start” →“Settings” →“Select Printers”.
2. Click “Add Printer”, then a window of “Add Printer Wizard” pops up, click “Next”, then please read
the select guide carefully, for example: select “Local Printer” in the “Local or Network Printer”
window, then click “Next”.
3. A window of “Select a Printer Port” pops up, according to your requirement, select “LPT1:
(Recommended Printer Port)” or serial interface, click “Next”.
4. A window of “Install Printer Software" pops up, click “Have Disk...”.
5. A window of “Install From Disk” pops up. Please according to the operating system environment,
you should select the path as follows: CD-ROM →“Drivers” →“WIN2000 (XP-Vista-Win7)”, click
“Open”, then click “OK” to return to the window of “Install Printer Software”, click “Next”.
6. Follow the guide and click “Next” gradually until the installation is finished.
(2) The hand-operated installing steps of USB interface cable:
In the following, Windows XP is taken as an example to show the installing steps. There are slight
differences among different operating systems. The installing way with other operating systems
depends on the practical installing process.
1. Connect with the USB cable and turn on both the computer and the printer. After the computer finds
out new hardware, and a window of “Found New Hardware” pops up — “Welcome to the new
hardware wizard”.
2. Select the “Install from the list or specific position”, then click “Next”
3. A window of “Please choose your search and installation options” pops up, choose “Don't search, I
will choose the driver to install”, click “Next”.
4. A window of “Add Printer Wizard” pops up, click “Have Disk...”.
5. A window of “Install From Disk” pops up. Please according to the operating system environment,
you should select the path as follows: CD-ROM →“Drivers” →“WIN2000 (XP-Vista-Win7)”, click
“Open”, then click “OK” to return to the window of “Add Printer Wizard", click “Next”.
6. Follow the guide and click “Next” gradually until the installation is finished.
2.6.2.2 The Operating System of Windows 8
The hand-operated installing steps of parallel interface, serial interface or USB interface cable:
1. Enter “Control Panel” →“Device and Printers”.
2. Click “Add Printer”, then a window of “Add Printer” pops up, then click “Next”, select “Add Local
Printer Manually” in the “Local or Network Printer” window.
3. A window of “Select a Printer Port” pops up, according to your requirement, click “Use the Current
Port”, select “LPT1: (Printer Port)”, serial interface or USB interface, click “Next”.
4. A window of “Install Printer Driver” pops up, click “Have Disk...”.
5. A window of “Install From Disk” pops up. Please according to the operating system environment,
you should select the path as follows: CD-ROM →“Drivers” →“Windows 8”, click “Open”, then click
Note: This installing way is used for people who have some knowledge on
hand-operated installing and equipment application.

EC-PM-530D User's Manual
- 9 -
“OK” to return to the window of “Install Printer Driver”, click “Next”.
6. Follow the guide and click “Next” gradually until the installation is finished.
2.6.2.3 The Operating System of Windows 98
(1) The installing steps of a parallel interface cable or a serial interface cable:
1. Click “Start” →“Settings” →“Printers”.
2. Double click “Add Printer”, then a window of “Add Printer Wizard” pops up, select “Local Printer” in
the “Local or Network Printer” window, then click “Next”.
3. A window of “Click the manufacturer and model of your printer” pops up, click “Have Disk...”, please
click “Browse”, select the path as follows: CD-ROM →“Drivers” →“WIN98 (WINME)”, then click
“OK”.
4. A window of “Install From Disk” pops up, click "OK”, return to a window of “Add Printer Wizard”,
then click "Next".
5. A window of “Printer Port” pops up, select “Available ports”, according to your requirement, select
“LPT1: (Recommended Printer Port)”, or serial interface, click “Next”, and then the printer’s name
will be shown. If the system has not installed other printer driver process, the printer is treated as
default printer by the application process of Window98 environment, click “Next”. Otherwise,
according to prompt, choose the printer as default printer: “Yes”, click “Next”, choose
“Yes-(recommended)”, click “Finish”. A window of “Printer test page completed” pops up, click
“Yes”.
6. The printer driver process is installed successfully.
(2) The installing steps with the USB interface cable:
USB driver installing steps:
1. Connect with the USB interface cable and turn on the printer.
2. After the computer finds out new hardware and finishes searching, a window of “Add New
Hardware Wizard” pops up, click “Next”.
3. A window of “Add New Hardware Wizard” — “Windows Operation” pops up, choose “Search the
best driver for the device (recommended)”, and click “Next”.
4. A window of “Add New Hardware Wizard” pops up, check “Specify a location (L)”, click “Browse”,
select the path as follows: CD-ROM →“Drivers”→“WIN98 (WINME)” →”USBdriver”, then click
“OK”.
5. Return to the window of “Add New Hardware Wizard”, click “Next”; a window of “Windows driver
file search for the device” pops up, click “Next”.
6. After the system finishing installing the file automatically, a window of “USB Printer Supported”
pops up, click "Finish".
7. The printer USB driver process is installed successfully.
USB printer driver installing steps:
1. Click “Start” →“Settings” →“Printers”.
2. Double click “Add Printer”, then a window of “Add Printer Wizard” pops up, click “Next”.
3. A window of “Click the manufacturer and model of your printer” pops up, click “Have Disk...”,
Note: 1. As the system of Windows 98/ME doesn’t integrate USB driver control, please
install USB driver before using USB interface printing. Then install USB printer
driver.
2. If it has installed the USB driver, please install the USB printer driver directly by
the following steps.
EC-PM-530D User's Manual
- 10 -
please click “Browse”, select the path as follows: CD-ROM →“Drivers” →“WIN98 (WINME)”, and
then click “OK”.
4. A window of “Install From Disk” pops up, click “OK”, return to the window of “Add Printer Wizard”,
then click "Next".
5. A window of “Printer Port” pops up, select “Available ports”, select “JMUSB”, click "Next", and
then the printer’s name will be shown. If the system has not installed other printer driver process,
the printer is treated as default printer by the application process of Window98 environment, click
“Next”. Otherwise, according to prompt, choose the printer is default: "Yes"; click "Next", choose
“Yes-(recommended)”, click “Finish”. A window of “Printer test page completed” pops up, click
“Yes”.
6. The printer driver process is installed successfully.
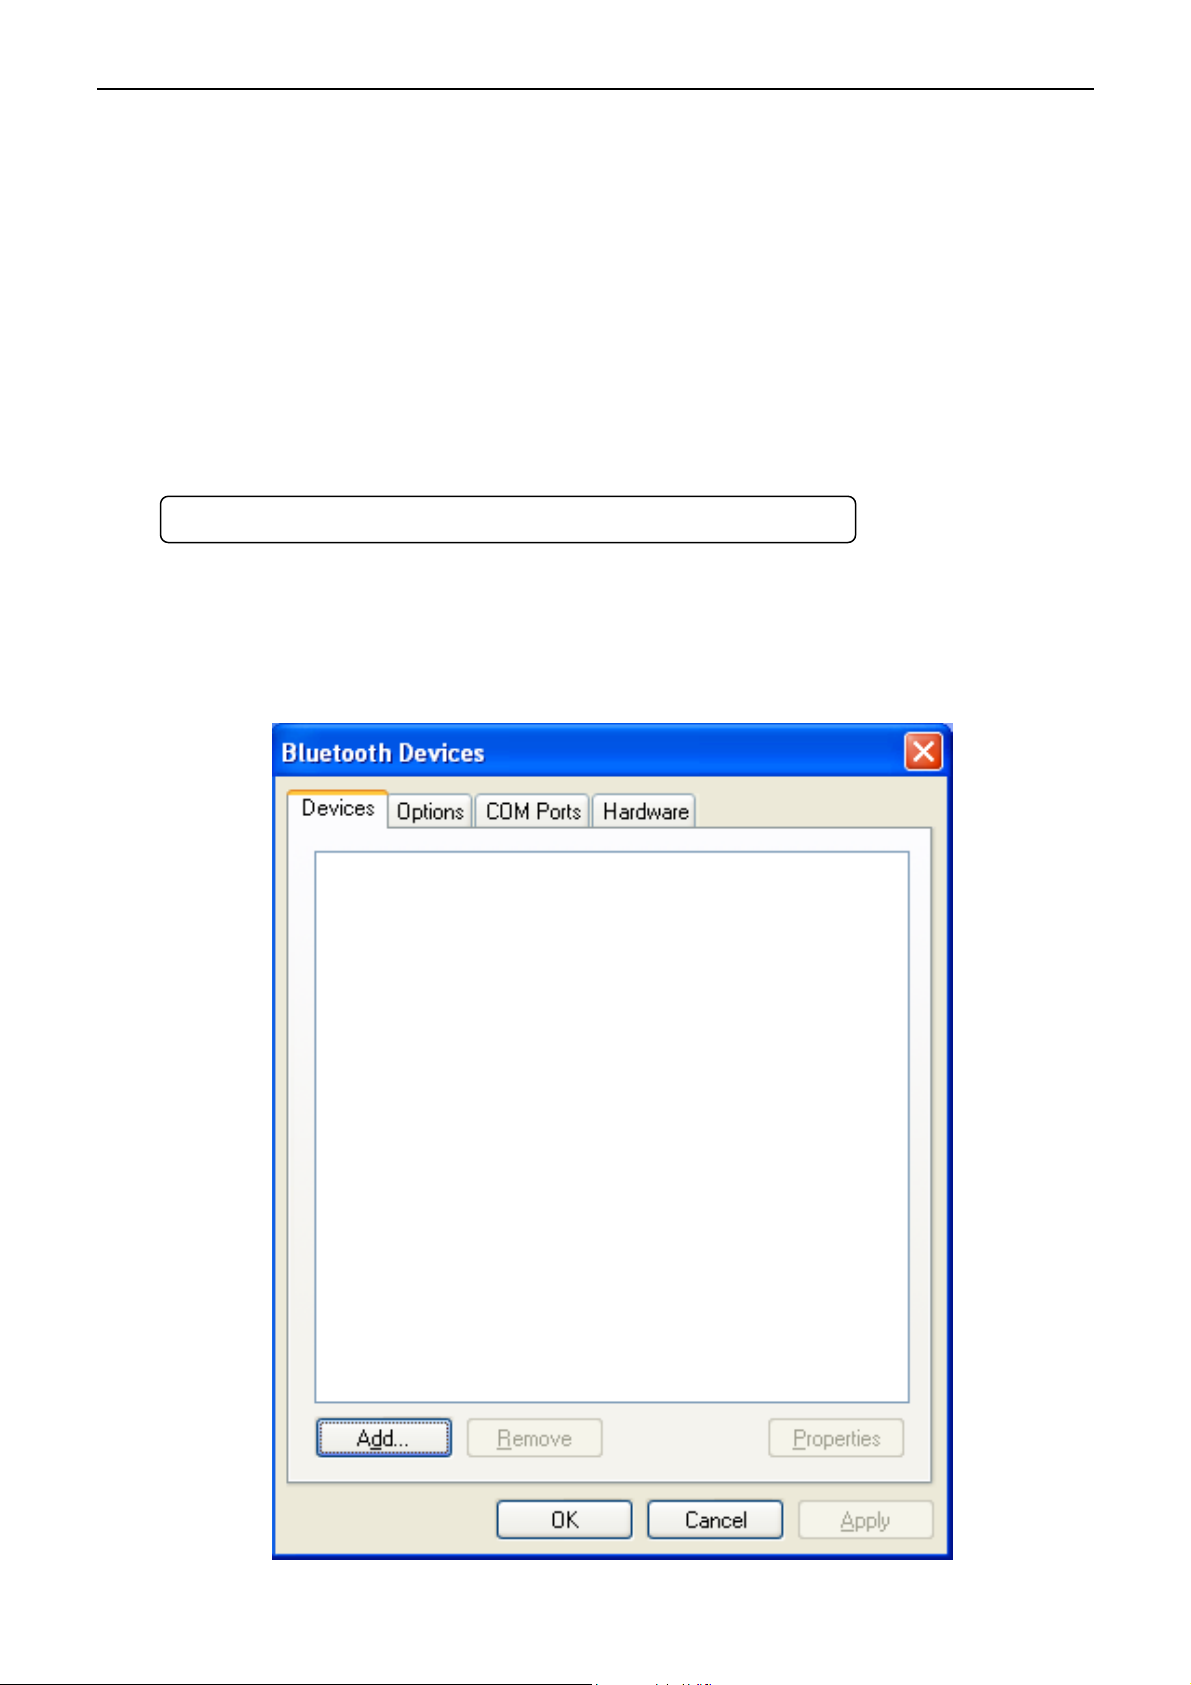
2.7 Installing Bluetooth Interface Driver
1. Choose the appropriate Bluetooth adapter, the operation system is Window XP or above which is
with Bluetooth adapter driver.
2. Turn on the printer, search Bluetooth device in Window XP system, and click “Add”.
Note: Select to install this driver according to the chosen model.
EC-PM-530D User's Manual
- 11 -
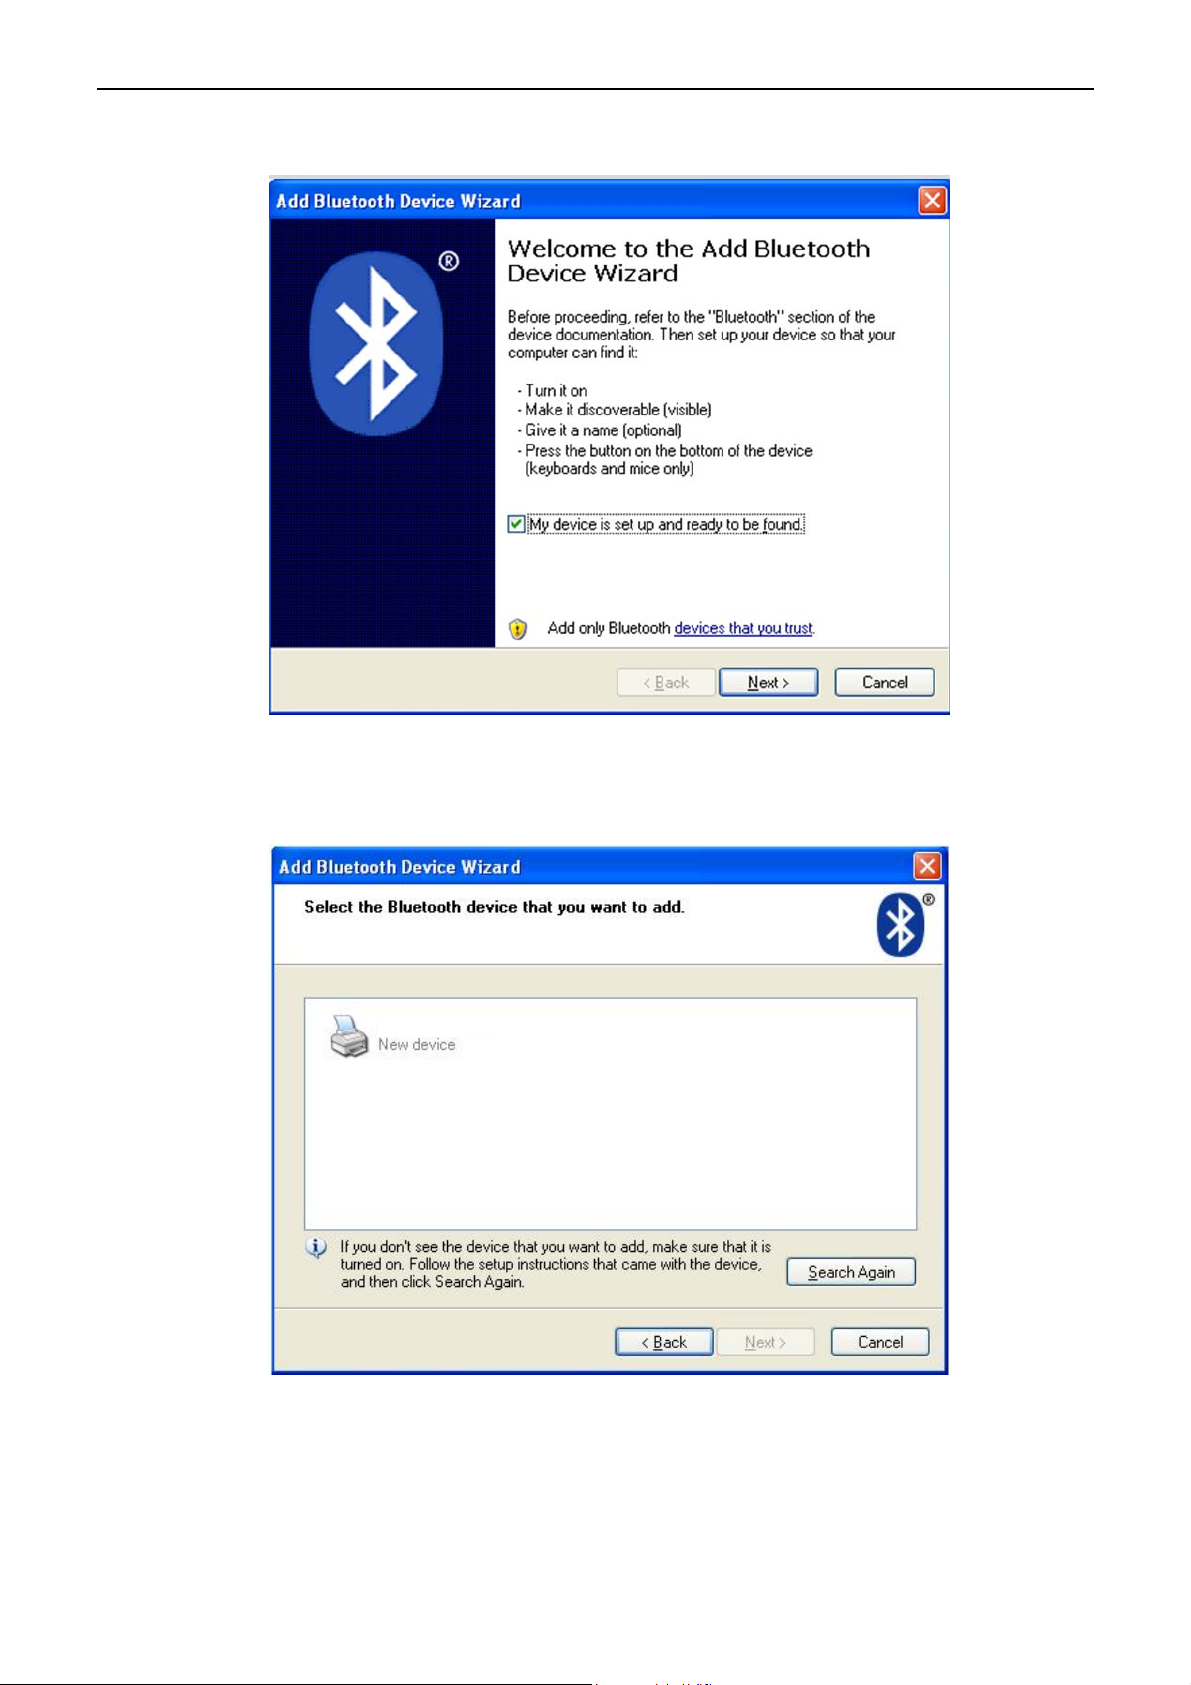
3. Tick off the option of “My device is set up and ready to be found.” Click “Next” to continue.
4. Select the “EC-PM-530D”, and then click “Next”.
5. Tick off the option of “Let me choose my own passkey” and enter “1234” as shown, then click “Next”.
EC-PM-530D

EC-PM-530D User's Manual
- 12 -
6. Record the Outgoing COM port and click “Finish”, then reboot the computer.
7. Set the printer driver print port as the outgoing port and the installation is finished.
Note: Every Bluetooth device has its own address. Please reinstall it when replacing
the Bluetooth device.

EC-PM-530D User's Manual
- 13 -
2.8 Network Settings
Please use EC network setting software NetFinder to set the IP address for EC Ethernet interface
network printers, which can be found in the CD or downloaded from http://www. eclinepos.com.
2.8.1 Connecting Printer
Power on the printer, connect with the Ethernet cable which has been connected to LAN, and look into
the information of Ethernet LED indicator to ensure the printer has entered into the normal connection.
Orange LED Green LED Description
ON Blink Connecting to network
OFF OFF Not connecting to network
2.8.2 Setting IP Address
1. Run NetFinder software
Double click NetFinder.exe in the PC which connects the printer in the same LAN. The figure of the
software is shown as follows:
2. Search printer
Click “Search” button in the main interface, the dialog box appearing will begin searching
automatically and displays the status, listing a printer in the main interface if found. The time is
counting down in the progress bar (10s in total) and the search will finish as soon as the time is over.
If you need to go on searching, press “Search” button again.
Button description:
Exit — Exit from the software
Search — Search printers in the same LAN
Assign IP — Modify the IP address and other settings for the specified printer.
Note: The network printing function needs the operation systems of Windows2000 and
above and the operation systems of Windows98/ME and below are not supported.
This manual suits for next models
6
Table of contents
Other EcLine Printer manuals

EcLine
EcLine EC-PM-80320D User manual

EcLine
EcLine EC-PM-530B Series User manual

EcLine
EcLine GP-5850 Series User manual

EcLine
EcLine EC-PM-80250 User manual

EcLine
EcLine EC-PM-80320 User manual

EcLine
EcLine EC-PM-58110 User manual

EcLine
EcLine EC-3150D-USB User manual

EcLine
EcLine EC-5890X User manual

EcLine
EcLine EC-3150D User manual

EcLine
EcLine EC-3150 Owner's manual


