ECO-WORTHY 12 User manual

12 5/8 inch Solar Fan &
ECO-WORTHY
30W Foldable Solar Panel
Email:[email protected] Call:1-866-939-8222

●
●
House Factory
Basement Cabin
Attic
Greenhouse
Solar Powered Attic Fan
Wide Application
Benefits of This Solar Powered Attic Fan
This is a DC solar exhaust fan with a high flow of 3000 CFM, which
can meet most of the air circulation needs of family life, sheds, attics,
roofs, attics, courtyards, greenhouses, RV, boats, cabin, chicken
coops, doghouse,garages, storage rooms , factories etc.
This solar exhaust fan has good working efficiency no matter in
summer or winter. Helps eliminate excess heat and moisture in the
attic, thereby protecting the roof system from premature damage.
POWERFUL & EFFICIENT - Larger airflow up to 3000 CFM, work auto-
matically at low voltage,even on cloudy days.
AFFORDABLE & CUT COOLING COSTS - Fully automatic operation
powered by solar energy,cut your cooling costs with low electric power
expense.
WELL-MADE QUALITY - Stainless steel material and galvanized steel
frame, highly resistant to corrosion.
●
●
●

Caution
1. For general ventilating use only. Do not use to exhaust hazardous or
explosive materials and vapors.
2. To avoid motor bearing damage and noisy and/or unbalanced impel-
lers, keep drywall spray, construction dust, etc. off power unit.
3. This ventilator operates when the solar panel is exposed to sun light. To
reduce risk of injury while installing, servicing or cleaning unit, cover the
solar panel with cardboard or disconnect the wires from the motor termi-
nals (note wire locations when disconnecting).
4. The recommended open air inlet for this ventilator is around 0.85
square feet (R=6.3in/0.53ft). The best location for these air intake vents
are under the eaves with direct access to the attic. Failure to provide
these intakes could cause natural-draft gas appliances to backdraft.
5. Your attic fan installation will create a screened opening into your attic
space. During a heavy rain storm there could be a light spray of rain into
this attic space. This is a normal condi-tion with all attic ventilators and will
not cause any damage to the structure. We recommend that you do not
store any valu-able articles directly under the fan opening in the roof.
6. This attic fan is intended for side wall installation. It is one perfect choice
to ventilate attic, boat, shed, greenhouse, caravan, workshop or garages,
etc.
7. Take care to avoid getting paint on the solar panel.
EASY INSTALLATION - Plug and play, beginner friendly.
FOLDABLE DESIGN - The foldable design of the solar panel saves
storage space and is convenient to carry.
READY-TO-USE - It's a ready-to-use solar fan system for home, shed,
garage or RV, outdoor, etc.
MULTIPURPOSE - Perfect cooling and ventilation solution for any
space at your home - including the attic, garage, shed, and more.
DECENT WARRANTY - 1-year warranty and replacement parts are
available.
●
●
●
●

Specifications
Packing List
8. The installation instructions contained in this document are only a
recommendation and individual professionals may have their own meth-
ods of installation. If your roof has an existing warranty, installation of this
product by anyone other than those who installed the roof may jeopardize
any future warranty claim. Please check with the original installer of your
roof if this is a concern.
9. When working with asphalt shingles in cold weather (below 40oF), take
care to avoid damage to the shingle edges and corners.
Motor life span
Wire length
Bearings
Blades Material
Shell Material
Diameter
High
DC Fan
more than 10000H
16 2/5ft (5m) waterproof wire
Roller bearings
High Strength Aluminum alloy
High Strength 304 Stainless steel
12 5/8in (320mm)
2/5in (125mm)
1piece
1 piece
1 piece
1 set
12 5/8 inch DC Solar Fan
30W Folding Solar Panel
16 2/5ft (5m)Wire with Connector
Mounting Brackets & Screws

Tools and Materials Required
Impact drill / electric hammer (for opening holes)
Screwdriver (screw the screws to the exhaust fan and the wall)
Wire stripper (required for bare wire version)
Compasses (determine the size of the wall opening)
Ruler (adjust the opening size of the compass)
Glue (after installation, used to seal the gap between the exhaust fan
and the wall)
Fodable Solar Panel
Irradiance and cell temperature
Open circuit voltage (Voc)
Max power voltage (Vpm)
Short circuit current (Isc)
Max power current (Ipm)
Open size
Folding size
1000W/㎡AM1.5 25℃
21.6V
18V
1.83A
1.67A
27.8*13.8*0.7in (707x350x18mm)
13.8*13.8*1.5in (350x350x38mm)
Installation Preparation
1. This solar fan is a perfect cooling
and ventilation solution for any
space at your home - including the
attics, roofs, garages, sheds, green-
houses, doghouse, RV and more.
2. You can choose the installation
place according to your needs. And
the best wall thickness is 4 1/4in
(10.8cm).
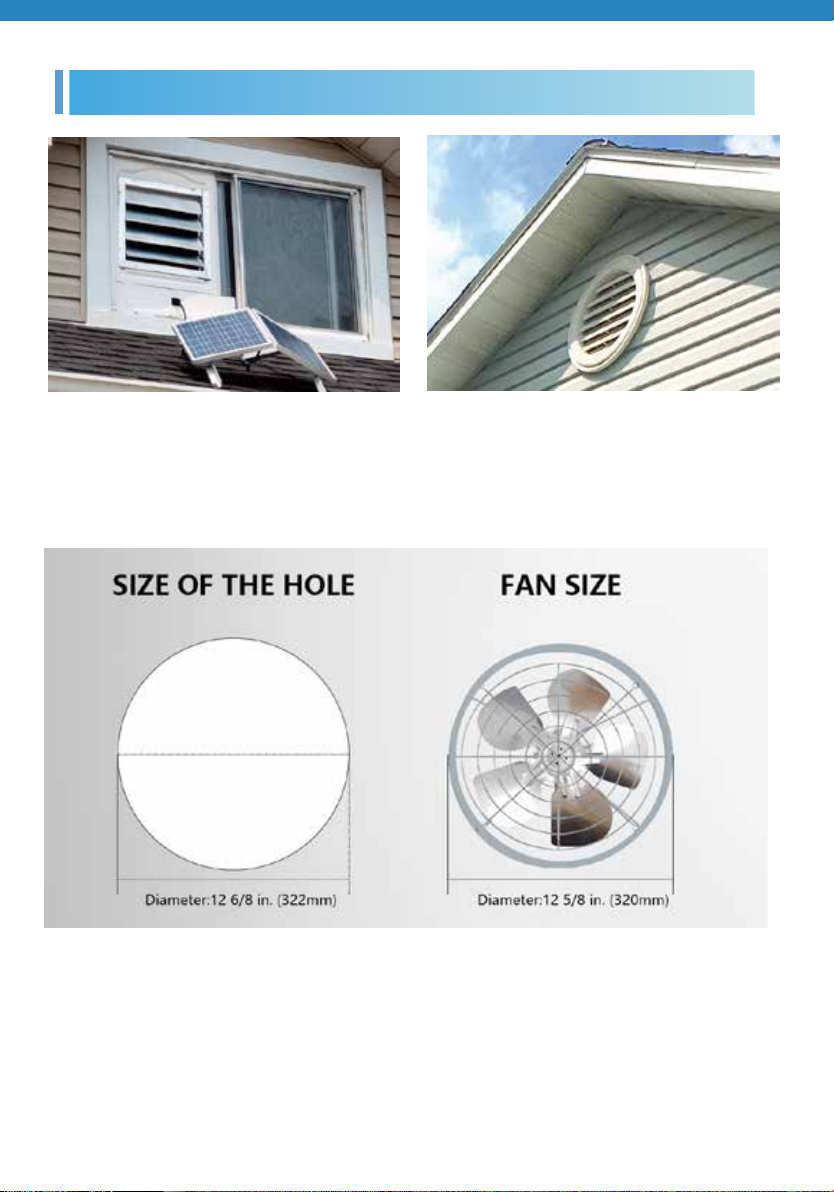
3. Firstly use a compass or ruler to measure the inner radius of the exhaust
fan, then fix it to the wall with a compass, turn out the size of the mounting
hole we need, and then use an assault drill or an electric hammer to drill the
required hole.

Install the Brackets
4. Install the exhaust fan into the hole, then use a screwdriver to screw on the
corresponding screws, and seal the gap between the exhaust fan and the
wall with glue.
NOTE: If you want the air to blow OUT, please install the fan with the blade
facing away from you. If you wan it to suck air IN, then mount with the blades
facing you. The installation direction depends on your needs, thanks.
NOTE that please place the brackets in the same way as the picture showing,
and the orientation is uniform, in case the brackets cannot be installed due to the
orientation of the brackets.
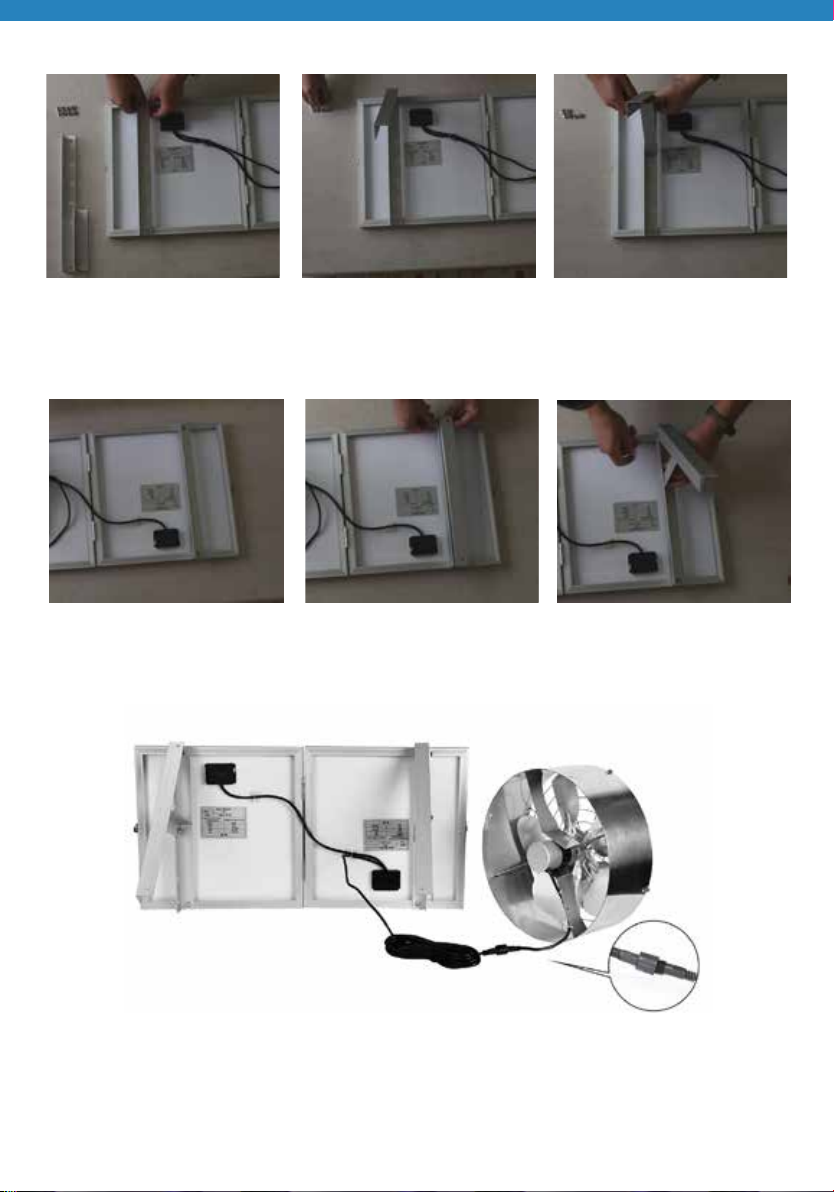
1. Install and fix the longest
aluminum alloy stent on the
solar panel.
2. Connect another alummi-
num alloy stent to the first
one.
3. Install the shortest alum-
minum alloy stent according
to the required. angle
4. Install the alumminum alloy
bracket on the other side as
step 1 showing.
5. Connect another alummi-
num alloy stent to the first
one.
6. Pay attention to maintain
the same angle of mounting
brackets on both sides.
7. Connect the cable of solar panel to the cable of the exhaust fan. Just plug the quick
connector of the exhaust fan to the quick connector of the solar panel directly.
Please don’t reverse the pin/power connector and make sure it has the right connection.
Warranties
Limited 365 Day Warranty (Retail)
ECO-WORTHY makes every effort to assure that its products meet high quality and durabili-
ty standards, and warrants to the original purchaser that this product is free from defects in materi-
als and workmanship for the period of 365 days from the date of purchase.
This warranty does not apply to damage due directly or indirectly,
to misuse, abuse, negligence or accidents, repairs or alterations outside our facilities, criminal
activity, improper installation, normal wear and tear, or to lack of maintenance.
To take advantage of this warranty, the product or part must be returned to us with transportation
charges prepaid.
Proof of purchase date and an explanation of the complaint must accompany the merchandise. If
our inspection verifies the defect, we will either repair or replace the product at our election or we
may elect to refund the purchase price if we cannot readily and quickly provide you with a replace-
ment. We will return repaired products at our expense, but if we determine there is no defect, or
that the defect resulted from causes not within the scope of our warranty, then you must bear the
cost of returning the product.
To see how to assemble the solar fan, please
scan the QR code of the installation video
that shared on Facebook, thanks.
Email:[email protected]
Facebook QR Code
Installation Video
Call:1-866-939-8222

Questions & Answers
The solar fan can be used for sheds, roof, attic, greenhouses,RV, boats, cabin, chicken coops,
doghouses etc.
It delivers an eco-friendly approach to neutralize moisture and drive out heat, can prolong the life
of your roof structure and air conditioning while helping you save up to 30% on A/C costs.
Please install the solar panel under sunlight. It’s a 100% solar power unit. Must have direct
exposure to the sun to work. If you install it in the dark, it won’t work.
Please check whether you had reversed the pin/power connector and make sure it has the
right connection.
If the fan still doesn’t work, please connect the DC fan to your 12V battery directly (please
make sure your 12V battery has enough power), then check if the fan works. If it doesn’t
work, there might be some problem with its motor, please contact the customer service
team for a replacement motor.
If the fan only works when connecting with the battery, there might be a problem with the
solar panel. Please put the solar panel under sunlight, then use a multimeter to check the
panel’s voltage. Generally, the voltage is around 18V to 22V, the current is around 1.3A. If
the voltage number you got is lower than 18V, please contact the customer service team
for a replacement solar panel.
1.
2.
3.
4.
If you want the air to blow OUT, please install the fan with the blade facing away from you.
If you wan it to suck air IN, then mount with the blades facing you.
The installation direction depends on your needs, thanks.
It must have direct exposure to the sun to work . The best working angle of solar panels is
facing south, forming an angle of 20-30 degrees with the horizontal.
Of course, you need to make appropriate adjustments according to your latitude.
The diameter of the fan is 12 5/8 in. (320mm)
Call:1-866-939-8222

Yes, the cable length can be extended. The solar panel comes with 1 piece of 16ft (5m)
extension cable which has a connector for the plug to the fan conveniently.
No thermostat for the fan is provided. It runs automatically when the solar panels are exposed
to sunlight and conversely shuts off when it’s dark. It is not temperature controlled. And the
thermostat also can be added to it, thanks.
As long as the sun is hitting the grid the fan is on. It works from the sun up to sun down but
winter time a few hours less.
Yes, the DC fan can be purchased separately by ASIN B08BZPPP8D, thanks.
It depends on the space and sunlight. On a bright sunny day it is close to 1500cfm for up to
2000 square feet. The cfm can be different in every home.
One-year warranty for the DC fan, 5-year warranty for the solar panel, and free replacement
of accessories are available. We always stand behind our products, any questions, please feel
free to contact our customer service team, thanks.
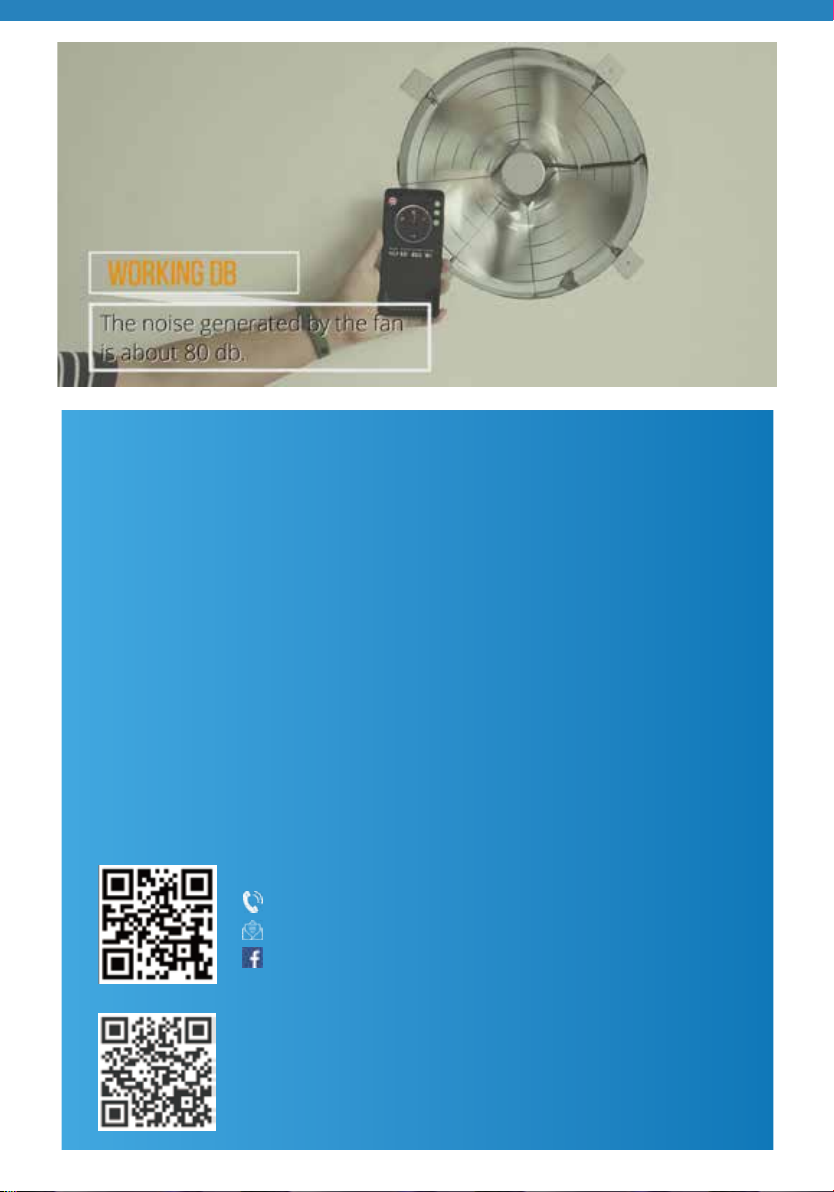
The noise of the working fan is around 70db, which is acceptable.
Blows strongly and steadily on a clear day.
Table of contents
Other ECO-WORTHY Solar Panel manuals


Popular Solar Panel manuals by other brands


CONCORD
CONCORD QC5528 quick start guide

Flashfish
Flashfish TSP18V100W user manual

Hyundai
Hyundai HiS-MxxxMF installation manual

boviet SOLAR
boviet SOLAR Vega BVM7612M H-HC-BFDG Series Installation and maintenance manual

Sharp
Sharp NU-AH370 installation manual

Megasun
Megasun ST-2000 Installation instructions and owner's manuals