Ecoair ECO DD122 Mini User manual
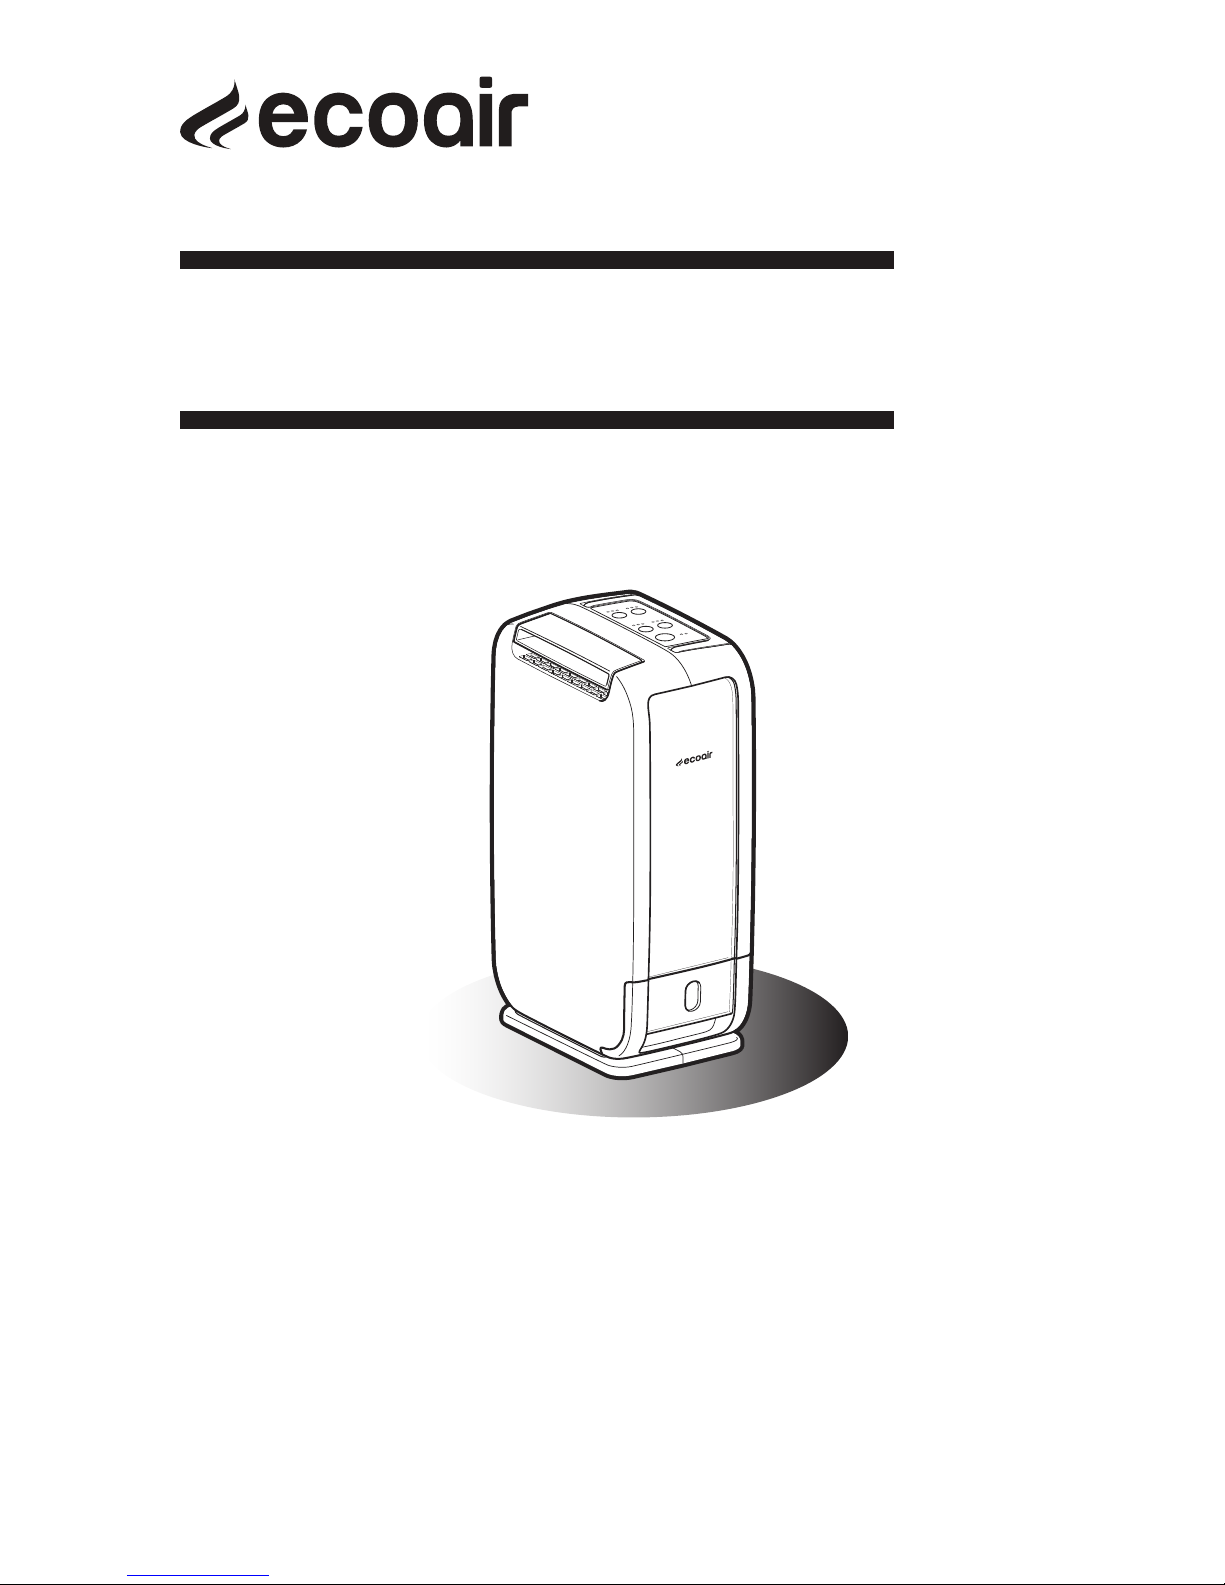
Model: ECO DD122 Mini
Desiccant Dehumidifier
USER GUIDE & ENERGY SAVING TIPS
Read This Guide
Inside you will find many helpful hints on how
to use and maintain your dehumidifier correctly.
Just a little preventative care can save you
money and prolong the life of your unit.
Thank you for choosing ECO DD122 Mini.
ECOAIR TECHNICAL SUPPORT
UK TEL: +44 208 459 2458
EMAIL: technical@ecoair.org
ECOAIR TECHNICAL SUPPORT
UK TEL: 0845 388 0007
EMAIL: [email protected]
IMPORTANT SAFETY INSTRUCTIONS
1
PLEASE READ ALL INSTRUCTIONS CAREFULLY BEFORE OPERATING.
WARNING - This appliance is intended for use in a domestic environment and light office
use only. Any other use is not recommended by the manufacturer and may cause fire,
electrical shocks or other injury to person or property.
When using electrical appliances, basic safety precautions should always be followed:
1. Do not operate the unit with a damaged cord or plug, after it malfunctions or has been
dropped or damaged in any way. Return to an authorized service facility for examination
and repair.
2. This unit should always be kept in an upright position to avoid any damage. The appliance
must be placed on a level flat surface during operation.
3. Check the household voltage to ensure it matches the units rated specification before
operating.
4. Operate this unit in an ambient temperature between 1°C and 40°C.
5. Ensure that the air inlets and outlets are not blocked or covered.
6. Do not place the unit too close to curtains or other objects - min 40cm.
7. When using the "LAUNDRY MODE" to speed up the drying of wet clothes in the
room, please keep the clothing at a safe distance from the unit to prevent water from
dropping onto the unit.
8. Never place anything on top of the unit and do not cover with any kind of material while
in use.
9. This product is intended for domestic and light office use ONLY and not for commercial,
industrial or outdoor use.
10. To protect against electrical shocks, do not immerse unit, plug or cord in water, or spray
with liquids.
11. Never unplug the power cord without press the "ON/OFF" key to off first, as
this could damage the unit.
12. Always unplug the unit when not in use or moving location. To disconnect from the
power supply, grip the plug and pull from the power socket. Never pull by the cord.
13. Always empty the water tank before storing the unit away.
14. Close supervision is necessary when any appliance is used by or near children and pets.
15. Do not run power cord under carpeting, or cover with rugs or runners. Arrange the
cord away from areas where it may be tripped over.
16. Never operate or store the unit in direct sunlight.
17. To repair the unit, take it to a qualified service engineer. Repairs carried out by
unqualified people may cause damage to the unit or injury to persons or property and
void the warranty.
18. Where possible, avoid the use of an extension cable as they may overheat and cause
a risk of fire. Only use an extension cord after ensuring it is in perfect condition.
19. Do not use the unit without the air filter.
SAVE AND READ THESE IMPORTANT SAFETY INSTRUCTIONS
This appliance is not intended for use by persons (including children) with reduced physical,
sensory or mental capabilities, or lack of experience and knowledge, unless they have been given
supervision or instruction concerning use of the appliance by a person responsible for their safety.
Children should be supervised to ensure that they do not play with the appliance.

Timer
The unit switches off after the selected timer (2, 4 or 8 hours).
Swing
Select swing for Wide, Front or Up as desired. To hold the swing, press Swing
until LED is off.
Laundry Mode
Use the Laundry modes to dry your clothes. The appliance will continuously dry
the air until you switch to one of the normal modes described below, Hi,
Economy or Auto.
Tip: It typically takes 2 – 4 hours to dry your laundry. You may want to put your
dehumidifier on the timer when using the Laundry mode to avoid wasting energy.
Avoid using the Laundry modes for normal daily use. You may use for extreme
drying of very damp rooms over 2 – 3 days and then switch to the recommended
Economy mode.
HOW TO USE YOUR DEHUMIDIFIER
2
DD122 Mini
Laundry Quick
Use to quickly dry your clothes over a shorter period of time or dry a very damp
room quickly. Your dehumidifier will run on high Turbo. During the operation the
power will be toggled to low energy mode as air humidity gets lower.
Tip: Use the Laundry modes in moderation and switch to Economy mode for more
energy savings once your laundry is dry or the room humidity is reduced to 55%RH
Laundry Normal
Use this Saving-Laundry mode to increase the toggling to low energy saver
mode during operation.
Dry Mode
Hi –
Dries the air to approximately 45%RH and stops dehumidifying at this
point but runs on fan only mode to sample the air for its humidity level. If the
relative humidity rises, it dehumidifies again.
Tip: Use this to control a very damp room in the first couple of days and then
switch to economy to save energy.
Economy – Dries the air to approximately 55%RH and runs on economy
fan mode to sample the air for its humidity level. It will dehumidify again when
the relative humidity rises.
Tip: Use this mode on a daily normal household use to keep the humidity to a
healthy level of 55%RH. (Bacteria and mould will not breed at this level).
Auto – Same as Economy except that once the humidity level of 55%
relative humidity level is reached, the fan will toggle between the normal and
economy mode depending on the relative humidity and temperature to find
a balance between the energy saving of the Economy mode and quicker drying in
RH = Relative Humidity
Full
Lights up when tank is full or not properly inserted.
Check
Lights up when:
1. Filter needs cleaning.
2. Appliance needs to cool down. Switch off and leave for 30 minutes and turn
on again. This is normal.
3. In low humidity or temperature conditions.
4. In high temperature condition over 35°C
Tip: When the check light comes on, remove the main plug from the socket. Move
it to another room after it cools down or when conditions allowed, put the main plug
back in the socket and turn on the unit. Make sure the dehumidifier is placed in a safe
distance away from any obstacles. (See unit setup in the next page)
Hi mode.
!
3
Tip: Use this mode for maximum energy saving and for quiet operation.

f
l
Place the unit in an upright position on a stable, flat surface.
Please ensure the unit is a safe distance away
from a wall or furniture (see diagram on the right).
Please keep clothes at a safe distance of
60 cm from air outlet of the unit. Make
sure water does not drip into the
unit.
Where to position your dehumidifier?
For best results position the
dehumidifier somewhere central
like a landing or a hallway.
As long as the internal doors are open
the excess moisture from all of the rooms
in the house will migrate naturally towards
the dehumidifier and be processed.
UNIT SETUP
Top
min 60cm
Air outlet
min 40cm
(When louvre closed)
min 20cm
(When louvre up)
Air inlet
min 20cm
min 20cm
min 50cm
Caution
Do not place the dehumidifier in a broom cupboard,
boiler room, small unventilated rooms etc.
Avoid placing the dehumidifier in small confined areas
or in close proximity to a radiator or heat source such
as tumble driers, cookers etc. to avoid the dehumidifier
from overheating.
Do not use this dehumidifier in dusty or an
industrial environment where particles can get into
the dehumidifier. This will cause a malfunction
and void your warranty.
!
TO DRAIN WATER (Continuous Drainage)
You may use a hose with an inner diameter of 12mm for
continuous drainage:
1. Use a screwdriver to remove the knockout at the back. Attach
the hose to the connector through the hole.
2. The hose must lead to an appropriate drain on a downward
slope with no sharp bends.
Note:
1. Ensure the tank is well fitted in position before inserting the hose.
2. Before removing the bucket, ensure that the hose is disconnected.
Knockout
Hose
4
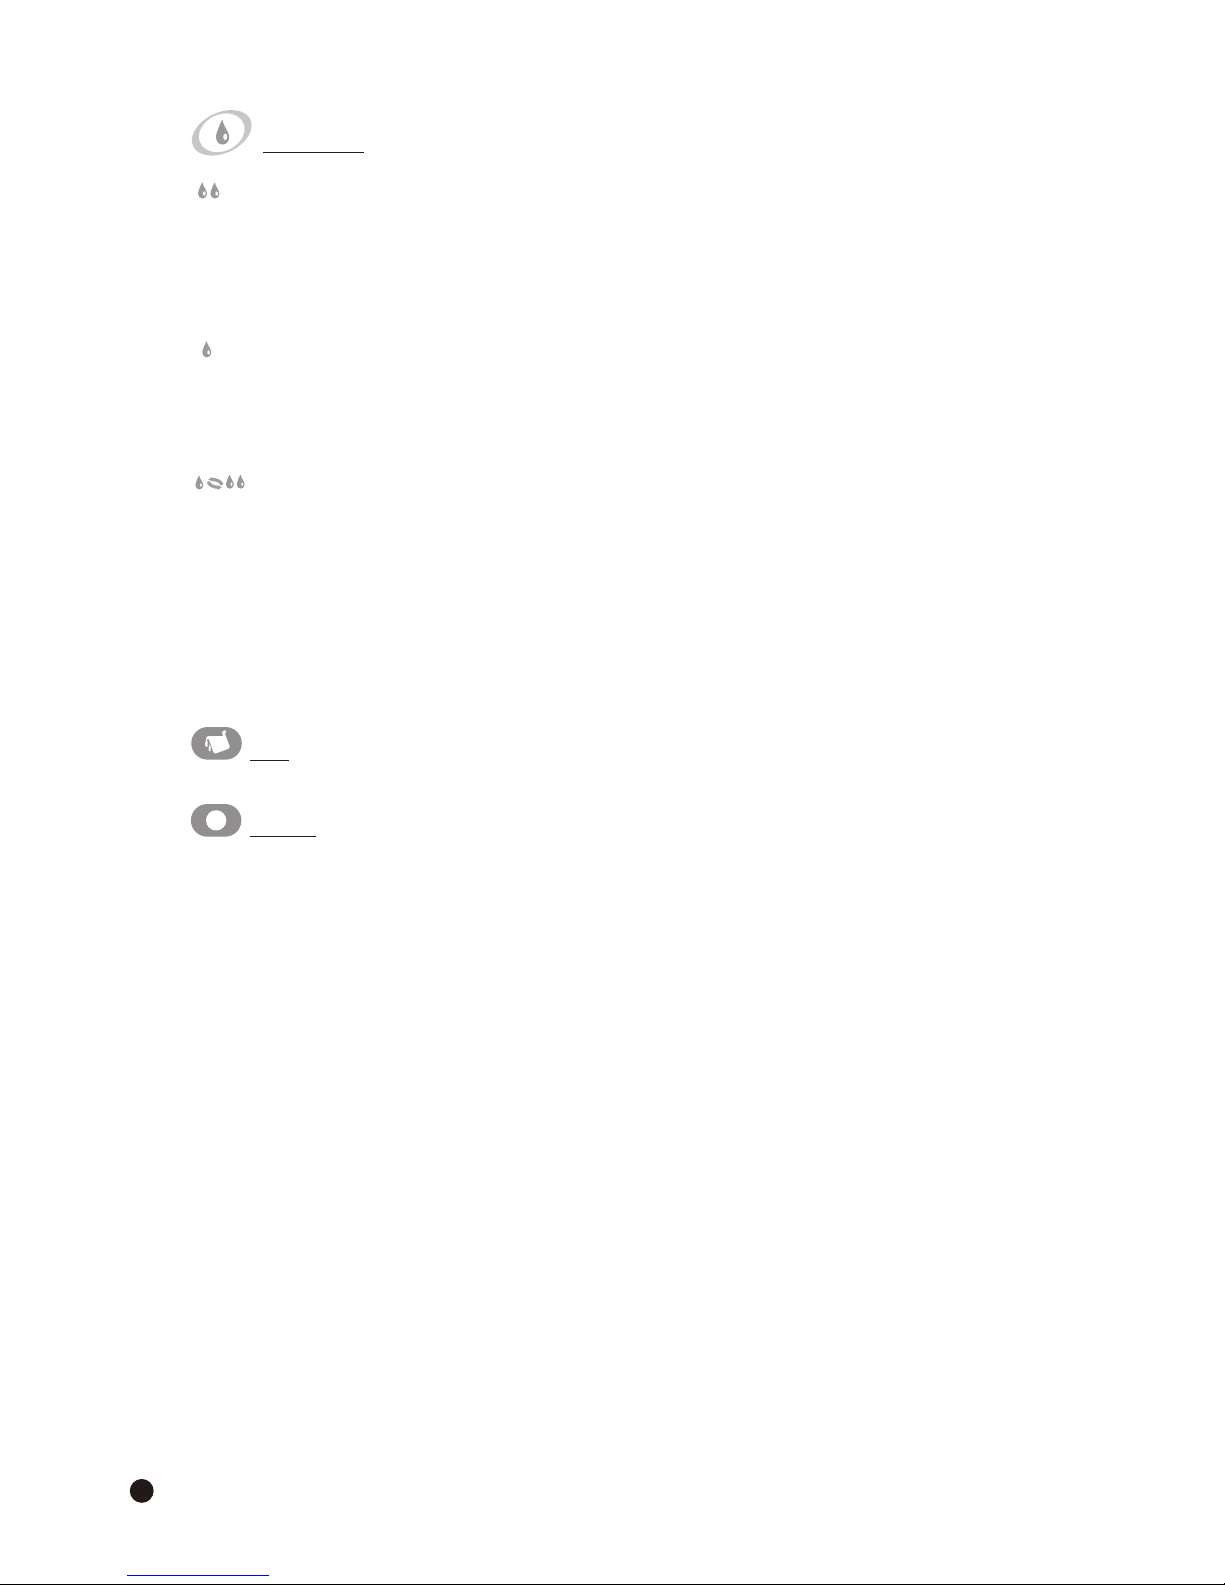
MAINTENANCE
Cleaning the unit
1. Turn off the unit, wait for the fan to stop and unplug from the power socket.
2. Clean the surface with a soft damp cloth.
3. Dry thoroughly with a towel after cleaning.
4. In order to avoid damage, do not wash the machine with water, or let water
drip into the air inlet or outlet.
Cleaning the filter
4. If the filter is covered with dust, the airflow and the performance of the unit
will be affected. Check the filter periodically to ensure any dust is removed.
Tip: Clean your filter every 2 weeks to keep your air clean and prolong the
life of your dehumidifier.
1. Turn off the unit and remove the filter from the unit.
2. Clean the anti allergic filter only with a brush.
(Washing the filter is not recommended)
3. Replace the filter in position.
Before storing
1. Turn off the unit, wait for it to stop and unplug from the power socket.
2. Clean and dry the tank. Leave the unit to drain for approximately one day.
3. Clean the filter and the unit. Cover the unit to prevent it from
gathering dust. Store upright in a cool dry place.
4. Do not expose to direct sunlight.
How to Clean
5
Always ensure that fine particles or small objects
do not enter the dehumidifier through the air outlet.
Dust build-up in the unit can cause malfunction and
Caution !
overheating.
SPECIFICATIONS
Model: ECO DD122 Mini
Operating Temperature Range: 1ºC - 40ºC
Dehumidification: 6 litres / day (20ºC / 60%RH)
Water tank capacity: 1.8 Litres
Power Consumption (H/L): 442W / 270W
Voltage: 230V ~50Hz
N.W: 5.1 Kg
G.W: 6.1 Kg
Product size (WxHxD): 26.9 x 44.5 x 17.4 cm
6
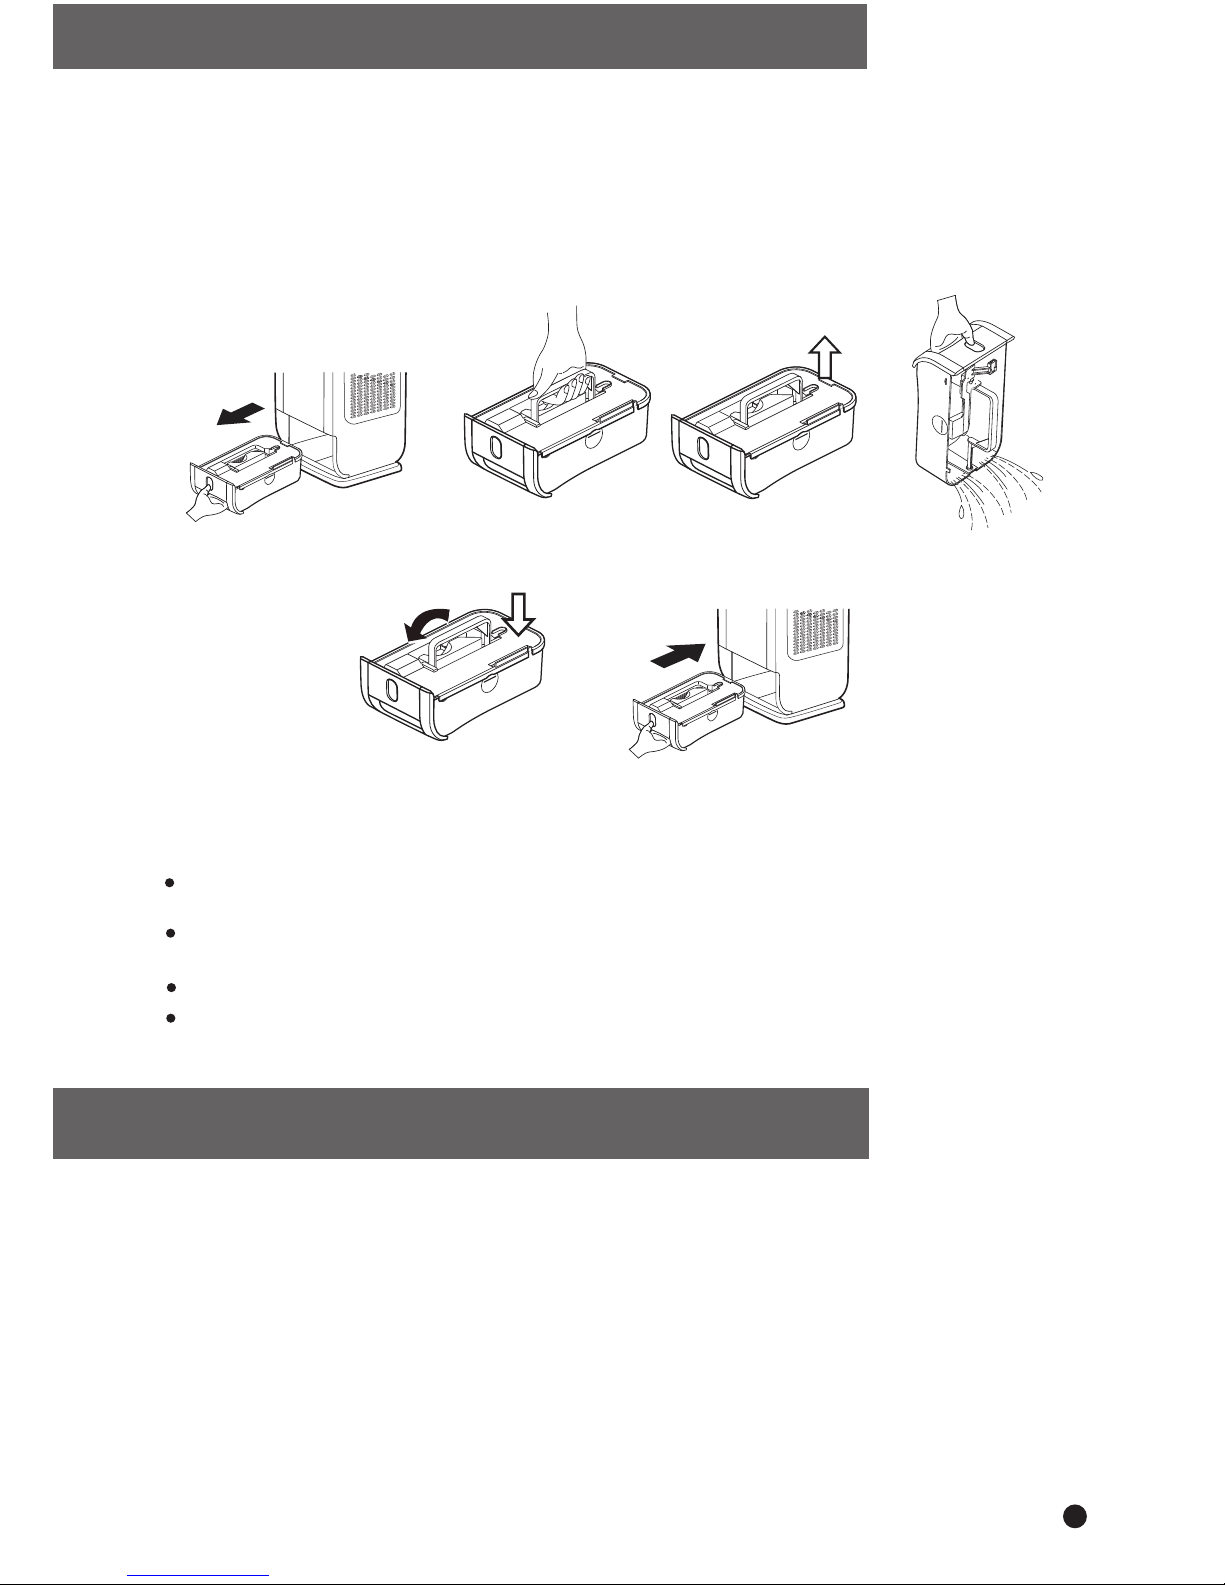
TO EMPTY THE TANK
1. When the tank is full, the Full/Check LED lights and the unit stops
in a few minutes
2. Do not move the unit or remove the tank, if the machine is still operating, as
water may leak, damage the unit or cause an electric shock.
3. To remove the tank pull it out gently by gripping the bottom of the tank,
and lift carefully.
4. Remove the cover of tank first, then pour the water away, clean the tank and
restore the cover and the tank to the correct position.
NOTE :
Clean the tank with clean water if needed. Do not use detergent, solvent, abrasive
or hot water to avoid damage to the appliance.
Do not remove or damage the float in the tank or the unit cannot
work correctly.
The tank cover must be well fitted in position.
The Led lights if the tank is not well in place.
Pull tank out Lift by the handle Remove the cover Pour the water away
Restore the cover
and the handle Restore the tank
Full/Check
EcoAir guarantees this product free from defects in materials and workmanship for a period
of Two (2) year from the date of purchase. Coverage is valid only with proof of purchase.
This unit must be operated in the conditions recommended and at the voltage indicated.
Misuse or use in a dusty environment, along with attempts to service or alter the unit, will
render this WARRANTY VOID. The actual product may differ slightly from illustration.
For further information, please contact 0845 388 0007.
This product has been manufactured to comply with the EC Directives 2006/95/EC and
2004/108/EC.
SERVICE AND WARRANTY
TWO (2) YEAR LIMITED WARRANTY
Save This Warranty Information
ments
Copyright Reserved
WEE/EC2601UR
This warranty is in addition to, and does not affect your statutory rights.
C139
Table of contents
Other Ecoair Dehumidifier manuals

Ecoair
Ecoair ECO20LDK User manual

Ecoair
Ecoair DC204 User manual

Ecoair
Ecoair DD1 Simple User manual

Ecoair
Ecoair DD3 SLIMLINE User manual

Ecoair
Ecoair ARION 26L User manual

Ecoair
Ecoair ECO DD122FW CLASSIC User manual

Ecoair
Ecoair D850E User manual

Ecoair
Ecoair DD122 CLASSIC MK5 User manual

Ecoair
Ecoair ECO DC10 User manual

Ecoair
Ecoair ECOI2LDT User manual

Ecoair
Ecoair DD128 User manual

Ecoair
Ecoair DC14 User manual

Ecoair
Ecoair SUMMIT-S User manual

Ecoair
Ecoair DD122 CLASSIC MK5 User manual

Ecoair
Ecoair ECO DCW10 User manual

Ecoair
Ecoair ECO DC12 User manual

Ecoair
Ecoair ECO8LDN User manual

Ecoair
Ecoair ECO8LDN User manual

Ecoair
Ecoair DD1 CLASSIC MK6 User manual

Ecoair
Ecoair DD1 CLASSIC MK6 User manual


