EcoMotion CORE Pro + eFAT User manual

EcoMotion Bikes
1
IMPORTANT! In order to ensure your safety and get !
the most out of your product please read this Manual !
carefully before first use.

!
!
EcoMotion Bikes
2
Table of Contents
Warnings
3
Definitions & Parts locations
6
Assembly instructions
Handlebar
6
Headlight & Front fender
8
Front wheel
8
Saddle
10
Pedals
11
Brake - sets adjustment
11
Handlebar height adjustment
12
Mounting & dismounting of battery
13
Folding the bike
14
Inspection prior riding
15
Operating of the electric system
16
The battery & charger
18
Charging of battery
19
Preserving of battery’s lifespan
20
Tips for proper use
21
Bike maintenance
22
More info & contact us
23
Malfunctions & solutions
24

Warnings!
EcoMotion Bikes
3
WARNING! When using your e-bike at the first - time, ride it
in a controlled environment away from cars, obstacles, and
other distractions.
WARNING! Cycling can be a hazardous activity even under the
best of circumstances. !
Proper maintenance of your bicycle is your responsibility as !
it helps reduce the risk of injury.
WARNING! Parental supervision is advised for use under
the age of 16
WARNING! User must be aware to all traffic laws &
regulations prior to using the product.
WARNING! your e-bike is exposed to wear and tear as well as
high pressure. !
Various materials and components may react differently to
fatigue, wear or pressure.!
In case the life expectancy of a certain component has expired,
it may fail unexpectedly and even cause injury to the user. !
Any form of cracking, scratching, discoloration in high pressure
areas are indications that the component's integrity has expired
and it must be replaced!
WARNING! Accidents and falls may cause severe injuries and in
extreme cases even death!!
Read this user manual responsibly, with care and
judiciousness!!
Also, always make sure that your e-bike is well assembled, well
maintained, and in a good condition according to this user
manual prior to riding!

EcoMotion Bikes
4
WARNING! Make sure that your e-bike's brakes are well tuned
and perfectly work before each ride.!
Check the brakes' pads before each ride.!
Brakes' tuning and maintaining must be performed in a bike
store, by qualified mechanic.
WARNING!This model is equipped with motor shut-off system
which controlled by the brakes.!
Make sure that the system is well operating before each ride.!
In case the system failed, do not use the e-bike and have it fixed
at a certified bike store.!
WARNING! Cycling can be a hazardous activity even under !
the best of circumstances.!
Always use protective gear such as a helmet and other !
shields as well as closed shoes, even for a short ride!
WARNING! Avoid Storing the battery in extreme hot / cold
temperature.!
Extremely low temperature may cause corrosion and !
extremely high temperature may cause battery swell, !
which will make the battery dangerous, and even can cause
battery explosion!!
The recommended storage temperature for the battery is
between 50°-80°F.
WARNING! Do not leave the battery unattended in a closed
vehicle!!
The vehicle may warm up by the sun and reach extremely high
temperature!
WARNING!Braking distance is influenced by the road / trail
condition as well as weather condition, speed of riding & weight
of rider.

!
!
!
EcoMotion Bikes
5
WARNING! Avoid exposing the battery to extreme !
temperatures (104°F or higher) for prolonged period!
WARNING! The battery charger should be checked for physical
damage before each charge.!
Make sure that the charger wire is not torn or exposed and
that its electrical plug is not damaged!!
If you notice any problem with the charger, DO NOT
CHARGED the battery with the charger.!
The charger must be replaced!!
WARNING! DO NOT charge the battery without supervision!!
DO NOT charge the battery overnight while all people are !
sleeping in the house!!
WARNING! Improper assembly of the bike is dangerous,
can cause bike / component failure, resulting in injury to the
rider!
It's your duty to contact us for explanation if any of the
instructions in this booklet are not clear to you or if you have
any question.
It is always recommended to have a professional bike shop for
assembling your bike.
WARNING! This model designed for road and trails ride only.
do not use it for down-hills ride , jumps or decline stairs.
WARNING! this model designed for a single grown rider only.
It is forbidden to use this bike by two users or more together at
the same ride. You may install a child seat on its back-rack,
make sure that your child weight not exceed 55 Lbs and that
you use the child seat according to its manufacturer’s
instructions..

!
Definitions:
PAS - Pedal Assist Support - a sensor that is located on the
bottom bracket, recognizes the pedals movement and
operates the motor accordingly to the PAS level which set on
the display .
TAG - Twist And Go - a throttle that located on the handlebar
activate the motor while it twisted.
Parts location:
!
!
!
!
!
!
!
!
!
!
!
!
!
!
!
!
Assembly instructions:
1. Handlebar:
•Prepare the handlebar stem by opening its top hoop .!
!
!
!
!
!
!
EcoMotion Bikes
6
WARNING! Do not use the bike carrying over 270 lbs. in total
weight (rider & belongings).

•Slide-in the handlebar into the stem and lock back its hoop.
•Straight up the stem and locked it into its place, by locking-
up the handlebar folding mechanism. (click in its lever
into the stem).
•Adjust the handlebar so it will be aligned with the bike’s
fork, re-open the handlebar folding mechanism, tight-
up the stem's central screw, re-locked the handlebar
folding mechanism, and then tight-up both of the
stem's sides screws.!
!
!
!
!
!
!
!
!
EcoMotion Bikes
7
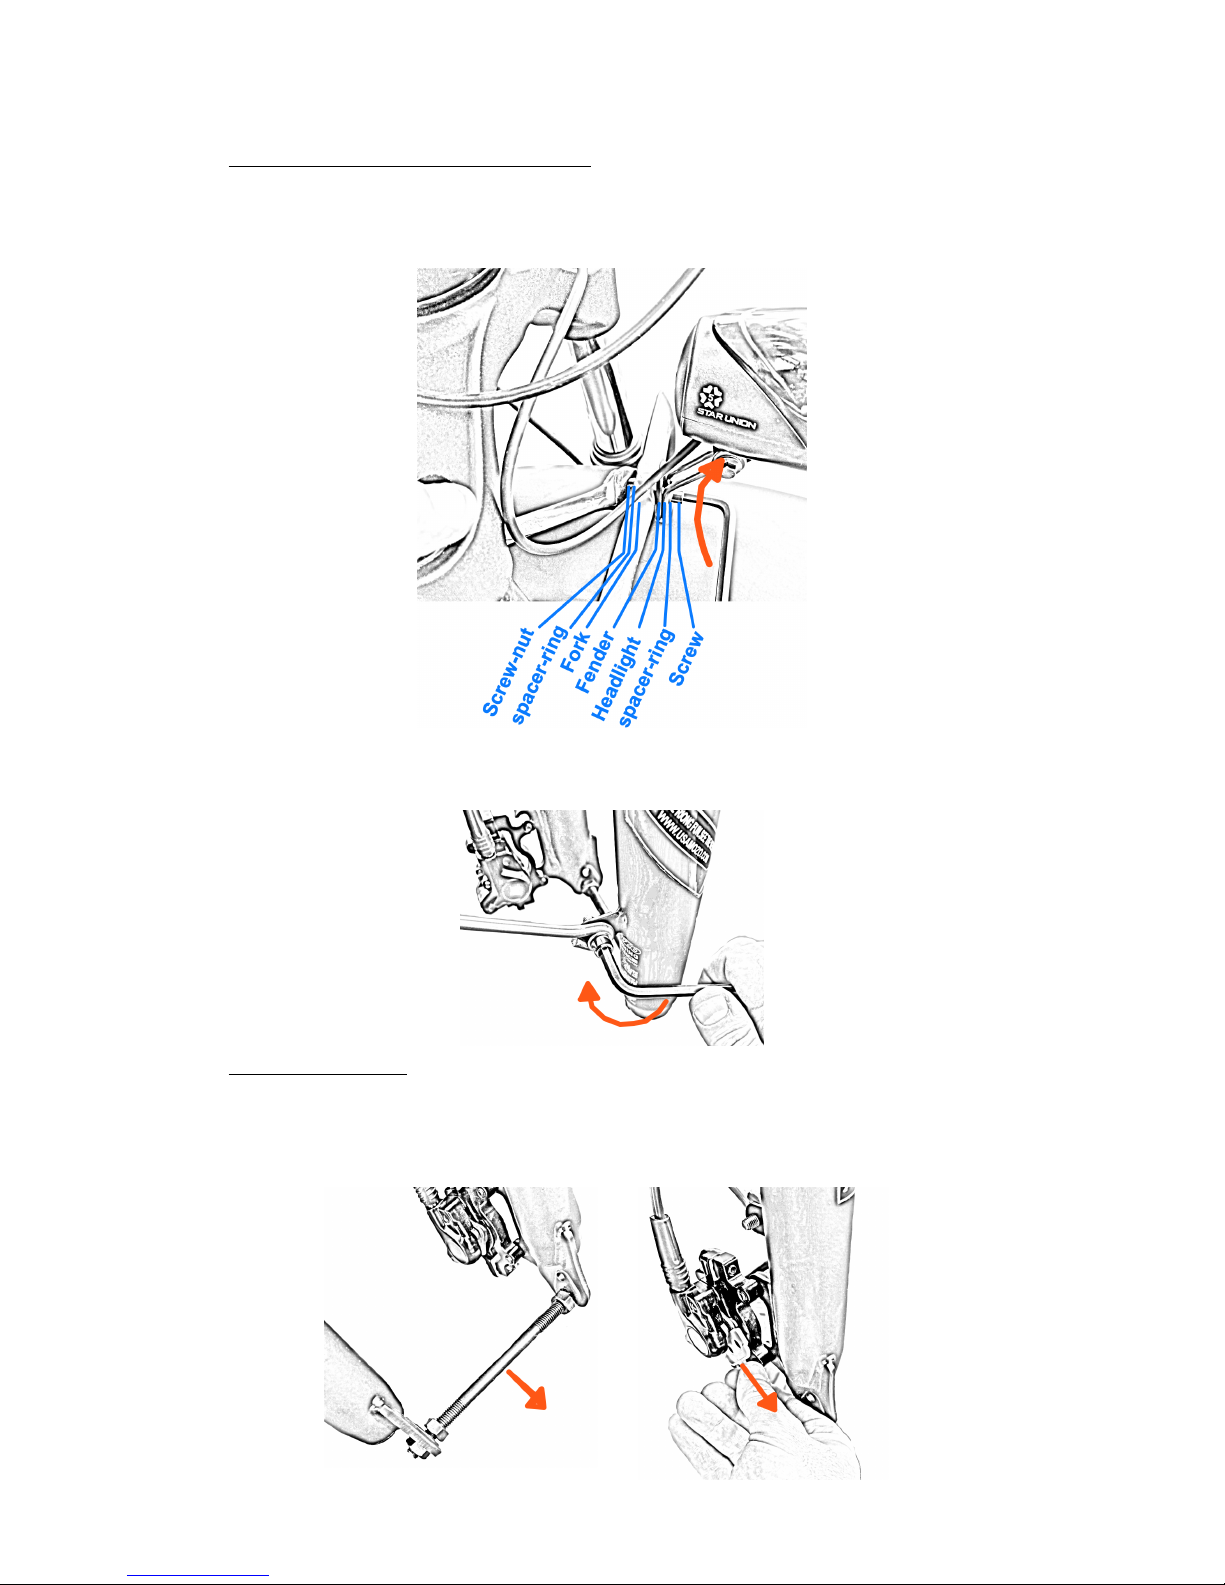
2. Headlight & Front fender:
•Assemble the headlight and the top hook of the fender to
the forks bow.
!
!
•Assemble the fender’s support pipes into the bottom of the
fork (from both sides).!
3. Front wheel:
•Unscrew the fork support rod from the bottom of the fork,
and pull out the plastic spacer from the brake caliper.
!
!
EcoMotion Bikes
8

•Slide in the lock rod of the wheel into its place in the hub,
and close it with its screw nut from the other side.!
!
!
!
•Insert and lock the wheel into its place in the fork by closing
the lock rod lever.!
!
!
!
!
!
!
!
EcoMotion Bikes
9
WARNING! Make sure that the front wheel turns easily
sideways and not jammed while you steering the handlebar.
Make sure that the bike's wires and brake tube are not jammed
or stretched during steering.
WARNING! The fork must hold the wheel in a way that the
wheel does not move to its sides or can be removed without
opening the lock - rod lever

4. Saddle:
•Open the saddle's hoop that located on the bike's frame,
slide-in the saddle into its place in the frame, and lock-
back the hoop.!
Make sure that the saddle can not turn to the sides or
move up & down after you locking it into the frame.!
!
!
!
!
!
!
!
!
!
!
!
!
!
!
!
!
!
EcoMotion Bikes
10
WARNING! In order to avoid damage to frame that can lead for
frame sudden breaking, always make sure that the safety line
that marked on the saddle's tube is hidden from the eye while
locking the saddle into its place.
NOTICE! For safe and comfortable riding, there should be
clearance of no less than 1-2 inches between the rider and the
top tube of the bicycle frame, while the rider straddles the
bicycle with both feet on the ground.

5. Pedals:
•Assemble both pedals to the bike by screwing them to the
Crank & pedals leg.!
!
!
!
!
!
!
!
!
!
Brake-sets adjustment
Make sure that the brake pads are not rubbing or locking the
front / rear disc, while you're not pressing the brake-levers.
•In case in which the disc rubs / locked into the brake pads.
Release a bit both of the caliper screws (the screws that
connect the caliper to the fork), tightly press on the
brake - lever and re-screw back the screws into their
place while continuously pressing on the lever. !
!
!
!
!
!
!
!
!
!
EcoMotion Bikes
11
•you can tune the braking power by tightening / releasing of
the small Helen screw which located between the brake
lever and the handlebar.
Handlebar height adjustment
•Open the stem's top hoop lever, adjust the height of the
handlebar to the desired position and lock it back into its
place by re-closing the lever.
!
EcoMotion Bikes
12
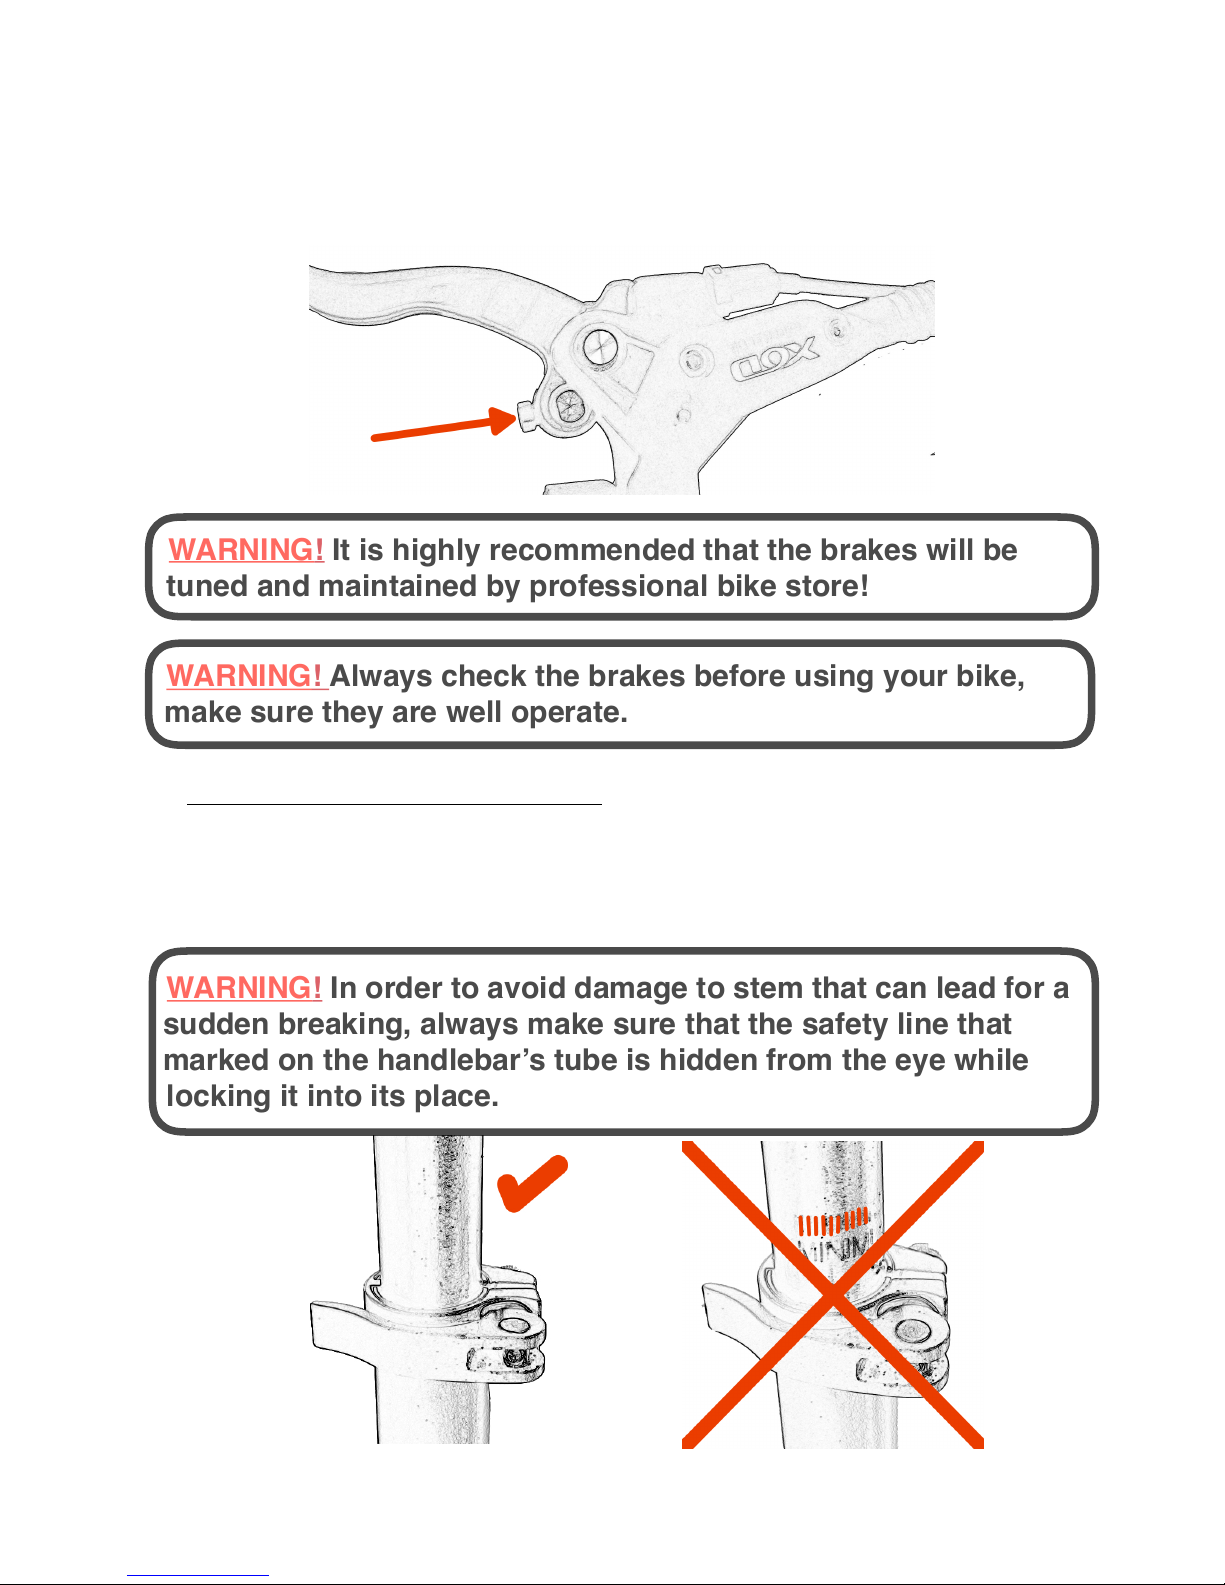
WARNING! Always check the brakes before using your bike,
make sure they are well operate.
WARNING!It is highly recommended that the brakes will be
tuned and maintained by professional bike store!
WARNING! In order to avoid damage to stem that can lead for a
sudden breaking, always make sure that the safety line that
marked on the handlebar’s tube is hidden from the eye while
locking it into its place.

•You can change the angle of the handlebar by using its top
lever. make sure to re-lock the lever before using the
bike.!
!
!
!
!
Mounting & dismounting of battery
The battery switch has three modes:
(1) A mode in which the battery is shut off and it's unlocked to
the frame (in this mode you can pull out the battery from
the bike or placed it into the bike).
(2) A mode in which the battery is locked into the bike, and it
powered off.
(3) A mode in which the battery is locked into the bike, and it
powered on and ready for use.
•In order to switch the key from mode (2) to mode (1) the key
should be pushed into the battery
!
!
EcoMotion Bikes
13
WARNING! After adjusting the handlebar height and before
riding the bike, make sure that the handlebar is well-locked in
its new position, by strongly pushing it down to the ground.
IMPORTANT! Make sure that while mounting the battery back into the frame,
the battery is sliding on its allocated rail, if the battery is misplaced it may get
stuck.

Folding the bike
Folding the handlebar:
(1) Lower the handlebar to its lower position and lock it.!
(2) Pull-up the folding mechanism lock.!
(3)Fold down the mechanism's lever.!
(4) Fold down the handlebar itself.
Raising the handlebar:!
(1) Straighten the handlebar. !
(2) Lock the folding lever by locking it into!
the stem. !
Folding the frame:
(1) Unlock the folding mechanism lever. !
(2) Open the lever towards the rear side of the bicycle.!
(3) Lift up the lever until a click is heard (double lock
mechanism).!
(4) Folding up the bike frame
Return the frame to a riding position:!
!
(3) Lift up the folding mechanism lever.!
(4) Return the frame to its unfolded position!
(2) Close back the lever. !
(1) Lock the lever to its place.
EcoMotion Bikes
14

Inspections prior riding:
•Check that the wheels are well connected to the frame / fork,
and that they are rotated freely.
•Check that the handlebar aligned with the front wheel, and all
the screws are tight.
•Check that there are no loose or missing spokes in the
wheels.
•Check that all the bearings of the bike are rotating freely and
not damaged
•Check that the brakes are properly functioning, and that their
pads are not overly worn.
•Check that tires' air-pressure is same as the one that written
on them
•Check that the tires are not overly worn, Worn tires will have
no proper road grip
•Check that the wheel rims are not broken or cracked.
•Check that the lights & horn systems are well functioning.
•Check that all components of the bike are well set in their
place.
•Check that there are no pressure marks / cracks /
discoloration marks on the bike frame and on the front fork.
•Check that there is no visual damage on the bike’s battery.
•check that the battery is properly mounted, and that it locked
in the bike's frame.
•Check that the TAG / PAS systems are properly functioning.
!
!
EcoMotion Bikes
15

Operating of the electric system:!
!
!
!
!
!
!
!
!
!
!
!
!
EcoMotion Bikes
16

•Turn on the power by switching the battery key to “mode (3)”,
and short press on the Power button.!
The bike is ready for use
•You can switch PAS speed levels by pressing on the PAS
Control buttons (+/-). !
PAS level "0" - without support , PAS level "5"- strongest
support.
•You can use the TAG system any time the display is on.
•By pressing on the SET button you can view the following
info: remaining distance to go, trip duration , trip mileage,
and total mileage of the bike .
•At any given time, the display will show the following info:
battery voltage, battery capacity, current ride speed & current
power usage.
•The front light, rear-light & the horn, controlled from the Horn
& Lights buttons which located at the left side of the
handlebar .
•Turn off the bike by long press on the Power button
EcoMotion Bikes
17

The battery & charger
!
!
!
!
!
!
!
!
!
!
!
!
!
!
!
!
!
!
EcoMotion Bikes
18
Type
Li-ion
Cells
LG
Voltage
48V
Amperage
14.5Ah
WARNING!
•Do not perforated or dropped the battery;
•Do not placed the battery near to fire or another heat
dispersing element;
•Do not soaked the battery in water;
•Do not placed / use the battery at the vicinity of strong
electromagnetic or electrostatic fields;
•Do not crushed or disassembled the battery.
WARNING! !
Use the battery for its intended purpose. Do not use it for other
purposes, such use might be dangerous! Do not crushed or
disassembled the battery.

!
!
!
Charging of battery
•Plug the charger to the battery first and then plug it to the
outlet.
•While charging the battery when it’s connected to the bike,
make sure the battery key is in position (2).
•The charger red indicator light shows that the battery is in
charging process. When the red light turns into green, the
battery is fully charged.
•In order to disconnect the charger from the battery, unplug
the charger from the battery first, and then unplug it from the
power outlet.
EcoMotion Bikes
19
IMPORTANT! In case that the electric system is left on, !
while the bike is not in use for a long time, the battery may !
reach a state where it is no longer chargeable.
IMPORTANT! The distance range of the bicycle in electric !
mode varies according to rider's weight, road conditions, !
battery power etc.!
The battery power diminishes with age (and with usage).
IMPORTANT! Proper maintenance of batteries, according to !
this guide, will maximize their lifespan and capacity.
WARNING! !
Keep away the battery and the charger from the reach of small
children.
WARNING! !
Charge the battery with the original charger only. Using an
unoriginal charger is forbidden and dangerous!

!
!
Preserving of battery's lifespan:
•make sure you charge the battery in full at least once in
every 20 charging cycles
•Do not leave the battery uncharged for more than 24 hours.
Battery that was left uncharged for a long time, may reach a
state in which it won’t be chargeable
•In case in which the battery won't be in use for a significant
time, there is need to disassemble it from the bike and store
it in a cool & dry location. Make sure that the storage period
won’t exceed 45 days without recharging the battery again.
EcoMotion Bikes
20
WARNING! !
Do not cover the battery and the charger during charging
process.
IMPORTANT! !
It’s recommended to charge the battery in full, prior to the first
use of the bike.
WARNING! !
Terminate the battery charging process immediately in case in
which the battery overheat during charging.
In such case you must consult us at
contact@ecomotionbikes.com or +1(323) 825 - 2518
WARNING!!
Do not place the battery and / or the charger near flammable
substances during charging.
IMPORTANT! !
Batteries work better when they are fully charged. It is
recommended to begin riding when battery is fully charged.
Table of contents
Other EcoMotion Scooter manuals


Popular Scooter manuals by other brands

Pride Mobility
Pride Mobility Go-Go Elite Traveller SC40LR Specifications

Orthoquad
Orthoquad RZ1000 user manual

Kumpan electric
Kumpan electric 54i user manual

Insportline
Insportline IN 12570 Windrunner Handy X3 user manual

Razor
Razor W13111701003 quick guide

Creme
Creme Ristretto ON+ Solo 2019 Manual & warranty


