EcoSpeed Electric Mid-Drive User manual

1
ElectricMid-Drive™
InstallationInstructionsforSun EZ-1SX,DX,AX
copyright2007,EcoSpeedLLC
http://www.ecospeed.com/docs/emd6,7_assy_rev1.12
Revision 1.12
2
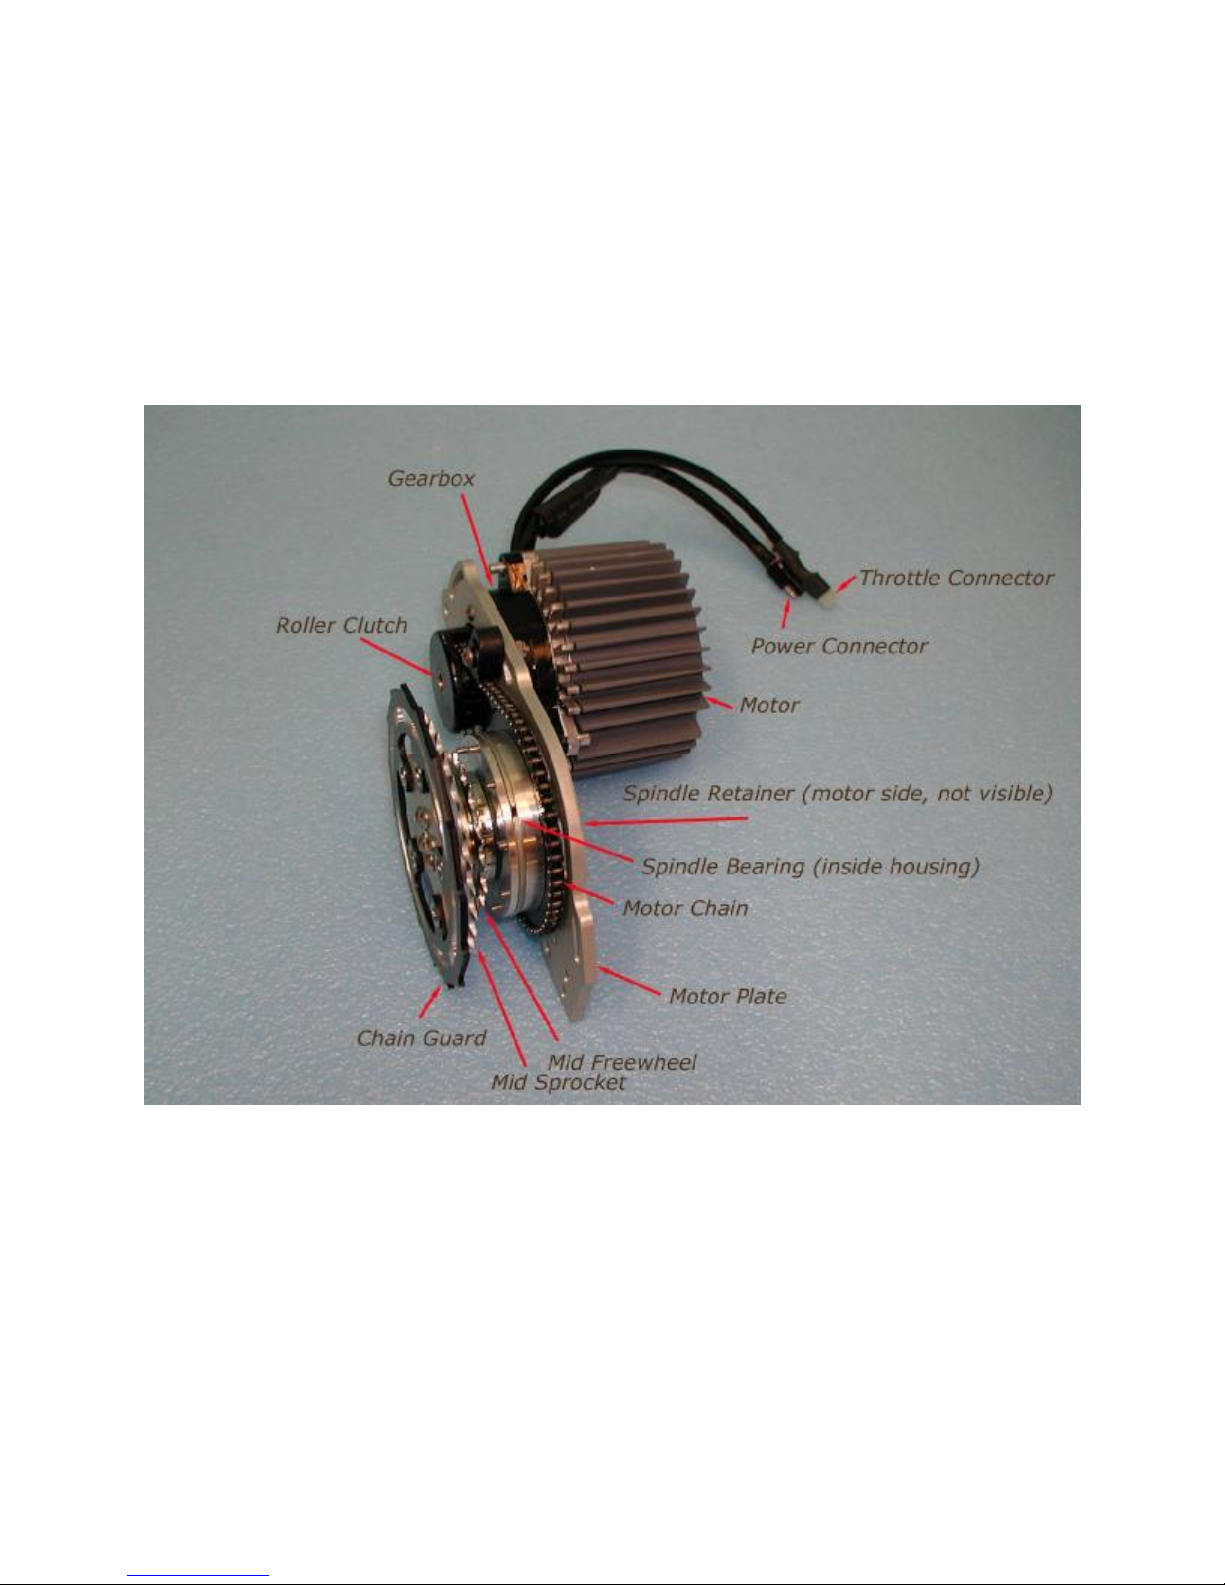
ElectricMid-DriveComponents

3
Congratulations onyourpurchaseofEcoSpeed’s ElectricMid-DrivefortheSunEZ-1modelrecumbent
bicycles.TheElectricMid-Driveis theworld’sbestmulti-speed,throttleoperated,electric-assistconver-
sionandtheonlyelectric-assistdesigned specificallytofita varietyofrecumbentbicycles.
Theseinstructions will guideyoustepbystepthroughwhatwehopewill bea simpleand painless instal-
lationof yourEMD.Themechanicalskills involved are modestand,wegiveyouhints andtips atevery
stepthatreflectwhata professionalmechanicknows.Ifatanytimeyouhaveproblems,call us at1-866-
EcoSpeed (866-326-7733)forfriendlytechnicalassistanceore-mailus at support@ecospeed.net.
A word onhowtheseinstructions areorganized.Eachstepis under a majorheading–Step1:,Step2:,
etc.Ifyou’veinstalled anEMDbefore youcanjustread themajorheadings and ignore theexplanatory
text.Beloweachmajorheadingis a listof sub-steps.Theimportantinformationineachsub-stepis in
boldtext.Ifyou’re a competentbikemechanic,youcanjustreadthebold textand safelyignore therest.
Theremainingtextis there toclarifythings fornon-mechanics. We’vealsoincluded tips andhints in
Italics.
Beforegettingstartedcheckthatall thepiecesneededwereincludedinyourshipment:
See Packinglistincludedwithyourshipment
Youwill also needthefollowingtools:
1)Bicyclechainbreaker. Availablefromanybikeshop.
2)2.5mm,3mm,4mm and5mmhex(orAllen)wrenches. (Thestandard “L”shapedhex
wrenches sold atbikeshops andhardwarestoreswill probablywork but,theirshorthandlesmake
looseningand tighteningdifficult,especiallyinthelargersizes.A betteralternativeis a¼”ratchet
drivewrenchand hexsockets.Yourlocal hardwarestoremayhavethemortry www.snapon.com for
topquality.)
3)10mm nutdriver.
4)8mmnutdriver.
5)Wireclippersorscissors.
6)Largepliers.
7)Phillipsscrewdriver.
8)TorqueWrench(optional).
Onceyouhaveall theparts and toolsyouneed,it’stimetoclear a nicespacetowork,find severalof
hours time, and gettoit.
Step 0:Makesurethatyourbikeisingoodcondition.
Ifyouhaven’thad yourbiketunedupbyyourlocalbikeshopina while, nowwouldbea good time. In-
stallingtheEMDwill placeextra stress onyourbikesoit’s importantthatitbeintopcondition.
Step 1:Findawayto secureyourbikewhile working.
Theidealhereistomountyourbikeonaworkstandsuchasbikeshopsuse.Ifyouhaveac-
cess toonegreat,otherwisethere are other possibilities.
4
Ifyouhavea workarea where it’s OK toput
hooks intheceiling, youcanhangthebike
fromtheceilingusingropes orstraps.Putin
twohooks about3 feet(1meter)apartand
hangthehandlebar ends fromthese. Putina
thirdhooka coupleof feetbehind thebikeand
hangoneoftheseatcross bracesfromthis
hook.Makesure thebikehangs levelwithall
wheels off theground.
Ifyoucan’tuseceilinghooks,youcanleanthe
bikeagainsta wall with thefrontbrakelocked
topreventrolling. Wrapseveraltightrubber
bands aroundthefrontbrakelever untilthe
frontwheelcannolonger roll.It’s alsopossible
toworkonthebikewithitupsidedownresting
onthehandlebars and seatframe.
Step 2:Removeidlers andchain.
Removethechainidlerandall associ-
atedpieces. Somemodelshavea “U”
shapedbracketthatholds theidler tothe
kickstandmount.Ifyouhavethistype, leave
thekickstand mountinplace. Other models
mounttheidler toa tubeweldedontothe
frame. Removeall pieces exceptthewelded
ontube.
Setasidetheidler wheel.Youmayneedtore-
useitata later step.
Next,usingyourchainbreaker tool,splitthe
chain,remove, and setaside.
Step 3: Install EMDunitlowerclamps.
1)Placeapairoflowerclamphalvesonthe
frameasinphoto2.
2)PlaceanM6flatwasheronan M6x 25
bolt andslip throughthelargerholeonthe
bottomoneoftheclamps.
3)Looselythreadan M6nylocknut and
washerontothebolt,holdingtheclamp
loosely inplace.
Repeatforthesecond clamp locatingtheclamps as
inphoto2.
(1)Bikeon WorkStand
(2)LowerClamps
(2a)UsingTorqueWrench

5
Step 4:AttachEMDunit.
1)Aligntheclampswiththeholesin
theEMDmotorplateasisphoto 3. (It
maybeeasiertohaveafriend holdthe
EMDinplacewhileyou insertbolts)
2)AttachtheEMDtotheclampsusing
4M5x 25mmbolts.Placeaflat
washeroneachbolt beforesliding
throughahole.Useanotherflat
washerwitheachofthenylocknuts.
3)TightentheM5(upper)boltsonthe
lowerclamps.Tighten theM6boltson
thebottomofthelowerclamps.Do
nottighten theM6boltsmorethan25
inch-pounds(2.8N.m). Usea torque
wrenchtomeasure ifyoudon’thavea feel
forhowmuchthatis (photo2a).Over tight-
eningcouldbreaktheclamp orcrushthe
frametube.
Step 5:Install thefrontchain.
1)Usethechainyouremovedinstep 2
asthefront.(read warningbelow)
2)Setthefront derailleurtothesmall-
estgear.Threadthechainthroughthe
derailleurcage,aroundtheinnermost
frontsprocket,andthroughtheEMD
sprocketsasshowninphoto 4.
Shortenthechainusingyourchainbreaker
and jointheends sothatitends uplooking
roughlylikephoto9with thechainonthe
smallestfrontring.
(Hint: ifyouneed anyinstructionintheuseofcom-
monbicycletools goto
http://www.parktool.com/repair_help/
FAQindex.shtml)
WARNING: Useonlydrylubricantsonall chains.
Ifyouhavebeenusingoiltolubricateyourchain,
youmusteither replaceitwith a newchain,orclean
itthoroughlyand switchlubricants.See Mainte-
nancesection.
(3)EMDAttachedto LowerClamps
(4)FrontChain Path
(5)DriveSprocket andChain Guard

6
Step 6:Attachdrivesprocketandchain-guardassembly.
Attachthedrivesprocketandchain-guardassemblytothedrive
spindleusing5M6x 25mmbuttonheadboltsasshowninphoto
5.
Tightenall5 bolts securely.
Step 7:Install thechainguidetube.
1)AttachusingM5x16mm bolttotheslotattherearofthemo-
torplateasshowninphoto 6.Usean M5nylocknutandwasher
onthemotorsideofthemotorplate.
2)Don’ttightentheboltyet,lettheguidetubehangfreeas
showninphoto7.
Youmaybetempted toleavethechainguidetubeoff.Wedon’t rec-
ommenddoingthis.Its purposeis todamp chainshakewhichcan
causethechaintocomeoff themid-sprocket
under someconditions.
Step 8: Install therearchain.
Settherear derailleurtothelargestcog.
Usethesupplied68inchesofSRAMPC-
48chain.Threadthechainaroundthe
mid-sprocket,throughthechainguide
tube,aroundtherearcassette,and
throughtherearderailleurcageas
showninphoto8.
Shortenthechain,ifneeded,usingyourchain
breaker tool.Withthechainaroundthelargest
rear cog, thederailleurchaintensioner should
beangled towards thefrontof thebikeatap-
proximately45 degrees.
Jointheends ofthechainwiththeincluded
Powerlink™connector.
Step 9:Adjust thechainguidetube.
1)Alignthechainguidetubesothatthe
flexibleattachmentishorizontaland
thebracket isverticalasonphoto9.
Thechainshouldbelooseinsidethetube. If
thechainisbeingpulled towards thebikeit
could derailfromthemid-sprocket.Ifneces-
sary,theguidetubecanbemovedtodifferent
slotsonthebrackettofinetunetheadjust-
ment.
(7)Chain GuideTubeInstallation
(8)RearChainInstalled
(6)Chain GuideTubeSlot

7
2)Tighten thenut andbolthold-
ingthebrackettothemotorplate.
Step 10:Install thechainidlerarm.
Iftherearchainclears therearbrake
when shifted intoanygear, thenthis
stepis notnecessary.
1)Attachthechainidleryoure-
movedinstep2totheincluded
idlerarmassembly.
UsetheM6x12mmhex head boltto
attachtheidler bolttotheholeinthe
idler arm.PlacetheM8 flatwasher be-
tweenthenidler pulleyand armas a
spacer.
2)Attachtheidlerarmtothemotor
plate.
RemovetheM5 nylocknutand flat
washer fromtheendof theM5 x 50bolt
thatpassesthroughtheslotintheidler
arm.Slidetheboltthroughtheroundhole
onthemotorplate(photo10)and secure
with theflatwasher and nylocknut.
3)Adjusttheidlerso that itpushes
thechainawayfromtherearbrakes
andtightenbolts.
Besure thatthe“L”bracketis belowthe
chainas shownonphoto14.
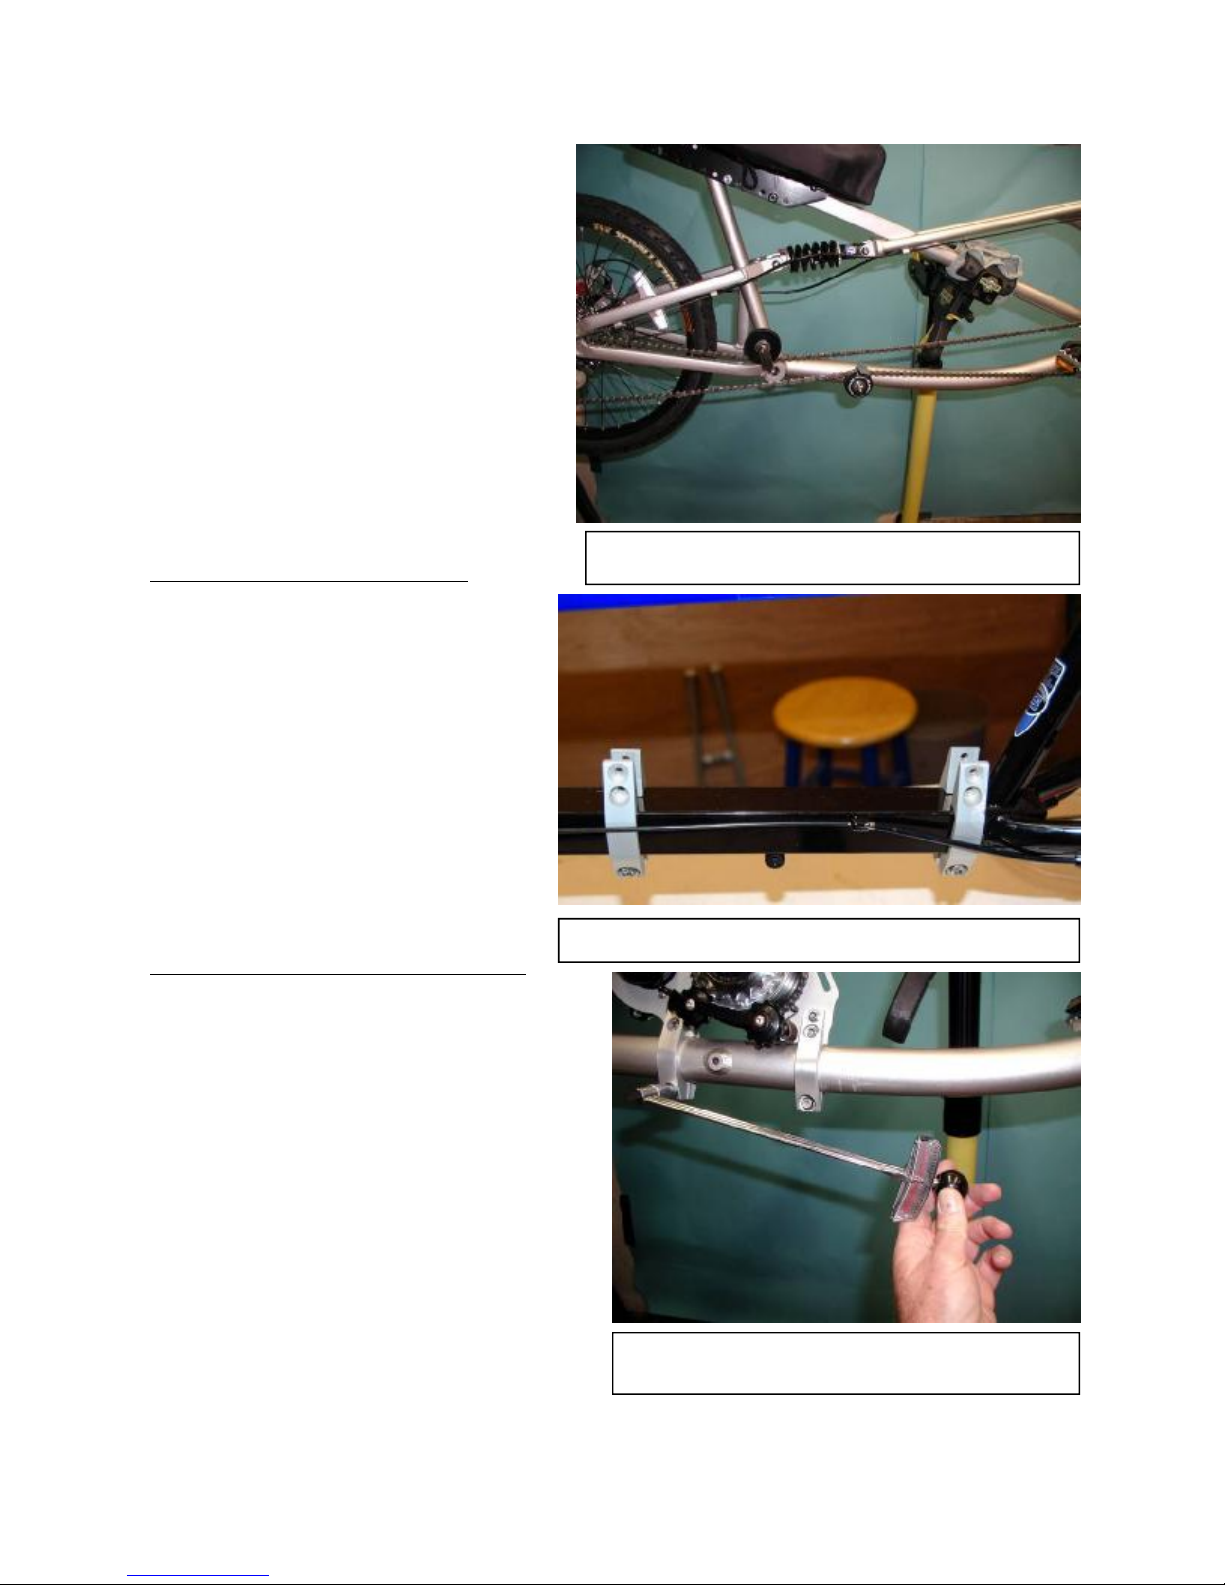
Step 11:Install thethrottle
Yourkit will haveoneoftwothrottletypes.
1a)The resistor throttlemountstoyourhandle-
barusingabracket asshowninphoto11,.
1b)The hall-effect throttleslidesontotheendof
yourhandlebarasshowninphoto12.
Thehall-effectthrottleis designed tobemountedonthe
right side, butmaybemounted ontheleftas well.
Right sidemountingistheusualbut,lefthandmounting
allows youtoshifttherear derailleurand operatethe
throttlesimultaneously,whichsomeprefer.
2)Routethethrottlewiresothatisdoesn’tim-
pairturningthebars,won’tsnagonanything,
andreachesthethrottleconnectoronthemotor.
(9)Chain GuideTubeAdjustment
(10)ChainIdlerInstalled
(11)MountingResistorThrottle

8
3)Connect thethrottletothemotor.
4)Don’tsecurethethrottlewirewithwiretiesyet.
Waituntilyoutestthesystemand knowthateverythingis
workingthensecure all thewires totheframewiththein-
cluded wire ties.
Step 12:Install thebatterysystem.
1)See theincludedseparateinstructionsforyour
typeofbatterysystem.
2)Afterinstallingthebattery,secureloosewires
withtheincludedwireties.Makesurethatthe
wiresarelocatedso asnotto interferewiththemovementofthesuspension.
Step 13: FinishupandTest
1)Withtherearwheelsuspendedoffoftheground,turnonthebatterypackswitchand
pressthethrottleto testthesystem.Runthebikethroughall ofthegearstomakesurethe
derailleurisproperly adjusted. Lookat themotorchainandverify that itisrunning
smoothly.Makesurethatall wiresareout ofthewayofall movingparts.Makesureaxle
boltsorskewersaretight.
Proper adjustmentofthegears and makingsure thattherear cassetteandbearings areingood shapeis
especiallycriticalgiventheextra load thedrivetrainwillbesubjected to.Also,checkthattherear axle
skewer orbolts arefullytightened.Axlebolts shouldbetorqued toabout20ft-lbs (28Nm).Skewers
shouldbeas tight as youcancomfortablymakethem.Itis possibleforthemotortopull theaxleright
outof thedropouts iftheyare loose.
3)Roadtest. Runthroughall thegears makingsure theyare shiftingsmoothly.Usefull throttleineach
gear tocheckforskippingofthedrivechain.Keepspeeds lowatfirstuntilyou’re sure thateverythingis
functioningproperlyand youbecomefamiliar withridingwiththemotorassist.
(12)MountingHall-EffectThrottle

9
Other manuals for Electric Mid-Drive
2
Other EcoSpeed Bicycle manuals


