Worksman M2626 Datasheet

Worksman Mover Industrial Tricycles Assembly Instructions and Parts List
Worksman Trading Corp - 94-15 100th Street - Ozone Park, NY 11416 - (888) 3-WHEELER or (718) 322-2000
www.worksman.com Parts list M2626-0416
Models M2626, M2626-NDB, M2626-CB, M2626-3CB
M2626 = Drum Brake Only M2626-NDB = Coaster Brake Only M2626-CB = Drum & Coaster Brake M2626-3CB = Drum & 3 Speed Coaster
The Worksman Mover - The World’s Toughest Industrial Tricycle
Congratulations on the purchase of your Worksman Mover Industrial Tricycle.
The Mover is considered the flagship of the Worksman Business Cycle System,
which is undoubtedly the finest line of industrial cycles. These durable tricycles
are used around the world by leading companies to move personnel and supplies
efficiently and safely in an environmentally friendly manner.
Before assembly and riding, make certain to read this manual and any other literature provided
thoroughly. Always follow the rules of safe riding. Always keep your Mover Tricycle in tip-top shape
by replacing worn parts as needed with genuine Worksman Cycles parts. (Do not use generic bicycle
parts.) With simple maintenance, your Worksman Mover Tricycle will perform reliably day after day,
year after year.
·This manual is intended as an assembly and maintenance guideline for a professional and qualified
bicycle mechanic. Failure to have this cycle professionally assembled could result in injury or death.
Worksman Mover Parts List (For the entire M2626 Series)
Note: As of 2013, Worksman uses ED (electrodeposition) black electro-coated components as standard equipment,
including black handlebars, crank parts, and stems to help prevent rust and increase parts lifespan.
Frame, Fork and Related Parts (Fork includes Bottom Cone # 51.)
Part # Description Part # Description
MF2626A Mover Frame (Specify color)
60HD Fork w/ Drum Brake Tab - Black 60HD-YEL Fork w/ Drum Brake Tab - Safety Yellow
60HD-ORG Fork w/ Drum Brake Tab - Safety Orange 60HD-SP Fork w/ Drum Brake Tab - Special color
48 Head Set Cups (pair) 49 Headset Bearings (pair)
50A Headset Complete (48,49,52,53,54) 51 Bottom Cone (presses on Fork)
52 Top Adjusting Cone (threaded) 53 Key Washer
54 Fork Top Lock nut 55F Handlebar - Junior High Rise (Chrome)
55A Stem for Handlebar 55F-BLK Handlebar - Junior High Rise (Black)
3927M Rear Platform 55B Handgrips (pair)
Front Drum Brake Parts (Old style hubs have loose bearings. New style hub has pressed bearings.)
Part # Description Part # Description
OLD STYLE
L900 Drum Brake Hub L709 Front Axle Set for Drum Brake
F817 Wheel Bearings - Loose 11 balls L725-1 Drum Brake Plate Kit (Internal parts kit)
NEW STYLE
L500-F Hub - NEW STYLE w/ pressed bearing L509 Axle - NEW STYLE for pressed bearing
L517 Pressed Bearing - NEW STYLE L725-1 Drum Brake Plate Kit (NEW STYLE)
F719 Drum Brake Cable w/ F769 and F770 L816 Axle Washer
F769 Anchor Bolt Assembly for F719 Cable F770 Adjusting Barrel for F719 Cable
L752R Brake Lever (Right) w/ Parking Lock 160B Fork Retention Clip (each)
L752L Brake Lever (Left) w/ Parking Lock L815 Outside Axle Nut (each)
50A Headset Free (Left) Side Rear Wheel –Exploded View

Rear Axle and Related Parts (3 Speed hubs include shifter and cable.)
Part # Description Part # Description
102 Key Washer 103 Cups for Free Side Hub
105 Adjusting Cone (threaded) 106 Stationary Cone (presses onto axle)
109 Dust Washer 113 Locknut - Left Hand Thread- Free Side)
146 Bearings (pair) 64M Woodruff Key
59M Locknut-Drive Side 132 Axle Parts Set (102,105,109,113,146,64M,59M)
M13966 Rear Axle 69 Fixed Drive Sprocket (CB, 3CB, NDB)
4129 Freewheel Sprocket –22 tooth (M2626) ----à63AD Bushing for 4129 (M2626)
62C Keyway (Fits in axle slot to attach 69 sprocket.) 63B Set screw for 69 and 4129
M13975 Side Bearing with Plate (each) M13974 Center Axle Support Bearing
301M Coaster Brake w/Dual Sprockets 404NM 3 Spd Coaster Brake w/ Dual Sprockets
SS721 Coaster Brake Internal Kit (for 301M) SS12N-1 3 Speed Cable and Trigger for 404NM
Crank and Crank Parts (Pedal Section) and Chains
Part # Description Part # Description
1265 Crank Parts (1266/1268/1269/1271/1272/1273/1274) 1265BMXS Deluxe Sealed Crank Set (Upgrade)
1266 Crank Bearings (pair) 1268 Cups for Crank Housing (pair)
1267D Complete Crank Set (36T blk sprocket, crank, 1265) 1269 Stationary Washer (inside)
1267F Complete Crank Set (32T blk sprocket, crank, 1265) 1267H Complete Crank Set (28T blk sprkt, crank, 1265)
1271 Key Washer (outside) 1272 Adjusting Cone (threaded, outside)
1273 Stationary Cone (inside) 1274 Crank Locknut
1275 Crank (one piece, forged, 6½”, plated) 1275-EDB Crank (one piece, forged, 6½”, black)
1380D Sprocket 36 Tooth (3/16”, Chrome) 1380D-EDB Sprocket 36 Tooth (3/16”, Black)
1380F Sprocket 32 Tooth (3/16”, Chrome) 1380F-EDB Sprocket 32 Tooth (3/16”, Black)
1380H Sprocket 28 Tooth (3/16”, Chrome) 1380H-EDB Sprocket 28 Tooth (3/16”, Black)
4910P-BLK Chainguard (Black resin - standard) 4910M Chainguard (Chrome - optional)
4915-55MM Chain Adjuster (1 spd coaster brake) 4915E Chain Adjuster (3 spd coaster brake)
7217 Pedal Set (Pair) 7217-41557 Pedal Set - Alloy Platform (Optional)
7217-EXT Pedal Extenders (mounts pedals wider) 4914A Chain Connecting Link (1/2x3/16”)
4914S Long Chain (36T, CB/3CB: ½”x3/16”x148 links) 4914S32 Long Chain (32T, CB/3CB: ½”x3/16”x145 links)
4914SA Long Chain ½”x3/16”x133 links (Freewheel) 4914XX Chain- Short (CB/3CB: 1/2”x3/16”x38 links)
Note- The Mover comes standard with a 36T front sprocket and 1265 crank part set. Smaller sprockets in the front will reduce gear
ratio, which makes it easier to start pedaling. The 1265BMXS is a sealed, heavier duty upgrade for crank parts.
Seats, Seatpost and Fenders, Baskets and Cabinets (2005 and up models do not require “-5”saddles.)
Part # Description Part # Description
6910V-5 Saddle (Padded w/ 5/8”shim - Pre-2005) 6911V-5 Saddle (Padded w/ 5/8”shim, springs)
6910V Saddle (Padded w/ 7/8”clamp - 2005 and up) 6911V Saddle (Padded w/ 7/8”clamp, springs)
4908M Seatpost - Solid Steel (Pre-2005) 4909M Square Head Bolt (Secures Seatpost)
4908D Seatpost –1”tubular (2005 and up) 4911D Seat Binder Clamp (2005 and up)
M13970 Basket for Rear Platform (23”x23”x12”) M13E5 5”Platform Lip
M17350 Cabinet (23”x22”x11.5”) M17350J Jumbo Cabinet (23”x22”x18”)
7228 Front Wire Basket (21x15x9”w/ bracket) 139 Front Wire Basket (18x13x6”w/bracket)
82 Front Fender (Chrome) 82-C Front Fender w/ all parts attached (Chr)
82P-BLK Front Fender (Black Polycarbonate) 82P-BLK-C Front fender w/ all parts attached (Blk)
83A Front Fender U-Brace 95 Front “L”Bracket (fender to fork)
82K Front Fender Hardware Kit (95, 4907, 4907A) 4905 Bolt set to attach (4902 to M13996)
4907 Bolts, Nut, Washer (U-brace to fender) 4907A Bolt, Nut, Washer (“L”bracket to fork)
4902P-BLK Rear Fender (26”- Black Resin) 4902 Rear Fender (26”- Chrome)
MSF26 Complete Rear Fender Kit w/ braces (Resin) M13996 Rear Fender Brace (L or R)
MSF26-CP Complete Rear Fender Kit w/ braces (Chrome)
Note- Movers come with a front fender standard. Rear fenders may be added as an option. Baskets and Cabinets are optional.

Wheels, Tires, and Fenders (All wheels and wheel parts shown below are for 26”wheels ONLY.)
“KVPR”= KEVLAR TIRES AND PUNCTURE RESISTANT TUBES INSTALLED! REDUCE FLATS WHILE MAINTAINING AIR RIDE!
Part # Description Part # Description
77A Front Wheel w/ Drum Brake 77 Front Wheel w/ Drum w/Air Tire
77S Front Wheel w/ Drum w/Solid Tire 77KVPR Front Wheel w/ Drum w/ KV Tire
78SA Free Side Wheel (left) M14031 Drive Side Wheel (right)
1007 Free Side Wheel (left) with Air Tire M14032 Drive Side Wheel (right) w/ Air Tire
78S Free Side Wheel (left) with Solid Tire M14032S Drive Side Wheel (right) w/Solid Tire
1007KVPR Free Side Wheel (left) with Kevlar Tire M14032KVPR Drive Side Wheel (right) w/ Kevlar Tire
77CAR 26”Alloy Front Wheel w/ Stainless Steel Spokes and Drum Brake (No tire or tube.)
1007CAR 26”Alloy Rear Free Side Wheel w/ Stainless Steel Spokes (No tire or tube.)
M14031CAR 26”Alloy Rear Drive Side Wheel w/ Stainless Steel Spokes (No tire or tube.)
9178SA Free Side Mag Welded Wheel 9179MSA Drive Side Mag Welded
9178 Free Side Mag Welded Wheel w/ Air tire 9179M Drive Side Mag Welded w/ Air tire
9178S Free Side Mag Welded Wheel w/ Solid tire 9179MS Drive Side Mag Welded w/ Solid tire
9178KVPR Free Side Mag Welded Wheel w/ Kevlar tire 9179MKVPR Drive Side Mag Welded w/ Kevlar tire
4922A Tire - 26”x2.125”WTC Sup-r-Tire (standard) 4923A Tube - 26”x2.125”(standard)
4922AKV Tire - 26”x2.125”WTC KEVLAR Sup-r-Tire 6023A Tube - 26”x2.125”Puncture Resistant
4922AWSW Tire - 26”x2.125”Sup-r-Tire (White Wall) 4939A Solid Rubber Nev-R-Fail Tire - 26”
1017 Rim Strip
101 Hub for Free Wheel w/ Cups 3980M Hub for Drive Side Wheel
1016 Rim Only (Chrome) 1016A 26”Alloy Rim Only
1014A Spoke (Rear & Front w/o Drum, 11G, 10 9/16”)1014B Spoke (Front Drum Wheel, 11G, 9 9/16”)
Key Component Exploded View of M2626 Series
Key # Part # Description
1 MF2626A Frame
2 60HD Fork
3 55A Stem for Handlebar
4 L752L / L752R Brake Hand Lever
5 7217 Pedal Set
6 82P-BLK-C Front Fender w/ Front Brace
7 77A (w/o tire) Front Wheel w/Drum Brake
8 55F/55F-BLK Handlebar
9 55B Hand Grips (pair)
10 4908M or D Seatpost - See seat section.
11 6910V-5 Seat - See seat section for part #’s.
12 4910P-BLK Chainguard
13 4914T /4914S Chain (M2626 / M2626-CB)-SEE ABOVE
14 1267D Sprocket & Crank Set 36T
16/24 69 or 4129+63AD Fixed Drive or Freewheel Sprocket/Bushing
17 4914XX Short Chain for CB
18 301M or 404NM Coaster Brake / 3 Speed Coaster
19 3927M Rear Platform
20 4902P-BLK Side Fender (Resin) 21 M13996 Brace for Side Fender
22 M13975 Outer bearing for axle w/plate 23 M14031 (w/o tire) Wheel-Drive Side (Right)
25 M13966 Rear Axle
26 M13970 Steel Basket for Rear Platform 27 M17350 12”Rear Cabinet (18”Cabinet –M17350J)
28 132 Rear Axle Parts Set (Partial Image) 29 L900 Drum Brake (Hub Only)
30 78SA (w/o tire) Wheel- Free Side (Left) 31 4909M Bolt- Square Head for Seatpost (Pre-2005)
Safety and Comfort Accessories
Part # Description Part # Description
3979 Ding Dong Chime Bell 303 Squeeze Bulb Horn (chrome w/ rubber)
3973 Mega-Horn (battery operated) 201 Cable and Lock set (with keyed padlock)
4963 Rear View Mirror (Chrome, rectangular) 5030T Reflector Kit
3978 Safety Flag on Pole P19 Bicycle Helmet
101710 Flashing Strobe Light (clear lens) 101714 Flashing Strobe Light (red lens)
7217-41197 Pedals with Velcro Foot Straps (pair) 3975 Generator Light Set
1006 Air Foot Pump 1000 Spoke Wrench
202 Mini-Frame Pump w/ Attachment Strap 2000 Chain Rivet Remover Tool
1265TW Crank Cone Wrench 95021 Water Bottle w/ Cage, Attachment Strap
1001 Pedal Wrench 7917A Backrest w/ Mounting Hardware
6001A Patch Kit (5) 3976 Battery Operated Headlight
7217GS12 “Glowspeck”Flashing Pedals –Flash without batteries!

ASSEMBLY INSTRUCTIONS FOR THE WORKSMAN MOVER™INDUSTRIAL TRICYCLE:
Your Worksman Mover™Industrial Tricycle has been hand made by American Craftspeople at our
Ozone Park, New York City factory. We take great pride in each and every Worksman Business
Cycle that we manufacture and appreciate your support. Please read this manual carefully prior to
performing the simple finishing assembly and prior to riding. Keep these instructions as our parts list
is contained within this document which you will need for future reference.
Carefully remove the tricycle from the carton. You will notice the tricycle is mostly pre-assembled at
the factory. Some finishing assembly is required. The front wheel and the fork assembly is pre-
assembled at the factory
. PROFESSIONAL ASSEMBLY IS HIGHLY RECOMMENDED!
TO ATTACH FRONT FORK/WHEEL ASSEMBLY TO THE FRAME:
1) Grease cups (48) with Rustolene 200 lubricant or equal. Bearings (49) are pre-
greased at the factory, but it is always a good idea to add lubrication prior to
assembly.
2) Place one bearing (#49) onto the fork steering tube with the balls facing up.
3) Slide the threaded fork (50HD) steering tube into the frame head.
4) Place the other bearing on the top of the fork tube with the balls facing down towards
the cup (#48), which is already pressed onto the frame.
5) Install the top adjusting cone (#52) onto the treaded fork steering tube. Hand-
tighten, making certain the bearings do not bind. After hand tightening, turn back ¼ turn.
6) Install the fork key washer (#53) and reflector bracket (if reflectors were ordered)
on top of the adjusting cone with tip of washer in slot on steering tube.
7) Install head lock nut (#54) and securely tighten. Make sure that the fork rotates freely
without being loose. Excess play or resistance must be adjusted. Failure to adjust
properly can lead to improper steering response.
8) Install handlebar stem (55A) into the fork steering tube with the handlebar clamp
facing forward. The stem must be inserted far enough to reach the minimum insertion
line. Tighten the stem bolt slightly at this point. Loosen the handlebar clamp nut and
slide the handlebar through the clamp centering the knurled center section of the
handlebar into the clamp. Position the handlebar to the desired angle and tighten clamp
securely. Recommended torque is 300 IN. LBS. Adjust the handlebar rotation so that it
is perpendicular to the front wheel when it is perfectly straight. Tighten stem bolt
securely. Recommended torque 240 IN. LBS. Be sure not to over tighten as damage to
the parts may occur causing steering failure.
9) Attach brake hand lever to the handlebar (either left or right depending upon the
rider’s preference) Make sure brake cable is not tangled in anyway.
INSTALLING PEDALS:
Pedals are marked on the shaft with either an “L”or “R”denoting left or right. The “R”pedal fits on the right (sprocket
side) of the crank arm. Tighten clockwise. The “L”pedal fits on the left side of the crank arm. Tighten counter-clockwise
(left-hand thread). Securely tighten. Recommended torque 275 IN. LBS. CAUTION: Tightening in the wrong direction
will damage the crank and pedal threads, and will not be covered under warranty.
SEAT ADJUSTMENTS:
Although the seat is already installed at the factory, adjust the height to your desired level by loosening the seat clamp
bolt at the top of the frame’s seat tube. Re-tighten at desired height. Make sure a minimum of 3 1/2”of the post remains
in the frame tube. Never adjust post above this level. Adjust angle of seat with nose raised slightly. Tighten seat clamp
securely. (240 IN. LBS.)
REAR FENDERS:
Attach fender braces to fender, and fender braces to mounting bracket on frame using the provided nuts, bolts, and
washers. Bend braces slightly if tire is rubbing the brace.

MAINTENANCE TIPS:
Always inspect your Worksman Cycle to ensure that all nuts, bolts, screws and hardware are tight and that no parts are
worn or damaged. Do not attempt to straighten bent forks or frames.
Chain:
Lubricate chain once a month or as needed with light oil.
Replace sprockets when teeth become worn, bent or broken.
Keep chain adjusted so there is no more than 3/8”slack. Note
that we make the chains tight at the factory, as we do know
they will stretch during the break-in period.
Lubricate crank parts every six months. Replace pedals when the surface is worn or if axle becomes “tight”or frozen.
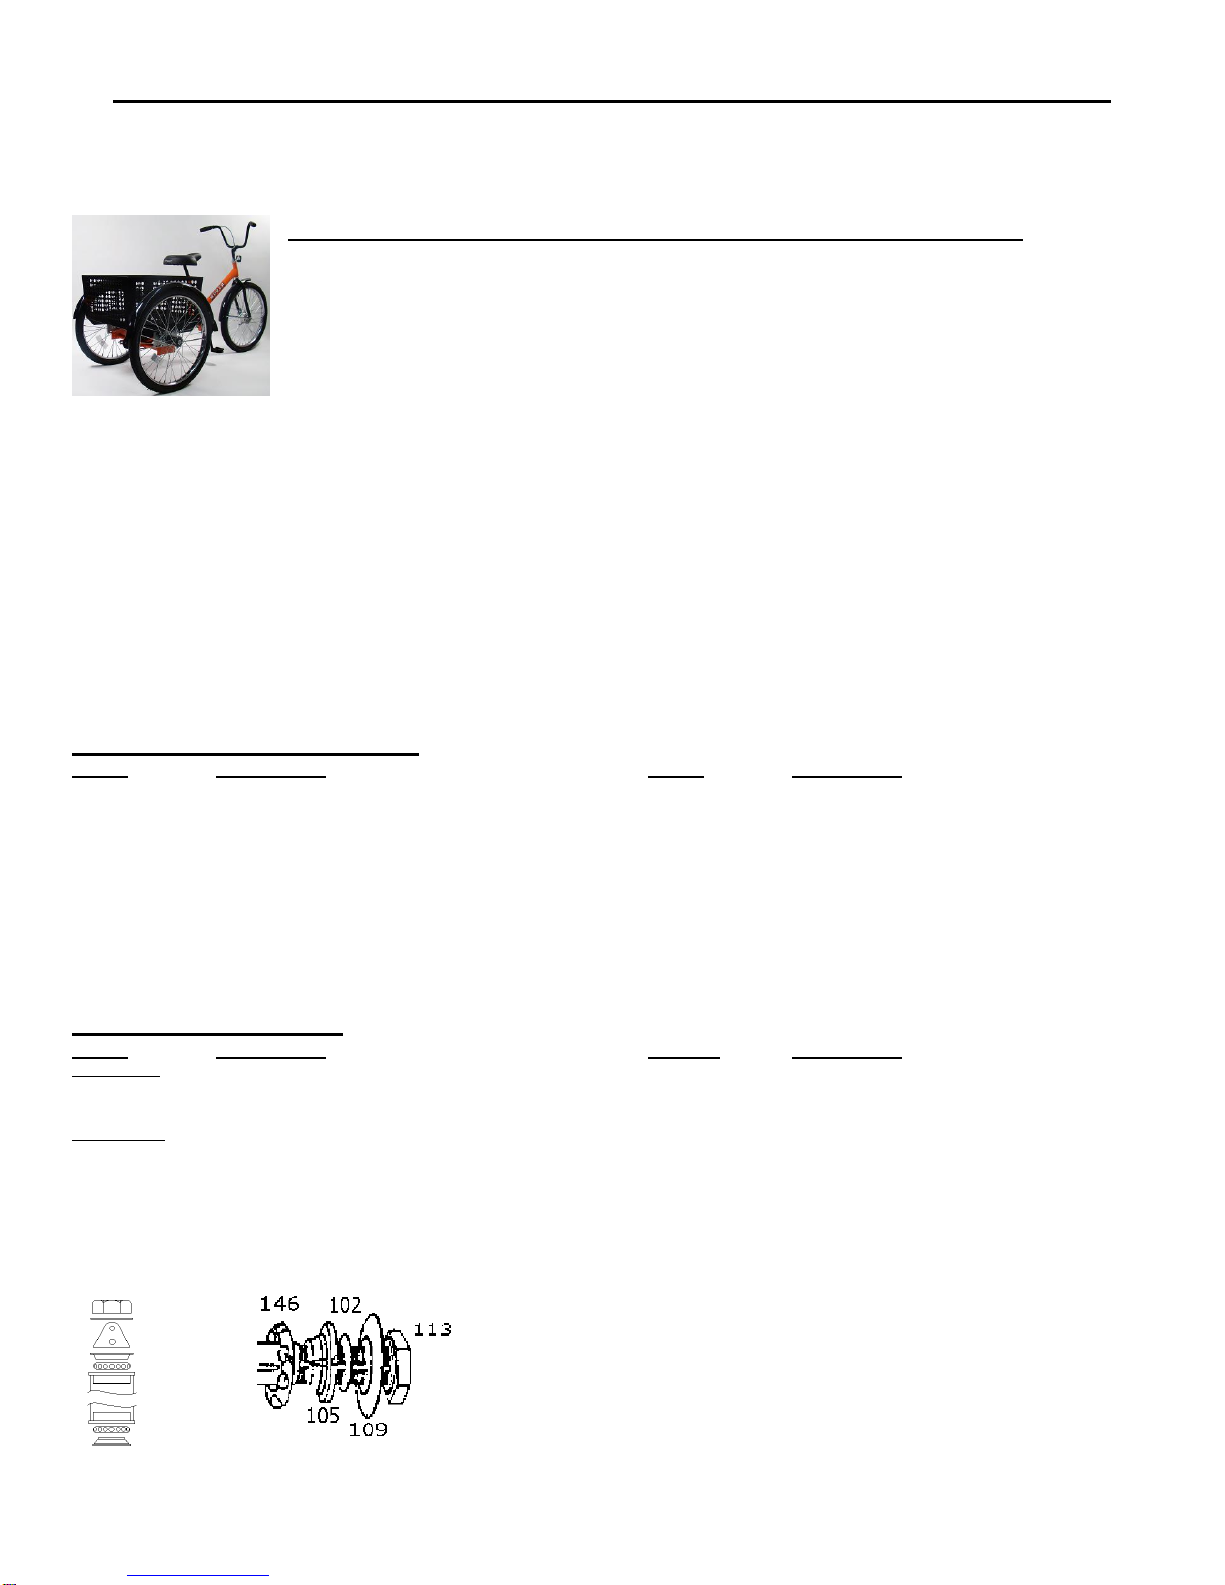
Drum Brake:
Your Worksman Mover Tricycle may be equipped with an automotive type front drum brake.
This brake is ideal for slowing your vehicle smoothly and reliably. It is engaged by squeezing
the hand lever on the handlebar. To use “Park”feature, when cycle is completely stopped,
squeeze hand lever and push in parking plunger button on lever. To disengage, simply
squeeze lever until parking plunger button releases.
Drum brakes are pre-adjusted at the factory. Readjust the cable tension as necessary using the
adjusting barrel so that wheel spins freely and stops when brake is applied. Always replace
worn brake cables (F719) and damaged hand levers. Internal parts kits are available for your
drum brake. (See parts list for part #’s.)
Coaster Brake (if applicable):
Foot activated coaster brakes are easy to use and reliable. To activate this internal brake, reverse the pedaling motion
until the brake engages. To avoid skidding and maintain control, apply care when braking. This is especially true on wet
surfaces. Apply brakes gently, gradually increasing pressure. Replace coaster brakes when they become worn. Check
chain tension regularly. Coaster brake hubs may make a vibrating noise under braking until they are broken in. For three
speed units, pause pedaling to help mesh gears. (Let the cycle coast.) This will make shifts smoother and will reduce
wear and tear on the hub. Do not shift when pedals are not moving as damage could occur.
Tires:
Always check for worn or damaged tires. We recommend 40PSI as proper level of inflation. Replace tires that are worn
or cut immediately. Replace or repair tubes that show leaks.
LIMITED WARRANTY:
This cycle is warranteed against faulty parts under the following conditions: this warranty does not cover any failure due to accident,
abuse, misuse, neglect or as the result of normal wear and tear, or improper assembly. The entire frame, including all welded joints, is
warranted to be free from defects and material for one year while in possession of the original purchaser. All other parts on this cycle,
except tires and tubes, are warranteed for Ninety days from the date of purchase. Repair and replacement of these parts is to be
according the Worksman cycles parts and service procedures and must be handled directly through the source where the cycle was
purchased. If upon examination of the parts in question, the Worksman Cycle dealer determines that it is defective, either repair or
replacement will be made at no cost except the cost of transportation and labor charges (if any). Unauthorized repairs or replacement
automatically voids warranty. Proper maintenance is required for warranty to be valid. In the event that it was determined that the
warranty claim is the result of misuse, abuse, improper maintenance or simply not defective or beyond the warranty period, Worksman
Cycles or the dealer will advise you as to the cost of repair, replacement or labor prior to performing any work or replacing any parts. If
you choose not to have the dealer or Worksman Cycles perform the work, the parts will be returned to you at your expense or
discarded if no reply is received within 2 weeks of notification. The sole responsibility of the manufacturer to the terms of this warranty,
if any, shall be the repair and/or replacement of the parts as indicated above. The liability of the manufacturer shall in no event exceed
the original purchase price of the product, and the manufacturer shall not be responsible for any consequential damages of any nature,
including, but not by way of limitation, damages for personal injury or property. This statement constitutes the exclusive expression of
warranties by the manufacturer and is in lieu of any or all other warranties such as expressed warranties, implied warranties, including
but not limited to warranties of merchantability, and fitness or purpose, are limited in duration for one year from the date of purchase of
the frame only and 90 days for all other parts, except tires and tubes which are not warranted. Worksman Trading Corporation is the
manufacturer. Misuse of the cycles including off road riding, installation of motors or power assists, alterations, repairs using parts
other than genuine Worksman Cycle parts voids warranty. Worksman Trading Corporation is not responsible for maintaining records of
serial numbers. Void where prohibited by state law.
Worksman Trading Corporation –94-15 100th Street –Ozone Park, NY 11416 –(718) 322-2000
www.worksman.com

Maintenance Log
DATE MAINTAINED MAINTENANCE PERFORMED
_________________ _______________________________________________________________________
_________________ _______________________________________________________________________
_________________ _______________________________________________________________________
_________________ _______________________________________________________________________
_________________ _______________________________________________________________________
_________________ _______________________________________________________________________
_________________ _______________________________________________________________________
_________________ _______________________________________________________________________
_________________ _______________________________________________________________________
_________________ _______________________________________________________________________
_________________ _______________________________________________________________________
_________________ _______________________________________________________________________
_________________ _______________________________________________________________________
_________________ _______________________________________________________________________
RULES FOR SAFE RIDING AND RESPONSIBLE OPERATION: Carefully read this manual before operating the cycle.
·It is the responsibility of the person who completes the assembly to properly install all parts included and to
inspect the cycle prior to riding to insure proper operation.
·Operator is responsible for required maintenance to keep the cycle in good operation condition.
·Observe all traffic regulations in the operating environment. (Stop signs, etc.)
·Keep to the right and in a straight line. Ride in single file.
·Do not ride outdoors at night, and have appropriate signaling device as needed. (We recommend the 3973 Mega
Horn.)
·Give pedestrians the Right of Way
·Always look around you to understand the riding environment and hazards.
·Do not carry passengers.
·Check brakes prior to riding.
·Slow down when approaching turns or intersections. Tricycles are meant for slow pace rides, not for racing.
·Use proper hand signals when turning or stopping.
·Recommended safety options include, but are not limited to, an approved helmet, audible warning device,
front/rear lights and/or reflectors.
·Never ride the cycle if there are known repairs required.
·Do not exceed the recommended weight capacity of the cycle. (500 lbs., including the rider.)
·Place loads evenly on platform. Do not stack cargo too high and always secure cargo with appropriate tie down
straps.
·Wipe surface of cycle clean and dry when exposed to corrosive substances or environment.
·Operate cycle at slow speeds, particularly in high traffic areas.
·Operators of cycles should be in good physical condition. Ride at your own risk.
·Wear proper riding attire. Check shoelaces and pant legs prior to riding so they do not become engaged in the
chain and sprocket.
·Ride only on smooth, paved surfaces. Do not use off road.
·Do not operate a tricycle on steep grades. They are designed for relatively level, paved surfaces only.
·Always replace worn parts with genuine Worksman Cycle Repair Parts.
·Always keep both hands on the handlebars. Tricycles have a tendency to pull slightly to one side.

Worksman Trading Corporation –94-15 100th Street –Ozone Park, NY 11416 –(718) 322-2000
www.worksman.com
HERE ARE SOME OTHER EXCITING PRODUCTS FROM WORKSMAN CYCLES…
Worksman Front-Loaders
Worksman Executive Trike
Worksman Movers
Worksman Heavy-Duty Industrial and Recreational Bicycles
Worksman Recreational Tricycles
800BUYCART.com
Vending Carts

Worksman Trading Corporation –94-15 100th Street –Ozone Park, NY 11416 –(718) 322-2000
www.worksman.com
FAX THIS COMPLETED REGISTRATION FORM TO 718-529-4803 OR MAIL TO THE ADDRESS ABOVE:
Name of Purchaser: ______________________ Company Name: ____________________________
Mailing Address: _________________________________________________________
___________________________ ______ _____________________
Tel: __________________________
Fax: __________________________
Email: __________________________
Date of Purchase: __________________________
Dealer Name: _________________________________________________________
Address of Dealer: _________________________________________________________
___________________________ ______ _____________________
Serial Number (located under crank housing): ________________________ Color_______________________
NOTES
SIGNATURE: __________________________________ DATE: ______________________
Worksman Business Cycles are hard at work at most of the
World's most respected companies. Worksman Business
Cycles are on the job 24-7/365 at this facility and many others
around the world. Worksman Business Cycles have set the
industry standard for over a century!
How do Worksman Business Cycles really help your business?
When you need an efficient method of transportation to move personnel around a
large facility, the solution is simple! Many of the World’s largest companies already
know that Worksman Business Cycles are the low cost alternative to motorized
vehicles. They also realize that workers who spend time walking around a factory or
warehouse are simply not as
productive as they could be.
The simple chart above illustrates how Worksman
Business Cycles pay for themselves in a very short
period of time when productivity gains are considered.
The chart is actually conservative, but Worksman
Business Cycles are about far more than economics.
Workers who ride them benefit through aerobic
exercise and a healthier environment in which to
work. People actually enjoy riding them, which often
leads to improved worker morale. When you consider
load carrying capacity, Worksman Business Cycles
are a great choice. Just think of how tired you would
be walking on concrete floors, back and forth, often
carrying tools or supplies.
Worksman Business Cycles are ideal for and used in:
*Warehouses *Factories *Campuses *Universities *Resorts
*Refineries *Distribution Centers *Airports *Movie Studios *Mills
*Chemical Plants *Amusement Parks *Delivery Services *Hospitals
Visit us online at www.worksmancycles.com or call us at 888-3WHEELER!
This manual suits for next models
3
Table of contents
Other Worksman Bicycle manuals

Worksman
Worksman Stretch Mover M2620-CB-STR Datasheet

Worksman
Worksman Eagle Lite User manual

Worksman
Worksman PORTOTRIKE PT, PORTOTRIKE PT2F, PORTOTRIKE PTCB, PORTOTRIKE PT2CB, PORTOTRIKE... User manual

Worksman
Worksman STPT User manual

Worksman
Worksman WTX Datasheet

Worksman
Worksman TT User manual

Worksman
Worksman WTX WideTracker User manual

Worksman
Worksman ADP-CB User manual

Worksman
Worksman WTC4X4 User manual

Worksman
Worksman INB User manual